Shiro(二)
2024-09-05 16:50:20
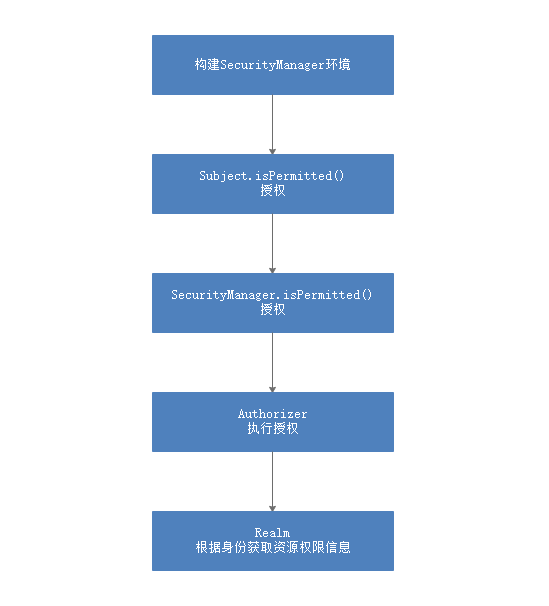
1 Shiro的授权
1.1 授权流程
1.2 授权方式
- shiro支持三种方式的授权
1.2.1 编程式
- 通过编写if/else完成授权代码。
if(subject.hasRole("role1")){

    //有权限

}else{

    //没有权限

}
1.2.2 注解式
- 通过在执行的Java方法上配置相应的注解完成。
@RequiresRoles("")

public void hello(){

    //有权限

}
1.2.3 JSP标签
- 在JSP标签页面通过相应的标签完成。
<shiro:hasRole name="admin">

<!-- 有权限 -->

</shiro:hasRole>
1.3 授权测试
1.3.1 shiro-permissioin.ini
- 创建存放权限的配置文件shiro-permission.ini,如下:
[users]

# 用户zhangsan的密码是123456,此用户具有role1和role2两个角色

zhangsan=123456,role1,role2

lisi=123456,role1

[roles]

# role1对资源user具有create、update权限

role1=user:create,user:update

# role2对资源user具有create、delete权限

role2=user:create,user:delete

# role3对资源user具有create权限

role3=user:create
1.3.2 权限字符串规则
- 权限字符串的规则是“资源标识符:操作:资源实例标识符”,意思是对那个资源的那个实例具有什么的操作,“:”是资源、操作、实例的分隔符,权限字符串也可以使用*通配符。
- 比如:
用户创建权限:user:create或user:create:*

用户修改实例001的权限:user:update:001

用户实例001的所有权限:user:*:001
1.3.3 测试代码
- 授权需要在用户认证完毕之后,方可进行授权。
1.3.3.1 基于角色的授权
- 示例:
package com.sunxiaping.shiro;

import org.apache.shiro.SecurityUtils;

import org.apache.shiro.authc.IncorrectCredentialsException;

import org.apache.shiro.authc.UnknownAccountException;

import org.apache.shiro.authc.UsernamePasswordToken;

import org.apache.shiro.config.IniSecurityManagerFactory;

import org.apache.shiro.mgt.SecurityManager;

import org.apache.shiro.subject.Subject;

import org.apache.shiro.util.Factory;

import org.junit.Test;

import java.util.Arrays;

public class ShiroTest {

    @Test

    public void test() {

        //创建SecurityManager工厂对象:加载配置文件,创建工厂对象

        Factory<SecurityManager> securityManagerFactory = new IniSecurityManagerFactory("classpath:shiro-permission.ini");

        //获取SecurityManager对象

        SecurityManager securityManager = securityManagerFactory.getInstance();

        //将SecurityManager对象绑定到当前运行环境中,让系统随时随地都可以访问SecurityManager对象

        SecurityUtils.setSecurityManager(securityManager);

        //获取Subject主体对象

        Subject subject = SecurityUtils.getSubject();

        //执行登录

        try {

            subject.login(new UsernamePasswordToken("zhangsan", "123456"));

        } catch (UnknownAccountException e) {

            System.out.println("用户名不存在");

            e.printStackTrace();

        } catch (IncorrectCredentialsException e) {

            System.out.println("用户名存在,密码不正确");

            e.printStackTrace();

        }

        //判断当前用户是否拥有某个角色,返回true表示拥有,返回false表示没有

        System.out.println(subject.hasRole("role1"));

        //判断当前用户是否拥有一些角色,返回true表示全部拥有,返回false表示不全部拥有

        System.out.println(subject.hasAllRoles(Arrays.asList("role1", "role2", "role3")));

        //判断当前用户是否拥有一些角色,返回值是boolean[],如果有角色,那么数组中对应的就是true,如果没有数组中对应的就是false

        System.out.println(Arrays.toString(subject.hasRoles(Arrays.asList("role1", "role2", "role3"))));

        //检查当前用户是否拥有某个角色,如果有,不做任何操作,没有报异常

        subject.checkRole("role1");

        //检查当前用户是否拥有某些角色,如果传入的角色当前用户没有,就会报异常

        subject.checkRoles("role1","role2","role3");

    }

}
1.3.3.2 基于资源的授权
- 示例:
package com.sunxiaping.shiro;

import org.apache.shiro.SecurityUtils;

import org.apache.shiro.authc.IncorrectCredentialsException;

import org.apache.shiro.authc.UnknownAccountException;

import org.apache.shiro.authc.UsernamePasswordToken;

import org.apache.shiro.config.IniSecurityManagerFactory;

import org.apache.shiro.mgt.SecurityManager;

import org.apache.shiro.subject.Subject;

import org.apache.shiro.util.Factory;

import org.junit.Test;

import java.util.Arrays;

public class ShiroTest {

    @Test

    public void test() {

        //创建SecurityManager工厂对象:加载配置文件,创建工厂对象

        Factory<SecurityManager> securityManagerFactory = new IniSecurityManagerFactory("classpath:shiro-permission.ini");

        //获取SecurityManager对象

        SecurityManager securityManager = securityManagerFactory.getInstance();

        //将SecurityManager对象绑定到当前运行环境中,让系统随时随地都可以访问SecurityManager对象

        SecurityUtils.setSecurityManager(securityManager);

        //获取Subject主体对象

        Subject subject = SecurityUtils.getSubject();

        //执行登录

        try {

            subject.login(new UsernamePasswordToken("zhangsan", "123456"));

        } catch (UnknownAccountException e) {

            System.out.println("用户名不存在");

            e.printStackTrace();

        } catch (IncorrectCredentialsException e) {

            System.out.println("用户名存在,密码不正确");

            e.printStackTrace();

        }

        //判断当前用户是否拥有某个权限,返回true表示有权限,反之,则返回false

        System.out.println(subject.isPermitted("user:create"));

        //判断当前用户是否拥有一些权限,返回true表示全部拥有,返回false表示不全部拥有

        System.out.println(subject.isPermittedAll("user:create", "user:view"));

        //判断当前用户是否拥有一些权限,返回boolean数组,true表示有,false表示没有

        System.out.println(Arrays.toString(subject.isPermitted("user:create", "user:view")));

        //校验当前用户是否具有某个权限,有,无操作,没有,将抛出异常

        subject.checkPermission("user:create");

        //校验当前用户是否具有某些权限,有,无操作,没有,将抛出异常

        subject.checkPermissions("user:create", "user:view");

    }

}
1.4 自定义Realm
- 和自定义认证Realm一样,大部分情况是要从数据库获取权限数据,这里直接实现的是基于资源的授权。
1.4.1 Realm的代码
- 示例:
package com.sunxiaping.shiro;

import org.apache.shiro.authc.AuthenticationException;

import org.apache.shiro.authc.AuthenticationInfo;

import org.apache.shiro.authc.AuthenticationToken;

import org.apache.shiro.authc.SimpleAuthenticationInfo;

import org.apache.shiro.authz.AuthorizationInfo;

import org.apache.shiro.authz.SimpleAuthorizationInfo;

import org.apache.shiro.realm.AuthorizingRealm;

import org.apache.shiro.subject.PrincipalCollection;

import java.util.ArrayList;

import java.util.List;

/**

 * 自定义Realm

 */

public class CustomRealm extends AuthorizingRealm {

    @Override

    public String getName() {

        return "customRealm";

    }

    /**

     * 授权

     *

     * @param principals 用户认证的身份信息,其实就是doGetAuthenticationInfo返回值的第一个参数,本例是是username

     * @return

     */

    @Override

    protected AuthorizationInfo doGetAuthorizationInfo(PrincipalCollection principals) {

        String username = (String) principals.getPrimaryPrincipal();

        //根据用户名查询用户制定的角色和权限

        //假设用户在数据库中具有role1角色

        List<String> roles = new ArrayList<>();

        roles.add("role1");

        //假设用户在数据库中拥有user:delete权限

        List<String> permissions = new ArrayList<>();

        permissions.add("user:delete");

        //返回用户在数据库中的权限和角色

        SimpleAuthorizationInfo info = new SimpleAuthorizationInfo();

        info.addRoles(roles);

        info.addStringPermissions(permissions);

        return info;

    }

    /**

     * 认证

     *

     * @param token

     * @return

     * @throws AuthenticationException

     */

    @Override

    protected AuthenticationInfo doGetAuthenticationInfo(AuthenticationToken token) throws AuthenticationException {

        //获取身份信息 zhangsan

        Object principal = token.getPrincipal();

        //假设从数据库中查询到的zhangsan的密码是123456

        String password = "123456";

        AuthenticationInfo info = new SimpleAuthenticationInfo(principal, password, getName());

        return info;

    }

}
1.4.2 shiro-realm.ini
[main]

# 自定义Realm

customRealm = com.sunxiaping.shiro.CustomRealm

# 将Realm设置到SecurityManager中

securityManager.realms=$customRealm
1.4.3 测试
- 示例:
package com.sunxiaping.shiro;

import org.apache.shiro.SecurityUtils;

import org.apache.shiro.authc.IncorrectCredentialsException;

import org.apache.shiro.authc.UnknownAccountException;

import org.apache.shiro.authc.UsernamePasswordToken;

import org.apache.shiro.config.IniSecurityManagerFactory;

import org.apache.shiro.mgt.SecurityManager;

import org.apache.shiro.subject.Subject;

import org.apache.shiro.util.Factory;

import org.junit.Test;

public class ShiroTest {

    @Test

    public void test() {

        //创建SecurityManager工厂对象:加载配置文件,创建工厂对象

        Factory<SecurityManager> securityManagerFactory = new IniSecurityManagerFactory("classpath:shiro-realm.ini");

        //获取SecurityManager对象

        SecurityManager securityManager = securityManagerFactory.getInstance();

        //将SecurityManager对象绑定到当前运行环境中,让系统随时随地都可以访问SecurityManager对象

        SecurityUtils.setSecurityManager(securityManager);

        //获取Subject主体对象

        Subject subject = SecurityUtils.getSubject();

        //执行登录

        try {

            subject.login(new UsernamePasswordToken("zhangsan", "123456"));

        } catch (UnknownAccountException e) {

            System.out.println("用户名不存在");

            e.printStackTrace();

        } catch (IncorrectCredentialsException e) {

            System.out.println("用户名存在,密码不正确");

            e.printStackTrace();

        }

        System.out.println(subject.isPermitted("user:delete"));

        System.out.println(subject.hasRole("role1"));

    }

}
2 web集成
2.1 集成原理
- shiro和web集成,主要是通过配置一个ShiroFilter拦截所有的URL,其中ShiroFilter类似于如Struts2和SpringMVC这种web框架的前端控制器,是所有请求的入口点,负责根据配置(如ini配置文件),判断请求进入URL是否需要登录/权限等工作。
2.2 web集成
2.2.1 添加相关依赖
<dependency>

          <groupId>commons-logging</groupId>

          <artifactId>commons-logging</artifactId>

          <version>1.1.3</version>

      </dependency>

      <!-- shiro核心的依赖 -->

      <dependency>

          <groupId>org.apache.shiro</groupId>

          <artifactId>shiro-core</artifactId>

          <version>1.2.2</version>

      </dependency>

      <!-- shiro对web支持的依赖 -->

      <dependency>

          <groupId>org.apache.shiro</groupId>

          <artifactId>shiro-web</artifactId>

          <version>1.2.2</version>

      </dependency>

      <!-- serlvet-api -->

      <dependency>

          <groupId>javax.servlet</groupId>

          <artifactId>javax.servlet-api</artifactId>

          <version>3.0.1</version>

          <scope>provided</scope>

      </dependency>

      <dependency>

          <groupId>javax.servlet.jsp</groupId>

          <artifactId>jsp-api</artifactId>

          <version>2.2</version>

          <scope>provided</scope>

      </dependency>
2.2.2 配置web.xml
<?xml version="1.0" encoding="UTF-8"?>

<web-app xmlns:xsi="http://www.w3.org/2001/XMLSchema-instance"

         xmlns="http://java.sun.com/xml/ns/javaee"

         xmlns:web="http://java.sun.com/xml/ns/javaee/web-app_2_5.xsd"

         xsi:schemaLocation="http://java.sun.com/xml/ns/javaee http://java.sun.com/xml/ns/javaee/web-app_3_0.xsd" id="WebApp_ID" version="3.0">

    <!--初始化securityManager对象所需要的环境配置-->

    <context-param>

        <param-name>shiroEnvironmentClass</param-name>

        <param-value>org.apache.shiro.web.env.IniWebEnvironment</param-value>

    </context-param>

    <context-param>

        <param-name>shiroConfigLocations</param-name>

        <param-value>classpath:shiro.ini</param-value>

    </context-param>

    <!--

        从Shiro 1.2开始引入了Environment/WebEnvironment的概念,即由它们的实现提供相应的SecurityManager及其相应的依赖。

        ShiroFilter会自动找到Environment然后获取相应的依赖。

        底层:返回反射创建shiroEnvironmentClass对象,调用其init方法.

            shiroEnvironmentClass中的init方法创建SecurityManager实例并绑定到当前运行环境

     -->

    <listener>

        <listener-class>org.apache.shiro.web.env.EnvironmentLoaderListener</listener-class>

    </listener>

    <filter>

        <filter-name>shiroFilter</filter-name>

        <filter-class>org.apache.shiro.web.servlet.ShiroFilter</filter-class>

    </filter>

    <filter-mapping>

        <filter-name>shiroFilter</filter-name>

        <!-- 拦截所有的请求 -->

        <url-pattern>/*</url-pattern>

    </filter-mapping>

</web-app>
2.2.3 shiro.ini
[main]
#默认是/login.jsp
authc.loginUrl = /login
#用户无需要的角色跳转的页面
roles.unauthorizedUrl = /nopermission.jsp
#用户无需要的权限时提哦啊转的页面
perms.unauthorizedUrl=/nopermission.jsp
#登出之后重定向的页面
logout.redirectUrl=/login
[users]
admin=123456,admin
sunxiaping=123456,deptMgr
[roles]
admin=employee"*,department:*
deptMgr=department:view
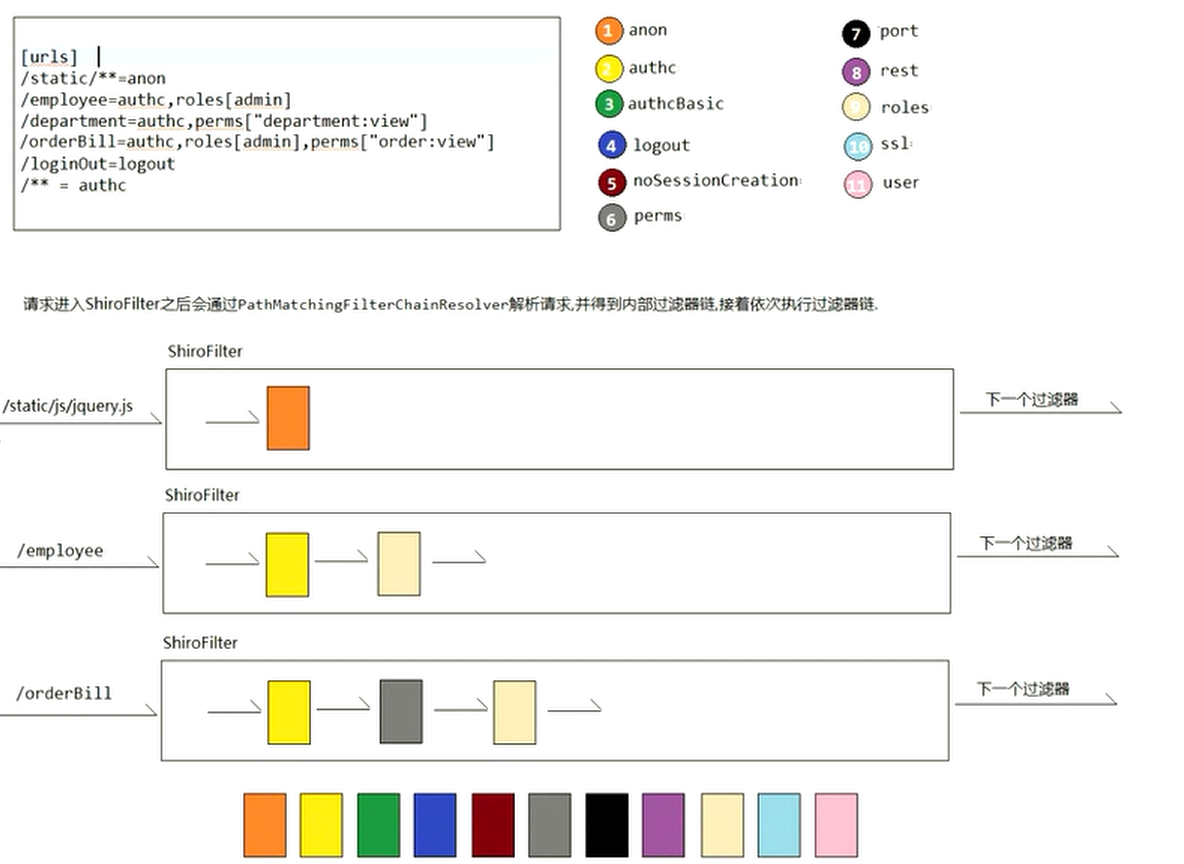
[urls]
#静态资源可以匿名
/static/**=anon
#访问员工列表需要身份认证以及需要有admin角色
/emplouee=authc,roles[admin]
#访问部门列表需要身份认证以及需要拥有department:view的权限
/department=authc,perms["department:view"]
#当请求logout,会被logout捕获并清楚session
/logout=logout
#所有的请求都需要身份认证
/**=authc
2.2.4 Shiro默认的过滤器
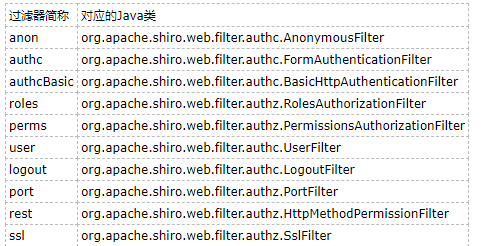
- anno:匿名拦截器,即不需要登录即可访问;一般用于静态资源过滤。例如:/static/**=anno
- authc:表示需要认证(登录)才能使用。例如:/**=auth,其主要属性如下:
- usernameParam:表单提交的用户名参数名(username)。
- passwordParam:表单提交的密码参数名(password)。
- rememberMeParam:记住我参数名(rememberMe)。
- logurl:登录页面地址。
- authcBasic:BasicHttp身份验证拦截器。其主要属性如下:
- applicationName:弹出登录框显示的信息(application)。
- roles:角色授权拦截器,验证用户是否拥有资源角色。例如:/admin/**=roles[admin]
- perms:权限授权拦截器,验证用户是否拥有资源权限。例如:/user/create=perms["user:create"]
- user:用户拦截器,用户已经身份认证/记住我登录都可。例如:/index=user
- logout:退出拦截器,例如:/logout=logout,其主要属性如下:
- redirectUrl:退出成功后重定向的地址(/)
- port:端口拦截器,例如:/test=port[80],如果用户访问该页面是非80,将自动将请求端口改为80并重定向到该80端口,其他路径/参数等都一样,其主要属性如下:
- port(80):可以通过的端口。
- rest:rest风格拦截器,自动根据请求方法构建权限字符串(GET=read,POST=create,PUT=update,DELETE=delete,HEAD=read,TRACE=read,OPTIONS=read,MKCOL=create)构建权限字符串。例如:/users=rest[user],会自动拼出“user:create,user:create,user:update,user:delete”权限字符串进行权限匹配(所有权限都会匹配)。
- ssl:SSL拦截器,只有请求协议是https才会通过,否则自动跳转到https端口(443),其他和port拦截器一样。
2.2.4.1 authc登录拦截器工作原理
- authc登录拦截器有2个作用:
- ①登录认证:请求进来的时候,拦截并判断当前用户是否登录了,如果已经登录了就放行,如果没有登录,则跳转到authc.loginUrl属性配置的路径。注意:默认是/login.jsp。
- ②执行登录认证:请求进来的时候,如果请求的路径为authc.loginUrl属性配置的路径(如果没有配置,默认是/login.jsp),如果当前用户没有登录,authc这个拦截器会尝试获取请求中的账号和密码值,然后比对ini配置文件或者realm中的用户列表,如果比对正确,直接执行登录操作,反之,抛异常,跳转到authc.loginUrl指定的路径。注意:请求中的账号和密码必须固定为username和password,如果需要改动需要额外指定,authc.usernameParam=xxx,authc.passwordParam=xxx。
2.2.4.2 authc登录成功后处理逻辑

2.2.4.3 authc登录失败后处理逻辑
- 登录失败之后,会将异常信息写入到shiroLoginFailure的request域中,其值是异常类的全限定名。
2.2.5 shiro的jsp标签
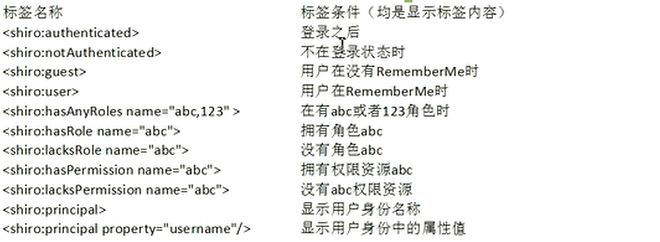
- 步骤:
- ①在jsp中引入shiro的标签库
<%@ taglib prefix="shiro" uri="http://shiro.apache.org/tags" %>
- ②标签是否拥有权限进而显示操作按钮
<shiro:hasPermission name="employee:add">

    <a href="${pageContext.request.contextPath}/employee?cmd=input">新增</a>

</shiro:hasPermission>
- ③显示当前的登录用户
<shiro:principal></shiro:principal>
2.2.6 登出
- 只需要在shiro.ini中配置一下即可。
#当请求loginOut,会被logout捕获并清除session

/loginOut=logout
- 示例:
<a href="${pageContext.request.contextPath}/loginOut">退出</a>
3 Spring集成
3.1 准备工作
3.1.1 sql文件
SET FOREIGN_KEY_CHECKS=0;

-- ----------------------------

-- Table structure for permission

-- ----------------------------

DROP TABLE IF EXISTS `permission`;

CREATE TABLE `permission` (

  `id` bigint(20) NOT NULL AUTO_INCREMENT,

  `name` varchar(255) DEFAULT NULL,

  `resource` varchar(255) DEFAULT NULL,

  PRIMARY KEY (`id`)

) ENGINE=InnoDB DEFAULT CHARSET=utf8;

-- ----------------------------

-- Records of permission

-- ----------------------------

-- ----------------------------

-- Table structure for role

-- ----------------------------

DROP TABLE IF EXISTS `role`;

CREATE TABLE `role` (

  `id` bigint(20) NOT NULL AUTO_INCREMENT,

  `name` varchar(255) DEFAULT NULL,

  `sn` varchar(255) DEFAULT NULL,

  PRIMARY KEY (`id`)

) ENGINE=InnoDB AUTO_INCREMENT=3 DEFAULT CHARSET=utf8;

-- ----------------------------

-- Records of role

-- ----------------------------

INSERT INTO `role` VALUES ('', '部门经理', 'deptMgr');

INSERT INTO `role` VALUES ('', '员工经理', 'empMgr');

-- ----------------------------

-- Table structure for role_permission

-- ----------------------------

DROP TABLE IF EXISTS `role_permission`;

CREATE TABLE `role_permission` (

  `role_id` bigint(20) NOT NULL,

  `permission_id` bigint(20) NOT NULL

) ENGINE=InnoDB DEFAULT CHARSET=utf8;

-- ----------------------------

-- Records of role_permission

-- ----------------------------

-- ----------------------------

-- Table structure for user

-- ----------------------------

DROP TABLE IF EXISTS `user`;

CREATE TABLE `user` (

  `id` bigint(20) NOT NULL AUTO_INCREMENT,

  `username` varchar(255) DEFAULT NULL,

  `password` varchar(255) DEFAULT NULL,

  PRIMARY KEY (`id`)

) ENGINE=InnoDB AUTO_INCREMENT=3 DEFAULT CHARSET=utf8;

-- ----------------------------

-- Records of user

-- ----------------------------

INSERT INTO `user` VALUES ('', 'admin', '');

INSERT INTO `user` VALUES ('', 'zhangsan', '');

-- ----------------------------

-- Table structure for user_role

-- ----------------------------

DROP TABLE IF EXISTS `user_role`;

CREATE TABLE `user_role` (

  `user_id` bigint(20) NOT NULL,

  `role_id` bigint(20) NOT NULL

) ENGINE=InnoDB DEFAULT CHARSET=utf8;

-- ----------------------------

-- Records of user_role

-- ----------------------------
3.1.2 新建jdbc.properties
jdbc.driverClassName=com.mysql.jdbc.Driver

jdbc.url=jdbc:mysql:///shiro?createDatabaseIfNotExist=true&useUnicode=true&characterEncoding=UTF-8

jdbc.username=root

jdbc.password=
3.1.3 log4j.properties
# Global logging configuration

log4j.rootLogger=ERROR, stdout

# MyBatis logging configuration...

log4j.logger.cn.wolfcode.shiro=TRACE

# Console output...

log4j.appender.stdout=org.apache.log4j.ConsoleAppender

log4j.appender.stdout.layout=org.apache.log4j.PatternLayout

log4j.appender.stdout.layout.ConversionPattern=%5p [%t] - %m%n
3.1.4 spring.xml
<?xml version="1.0" encoding="UTF-8"?>

<beans xmlns="http://www.springframework.org/schema/beans"

    xmlns:xsi="http://www.w3.org/2001/XMLSchema-instance" xmlns:p="http://www.springframework.org/schema/p"

    xmlns:context="http://www.springframework.org/schema/context"

    xmlns:aop="http://www.springframework.org/schema/aop" xmlns:jee="http://www.springframework.org/schema/jee"

    xmlns:mvc="http://www.springframework.org/schema/mvc"

    xsi:schemaLocation="

            http://www.springframework.org/schema/beans http://www.springframework.org/schema/beans/spring-beans.xsd

            http://www.springframework.org/schema/context http://www.springframework.org/schema/context/spring-context.xsd

            http://www.springframework.org/schema/jee http://www.springframework.org/schema/jee/spring-jee.xsd

            http://www.springframework.org/schema/aop http://www.springframework.org/schema/aop/spring-aop.xsd

            http://www.springframework.org/schema/mvc http://www.springframework.org/schema/mvc/spring-mvc.xsd">

    <!--1:引入数据源配置文件-->

    <context:property-placeholder location="classpath:jdbc.properties" system-properties-mode="NEVER"/>

    <!--2:配置数据源-->

    <bean id="dataSource" class="com.alibaba.druid.pool.DruidDataSource" init-method="init"

          destroy-method="close">

        <property name="driverClassName" value="${jdbc.driverClassName}"/>

        <property name="url" value="${jdbc.url}"/>

        <property name="username" value="${jdbc.username}"/>

        <property name="password" value="${jdbc.password}"/>

    </bean>

</beans>
3.1.5 mvc.xml
<?xml version="1.0" encoding="UTF-8"?>

<beans xmlns="http://www.springframework.org/schema/beans"

    xmlns:xsi="http://www.w3.org/2001/XMLSchema-instance" xmlns:p="http://www.springframework.org/schema/p"

    xmlns:context="http://www.springframework.org/schema/context"

    xmlns:aop="http://www.springframework.org/schema/aop" xmlns:jee="http://www.springframework.org/schema/jee"

    xmlns:mvc="http://www.springframework.org/schema/mvc"

    xsi:schemaLocation="

            http://www.springframework.org/schema/beans http://www.springframework.org/schema/beans/spring-beans.xsd

            http://www.springframework.org/schema/context http://www.springframework.org/schema/context/spring-context.xsd

            http://www.springframework.org/schema/jee http://www.springframework.org/schema/jee/spring-jee.xsd

            http://www.springframework.org/schema/aop http://www.springframework.org/schema/aop/spring-aop.xsd

            http://www.springframework.org/schema/mvc http://www.springframework.org/schema/mvc/spring-mvc.xsd">

    <!--1:配置DI注解解析器-->

    <context:annotation-config/>

    <!--2:配置IoC注解解析器-->

    <context:component-scan base-package="cn.wolfcode.shiro"/>

    <!--3:配置mvc注解解析器-->

    <mvc:annotation-driven/>

    <!--4:静态资源处理-->

    <mvc:default-servlet-handler/>

    <!--5:配置视图解析器-->

    <bean class="org.springframework.web.servlet.view.InternalResourceViewResolver">

        <property name="prefix" value="/WEB-INF/views/"/>

        <property name="suffix" value=".jsp"/>

    </bean>

    <!--6:引入shiro配置文件-->

    <!--7:引入spring配置文件-->

    <import resource="classpath:spring.xml"></import>

</beans>
3.1.6 web.xml
<?xml version="1.0" encoding="UTF-8"?>

<web-app xmlns:xsi="http://www.w3.org/2001/XMLSchema-instance" xmlns="http://java.sun.com/xml/ns/javaee"

         xmlns:web="http://java.sun.com/xml/ns/javaee/web-app_2_5.xsd"

         xsi:schemaLocation="http://java.sun.com/xml/ns/javaee http://java.sun.com/xml/ns/javaee/web-app_3_0.xsd"

         id="WebApp_ID" version="3.0">

    <display-name>Archetype Created Web Application</display-name>

    <servlet>

        <servlet-name>SpringMVC</servlet-name>

        <servlet-class>org.springframework.web.servlet.DispatcherServlet</servlet-class>

        <init-param>

            <param-name>contextConfigLocation</param-name>

            <param-value>classpath:mvc.xml</param-value>

        </init-param>

        <load-on-startup>1</load-on-startup>

    </servlet>

    <servlet-mapping>

        <servlet-name>SpringMVC</servlet-name>

        <url-pattern>/</url-pattern>

    </servlet-mapping>

    <!--编码过滤器-->

    <filter>

        <filter-name>CharacterEncodingFilter</filter-name>

        <filter-class>org.springframework.web.filter.CharacterEncodingFilter</filter-class>

        <init-param>

            <param-name>encoding</param-name>

            <param-value>UTF-8</param-value>

        </init-param>

        <init-param>

            <param-name>forceEncoding</param-name>

            <param-value>true</param-value>

        </init-param>

    </filter>

    <filter-mapping>

        <filter-name>CharacterEncodingFilter</filter-name>

        <url-pattern>/*</url-pattern>

    </filter-mapping>

</web-app>
3.2 添加Shiro和Spring集成依赖的jar包
- 完整项目的jar包的maven坐标:
        <dependency>

            <groupId>org.projectlombok</groupId>

            <artifactId>lombok</artifactId>

            <version>1.16.16</version>

        </dependency>

        <!--servlet-->

        <dependency>

            <groupId>javax.servlet</groupId>

            <artifactId>servlet-api</artifactId>

            <version>2.5</version>

            <scope>provided</scope>

        </dependency>

        <!--spring-->

        <dependency>

            <groupId>org.springframework</groupId>

            <artifactId>spring-core</artifactId>

            <version>${org.springframework.version}</version>

        </dependency>

        <dependency>

            <groupId>org.springframework</groupId>

            <artifactId>spring-context</artifactId>

            <version>${org.springframework.version}</version>

        </dependency>

        <dependency>

            <groupId>org.springframework</groupId>

            <artifactId>spring-context-support</artifactId>

            <version>${org.springframework.version}</version>

        </dependency>

        <dependency>

            <groupId>org.springframework</groupId>

            <artifactId>spring-expression</artifactId>

            <version>${org.springframework.version}</version>

        </dependency>

        <dependency>

            <groupId>org.springframework</groupId>

            <artifactId>spring-web</artifactId>

            <version>${org.springframework.version}</version>

        </dependency>

        <dependency>

            <groupId>org.springframework</groupId>

            <artifactId>spring-aop</artifactId>

            <version>${org.springframework.version}</version>

        </dependency>

        <dependency>

            <groupId>org.springframework</groupId>

            <artifactId>spring-webmvc</artifactId>

            <version>${org.springframework.version}</version>

        </dependency>

        <dependency>

            <groupId>org.springframework</groupId>

            <artifactId>spring-jdbc</artifactId>

            <version>${org.springframework.version}</version>

        </dependency>

        <dependency>

            <groupId>org.springframework</groupId>

            <artifactId>spring-tx</artifactId>

            <version>${org.springframework.version}</version>

        </dependency>

        <dependency>

            <groupId>mysql</groupId>

            <artifactId>mysql-connector-java</artifactId>

            <version>5.1.21</version>

        </dependency>

        <!-- druid -->

        <dependency>

            <groupId>com.alibaba</groupId>

            <artifactId>druid</artifactId>

            <version>1.0.14</version>

        </dependency>

        <!-- aspectj -->

        <dependency>

            <groupId>org.aspectj</groupId>

            <artifactId>aspectjrt</artifactId>

            <version>1.7.4</version>

        </dependency>

        <dependency>

            <groupId>org.aspectj</groupId>

            <artifactId>aspectjweaver</artifactId>

            <version>1.7.4</version>

        </dependency>

        <!-- cglib -->

        <dependency>

            <groupId>cglib</groupId>

            <artifactId>cglib</artifactId>

            <version>3.1</version>

        </dependency>

        <!--日志-->

        <dependency>

            <groupId>org.slf4j</groupId>

            <artifactId>slf4j-api</artifactId>

            <version>1.7.25</version>

        </dependency>

        <dependency>

            <groupId>org.slf4j</groupId>

            <artifactId>slf4j-log4j12</artifactId>

            <version>1.7.25</version>

        </dependency>

        <dependency>

            <groupId>log4j</groupId>

            <artifactId>log4j</artifactId>

            <version>1.2.17</version>

        </dependency>

        <!-- jstl -->

        <dependency>

            <groupId>jstl</groupId>

            <artifactId>jstl</artifactId>

            <version>1.2</version>

        </dependency>

        <!-- standard -->

        <dependency>

            <groupId>taglibs</groupId>

            <artifactId>standard</artifactId>

            <version>1.1.2</version>

        </dependency>

        <!--shiro-->

        <dependency>

            <groupId>commons-logging</groupId>

            <artifactId>commons-logging</artifactId>

            <version>1.1.3</version>

        </dependency>

        <dependency>

            <groupId>commons-collections</groupId>

            <artifactId>commons-collections</artifactId>

            <version>3.2.1</version>

        </dependency>

        <dependency>

            <groupId>org.apache.shiro</groupId>

            <artifactId>shiro-core</artifactId>

            <version>1.2.2</version>

        </dependency>

        <dependency>

            <groupId>org.apache.shiro</groupId>

            <artifactId>shiro-web</artifactId>

            <version>1.2.2</version>

        </dependency>

        <dependency>

            <groupId>net.sf.ehcache</groupId>

            <artifactId>ehcache-core</artifactId>

            <version>2.6.8</version>

        </dependency>

        <dependency>

            <groupId>org.apache.shiro</groupId>

            <artifactId>shiro-ehcache</artifactId>

            <version>1.2.2</version>

        </dependency>

        <dependency>

            <groupId>org.apache.shiro</groupId>

            <artifactId>shiro-quartz</artifactId>

            <version>1.2.2</version>

        </dependency>

        <dependency>

            <groupId>org.apache.shiro</groupId>

            <artifactId>shiro-spring</artifactId>

            <version>1.2.2</version>

        </dependency>
- 其中Shiro和Spring整合的jar包的maven坐标是:
        <dependency>

            <groupId>commons-logging</groupId>

            <artifactId>commons-logging</artifactId>

            <version>1.1.3</version>

        </dependency>

        <dependency>

            <groupId>commons-collections</groupId>

            <artifactId>commons-collections</artifactId>

            <version>3.2.1</version>

        </dependency>

        <dependency>

            <groupId>org.apache.shiro</groupId>

            <artifactId>shiro-core</artifactId>

            <version>1.2.2</version>

        </dependency>

        <dependency>

            <groupId>org.apache.shiro</groupId>

            <artifactId>shiro-web</artifactId>

            <version>1.2.2</version>

        </dependency>

        <dependency>

            <groupId>net.sf.ehcache</groupId>

            <artifactId>ehcache-core</artifactId>

            <version>2.6.8</version>

        </dependency>

        <dependency>

            <groupId>org.apache.shiro</groupId>

            <artifactId>shiro-ehcache</artifactId>

            <version>1.2.2</version>

        </dependency>

        <dependency>

            <groupId>org.apache.shiro</groupId>

            <artifactId>shiro-quartz</artifactId>

            <version>1.2.2</version>

        </dependency>

        <dependency>

            <groupId>org.apache.shiro</groupId>

            <artifactId>shiro-spring</artifactId>

            <version>1.2.2</version>

        </dependency>
3.3 配置web.xml
- 完整配置:
<?xml version="1.0" encoding="UTF-8"?>

<web-app xmlns:xsi="http://www.w3.org/2001/XMLSchema-instance" xmlns="http://java.sun.com/xml/ns/javaee"

         xmlns:web="http://java.sun.com/xml/ns/javaee/web-app_2_5.xsd"

         xsi:schemaLocation="http://java.sun.com/xml/ns/javaee http://java.sun.com/xml/ns/javaee/web-app_3_0.xsd"

         id="WebApp_ID" version="3.0">

    <display-name>Archetype Created Web Application</display-name>

    <servlet>

        <servlet-name>SpringMVC</servlet-name>

        <servlet-class>org.springframework.web.servlet.DispatcherServlet</servlet-class>

        <init-param>

            <param-name>contextConfigLocation</param-name>

            <param-value>classpath:mvc.xml</param-value>

        </init-param>

        <load-on-startup>1</load-on-startup>

    </servlet>

    <servlet-mapping>

        <servlet-name>SpringMVC</servlet-name>

        <url-pattern>/</url-pattern>

    </servlet-mapping>

    <!--编码过滤器-->

    <filter>

        <filter-name>CharacterEncodingFilter</filter-name>

        <filter-class>org.springframework.web.filter.CharacterEncodingFilter</filter-class>

        <init-param>

            <param-name>encoding</param-name>

            <param-value>UTF-8</param-value>

        </init-param>

        <init-param>

            <param-name>forceEncoding</param-name>

            <param-value>true</param-value>

        </init-param>

    </filter>

    <filter-mapping>

        <filter-name>CharacterEncodingFilter</filter-name>

        <url-pattern>/*</url-pattern>

    </filter-mapping>

    <!-- 配置Spring和Shiro集成需要的ShiroFilter代理类,DelegatingFilterProx会从spring容器中找shiroFilter -->

    <filter>

        <filter-name>shiroFilter</filter-name>

        <filter-class>org.springframework.web.filter.DelegatingFilterProxy</filter-class>

        <init-param>

            <param-name>targetFilterLifecycle</param-name>

            <param-value>true</param-value>

        </init-param>

    </filter>

    <filter-mapping>

        <filter-name>shiroFilter</filter-name>

        <url-pattern>/*</url-pattern>

    </filter-mapping>

</web-app>
- 其中,配置Spring和Shiro集成需要的ShiroFilter代理类,DelegatingFilterProxy会总Spring容器中找ShiroFilter
<!--

    配置Spring和Shiro集成需要的ShiroFilter代理类,DelegatingFilterProxy会从spring容器中找shiroFilter

    注意:<filter-name>必须和shiro配置文件中的真实ShiroFilter Bean的id一致

-->

<filter>

    <filter-name>shiroFilter</filter-name>

    <filter-class>org.springframework.web.filter.DelegatingFilterProxy</filter-class>

    <init-param>

        <param-name>targetFilterLifecycle</param-name>

        <param-value>true</param-value>

    </init-param>

</filter>

<filter-mapping>

    <filter-name>shiroFilter</filter-name>

    <url-pattern>/*</url-pattern>

</filter-mapping>
3.3 添加shiro的配置文件
- 新建spring-shiro.xml
<?xml version="1.0" encoding="UTF-8"?>

<beans xmlns="http://www.springframework.org/schema/beans"

    xmlns:xsi="http://www.w3.org/2001/XMLSchema-instance" xmlns:p="http://www.springframework.org/schema/p"

    xmlns:context="http://www.springframework.org/schema/context"

    xmlns:aop="http://www.springframework.org/schema/aop" xmlns:jee="http://www.springframework.org/schema/jee"

    xmlns:mvc="http://www.springframework.org/schema/mvc"

    xsi:schemaLocation="

            http://www.springframework.org/schema/beans http://www.springframework.org/schema/beans/spring-beans.xsd

            http://www.springframework.org/schema/context http://www.springframework.org/schema/context/spring-context.xsd

            http://www.springframework.org/schema/jee http://www.springframework.org/schema/jee/spring-jee.xsd

            http://www.springframework.org/schema/aop http://www.springframework.org/schema/aop/spring-aop.xsd

            http://www.springframework.org/schema/mvc http://www.springframework.org/schema/mvc/spring-mvc.xsd">

    <!--配置自定义的realm-->

    <bean id="userRealm" class="cn.wolfcode.shiro.realm.UserRealm">

    </bean>

    <!-- 配置安全管理器SecurityManager -->

    <bean id="securityManager" class="org.apache.shiro.web.mgt.DefaultWebSecurityManager">

        <property name="realm" ref="userRealm"/>

    </bean>

    <!-- 定义ShiroFilter -->

    <bean id="shiroFilter" class="org.apache.shiro.spring.web.ShiroFilterFactoryBean">

        <property name="securityManager" ref="securityManager"/>

        <property name="loginUrl" value="/login"/>

        <property name="unauthorizedUrl" value="/nopermission.jsp"/>

        <property name="filterChainDefinitions">

            <value>

                /logout=logout

                /**=authc

            </value>

        </property>

    </bean>

</beans>
- 在mvc.xml中将shiro的配置文件加入进去:
<import resource="classpath:spring-shiro.xml"></import>
<?xml version="1.0" encoding="UTF-8"?>

<beans xmlns="http://www.springframework.org/schema/beans"

    xmlns:xsi="http://www.w3.org/2001/XMLSchema-instance" xmlns:p="http://www.springframework.org/schema/p"

    xmlns:context="http://www.springframework.org/schema/context"

    xmlns:aop="http://www.springframework.org/schema/aop" xmlns:jee="http://www.springframework.org/schema/jee"

    xmlns:mvc="http://www.springframework.org/schema/mvc"

    xsi:schemaLocation="

            http://www.springframework.org/schema/beans http://www.springframework.org/schema/beans/spring-beans.xsd

            http://www.springframework.org/schema/context http://www.springframework.org/schema/context/spring-context.xsd

            http://www.springframework.org/schema/jee http://www.springframework.org/schema/jee/spring-jee.xsd

            http://www.springframework.org/schema/aop http://www.springframework.org/schema/aop/spring-aop.xsd

            http://www.springframework.org/schema/mvc http://www.springframework.org/schema/mvc/spring-mvc.xsd">

    <!--1:配置DI注解解析器-->

    <context:annotation-config/>

    <!--2:配置IoC注解解析器-->

    <context:component-scan base-package="cn.wolfcode.shiro"/>

    <!--3:配置mvc注解解析器-->

    <mvc:annotation-driven/>

    <!--4:静态资源处理-->

    <mvc:default-servlet-handler/>

    <!--5:配置视图解析器-->

    <bean class="org.springframework.web.servlet.view.InternalResourceViewResolver">

        <property name="prefix" value="/WEB-INF/views/"/>

        <property name="suffix" value=".jsp"/>

    </bean>

    <!--6:引入shiro配置文件-->

    <import resource="classpath:spring-shiro.xml"></import>

    <!--7:引入spring配置文件-->

    <import resource="classpath:spring.xml"></import>

</beans>
3.4 测试
- 访问地址:http://localhost:8080/main
最新文章
- PHP代码获取客户端IP地址经纬度及所在城市
- linux svn 提交文件时强制填写备注
- ActionBarSherlock环境搭建
- js 如何在浏览器中获取当前位置的经纬度
- exp/imp使用
- OD: Peimei & Versioning Analysis
- 在birt中解决引用了不存在的绑定出现的问题
- Asp.Net--回调技术
- join 数据库
- vs2012快速将项目托管到github
- Python3数据库模块(sqlite3,SQLite3)
- hdu4605 树状数组+离散化+dfs
- 如何设置静态IP
- 【ODI】| 数据ETL:从零开始使用Oracle ODI完成数据集成(三)
- sqlserver2016新功能
- Android应用开发-网络编程(一)
- 使用SecureCRT软件运维的配置习惯
- FastReport报表设计(仔细看)
- 初始化android studio的方法
- (实用)Eclipse中使用命令行(运行外部程序)