使用sequelize对数据库进行增删改查
2024-08-21 14:26:09
由于本人对于命令比较执着,所以基本都是在命令下操作的,喜欢使用命令的可以使用Cmder,需要安装、配置的可以参考这篇文章:
https://www.cnblogs.com/ziyoublog/p/10416684.html
首先我们需要在自己的文件夹下运行一下cmd
npm init -y
(-y)的主要目的是跳过配置一系列的package.json
其次我们需要安装两个sequelize和mysql2
yarn add sequelize mysql2 -S

或者

npm install sequelize mysql2 -S
接下来我们需要在根目录下新建一个js文件
// index.js

const Sequelize = require('sequelize')

const sequelize = new Sequelize(

    'testseq', // 数据库名

    'root', // 用户名

    'root', // 密码

    {

        'dialect': 'mysql', // 数据库使用mysql

        'host': 'localhost', // 数据库服务器ip

        'port': 3306, // 数据库服务器端口

        'define': {

            'underscored': true

        }

    }

)
上述操作是为了连接数据库的,可以通过以下代码验证:
// 测试数据库是否连接成功

sequelize

    .authenticate()

    .then(res => {

        console.log('Connection Success!')

    })

    .catch(err => {

        console.log('Connection Error')

    })

证明连接成功!
建立一个模板:
// 模板sequelize.define('表名', {}, {})

const User = sequelize.define(

    'first', {

        id: {

            field: 'id', // 字段名

            primaryKey: true,

            type: Sequelize.INTEGER, // 类型

            allowNull: false // 是否允许为空

        },

        name: {

            field: 'name',

            primaryKey: true,

            type: Sequelize.STRING

        },

        password: {

            field: 'password',

            primaryKey: true,

            type: Sequelize.STRING,

            allowNull: false

        }

    }, {

        tableName: 'first',

        timestamps: false,

        freezeTableName: true

    }

)
首先我们来实现往数据库添加数据:
// 往数据库添加单条数据

User.create({

    id: 1,

    name: 'test1',

    password: '123456'

})

你就可以看到sql语句,接下来看看数据库有没有数据:
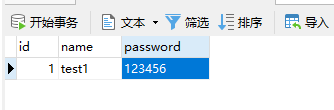
证明插入成功
其次就是改操作:
// 修改往数据库数据(通过id去修改name或者password)

User.update({

    'name': 'test2'

}, {

    'where': { 'id': 1 }

})
sql语句:

数据库:
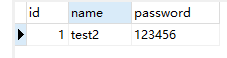
name成功由test1变成了test2,证明成功!
查所有操作:
// 查询所有

User.findAll().then((res) => {

    console.log(res)

})

查单个操作:
// 查询单条

User.findOne({

    'where': {

        'id': 1

    }

}).then(res => {

    console.log(res)

})
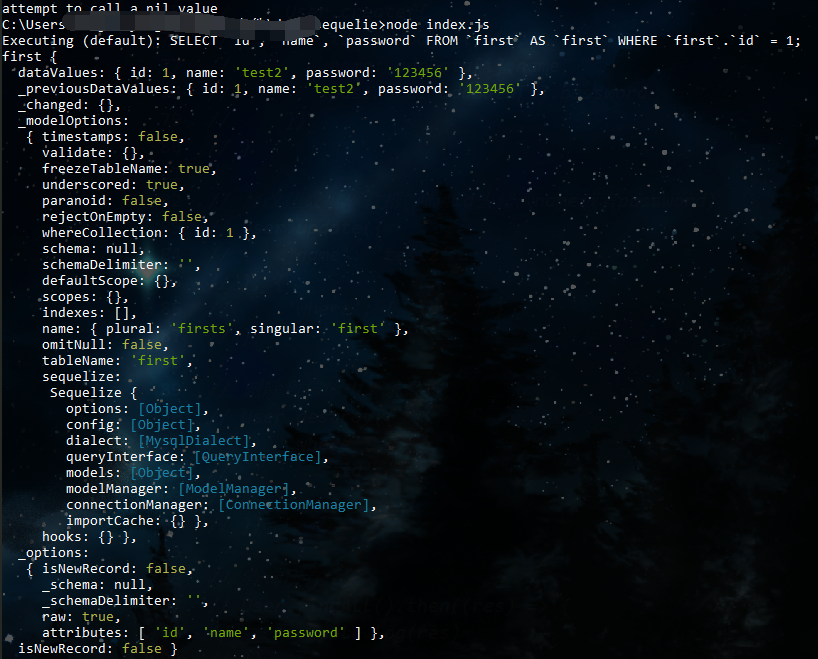
由于就只有一条数据,所以查出来的结果是一样的, 但是查询单个findOne、全部findAll。
接下来就是删除操作了:
// 删除数据库中某条数据

User.destroy({

    'where': {

        'id': 1

    }

})

数据库:

已经顺利删除了。
以上操作需要在已经建立数据表的情况下。
完整代码:
const Sequelize = require('sequelize')

const sequelize = new Sequelize(

    'testseq', // 数据库名

    'root', // 用户名

    'root', // 密码

    {

        'dialect': 'mysql', // 数据库使用mysql

        'host': 'localhost', // 数据库服务器ip

        'port': 3306, // 数据库服务器端口

        'define': {

            'underscored': true

        }

    }

)

// 测试数据库是否连接成功

// sequelize

//     .authenticate()

//     .then(res => {

//         console.log('Connection Success!')

//     })

//     .catch(err => {

//         console.log('Connection Error')

//     })

// 模板sequelize.define('表名', {}, {})

const User = sequelize.define(

    'first', {

        id: {

            field: 'id',

            primaryKey: true,

            type: Sequelize.INTEGER,

            allowNull: false

        },

        name: {

            field: 'name',

            primaryKey: true,

            type: Sequelize.STRING,

            allowNull: false

        },

        password: {

            field: 'password',

            primaryKey: true,

            type: Sequelize.STRING,

            allowNull: false

        }

    }, {

        tableName: 'first',

        timestamps: false,

        freezeTableName: true

    }

)

// 往数据库添加单条数据

User.create({

    id: 1,

    name: 'test1',

    password: '123456'

})

// // 往数据库添加数据多条数据   遍历

// const addData = [{

//         id: 5,

//         name: 'yang5',

//         password: '123456'

//     },

//     {

//         id: 6,

//         name: 'yang6',

//         password: '123456'

//     }

// ]

// for (let i = 0; i < addData.length; i++) {

//     User.create({

//         id: addData[i].id,

//         name: addData[i].name,

//         password: addData[i].password

//     })

// }

// 修改往数据库数据(通过id去修改name或者password)

// User.update({

//     'name': 'test2'

// }, {

//     'where': { 'id': 1 }

// })

// 删除数据库中某条数据

// User.destroy({

//     'where': {

//         'id': 1

//     }

// })

// 查询所有

User.findAll().then((res) => {

    console.log(res)

})

// 查询单条

User.findOne({

    'where': {

        'id': 1

    }

}).then(res => {

    console.log(res)

})
最新文章
- jQuery使用
- jQuery取得select 选中值和文本 来自园友“大气象”
- HDU-2243 考研路茫茫——单词情结(AC自动机)
- ORACLE 查看RMAN的备份信息总结
- 揭开HTTP网络协议神秘面纱系列(二)
- WPF oxyPlot 使用总结
- 使用xml来显示获取的mysql数据
- 消除SDK更新时的“https://dl-ssl.google.com refused”异常
- Swift入门(十一)——类型转换与is、as操作
- CSS content内容生成技术以及应用(转)
- asp.net与MVC4的路由原理和过程【学习笔记】
- 什么是staging server
- linux中的"32位"与"64位"
- 深入浅出Ajax(四)
- vue2.0 vetur插件提示 'v-for' directives require 'v-bind:key' directives 的解决办法
- python对pywifi模块的认识
- crontab计划任务实例
- 解决 ImportError: No module named _internal
- 安装python2、python3
- 22 Zabbix系统版本升级过程
热门文章
- 进行编译时提示'error: unrecognized command line option "-std=gnu11"'如何处理?
- Python将print输出内容保存到指定文件中
- webconfig 配置 分离
- 【Redis】Redis 事务
- k8s记录-kube-dns(core-dns)配置(七)
- [AWS] Cloud Server
- 【mysql 默认密码】ubuntu 上 初次启动mysql 默认密码
- 【机器学习之一】python开发spark环境搭建
- GroupBy之后加ToList和不加ToList有什么区别吗?
- 小程序重置index,重置item