Python3中的支持向量机SVM的使用(有实例)
https://www.cnblogs.com/luyaoblog/p/6775342.html
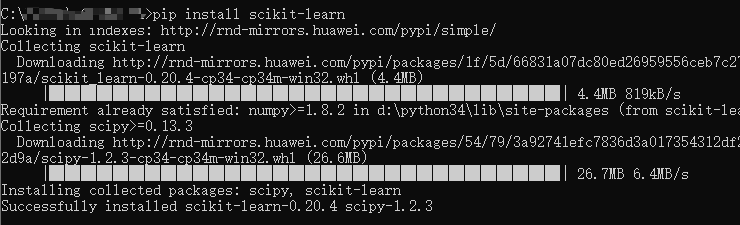
首先,我们需要安装scikit-learn
一、导入sklearn算法包
在python中导入scikit-learn的方法:
scikit-learn里面已经实现了基本上所有基本机器学习的算法,具体的使用方法详见官方文档说明,http://scikit-learn.org/stable/auto_examples/index.html#support-vector-machines
scikit-learn中集成了许多算法,其导入包的方法如下所示:
逻辑回归:from sklearn.linear_model import LogisticRegression
朴素贝叶斯:from sklearn.naive_bayes import GaussianNB
K-近邻:from sklearn.neighbors import KNeighborsClassifier
决策树:from sklearn.tree import DecisionTreeClassifier
支持向量机:from sklearn import svm
二、sklearn中svc的使用
(1)使用numpy中的loadtxt读入数据文件
loadtxt()的使用方法:
def loadtxt(fname, dtype=float, comments='#', delimiter=None,

            converters=None, skiprows=0, usecols=None, unpack=False,

            ndmin=0, encoding='bytes', max_rows=None):
fname:文件路径。eg:"G:\\SVM_Study\\iris.txt"
dtype:数据类型,如float,str等
delimiter:分隔符。eg','
converters:将数据列与转换函数进行映射的字典。如:{1:fun}含义是将第二列对应转换函数进行转换。
usecols:选取数据的列。
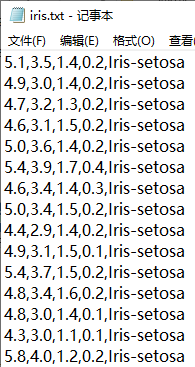
以iris兰花数据集为例子:
由于UCI数据库中下载的Iris原始数据集的样子是这样的,前四列为特征列,第五列为类别列,分别有三种类别:Iris-setosa,Iris-versicolor,Iris-virginica
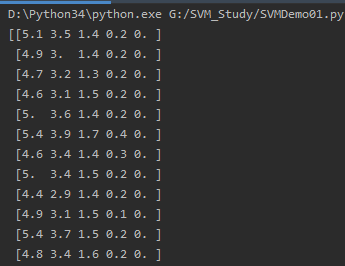
当使用numpy中的loadtxt函数导入该数据集时,假设数据类型dtype为浮点型,但是很明显第五列的数据类型并不是浮点型。
因此我们要二外做一个工作,即通过loadtxt()函数中的converters参数将第五列通过转换函数映射成浮点类型的数据。
首先,我们要写一个转换函数:
def iris_type(s):

    it = {b'Iris-setosa': 0, b'Iris-versicolor': 1, b'Iris-virginica': 2}

    return it[s]
接下来,我们读入数据,convetters={4:iris_type}中“4”指的是第五列。
textPath = "G:\\SVM_Study\\iris.txt"

data = np.loadtxt(textPath, dtype=float, delimiter=',', converters={4: iris_type})

print(data)
读入结果:
将Iris分为训练集和测试集
完整代码
from sklearn import svm

import numpy as np

from sklearn.model_selection import train_test_split

import matplotlib.pyplot as plt

import matplotlib as mpl

def iris_type(s):

    it = {b'Iris-setosa': 0, b'Iris-versicolor': 1, b'Iris-virginica': 2}

    return it[s]

def show_accuracy(a, b, tip):

    acc = a.ravel() == b.ravel()

    print(tip + "正确率:", np.mean(acc))

textPath = "G:\\SVM_Study\\iris.txt"

data = np.loadtxt(textPath, dtype=float, delimiter=',', converters={4: iris_type})

print(data)

x, y = np.split(data, (4,), axis=1)

print("y")

print(y)

# 所有行的前两列

x = x[:, :2]

print("x")

print(x)

x_train, x_test, y_train, y_test = train_test_split(x, y, random_state=1, train_size=0.6, test_size=0.4)

# 1. split(数据,分割位置,轴=1(水平分割) or 0(垂直分割))。

# 2. x = x[:, :2]是为方便后期画图更直观,故只取了前两列特征值向量训练。

# 3. sklearn.model_selection.train_test_split随机划分训练集与测试集。train_test_split(train_data,train_target,test_size=数字, random_state=0)

# 参数解释:

# train_data:所要划分的样本特征集

# train_target:所要划分的样本结果

# test_size:样本占比,如果是整数的话就是样本的数量

# random_state:是随机数的种子。

# 随机数种子:其实就是该组随机数的编号,在需要重复试验的时候,保证得到一组一样的随机数。比如你每次都填1,其他参数一样的情况下你得到的随机数组是一样的。但填0或不填,每次都会不一样。随机数的产生取决于种子,随机数和种子之间的关系遵从以下两个规则:种子不同,产生不同的随机数;种子相同,即使实例不同也产生相同的随机数。

clf = svm.SVC(C=0.8, kernel='rbf', gamma=20, decision_function_shape='ovr')

clf.fit(x_train, y_train.ravel())

# kernel='linear'时,为线性核,C越大分类效果越好,但有可能会过拟合(defaul C=1)。

# kernel='rbf'时(default),为高斯核,gamma值越小,分类界面越连续;gamma值越大,分类界面越“散”,分类效果越好,但有可能会过拟合。

# decision_function_shape='ovr'时,为one v rest,即一个类别与其他类别进行划分,

# decision_function_shape='ovo'时,为one v one,即将类别两两之间进行划分,用二分类的方法模拟多分类的结果。

print(clf.score(x_train, y_train))

y_hat = clf.predict(x_train)

show_accuracy(y_hat, y_train, '训练集')

print(clf.score(x_test, y_test))

y_hat = clf.predict(x_test)

show_accuracy(y_hat, y_test, '测试集')

print("decision_function:\n",clf.decision_function(x_train))

print("predict:\n",clf.predict(x_train))

# 第一列最大值,最小值

x1_min, x1_max = x[:, 0].min(), x[:, 0].max()

# 第二列最大值,最小值

x2_min, x2_max = x[:, 1].min(), x[:, 1].max()

x1, x2 = np.mgrid[x1_min:x1_max:200j, x2_min:x2_max:200j]

print("x1")

print(x1)

print("x2")

print(x2)

# 这里用到了mgrid()函数,该函数的作用这里简单介绍一下:

# 假设假设目标函数F(x,y)=x+y。x轴范围1~3,y轴范围4~6,当绘制图像时主要分四步进行:

# 【step1:x扩展】(朝右扩展):

# [1 1 1]

# [2 2 2]

# [3 3 3]

# 【step2:y扩展】(朝下扩展):

# [4 5 6]

# [4 5 6]

# [4 5 6]

# 【step3:定位(xi,yi)】:

# [(1,4) (1,5) (1,6)]

# [(2,4) (2,5) (2,6)]

# [(3,4) (3,5) (3,6)]

# 【step4:将(xi,yi)代入F(x,y)=x+y】

# x1

# [[4.3        4.3        4.3        ... 4.3        4.3        4.3       ]

#  [4.31809045 4.31809045 4.31809045 ... 4.31809045 4.31809045 4.31809045]

#  [4.3361809  4.3361809  4.3361809  ... 4.3361809  4.3361809  4.3361809 ]

#  ...

#  [7.8638191  7.8638191  7.8638191  ... 7.8638191  7.8638191  7.8638191 ]

#  [7.88190955 7.88190955 7.88190955 ... 7.88190955 7.88190955 7.88190955]

#  [7.9        7.9        7.9        ... 7.9        7.9        7.9       ]]

# x2

# [[2.        2.0120603 2.0241206 ... 4.3758794 4.3879397 4.4      ]

#  [2.        2.0120603 2.0241206 ... 4.3758794 4.3879397 4.4      ]

#  [2.        2.0120603 2.0241206 ... 4.3758794 4.3879397 4.4      ]

#  ...

#  [2.        2.0120603 2.0241206 ... 4.3758794 4.3879397 4.4      ]

#  [2.        2.0120603 2.0241206 ... 4.3758794 4.3879397 4.4      ]

#  [2.        2.0120603 2.0241206 ... 4.3758794 4.3879397 4.4      ]]

print("x1.flat")

print(x1.flat)

grid_test = np.stack((x1.flat, x2.flat), axis=1)

print("grid_test")

print(grid_test)

# 指定默认字体

mpl.rcParams['font.sans-serif'] = [u'SimHei']

mpl.rcParams['axes.unicode_minus'] = False

cm_light = mpl.colors.ListedColormap(['#A0FFA0', '#FFA0A0', '#FFA0FF'])

cm_dark = mpl.colors.ListedColormap(['g', 'r', 'b'])

grid_hat = clf.predict(grid_test)

grid_hat = grid_hat.reshape(x1.shape)

alpha = 0.5

plt.pcolormesh(x1, x2, grid_hat, cmap=cm_light)

plt.plot(x[:, 0], x[:, 1], 'o', alpha=alpha, color='blue', markeredgecolor='k')

plt.scatter(x[:, 0], x[:, 1], c=np.squeeze(y), edgecolors='k', s=50, cmap=cm_dark)

# plt.scatter(x_test[:, 0], x_test[:, 1], s=50, facecolors='none', zorder=10, cmap=cm_dark)

plt.xlabel(u'花萼长度',fontsize=13)

plt.ylabel(u'花萼宽度',fontsize=13)

plt.xlim(x1_min, x1_max)

plt.ylim(x2_min, x2_max)

plt.title(u'鸢尾花SVM二特征分类', fontsize=15)

plt.show()

# pcolormesh(x,y,z,cmap)这里参数代入x1,x2,grid_hat,cmap=cm_light绘制的是背景。

# scatter中edgecolors是指描绘点的边缘色彩,s指描绘点的大小,cmap指点的颜色。

# xlim指图的边界。
得到的结果:

最新文章
- visual studio for mac的安装初体验
- fatal: could not read Username for 'https://github.com': No such file or directo
- jQuery插件之验证控件jquery.validate.js
- 物理学家的LOGO
- dbcp连接池配置参数
- 数值的整数次方(剑指offer面试题11)
- 解决DBCP报错 Could not retrieve transation read-only s
- 深入解析spring中用到的九种设计模式
- 使用HTML5的页面资源预加载(Link prefetch)功能加速你的页面加载速度
- hdu2191 悼念512汶川大地震遇难同胞——珍惜如今,感恩生活
- 实现jsp页面显示用户登录信息,利用session保存。
- 【leetcode】148. Sort List
- java基础笔记(8)----接口
- sql server 中用于排名的三个函数 row_number() ,RANK() 和 DENSE_RANK()
- 22状态模式State
- springboot + mybatis
- 【awesome-dotnet-core-learning】(3)-Bogus-假数据生成器
- 剑指Offer题解(Python版)
- Python学习-终端字体高亮显示1
- 200个最常见的JAVA面试问题(附答案)