(已转)Linux基础第七章 线程
前言
之前讨论了进程,了解一个进程能做一件事情,如果想同时处理多件事情,那么需要多个进程,但是进程间很不方便的一点是,进程间的数据交换似乎没有那么方便。Linux提供线程功能,能在一个进程中,处理多任务,而且线程之间的数据是完全共享的。
线程也有PCB,它的PCB和进程的PCB结构完全一样,只是它里面保存的虚拟地址空间和创建它的进程的虚拟地址空间完全保持一致。
线程的创建
通过pthread_create函数可以创建一个线程,被创建的线程的例程,就是一个新的执行指令序列了。
#include <pthread.h>

void* thread_func(void* p )

{

    return NULL;

}

int main()

{

    pthread_t tid;

    pthread_create(&tid, NULL, thread_func, NULL);

    printf("tid=%d\n", (int)tid);

    pthread_create(&tid, NULL, thread_func, NULL);

    printf("tid=%d\n", (int)tid);

    pthread_create(&tid, NULL, thread_func, NULL);

    printf("tid=%d\n", (int)tid);

    pthread_create(&tid, NULL, thread_func, NULL);

    printf("tid=%d\n", (int)tid);

    getchar();

}
补充
intptr_t是一种整型,它的长度依赖机器位长,也就意味着它的长度和指针的长度一样的。
线程标识
线程使用pthread_t来标识线程,它也是一个非负整数,由系统分配,保证在进程范围内唯一。pthread_t虽然在Linux下是非负整数,但是在其它平台下不一定是,所以比较线程号是否想等,应该用pthread_equal。
任何一个函数都可以调用pthread_self来获取目前代码运行的线程。
线程终止
| 终止方式 | |
|---|---|
| 例程返回 | 正常退出 |
| 调用pthread_exit | 正常退出 |
| 响应pthread_cancel | 异常退出 |
注意:
在线程里调用
exit是退出整个进程。在多线程的进程中,主线程调用
pthread_exit,进程并不会退出,它的其他线程依旧在执行,但是主线程已经退出了。意味着:主线程和其他线程是几乎是平等的。
不平等的是,如果主线程的main函数return了,那么其他线程也结束了,如果其他线程的入口函数return了,主线程不会跟着结束。
线程的回收
线程退出之后,它的PCB依旧在内核中存在,等着其它线程来获取它的运行结果,可以通过pthread_join来回收线程。从这个角度看,线程和进程差不多,但是跟进程不同的时,线程没有父线程的概念,同一个进程内的其它线程都可以来回收它的运行结果。
pthread_join会阻塞调用它的线程,一直到被join的线程结束为止。
pthread_join和wait/waitpid一样,也是阻塞的调用,它除了有回收PCB的功能,也有等待线程结束的功能。
线程的使用场景
客户端使用场景
一般来说,线程用于比较复杂的多任务场景,比如:
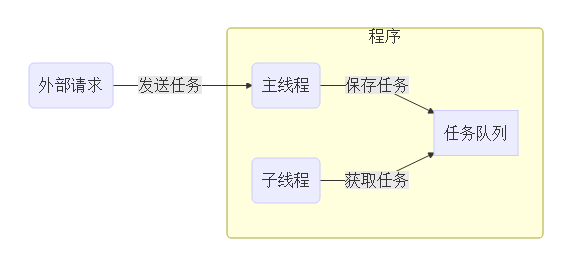
这样主线程可以基础处理主线程的事情,不至于被复杂的任务阻塞。比如:
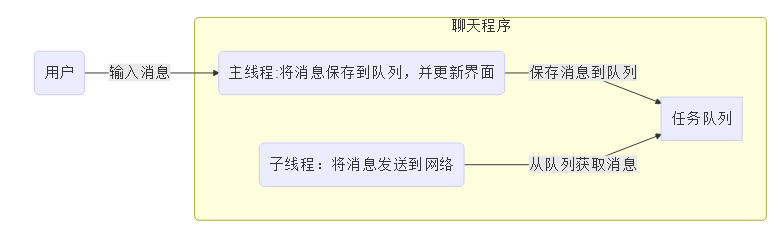
这样聊天界面不会卡死在那里,否则如果网络情况很差,有可能导致界面卡死。
服务器使用场景
服务器一般的流程如下:
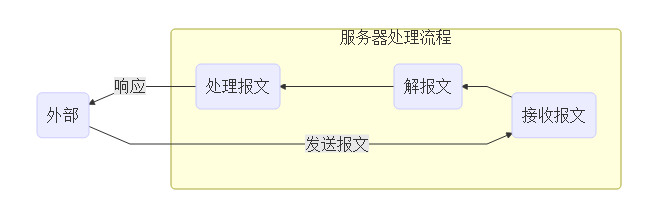
在服务器上,一个线程来处理整个流程,会导致处理流程非常慢,导致主线程无法及时接收报文。一般会使用子线程来做具体的工作,而主线程只负责接收报文。

有时为了提高处理效率,会使用线程池
7.7 线程的同步
无论上述那种场景,都有一个报文队列或者消息队列,一般这个队列是一个链表,主线程需要往链表中添加数据,而子线程从链表获取数据。两个线程同时操作一个全局变量是不安全的,应该避免不安全的访问。无论这种全局变量是数组、链表、还是一个简单的变量。
线程A:i = i + 1;
线程B:i = i + 1;
7.7.1 不安全的案例
多线程操作一个全局变量
 1 #include <stdio.h>

 2 #include <signal.h>

 3 #include <pthread.h>

 4

 5 int result=0;

 6

 7 void add()

 8 {

 9     int i;

10     for(i=0; i<100000; ++i)

11     {

12         result++;

13     }

14 }

15

16 void* thread_func(void* p)

17 {

18     add();

19     return NULL;

20 }

21

22 int main()

23 {

24     pthread_t t1;

25     pthread_t t2;

26

27     pthread_create(&t1, NULL, thread_func, NULL);

28     pthread_create(&t2, NULL, thread_func, NULL);

29

30     pthread_join(t1, NULL);

31     pthread_join(t2, NULL);

32

33     printf("%d\n", result);

34     return 0;

35 }

36 不安全的生产者消费者模型

37

38 #include <list>

39

40 struct task_t

41 {

42     int task;

43 };

44

45 list<task_t*> queue;

46

47 void* work_thread(void* arg)

48 {

49     while(1)

50     {

51         if(queue.size() == 0) continue;

52

53         task_t* task = *queue.begin();

54         queue.pop_front();

55

56         printf("task value is %d\n", task->task);

57         delete task;

58     }

59 }

60

61 void main(int argc, char* argv[])

62 {

63     pthread_t tid;

64     pthread_create(&tid, NULL, work_thread, NULL);

65

66     while(1)

67     {

68         int i;

69         cin >> i;

70         task_t* task = new task_t;

71         task->task = i;

72

73         queue.push_back(task);

74     }

75

76     pthread_join(tid, NULL);

77 }
7.7.2 锁(临界量)
锁能避免两个线程同时访问一个全局变量。
锁会带来两个问题:
效率低
死锁
#include <stdio.h>

#include <pthread.h>

int result = 0;

// 定义锁,锁一般也定义在全局

//pthread_mutex_t mutex;  // 粗粒度的锁

pthread_mutex_t mutex = PTHREAD_MUTEX_INITIALIZER;

int result1 = 0;

pthread_mutex_t mutex1;

// 1.一个线程重复加锁两次,会死锁

void func()

{

    pthread_mutex_lock(&mutex);

    pthread_mutex_unlock(&mutex);

}

void foo()

{

    pthread_mutex_lock(&mutex);

    func();

    pthread_mutex_unlock(&mutex);

}

// 2. 一个线程加锁之后,忘记了解锁

void foo1()

{

    pthread_mutex_lock(&mutex);

    if(...) // 这种场合容易产生忘记解锁

        return;

    // ....

    // 忘记了解锁

    pthread_mutex_unlock(&mutex);

}

void foo2()

{

    // 因为别的线程忘记解锁,所以本线程无法进行加锁

    pthread_mutex_lock(&mutex); // 阻塞在这里

    pthread_mutex_unlock(&mutex);

}

void* thread_func(void* ptr)

{

    foo();

    int i=0;

    for(i=0; i<100000; ++i)

    {

        pthread_mutex_lock(&mutex1);

        result1++;//它的值由什么决定

        pthread_mutex_unlock(&mutex1);

        // 两个线程同时操作全局变量,结果不可靠

        //

        // 将该操作变成原子操作,或者至少不应该被能影响它操作的人打断

        pthread_mutex_lock(&mutex);

        result ++;  // result++代码被锁保护了,不会被其他线程的result++影响

        pthread_mutex_unlock(&mutex);

    }

    return NULL;

}

int main()

{

    // 使用锁之前,要对它进行初始化

//    pthread_mutex_init(&mutex, NULL);

    pthread_mutex_init(&mutex1, NULL);

    pthread_t t1, t2;

    pthread_create(&t1, NULL, thread_func, NULL);

    pthread_create(&t2, NULL, thread_func, NULL);

    pthread_join(t1, NULL);

    pthread_join(t2, NULL);

    printf("result is %d\n", result);

}
#include <stdio.h>
#include <list>
#include <iostream>
using namespace std; struct task_t
{
int task;
}; // 全局的任务队列
list<task_t*> tasks;
pthread_mutex_t mutex;
pthread_cond_t cond; // pthred_cond_signal和pthread_cond_wait类似不可靠信号,signal不会累计
// 当一个线程发送signal时,如果另外一个线程此时没有调用wait函数,那么这个signal就会消失掉 void* work_thread(void* ptr)
{
while(1)
{
// 等待条件
pthread_mutex_lock(&mutex);
pthread_cond_wait(&cond, &mutex);
pthread_mutex_unlock(&mutex); // 一旦条件满足,就应该处理队列中所有的任务
while(1)
{
pthread_mutex_lock(&mutex);
if(tasks.size() == 0)
{
pthread_mutex_unlock(&mutex); // 特别容易忘记解锁
break;
}
task_t* task = *tasks.begin();
tasks.pop_front();
pthread_mutex_unlock(&mutex); // 处理任务
printf("current task is %d\n", task->task); // new和delete(malloc和free)都是线程安全的
delete task;
}
}
} int main()
{
pthread_mutex_init(&mutex, NULL);
pthread_cond_init(&cond, NULL); pthread_t tid;
pthread_create(&tid, NULL, work_thread, NULL); while(1)
{
int i;
// 阻塞的,等待任务
cin >> i; // 构造任务结构体
task_t* task = new task_t;
task->task = i; // 把任务丢到任务列表中
pthread_mutex_lock(&mutex);
tasks.push_back(task);
pthread_mutex_unlock(&mutex); // 唤醒条件变量
pthread_cond_signal(&cond);
}
}//运用析构函数 #ifndef __AUTO_LOCK_H__
#define __AUTO_LOCK_H__ #include <pthread.h> class auto_lock
{
public:
auto_lock(pthread_mutex_t& m);
~auto_lock();
private:
pthread_mutex_t& mutex;
}; #endif #include "auto_lock.h" auto_lock::auto_lock(pthread_mutex_t& m): mutex(m)
{
pthread_mutex_lock(&mutex);
} auto_lock::~auto_lock()
{
pthread_mutex_unlock(&mutex);
} #include <stdio.h>
#include "auto_lock.h" pthread_mutex_t mutex;
int result = 0; void* thread_func(void*ptr)
{
for(int i=0 ;i<100000; ++i)
{
auto_lock var1(mutex); // 重复加锁
auto_lock var(mutex); // 在构造里自动加锁
result++;
}
} int main()
{
// 变成递归锁 及循环锁
pthread_mutexattr_t attr;//设计循环锁属性
pthread_mutexattr_init(&attr);
pthread_mutexattr_settype(&attr, PTHREAD_MUTEX_RECURSIVE); // 用递归属性去初始化这个锁
pthread_mutex_init(&mutex, &attr); pthread_t tid1, tid2;
pthread_create(&tid1, NULL, thread_func, NULL);
pthread_create(&tid2, NULL, thread_func, NULL); pthread_join(tid1, NULL);
pthread_join(tid2, NULL); printf("result is %d\n", result);
}
相对的解决方法:
读写锁
#include <pthread.h>

pthread_rwlock_t mutex;

int result;

void* thread_func(void* ptr)

{

    pthread_rwlock_rdlock(&mutex);

    // 只能对数据读

    result ++; // 写数据的行为是会导致数据不正确

    pthread_rwlock_unlock(&mutex);

    pthread_rwlock_wrlock(&mutex);

    // 可以对数据读写

    pthread_rwlock_unlock(&mutex);

}

int main()

{

    pthread_rwlock_init(&mutex, NULL);

    pthread_t tid;

    pthread_create(&tid, NULL, thread_func, NULL);

}
循环锁
7.7.2.1 基本锁
类型:pthread_mutex_t
定义的变量一般在全局:pthread_mutex_t g_mutex;
在使用之前要初始化:pthread_mutex_init(&g_mutex, NULL);
访问敏感对象前加锁:pthread_mutex_lock(&g_mutex);
访问结束要解锁:pthread_mutex_unlock(&g_mutex);
一把所可以负责多个全局变量的安全问题,但是负责的范围越大,效率越低,代码相对容易写。负责全局变量的数量,被称之为锁的粒度。
死锁问题
忘了解锁会产生死锁
重复加锁会导致死锁
怎么解决死锁问题:
忘了解锁:程序员自己要注意
重复加锁:使用循环锁可以解决问题
7.7.2.2 循环锁
解决重复加锁导致死锁问题,循环锁的特点是,同一个线程进行多次加锁,不会阻塞。
pthread_mutex_lock(&mutex);
pthread_mutex_lock(&mutex); // 第二次加锁不会阻塞,但是它会给mutex增加一个计数。
pthread_mutex_unlock(&mutex) // 减少计数
pthread_mutex_unlock(&mutex);//减少到0的时候,真正解锁
怎么设置循环锁。
//头文件
#ifndef __AUTO_LOCK_H__
#define __AUTO_LOCK_H__
#include <pthread.h>
class auto_lock
{
public:
auto_lock(pthread_mutex_t& m);
~auto_lock();
private:
pthread_mutex_t& mutex;
};
#endif
//头文件的实现
#include "auto_lock.h"
auto_lock::auto_lock(pthread_mutex_t& m): mutex(m)
{
pthread_mutex_lock(&mutex);
}
auto_lock::~auto_lock()
{
pthread_mutex_unlock(&mutex);
}
//主函数
#include <stdio.h>

#include "auto_lock.h"

pthread_mutex_t mutex;

int result = 0;

void* thread_func(void*ptr)

{

    for(int i=0 ;i<100000; ++i)

    {

        auto_lock var1(mutex); // 重复加锁

        auto_lock var(mutex); // 在构造里自动加锁

        result++;

    }

}

int main()

{

    // 变成递归锁

    pthread_mutexattr_t attr;

    pthread_mutexattr_init(&attr);

    pthread_mutexattr_settype(&attr, PTHREAD_MUTEX_RECURSIVE);

    // 用递归属性去初始化这个锁

    pthread_mutex_init(&mutex, &attr);

    pthread_t tid1, tid2;

    pthread_create(&tid1, NULL, thread_func, NULL);

    pthread_create(&tid2, NULL, thread_func, NULL);

    pthread_join(tid1, NULL);

    pthread_join(tid2, NULL);

    printf("result is %d\n", result);

}
7.7.2.3 读共享写排他锁(读写锁)
共享锁/排他锁
定义锁:pthread_rwlock_t mutex;
初始化:pthread_rwlock_init(&mutex, NULL);
读锁定:pthread_rwlock_rdlock(&mutex);
写锁定:pthread_rwlock_wrlock(&mutex);
解锁:pthread_rwlock_unlock(&mutex);
7.7.2.4 总结
无论是什么锁,都会导致性能下降,所以能不用就尽量不用
锁能不能用于进程间同步?可以
C++使用构造函数和析构函数自动加锁解锁
7.7.3 条件变量
条件变量是另外一种同步机制,它可以使线程在无竞争的等待条件发生。在之前讲到的线程场景里,子线程往往要等到队列有数据才运行,否则它应该休眠,以避免浪费CPU。但是如果用锁来实现这种机制的话,会非常麻烦。
定义:pthread_cond_t g_cond;
初始化:pthread_cond_init(&g_cond);
等待:pthread_cond_wait(&g_cond, &g_mutex);
唤醒:pthread_cond_signal(&g_cond);
pthread_cond_broadcast(&g_cond);
惊群
#include <stdio.h>

#include <pthread.h>

pthread_mutex_t mutex;

pthread_cond_t cond;

void* thread_func(void* ptr)

{

    sleep(1);

    pthread_mutex_lock(&mutex);

    pthread_cond_wait(&cond, &mutex);

    pthread_mutex_unlock(&mutex);

    printf("wait ok\n");

}

int main()

{

    pthread_mutex_init(&mutex, NULL);

    pthread_cond_init(&cond, NULL);

    pthread_t tid;

    pthread_create(&tid, NULL, thread_func, NULL);

    // 发信号时,线程不是正在调用pthread_cond_wait,而是在执行sleep(1),所以signal发送之后,就消失了,不会保留

    // 按照刚才的说法,这个signal根本无效

    // 所以当一个线程发送多次的signal时,那么最多只有一次是有作用的

    pthread_cond_signal(&cond);

    pthread_join(tid, NULL);

}
7.7.3.1 条件变量的等待和唤醒
如果没有线程在等待条件,此时唤醒函数pthread_cond_signal不会唤醒任何的线程,也不会记录。
如果有多个线程在执行pthread_cond_wait,而此时有一个线程调用pthread_cond_signal,那么只会唤醒其中一个线程。
如果想唤醒所有线程,那么调用pthread_cond_broadcast,该函数可以唤醒等待该条件的所有线程。
#include <stdio.h>

#include <pthread.h>

// 假如有三个线程同时调用pthread_cond_wait,一个线程调用pthread_cond_signal

//

pthread_mutex_t mutex;

pthread_cond_t cond;

void* thread_func(void* ptr)

{

    pthread_mutex_lock(&mutex);

    pthread_cond_wait(&cond, &mutex);

    pthread_mutex_unlock(&mutex);

    printf("wait ok\n");

}

int main()

{

    pthread_mutex_init(&mutex, NULL);

    pthread_cond_init(&cond, NULL);

    pthread_t tid1, tid2, tid3;

    pthread_create(&tid1, NULL, thread_func, NULL);

    pthread_create(&tid2, NULL, thread_func, NULL);

    pthread_create(&tid3, NULL, thread_func, NULL);

    sleep(1);

    // 唤醒一个线程

//    pthread_cond_signal(&cond);

//    唤醒所有正在等待的线程

    pthread_cond_broadcast(&cond);

    pthread_join(tid1, NULL);

    pthread_join(tid2, NULL);

    pthread_join(tid3, NULL);

}
7.7.4 信号量
信号量类似条件变量,但是信号量可以保存信号数量。
定义: sem_t sem;
初始化:sem_init(&sem, 0, 0);
初始化的第二个参数,如果是0表示同一进程内的多线程之间的信号量,如果是非0,那么该信号量可以使用在进程之间。第三个参数表示信号量的初始值。等待:sem_wait(&sem);
sem_wait函数会导致该线程休眠,唤醒的条件是sem的值大于0。并且sem_wait调用结束后,会自动将sem值减1。唤醒:sem_post(&sem);
sem_post只是简单的将sem值+1#include <stdio.h>
#include <semaphore.h>
#include <pthread.h> sem_t sem; void* thread_func(void* ptr)
{
sleep(1);
sem_wait(&sem);
printf("wait ok\n");
} int main()
{
sem_init(&sem, 0, 0); pthread_t tid1, tid2, tid3;
pthread_create(&tid1, NULL, thread_func, NULL);
pthread_create(&tid2, NULL, thread_func, NULL);
pthread_create(&tid3, NULL, thread_func, NULL); // 发送信号
sem_post(&sem); pthread_join(tid1, NULL);
pthread_join(tid2, NULL);
pthread_join(tid3, NULL);
}
7.8 重入
如果函数操作了全局变量,这个函数就不是可重入的函数了。
#include <stdio.h>

#include <pthread.h>

#include <string.h>

int result = 0;

void foo()

{

    // 因为这个函数操作了全局变量

    result ++;

}

void* thread_func(void* ptr)

{

#if 0

    int i;

    for(i=0; i<10000; ++i)

    {

        // 该函数是不可重入的函数

        // 用锁来保护它

        foo();

    }

#endif

    char p[] = "1 2 3 4 5 6 7 8 9 0";

    char* saveptr;

    char* sub = strtok_r(p, " ", &saveptr);

    while(sub)

    {

        usleep(1000); // 1毫秒

        printf("%s, tid=%d\n", sub, (int)pthread_self());

        sub = strtok_r(NULL, " ", &saveptr);

    }

}

int main()

{

    pthread_t tid1, tid2;

    pthread_create(&tid1, NULL, thread_func, NULL);

    pthread_create(&tid2, NULL, thread_func, NULL);

    pthread_join(tid1, NULL);

    pthread_join(tid2, NULL);

    printf("result=%d\n", result);

}
7.9 分离的线程
分离的线程不用pthread_join,也无法通过pthread_join来获取结果。因为它运行结束之后,它的PCB同时被释放了。
#include <errno.h>

#include <stdio.h>

#include <pthread.h>

#include <inttypes.h>

// intptr_t 整数类型:char short int long (long long)

//     整数:8 16 32 64

//     有些机器的int是32位,有的机器是64位

//     void*指针类型都是按照机器的字长决定

//

//     intptr_t是一个整数,并且它总是和指针的字节数是一样的

void* thread_func(void* ptr)

{

    // 用的是地址本身,而不是地址指向的值

    printf("%d\n", (int)(intptr_t)ptr);

    sleep(1);

}

int foo()

{

    char p[] = "hello world";

    int a = 100;

    pthread_attr_t attr;

    pthread_attr_init(&attr);

    pthread_attr_setdetachstate(&attr, PTHREAD_CREATE_DETACHED);

    pthread_t tid;

    pthread_create(&tid, &attr, thread_func, (void*)(intptr_t)a);

    // 该线程自生自灭

    // pthread_detach(tid);

    int ret = pthread_join(tid, NULL);

    printf("join error, ret=%d, errno=%d, EINVAL=%d\n", ret, errno, EINVAL);

}

int main()

{

    foo();

    sleep(2);

}
7.10 线程私有数据
线程可以定义私有数据,私有数据只供该线程使用。
线程私有数据可以在该线程调用函数中访问,其他线程调用的函数中,不可访问。
#include <string.h>

#include <pthread.h>

#include <stdio.h>

#include <stdlib.h>

pthread_key_t key;

// 可能被线程A调用

// 也可能线程B调用

void foo()

{

    char* p = (char*)pthread_getspecific(key);

    printf("%s\n", p);

}

void my_malloc()

{

    // 去这个线程的内存池去申请内存

    void* mempool = pthread_getspecific(key);

  //  __my_malloc(mempool, ...);

}

void* thread_func(void* ptr)

{

    // setspecific,需要在线程中调用,当然也可以在主线程中调用

    // 为这个线程设置私有数据

    pthread_setspecific(key, ptr);

    foo();

    my_malloc();

    return NULL;

}

void free_func(void* ptr)

{

    printf("free call\n");

    free(ptr);

}

int main()

{

    pthread_key_create(&key, free_func);

    pthread_t tid1, tid2;

    pthread_create(&tid1, NULL, thread_func, strdup("thread1"));

    pthread_create(&tid2, NULL, thread_func, strdup("thread2"));

    pthread_join(tid1, NULL);

    pthread_join(tid2, NULL);

}
#include <stdio.h>

#include <stdlib.h>

#include <pthread.h>

#include <unistd.h>

// 线程本地变量,每个线程都有一份拷贝

thread_local int result = 0;

void foo()

{

    // 全局变量

    thread_local static int a = 0;

    a++;

    printf("%d\n", a);

}

void* thread_func1(void* ptr)

{

    foo();

    foo();

    result = 100;

}

void* thread_func2(void* ptr)

{

    foo();

    foo();

    sleep(1);

//    printf("%d\n", result); // 100

    printf("%d\n", result); // thread_local时,这个值是0

}

int main()

{

    pthread_t tid1, tid2;

    pthread_create(&tid1, NULL, thread_func1, NULL);

    pthread_create(&tid2, NULL, thread_func2, NULL);

    pthread_join(tid1, NULL);

    pthread_join(tid2, NULL);

}
7.11 线程取消
取消线程也结束线程,但是应该避免这种设计。
退出点函数:man pthreads搜索cancel关键字,找到这些退出点函数。
pthread_cancel在线程外部(其他线程)来退出另外一个线程A,当线程A调用了cancelpoint函数时,会退出。
如果希望调用cancelpoint函数不退出,应该设置当前的线程状态为:不理会线程退出(cancelability disabled)
pthread_setcancelstate(...)
#include <stdio.h>

#include <pthread.h>

void* thread_func(void* ptr)

{

    // 因为这个线程没有cancel point

    while(1)

    {

        // 关闭cancel检测

        pthread_setcancelstate(PTHREAD_CANCEL_DISABLE, NULL);

        sleep(10);

        // 打开cancel检测

        pthread_setcancelstate(PTHREAD_CANCEL_ENABLE, NULL);

        // 检查cancel point

        pthread_testcancel();

    }

    return NULL;

}

int main()

{

    pthread_t tid;

    pthread_create(&tid, NULL, thread_func, NULL);

    // 让线程退出

    pthread_cancel(tid);

    // 等待线程退出

    pthread_join(tid, NULL);

}
最新文章
- Groovy解析xml并且注入Project,TestSuite,TestCase级别的custom properties
- android应用中增加权限判断
- ural One-two, One-two 2
- supervisor program配置实例
- NuGet多个项目依赖的公共组件如何打包
- 解决ERROR 2003 (HY000): Can't connect to MySQL server on
- 【Java 基础篇】【第一课】HelloWorld
- 注册dll失败
- form表单select联动
- NOJ1018-深度遍历二叉树
- 243. Shortest Word Distance
- sql server 表空间
- gif动画问题
- Sublime Text 3配置记录
- file_get_contents 获取不了网页内容
- windows7下virtualBox配置识别usb
- 【C语言】数字在排序数组中出现的次数(改动)
- 返璞归真 asp.net mvc (5) - Action Filter, UpdateModel, ModelBinder, Ajax, Unit Test
- 筛法求质——poj2262&2909
- Spring Boot应用 打包与部署指南