使用Typescript重构axios(十四)——实现拦截器
0. 系列文章
1.使用Typescript重构axios(一)——写在最前面
2.使用Typescript重构axios(二)——项目起手,跑通流程
3.使用Typescript重构axios(三)——实现基础功能:处理get请求url参数
4.使用Typescript重构axios(四)——实现基础功能:处理post请求参数
5.使用Typescript重构axios(五)——实现基础功能:处理请求的header
6.使用Typescript重构axios(六)——实现基础功能:获取响应数据
7.使用Typescript重构axios(七)——实现基础功能:处理响应header
8.使用Typescript重构axios(八)——实现基础功能:处理响应data
9.使用Typescript重构axios(九)——异常处理:基础版
10.使用Typescript重构axios(十)——异常处理:增强版
11.使用Typescript重构axios(十一)——接口扩展
12.使用Typescript重构axios(十二)——增加参数
13.使用Typescript重构axios(十三)——让响应数据支持泛型
14.使用Typescript重构axios(十四)——实现拦截器
15.使用Typescript重构axios(十五)——默认配置
16.使用Typescript重构axios(十六)——请求和响应数据配置化
17.使用Typescript重构axios(十七)——增加axios.create
18.使用Typescript重构axios(十八)——请求取消功能:总体思路
19.使用Typescript重构axios(十九)——请求取消功能:实现第二种使用方式
20.使用Typescript重构axios(二十)——请求取消功能:实现第一种使用方式
21.使用Typescript重构axios(二十一)——请求取消功能:添加axios.isCancel接口
22.使用Typescript重构axios(二十二)——请求取消功能:收尾
23.使用Typescript重构axios(二十三)——添加withCredentials属性
24.使用Typescript重构axios(二十四)——防御XSRF攻击
25.使用Typescript重构axios(二十五)——文件上传下载进度监控
26.使用Typescript重构axios(二十六)——添加HTTP授权auth属性
27.使用Typescript重构axios(二十七)——添加请求状态码合法性校验
28.使用Typescript重构axios(二十八)——自定义序列化请求参数
29.使用Typescript重构axios(二十九)——添加baseURL
30.使用Typescript重构axios(三十)——添加axios.getUri方法
31.使用Typescript重构axios(三十一)——添加axios.all和axios.spread方法
32.使用Typescript重构axios(三十二)——写在最后面(总结)
1. 前言
在官方的axios中,有一个非常重要而且非常好用的功能,那就是:请求和响应拦截器。请求拦截器就是可以在每个请求发送之前为请求做一些额外的东西,例如:我们可以在请求拦截器中为所有的请求添加token认证等信息,添加后再将请求发出。而响应拦截器就是当每个请求的响应回来之后我们可以先对其进行一道预处理,处理后再将响应返回给真正的请求。像如下使用方式:
// 添加一个请求拦截器

axios.interceptors.request.use(function (config) {

  // 在发送请求之前可以做一些事情

  return config;

}, function (error) {

  // 处理请求错误

  return Promise.reject(error);

});

// 添加一个响应拦截器

axios.interceptors.response.use(function (response) {

  // 处理响应数据

  return response;

}, function (error) {

  // 处理响应错误

  return Promise.reject(error);

});

// 删除一个请求拦截器

const myInterceptor = axios.interceptors.request.use(function () {/*...*/})

axios.interceptors.request.eject(myInterceptor)
在 axios 对象上有一个 interceptors 对象属性,该属性又有 request 和 response 2 个属性,它们都有一个 use 方法,use 方法支持 2 个参数,第一个参数类似 Promise 的 resolve 函数,第二个参数类似 Promise 的 reject 函数。我们可以在 resolve 函数和 reject 函数中执行同步代码或者是异步代码逻辑。
另外,也可以使用eject删除某个拦截器。
接下来,我们就要在我们的axios中实现该功能。
2. 需求分析
通过观察上面官方给出的使用示例,不管是请求拦截器axios.interceptors.request还是响应拦截器axios.interceptors.response,它们都有一个添加拦截器的use方法和删除拦截器的eject方法。那么我们不妨可以这样想:假设有一个拦截器类,该类上有两个实例方法,分别是添加拦截器的use方法和删除拦截器的eject方法,而请求拦截器和响应拦截器都是该类的实例,当我们在实例化axios时,我们给axios的实例上绑定interceptors.request和interceptors.response属性,同时这两个属性分别实例化了拦截器类,这样我们就可以通过axios.interceptors.request.use来为axios实例添加拦截器,或者通过axios.interceptors.request.eject来删除拦截器,说的再多,不如来看下代码,伪代码如下:
// InterceptorManager为拦截器类

class InterceptorManager {

    use(){

    },

    eject(){

   }

}

// Axios是之前创建的Axios类

class Axios {

  interceptors: Interceptors

  constructor() {

    this.interceptors = {

      request: new InterceptorManager(),

      response: new InterceptorManager()

    }

  }

}

axios = new Axios()

axios.nterceptors.request.use()

axios.nterceptors.request.eject()
OK,需求明确了,我们就先来实现一下拦截器类InterceptorManager。
3. 实现拦截器类
3.1 接口定义
根据需求,拦截器类需要包含两个方法:use和eject。并且use方法接收 2 个参数,第一个必选参数是 resolve 函数,第二个可选参数是 reject 函数,对于 resolve 函数的参数在请求拦截器和响应拦截器中有所不同,请求拦截器中参数是请求的配置对象config,其类型是 AxiosRequestConfig ,而响应拦截器中参数是响应对象response,其类型是 AxiosResponse 。所以我们的拦截器类类型接口定义如下:
// src/types/index.ts

export interface AxiosInterceptorManager<T> {

  use(resolved: ResolvedFn<T>, rejected?: RejectedFn): number

  eject(id: number): void

}

export interface ResolvedFn<T=any> {

  (val: T): T | Promise<T>

}

export interface RejectedFn {

  (error: any): any

}
- 我们定义的拦截器类型接口
AxiosInterceptorManager支持传入一个泛型参数T,而这个T就是根据看创建的是请求拦截器还是响应拦截器对应传入的AxiosRequestConfig或AxiosResponse。 use方法除了接收上面说的两个函数作为参数,它还返回一个创建的拦截器的id,这个id用来标识拦截器;eject方法接收拦截器的id作为参数,用来标明删除哪个拦截器;
3.2 实现拦截器类
接口定义好之后,我们就可以来实现拦截器类了。我们在src/core目录下创建interceptorManager.ts文件
首先我们创建一个类,类名叫
InterceptorManager,在该类的构造函数中我们创建一个数组,用来存放创建的所有拦截器Interceptor。// src/core/interceptorManager.ts import { ResolvedFn, RejectedFn } from '../types'
interface Interceptor<T> {
resolved: ResolvedFn<T>
rejected?: RejectedFn
} export default class InterceptorManager<T> {
private interceptors: Array<Interceptor<T> | null> constructor() {
this.interceptors = []
}
}
每个拦截器
Interceptor都是一个对象,包含两个属性resolved和rejected,对应use方法的两个函数参数。接着,我们为
InterceptorManager类中添加use方法use(resolved: ResolvedFn<T>, rejected?: RejectedFn): number {
this.interceptors.push({
resolved,
rejected
})
return this.interceptors.length - 1
}
该方法接收上文说的两个函数参数,我们把这两个函数参数组成一个对象存入第一步创建的数组
interceptors中,并且返回该对象在数组中的索引作为该拦截器的id最后,我们
InterceptorManager类中添加eject方法eject(id: number): void {
if (this.interceptors[id]) {
this.interceptors[id] = null
}
}
在该方法中,我们之所以没有简单粗暴的使用数组的
slice方法将需要删除的拦截器直接剔除掉,是因为如果这样做了之后interceptors数组的长度就会发生变化,而我们在第2步中用拦截器在数组中的索引作为了拦截器的唯一标识id,如果数组长度变了,那么数组里的拦截器id也就变了,所以我们在数组中将需要删除的拦截器置为null,在后面的逻辑中,我们只需判断拦截器为不为null,如果为null不做处理就是了。
OK,拦截器类就已经暂时创建好了。接下来我们就来实现拦截器的调用。
4. 拦截器调用顺序
在实现拦截器的调用之前,我们有必要了解一下当有多个拦截器时官方对每个拦截器的调用先后顺序时怎样的。为此,我们用官方axios写了如下试验代码:
// 请求拦截器1

axios.interceptors.request.use(config => {

  config.headers.test += 'requestInterceptors1---'

  return config

})

// 请求拦截器2

axios.interceptors.request.use(config => {

  config.headers.test += 'requestInterceptors2---'

  return config

})

// 响应拦截器1

axios.interceptors.response.use(response => {

  response.data.test += '响应拦截器1'

  return response

})

// 响应拦截器2

axios.interceptors.response.use(response => {

  response.data.test += '响应拦截器2'

  return response

})

axios.get("/api/getuser", { headers: { test: "NLRX---" } }).then(res => {

  console.log(res);

});
我们为axios分别添加了两个请求拦截器和两个响应拦截器,然后发出一个get请求,我们可以通过观察请求headers里面的test字段,以及响应data里面的test字段,我们就可以看出所有拦截器的调用先后顺序时怎样的。结果如下:
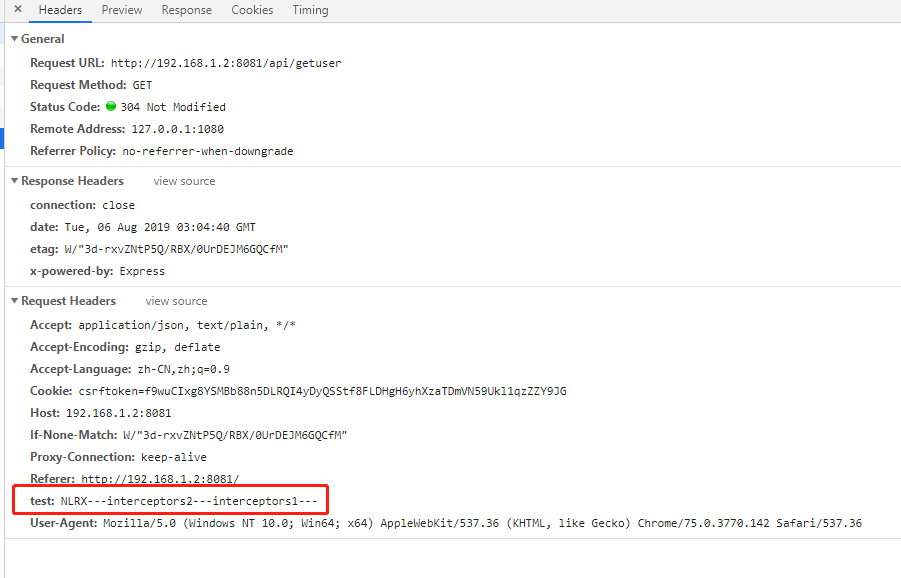
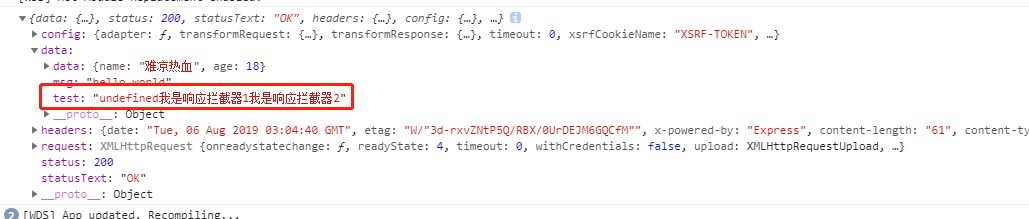
从结果中我们可以看到:
- 请求拦截器:先添加的后执行,后添加的先执行;
- 响应拦截器:按添加顺序执行
其实,我们可以用一张图来描述拦截器的工作流程:

OK,以上就是拦截器的调用顺序,了解了这个顺序后,我们就可以来着手实现拦截器的调用了。
5. 实现拦截器调用
实现拦截器调用之前我们先需要思考如下三个问题:
- 调用的逻辑应该实现在哪?
- 请求和响应拦截器调用分别是有顺序的,并且要先调用请求拦截器,然后再调用响应拦截器,该怎么实现?
- 每个拦截器调用都应该是链式的,该怎么实现?
OK,基于以上三个问题,我们分别来解答。
5.1 在哪里实现调用逻辑
我们知道,请求拦截器应该在发出请求之前调用,响应拦截器应该是在响应回来之后调用,所以这两个都跟核心请求功能相关。而我们又知道,在之前的实现方案中,所有的请求都是通过Axios类的request方法发出的,所以自然而然,拦截器的调用应该在request里面实现。
OK,这个问题搞明白以后,我们先根据第2章中的伪代码,在Axios类的构造函数中为Axios实例添加interceptor属性,如下:
// src/core/Axios.ts

import { InterceptorManager } from "./InterceptorManager";

export default class Axios {

  private interceptors: {

    request: InterceptorManager<AxiosRequestConfig>;

    response: InterceptorManager<AxiosResponse<any>>;

  };

  constructor() {

    this.interceptors = {

      request: new InterceptorManager<AxiosRequestConfig>(),

      response: new InterceptorManager<AxiosResponse>()

    };

  }

}
给Axios实例添加了interceptor属性后别忘了给Axios类类型接口里面添加上这个属性接口:
// src/types/index.ts

export interface Axios {

  interceptors: {

    request: AxiosInterceptorManager<AxiosRequestConfig>;

    response: AxiosInterceptorManager<AxiosResponse>;

  };

  // ...

}
5.2 实现按顺序调用
通过第4章的试验,我们得知:请求拦截器和响应拦截器调用遵循以下顺序:
- 请求拦截器:先添加的后调用,后添加的先调用。
- 响应拦截器:先添加的先调用,后添加的后调用。
- 请求拦截器调用完后,再调用响应拦截器。
想要实现这种顺序其实也不难,我们可以创建一个数组,把所有拦截器都按照执行的顺序放入该数组,然后按照数组顺序去调用即可,数组可以如下:
arr = ['请求拦截器2','请求拦截器1',...,'真实请求','响应拦截器1','响应拦截器2',...]
OK,办法有了,那就来实现一下:
我们先创建一个数组
arr,该数组内默认只存储真实请求;interface PromiseArr<T> {
resolved: ResolvedFn<T> | ((config: AxiosRequestConfig) => AxiosPromise);
rejected?: RejectedFn;
}
let arr: PromiseArr<any>[] = [
{
resolved: dispatchRequest,
rejected: undefined
}
];
然后遍历所有的请求拦截器,把每个请求拦截器都从
arr的头部插入,这样就可以保证后面添加的在数组中前面,并且处于真实请求之前。this.interceptors.request.interceptors.forEach(interceptor => {
if (interceptor !== null) {
arr.unshift(interceptor);
}
});
this.interceptors.request.interceptors是所有添加的请求拦截器,然后遍历这些请求拦截器,把不为null(是null的表示被删掉的拦截器)的从arr的头部插入。然后遍历所有的响应拦截器,把每个响应拦截器都从
arr的尾部插入,这样就可以保证后面添加的在数组中后面,并且处于真实请求之后。this.interceptors.response.interceptors.forEach(interceptor => {
if (interceptor !== null) {
arr.push(interceptor);
}
});
OK,这样我们就把这个调用顺序数组构造好了。
5.3 实现链式调用
要实现链式调用,我们首先想到的就是通过Promise进行链式调用,如下:
let promise = Promise.resolve(config)
while (arr.length) {
const { resolved, rejected } = arr.shift()!;
promise = promise.then(resolved, rejected);
}
return promise
定义一个已经 resolve 的 promise,循环 arr,拿到每个拦截器对象,把它们的 resolved 函数和 rejected 函数添加到 promise.then 的参数中,这样就相当于通过 Promise 的链式调用方式,实现了拦截器一层层的链式调用的效果。
5.4 完整代码
OK,三个问题解决完后,我们的拦截器调用也就实现了,request方法完整代码如下:
import { InterceptorManager } from "./InterceptorManager";
interface PromiseArr<T> {
resolved: ResolvedFn<T> | ((config: AxiosRequestConfig) => AxiosPromise);
rejected?: RejectedFn;
}
export default class Axios {
private interceptors: {
request: InterceptorManager<AxiosRequestConfig>;
response: InterceptorManager<AxiosResponse<any>>;
};
constructor() {
this.interceptors = {
request: new InterceptorManager<AxiosRequestConfig>(),
response: new InterceptorManager<AxiosResponse>()
};
}
request(url: any, config?: any): AxiosPromise {
if (typeof url === "string") {
config = config ? config : {};
config.url = url;
} else {
config = url;
}
let arr: PromiseArr<any>[] = [
{
resolved: dispatchRequest,
rejected: undefined
}
];
this.interceptors.request.interceptors.forEach(interceptor => {

    if (interceptor !== null) {

        arr.unshift(interceptor);

    }

});
this.interceptors.response.interceptors.forEach(interceptor => {

    if (interceptor !== null) {

        arr.push(interceptor);

    }

});
let promise = Promise.resolve(config);
while (arr.length) {
const { resolved, rejected } = arr.shift()!;
promise = promise.then(resolved, rejected);
}
return promise;
}
// ...
}
接下来,我们就可以编写demo来测试下我们实现的拦截器效果如何。
6. demo编写
在 examples 目录下创建 interceptor目录,在 interceptor目录下创建 index.html:
<!DOCTYPE html>

<html lang="en">

  <head>

    <meta charset="UTF-8" />

    <title>interceptor demo</title>

  </head>

  <body>

    <script src="/__build__/interceptor.js"></script>

  </body>

</html>
接着再创建 app.ts 作为入口文件:
import axios from "../../src/axios";

// 请求拦截器1

let requestInterceptor1 = axios.interceptors.request.use(config => {

  config.headers.test += "requestInterceptors1---";

  return config;

});

// 请求拦截器2

axios.interceptors.request.use(config => {

  config.headers.test += "requestInterceptors2---";

  return config;

});

// 请求拦截器3

axios.interceptors.request.use(config => {

  config.headers.test += "requestInterceptors3---";

  return config;

});

// 响应拦截器1

axios.interceptors.response.use(response => {

  response.data.test += "响应拦截器1";

  return response;

});

// 响应拦截器2

let responseInterceptor2 = axios.interceptors.response.use(response => {

  response.data.test += "响应拦截器2";

  return response;

});

// 响应拦截器3

axios.interceptors.response.use(response => {

  response.data.test += "响应拦截器3";

  return response;

});

axios.interceptors.request.eject(requestInterceptor1);

axios.interceptors.response.eject(responseInterceptor2);

axios.get("/api/getuser", { headers: { test: "NLRX---" } }).then(res => {

  console.log(res);

});
demo 里面我们添加了 3 个请求拦截器,和 3 个响应拦截器,并且删除了第1个请求拦截器和第2个响应拦截器。
路由接口沿用上篇文章的接口,故不需要添加新的路由接口。
最后在根目录下的index.html中加上启动该demo的入口:
<li><a href="examples/interceptor">interceptor</a></li>
OK,我们在命令行中执行:
# 同时开启客户端和服务端

npm run server | npm start
接着我们打开 chrome 浏览器,访问 http://localhost:8000/ 即可访问我们的 demo 了,我们点击 interceptor,通过F12的 network 部分我们可以看到请求已正常发出:

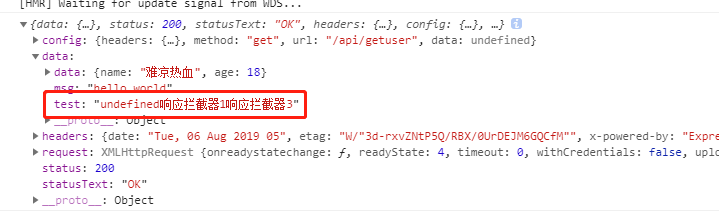
从结果中,我们可以看到:请求拦截器1被删除了,请求拦截器2和3正常工作,并且顺序也是先3后2;响应拦截器2被删除了,1和3正常工作,并且顺序是先1后3。
OK,拦截器到此就实现完毕了。
(完)
最新文章
- sql中查询中的when...then 语句
- C语言之链表
- CProgressCtrl进度条
- javascript事件之:谈谈自定义事件
- 【原】UIView实现点击着重效果的解决方案
- 转: utf16编码格式(unicode与utf16联系)
- 你真的会用 SDWebImage?
- linux 解压操作命令
- 使用WebBrowser,内存一直增加的解决办法
- Win7如何解决telnet不是内部或外部命令的方案!听语音
- Python第九课学习
- Elasticsearch System Call Filters Failed to Install
- golang处理signal
- linux 防火墙 iptables 目录
- 011 Spark应用构成结构
- SQL Server 利用Profiler观察执行计划是否重用时SP:Cachemiss,SP:CacheInsert以及SP:CacheHit的含义
- CentOS 6.8 安装Tomcat7
- poj1220------高精度进制转换模板
- python opencv3 人脸识别的例子
- Jmeter之线程组详解
热门文章
- 《构建之法》项目管理&典型用户和场景
- 01 python安装与初识
- Python 爬虫从入门到进阶之路(十)
- TCP方式的传输
- 从实践角度重新理解BIO和NIO
- 第3章(2) Linux下C编程风格
- Ubuntu 16.04 集成安装Apache+PHP+Kerberos+LDAP+phpLDAPadmin
- 数据结构5_java---二叉树,树的建立,树的先序、中序、后序遍历(递归和非递归算法),层次遍历(广度优先遍历),深度优先遍历,树的深度(递归算法)
- Twitter-Snowflake:自增ID算法
- 手动部署 Docker+Grafana+Prometheus系统监控之Redis