Linux OpenGL 实践篇-9 模型
之前一直渲染箱子,显得有点单调。这一次我们绘制一个用艺术家事先用建模工具创建的模型。
本次实践参考:https://learnopengl-cn.github.io/03%20Model%20Loading/01%20Assimp/
在之前我们的OpenGL实践中,绘制图形的过程是先定义顶点的位置、法线、纹理坐标(UV)等信息,按一定的规则组织后传给着色器处理,最终绘制到屏幕上。现在使用艺术家构建的模型,绘制的过程并没有变,只不过顶点和使用的贴图信息从原来我们自己定义变为从已构建好的模型中提取,所以导入模型的重点是解析模型文件中的顶点、贴图等信息,然后按照OpenGL的规则组织读取的数据。
艺术家构建模型时使用率高的几个构建工具有:blender,3ds max, maya。这些工具提供良好的界面和操作方式,艺术家可以非常方便顺畅的构建想要的模型,同时也屏蔽了模型文件保存的细节,使得他们并不需要关心他们构建的模型数据如何保存。但如果你想把这些文件中的数据导入到OpenGL中就必须了解这些文件的格式。然而,现在模型文件的格式有很多中,每一种的结构并不相同。比如比较简单的Wevefront 的.obj格式和基于xml的比较复杂的collada文件格式,我们如果想支持他们的导入,就需要为它们都写一个导入模块,幸运的是现在有一个叫Assimp的库专门处理这个问题,我们直接使用即可。在使用Assimp之前,我们推荐自己编译Assimp库,一般的与编译库使用起来会有比较多的问题或者根本就不能使用。
Assimp
Assimp全称是Open Asset Import Library的缩写,是一个非常流行的模型导入库。它解析模型文件,把顶点数据等信息按它设定的格式组织起来,我们的程序只需要按照它的格式使用数据即可,文件格式的差异性由Assimp处理。
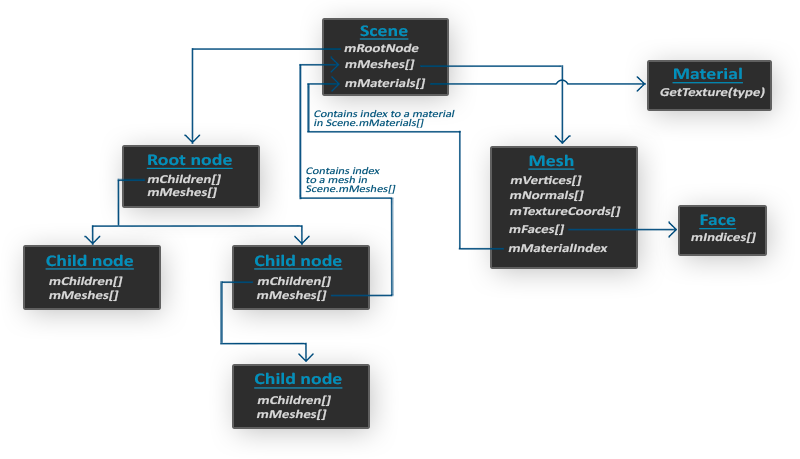
Assimp使用的数据结构在概念上可以分为场景(scene)、节点(Node)、网格(Mesh)。
场景:一个模型文件导入之后通常就一个场景对象,这个场景对象包含所有的模型数据;
节点:场景对象的数据组织结构是树,通常有一个根节点(root node),每个节点下会包含其他的节点;
网格:网格存储所有的渲染数据,包括顶点位置、UV、面、材质等信息。在节点中有一个mMeshes的数组,存储的只是网格数据中索引。
具体的数据结构关系如下图:
导入模型
使用Assimp之前,我们先引用所需的Assimp的头文件:
#include "assimp/Importer.hpp"
#include "assimp/scene.h"
#include "assimp/postprocess.h"
根据Assimp的数据结构,我们在程序中也设计两个数据结构来使用Assimp的数据——Model和Mesh。其中Model对应的是模型的概念,Mesh对应的是网格的概念。Model和Mesh的关系是一对多。
Model的定义:
class Model

{

        public:

                vector<Texture> textures_loaded;

                vector<Mesh> meshes;

                string directory;

                Model(const string &path)

                {

                        LoadModel(path);

                }

                Model(const Model &other) = delete;

                void operator=(const Model &other) = delete;

                ~Model()

                {

                }

                void Draw(std::shared_ptr<Shader> shader);

        private:

                void LoadModel(string path);

                void ProcessNode(aiNode *node, const aiScene *scene);

                Mesh ProcessMesh(aiMesh *mesh, const aiScene *scene);

                vector<Texture> LoadMaterialTextures(aiMaterial *mat,aiTextureTyp

type,string typeName);

};
在Model中,我们需要做的事情就是解析文件,并把解析出来的数据Mesh中使用。
Mesh包括顶点的位置、法线、UV、贴图信息(这些是我们现阶段暂时定义的,你也可以按你的想法添加额外的数据,不过要记得在Model中给相应的数据赋值)。
struct Vertex
{
        Vector3 position;
        Vector3 normal;
        Vector2 texcoords;
};

struct Texture
{
        unsigned int id;
        string type;
        string path;
};

class Mesh

{

        public:

                /*网格数据*/

                vector<Vertex> vertices;

                vector<unsigned int> indices;

                vector<Texture> textures;

                Mesh(vector<Vertex> vertices,vector<unsigned int> indices, vector<Texture> textures);

                void Draw(std::shared_ptr<Shader> shader);

        private:

                /*渲染数据*/

                unsigned int VAO,VBO,EBO;

                void SetupMesh();

};
在Model中核心是LoadMoel的处理,读取出scene对象后,调用ProcessNode处理,ProcessNode是一个递归调用。
void Model::LoadModel(string path)

{

        Assimp::Importer import;

        const aiScene *scene = import.ReadFile(path, aiProcess_Triangulate | aiProcess_FlipUVs);

        if(!scene || scene->mFlags & AI_SCENE_FLAGS_INCOMPLETE || !scene->mRootNode)

        {

                std::cout<<"error:assimp:"<<import.GetErrorString()<<std::endl;

                return;

        }

        directory = path.substr(,path.find_last_of('/'));

        ProcessNode(scene->mRootNode,scene);
}
void Model::ProcessNode(aiNode *node, const aiScene *scene)

{

        //处理节点所有网格

        for(unsigned int i = ; i < node->mNumMeshes; i++)

        {

                aiMesh *mesh = scene->mMeshes[node->mMeshes[i]];

                meshes.push_back(ProcessMesh(mesh,scene));

        }

        //接下来对它的节点重复这一过程

        for(unsigned int i = ; i < node->mNumChildren; i++)

        {

                ProcessNode(node->mChildren[i],scene);

        }

}

Mesh Model::ProcessMesh(aiMesh *mesh, const aiScene *scene)

{

        vector<Vertex> vertices;;

        vector<unsigned int> indices;

        vector<Texture> textures;

        //顶点,法线,纹理

        for(unsigned int i = ; i < mesh->mNumVertices; i++)

        {

                Vertex vertex;

                 Vector3 v;

                 v.x = mesh->mVertices[i].x;

                 v.y = mesh->mVertices[i].y;

                 v.z = mesh->mVertices[i].z;

                 vertex.position = v;

                 v.x = mesh->mNormals[i].x;

                 v.y = mesh->mNormals[i].y;

                 v.z = mesh->mNormals[i].z;

                 vertex.normal = v;

                 if(mesh->mTextureCoords[])

                 {

                         Vector2 vec;

                         vec.x = mesh->mTextureCoords[][i].x;

                         vec.y = mesh->mTextureCoords[][i].y;

                         vertex.texcoords = vec;

                 }

                 else

                 {

                         vertex.texcoords = Vector2(0.0f,0.0f);

                 }

                 /*//tangent

                 v.x = mesh->mTangents[i].x;

                v.y = mesh->mTangents[i].y;

                v.z = mesh->mTangents[i].z;

                vertex.tangent = v;

                //bitangent

                v.x = mesh->mBitangents[i].x;

                v.y = mesh->mBitangents[i].y;

                v.z = mesh->mBitangents[i].z;

                vertex.bitangent=v;*/

                vertices.push_back(vertex);

        }

        //索引

        for(unsigned int i=;i < mesh->mNumFaces;i++)

        {

                aiFace face = mesh->mFaces[i];

                for(unsigned int j = ; j < face.mNumIndices;j++)

                {

                        indices.push_back(face.mIndices[j]);

                }

        }

        aiMaterial *material = scene->mMaterials[mesh->mMaterialIndex];

        vector<Texture> diffuseMaps = LoadMaterialTextures(material,aiTextureType_DIFFUSE,"texture_diffuse");

        textures.insert(textures.end(),diffuseMaps.begin(), diffuseMaps.end());

        vector<Texture> specularMaps = LoadMaterialTextures(material,aiTextureType_SPECULAR,"texture_specular");

        textures.insert(textures.end(),specularMaps.begin(),specularMaps.end());

        return Mesh(vertices, indices, textures);

}
Mesh的处理主要就是使用OpenGL的数据缓存对象组织这些数据:
 void Mesh::SetupMesh()

 {

         glGenVertexArrays(,&VAO);

         glGenBuffers(,&VBO);

         glGenBuffers(,&EBO);

         glBindVertexArray(VAO);

         glBindBuffer(GL_ARRAY_BUFFER,VBO);

         glBufferData(GL_ARRAY_BUFFER,this->vertices.size() * sizeof(Vertex), &vertices[],GL_STATIC_DRAW);

         glBindBuffer(GL_ELEMENT_ARRAY_BUFFER,EBO);

         glBufferData(GL_ELEMENT_ARRAY_BUFFER,indices.size() * sizeof(unsigned int), &indices[],GL_STATIC_DRAW);

         //顶点位置

         glEnableVertexAttribArray();

         glVertexAttribPointer(,,GL_FLOAT, GL_FALSE, sizeof(Vertex), (GLvoid*));

         //顶点法线

         glEnableVertexAttribArray();

         glVertexAttribPointer(,,GL_FLOAT, GL_FALSE, sizeof(Vertex), (GLvoid*)(offsetof(Vertex,normal)));

         //顶点纹理坐标

         glEnableVertexAttribArray();

         glVertexAttribPointer(,,GL_FLOAT, GL_FALSE, sizeof(Vertex), (GLvoid*)(offsetof(Vertex,texcoords)));

         glBindVertexArray();

}
在这里要注意的是纹理的使用,在本次的实践过程中,我是在着色器中使用固定的前缀和序号来组织纹理的,如漫反射贴图使用texture_diffuseN来表示,texture_specularN表示镜面反射,在着色器中预先定义好要使用的最大贴图数量,如3张漫反射贴图(texture_diffuse1,texture_diffuse2……) 。
这种做法比较简单,你可能有其它更好的解决方案,但这些对现在来说没有关系。我们暂时这么用它。
void Mesh::Draw(std::shared_ptr<Shader> shader)

{

        unsigned int diffuseNr = ;

        unsigned int specularNr = ;

        for(unsigned int i = ; i < textures.size(); ++i)

        {

                glActiveTexture(GL_TEXTURE0 + i); //在绑定之前激活相应纹理单元

                //获取纹理号

                string number;

                string name = textures[i].type;

                if(name == "texture_diffuse")

                {

                        number = std::to_string(diffuseNr++);

                }

                else if(name == "texture_specular")

                {

                        number = std::to_string(specularNr++);

                }

                shader->SetInt((name + number).c_str(),i);

                glBindTexture(GL_TEXTURE_2D,textures[i].id);

        }

        //绘制网格

        glBindVertexArray(VAO);

        glDrawElements(GL_TRIANGLES,indices.size(),GL_UNSIGNED_INT,);

        glBindVertexArray();

        glActiveTexture(GL_TEXTURE0);

 }
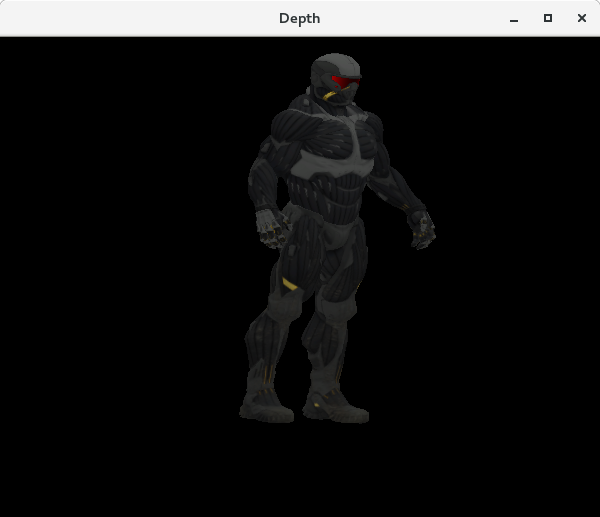
最终效果:
最新文章
- 30分钟全面解析-SQL事务+隔离级别+阻塞+死锁
- IM服务器的架构
- Jackson 框架,轻易转换JSON
- 云服务器 ECS Linux 磁盘空间满(含 innode 满)问题排查方法
- csuoj 1354: Distinct Subsequences
- HDOJ(HDU) 2401 Baskets of Gold Coins(数列、)
- Django学习笔记(五)—— 表单
- poj 1018 Communication System_贪心
- 蓝桥网试题 java 基础练习 十六进制转八进制
- BZOJ-1721|线性dp-缆车支柱
- Solr Cloud安装
- Node+GitLab实现小程序CI系统
- CodeFirst+MySql开发
- 一步步搭建 Spring Boot maven 框架的工程
- socket.io的connect连接时不断的进行自动连接,并产生错误net::ERR_EMPTY_RESPONSE
- Lib作为“静态库”与“动态库”中的区别
- Django接收URL问号参数
- JQuery之拖拽插件
- Shell语法整理,持续维护
- 分析解决Java运行时异常