NFS搭建
2024-08-27 19:54:06
一、环境
nfsserver01:192.168.127.100 centos7.3
nfsclient01:192.168.127.101 centos7.3
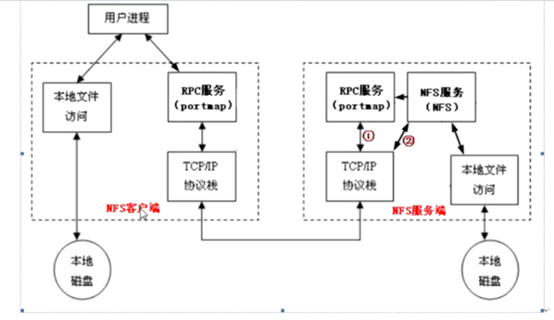
二、NFS原理
三、安装测试
1、nfsserver安装
[root@nfsserver01 ~]# yum install rpcbind nfs-utils -y[root@nfsserver01 ~]# mkdir /Share[root@nfsserver01 ~]# chmod 755 /Share[root@nfsserver01 ~]# ll -d /Sharedrwxr-xr-x. 2 root root 6 8月  16 10:42 /Share[root@nfsserver01 ~]# mkdir /Share[root@nfsserver01 ~]# chmod 755 /Share[root@nfsserver01 ~]# ll -d /Sharedrwxr-xr-x. 2 root root 6 8月  16 10:42 /Share[root@nfsserver01 ~]# vim /etc/exports

#######shared for test by suffergtf at 2018-8-16######/Share  192.168.127.0/24(rw,sync)[root@nfsserver01 ~]# systemctl start rpcbind[root@nfsserver01 ~]# systemctl enable rpcbind[root@nfsserver01 ~]# netstat -lntup|grep rpcbindtcp        0      0 0.0.0.0:111             0.0.0.0:*               LISTEN      10432/rpcbind       tcp6       0      0 :::111                  :::*                    LISTEN      10432/rpcbind       udp        0      0 0.0.0.0:855             0.0.0.0:*                           10432/rpcbind       udp        0      0 0.0.0.0:111             0.0.0.0:*                           10432/rpcbind       udp6       0      0 :::855                  :::*                                10432/rpcbind       udp6       0      0 :::111                  :::*                                10432/rpcbind [root@nfsserver01 ~]# rpcinfo -p localhost   program vers proto   port  service    100000    4   tcp    111  portmapper    100000    3   tcp    111  portmapper    100000    2   tcp    111  portmapper    100000    4   udp    111  portmapper    100000    3   udp    111  portmapper    100000    2   udp    111  portmapper

[root@nfsserver01 ~]# systemctl start nfs[root@nfsserver01 ~]# systemctl enable nfsCreated symlink from /etc/systemd/system/multi-user.target.wants/nfs-server.service to /usr/lib/systemd/system/nfs-server.service.

[root@nfsserver01 ~]# rpcinfo -p localhost   program vers proto   port  service    100000    4   tcp    111  portmapper    100000    3   tcp    111  portmapper    100000    2   tcp    111  portmapper    100000    4   udp    111  portmapper    100000    3   udp    111  portmapper    100000    2   udp    111  portmapper    100024    1   udp  40390  status    100024    1   tcp  56253  status    100005    1   udp  20048  mountd    100005    1   tcp  20048  mountd    100005    2   udp  20048  mountd    100005    2   tcp  20048  mountd    100005    3   udp  20048  mountd    100005    3   tcp  20048  mountd    100003    3   tcp   2049  nfs    100003    4   tcp   2049  nfs    100227    3   tcp   2049  nfs_acl    100003    3   udp   2049  nfs    100003    4   udp   2049  nfs    100227    3   udp   2049  nfs_acl    100021    1   udp  50142  nlockmgr    100021    3   udp  50142  nlockmgr    100021    4   udp  50142  nlockmgr    100021    1   tcp  32899  nlockmgr    100021    3   tcp  32899  nlockmgr    100021    4   tcp  32899  nlockmgr[root@nfsserver01 ~]# showmount -e localhostExport list for localhost:/Share 192.168.127.0/24
2、nfsclient安装
[root@nfsclient01 ~]# yum install rpcbind nfs-utils -y #nfs-utils可不安装[root@nfsclient01 ~]# systemctl start rpcbind[root@nfsclient01 ~]# systemctl enable rpcbind
3、测试连接
[root@nfsclient01 ~]# showmount -e 192.168.127.100
clnt_create: RPC: Port mapper failure - Unable to receive: errno  (No route to host)  ##关闭server,client端防火墙和selinux######nfsserver端[root@nfsserver01 ~]# systemctl stop firewalld[root@nfsserver01 ~]# systemctl disable firewalldRemoved symlink /etc/systemd/system/dbus-org.fedoraproject.FirewallD1.service.Removed symlink /etc/systemd/system/basic.target.wants/firewalld.service.[root@nfsserver01 ~]# vim /etc/selinux/config

# This file controls the state of SELinux on the system.# SELINUX= can take one of these three values:#     enforcing - SELinux security policy is enforced.#     permissive - SELinux prints warnings instead of enforcing.#     disabled - No SELinux policy is loaded.SELINUX=disabled# SELINUXTYPE= can take one of three two values:#     targeted - Targeted processes are protected,#     minimum - Modification of targeted policy. Only selected processes are protected. #     mls - Multi Level Security protection.SELINUXTYPE=targeted######nfsclient端同上

[root@nfsclient01 ~]# showmount -e 192.168.127.100Export list for 192.168.127.100:/Share 192.168.127.0/24[root@nfsclient01 ~]# mount -t nfs 192.168.127.100:/Share /mnt[root@nfsclient01 mnt]# echo 'mount -t nfs 192.168.127.100:/Share /mnt' >>/etc/profile[root@nfsclient01 ~]# df -h文件系统                容量  已用  可用 已用% 挂载点/dev/sda3                18G  1.2G   17G    7% /devtmpfs                227M     0  227M    0% /devtmpfs                   237M     0  237M    0% /dev/shmtmpfs                   237M  4.6M  232M    2% /runtmpfs                   237M     0  237M    0% /sys/fs/cgroup/dev/sda1                97M   89M  8.6M   92% /boottmpfs                    48M     0   48M    0% /run/user/0192.168.127.100:/Share   18G  1.2G   17G    7% /mnt[root@nfsclient01 mnt]# touch 1.testtouch: 无法创建"1.test": 权限不够

[root@nfsserver01 ~]# cat /var/lib/nfs/etab     ######查看默认共享参数/Share    192.168.127.0/24(rw,sync,wdelay,hide,nocrossmnt,secure,root_squash,no_all_squash,no_subtree_check,secure_locks,acl,no_pnfs,anonuid=65534,anongid=65534,sec=sys,secure,root_squash,no_all_squash)[root@nfsserver01 ~]# ll /Share/ -ddrwxr-xr-x. 2 root root 6 8月  16 10:42 /Share/    ###共享文件属主为root,挂载的客户端root用户,被转换成nfsnobody用户,所以没有权限[root@nfsserver01 ~]# chown nfsnobody.nfsnobody /Share[root@nfsserver01 ~]# ll /Share/ -ddrwxr-xr-x. 2 nfsnobody nfsnobody 6 8月  16 10:42 /Share/

[root@nfsclient01 mnt]# touch 1.test[root@nfsclient01 mnt]# ll /mnt/总用量 0-rw-r--r--. 1 nfsnobody nfsnobody 0 8月  16 11:22 1.test
最新文章
- 第一章 MYSQL的架构和历史
- [llvm] Call the LLVM Jit from c program
- background属性
- [LINUX] 查看连接数和IO负载
- thread_fork/join并发框架1
- 鸟哥的Linux私房菜之学习shell script
- [Hibernate] - EAGER and LAZY
- C C++实现创建目录
- 15个实用的Linux find命令示例(一)
- bzoj 3879 虚树
- Windbg DUMP
- Hibernate查询,返回new对象(注意这个新定义的类要有构造函数),使用sql带条件分页查询并且把结果显示到一个对象的集里面的解决方案
- TTL 和 DNS TTL 的区别
- JAVA基础复习与总结<四> 抽象类与接口
- .NET-ORM框架EF-Code First代码优先
- (6)Microsoft office Word 2013版本操作入门_文件封面,页首,页尾
- IEDA序列化设置
- atitit 读书与获取知识资料的attilax的总结.docx
- Spring Boot Tomcat配置详解
- 4.移植uboot-使uboot支持DM9000网卡