【数据售卖平台】—— Vue2.0入门学习项目爬坑
前言:这个项目是我从零学习Vue2.0时用于练习基础知识的入门项目,包含了Vue2.0几乎所有项目都会用到的基础功能,是新手用来练手的好项目,这里温故知新对功能点做一个总结。github地址:https://github.com/66Web/ljq_sjsm,欢迎Star。
 |
 |
| 平台首页 | 登录注册 |
| 一、安装配置 |
1、淘宝镜像cnpm:
$ npm install -g cnpm --registry=https://registry.npm.taobao.org
2、v-cli开发环境搭建:
npm install -g vue-cli

vue init webpack my-project

cd my-project

npm install

npm run dev
3、创建vue项目时:严格遵守Enlint语法选择No
- WebStorm javascript 版本更改为 ES6
4、新版本vue-cli不需要下载vue-router,旧版本需要:
npm install vue-router --save
5、main.js入口文件中配置vue-Router:
import VueRouter from 'vue-router'

vue.use(VueRouter)

let router = new VueRouter({

      mode: 'history',   //router路由版本

      routers: [         //router路由map

           {

               path: '/',

               component:IndexPage

            }

      ]

})
7.layout.vue主组件中使用router-view:
<div class="app-content">

        <keep-alive>   //建立缓存,来回切换时可保持状态

             <router-view></router-view>

        </keep-alive>

</div>
| 二、根组件layout.vue |
在公用组件文件夹components目录下:
1.所有reset css都放到layout.vue的<style>中: 去掉scoped 让样式应用到全局
2.head、content、foot三个div要包含在一个div中:才可以一起挂载到index.html中的挂载点上
3.content内容div:用来切换显示路由
<div class="app-content">

        <keep-alive>

             <router-view></router-view>

        </keep-alive>

</div>
| 三、首页index.vue |
在页面组件文件夹pages目录下:
1.<style>为了避免样式污染 一定记得加scoped
2.webpack中每一个图片都会被当做一个模块module:
- 首页中用到的图片都要事先放置在assets文件中,否则图片缺失都会报模块错误
3.列表都是循环渲染的:
- a标签绑定href属性时要用v-bind:href 或者缩写:href
<a :href="item.url">{{item.name}}</a>
4.新版本的vue-cli中v-for="item in items":
- 后面都需要跟:key="item.name",key值必须是唯一的,如果有item属性不唯一的时候,使用:key="index"一定不会报错
5.使用 index 将循环模块中的图片一一对应上
- 这要求 在图片命名时以index的顺序命名 1、2、3、4
v-for="(item, index) in boardList"
注:当图片关联性强的时候 在数据中定义id字段
id="car" //图片路径根据id值命名
:class="[{'line-last': index % 2 !== 0},'index-board-' + item.id]">
.index-board-car .index-board-item-inner{

    background: url(../assets/images/1.png) no-repeat;

}
6.循环出的四个模块 “田”字形排列,有两个模块样式不同
- 另外加一个‘line-last'class,使margin-right=0;
- 需要借助index找到index%2!===0的两个模块赋予class
 <div class="index-board-item"

      v-for="(item, index) in boardList"

      :key="item.title"

      :class="{'line-last': index % 2 !== 0}">
| 四、(方法一)json-server模拟数据 |
vue-resource实现Ajax获取信息数据、从后端获取数据
1.安装vue-resource
npm install vue-resource --save
注:每次install完插件等之后需要重新启动项目
2.main.js文件中引入vue-resouce:
 import VueResource from 'vue-resource'

 Vue.use(VueResource)
之后就可以在项目任何地方:使用this.$http命令
3.index.vue组件中发送get请求:
created: function () {

      this.$http.get('api/getNewsList')//发送get请求

          .then(function(res){//.then方法  请求完成后调用

                              //第一个函数是请求成功后方法

          }, function (err) { //第二个函数是请求失败后方法

          })

},
- 如果发送post请求(有时会报错)
this.$http.post('postList',{userId: 123})
4.安装json-server工具
npm install json-server --save
5.旧版本在build->dev.server.js文件中进行扩展,新版本在build->webpack.dev.conf.js中进行配置
const jsonServer = require('json-server')

const apiServer = jsonServer.create()

const apiRouter = jsonServer.router('db.json')//数据关联server

const middlewares = jsonServer.defaults()

apiServer.use(middlewares)

apiServer.use('/api',apiRouter)

apiServer.listen(8081, function (err) { //监听端口,存在跨域

      if (err) {

          console.log(err)

          return

      }

      console.log('Lisening at http://localhost:8081/')

})
注:db.json是当前访问页面index.html同级的json数据文件
6.config->index.js文件中配置代理端口
proxyTable: {

      '/api': 'http://localhost:8081' //配置代理端口

},                       //json-server被代理到8081端口
- 重新启动项目,运行json-server:
npm run dev
- 此时检查http://localhost:8081 如果看到JSON Server页面即访问成功
- 访问getNewList JSON数据 http://localhost:8081/api/getNewsList
7.请求发送成功后,将获取的数据res.data赋值给data数据中的newsList
created: function () {

   this.$http.get('api/getNewsList')

       .then((res) => {

           this.newsList = res.data

       }, (err) => {

       })

},
- 此时data中的newsList应为空数组
- 坑:此处用箭头函数=> this才表示环境中的this; 如果用的是传统函数 因为闭包的影响,需要在外面定义一个变量
created: function () {

      let me = this

      this.$http.get('api/getNewsList')

             .then(function (res) {

                    me.newsList = res.data

              }, function (err) {

              })

},
| 五、(方法二)通过express本身获取数据 |
express是通用方法:不用json-server
- json-server只能通过get请求获取数据,无法通过post请求
- express获取数据,get/post请求都可以
1.同样旧版本在build->dev.server.js文件中进行扩展,新版本在build->webpack.dev.conf.js中进行配置
var express = require('express')

var app = express()

var apiServer = express()
var bodyParser = require('body-parser')

apiServer.use(bodyParser.urlencoded({ extended: true }))

apiServer.use(bodyParser.json())

var apiRouter = express.Router()

var fs = require('fs')

apiRouter.route('/:apiName')

.all(function (req, res) {

    fs.readFile('./db.json', 'utf8', function (err, data) {

        if (err) throw err

        var data = JSON.parse(data)

        if (data[req.params.apiName]) {

            res.json(data[req.params.apiName])

        }else {

            res.send('no such api name')

        }

    })

})

apiServer.use('/api', apiRouter);

apiServer.listen(port + 1, function (err) {

     if (err) {

        console.log(err)

        return

}

console.log('Listening at http://localhost:' + (port + 1) + '\n')

})
2. 同上6.7
| 五、幻灯片组件(公用组件) |
第三方组件库:awesome-vue 查找vue组件的一种方式 github官方的一个集合
https://github.com/vuejs/awesome-vue ctrl+F 搜索slider
1.新建components->slideShow.vue组件
2.插入index.vue中
import slideShow from '../components/slideShow'
3.使用components选项声明:需要保证声明名与导入名一致
components: {

    slideShow

},
4.使用自定义组件名渲染到模板中:
<slide-show></slide-show>
————————————以上创建公用组件的四个基本步骤
5.传:slides属性 在不同的地方使用同一组件时显示不同内容
6.图片通过js引入,必须使用require:
src: require('../assets/slideShow/pic1.jpg'),
- 这个图片会由webpack解析到相应的位置
注:如果不用require webpack不会识别为模块,不会打包到最终的文件里,就不会显示到相应的位置
7.props:{ } 表示这个组件要接收一些什么样的属性(从父组件)
props: {

      slides: {

         type: Array,

         default: function () {

              return []

         }

     }

}
- 检查数据是否拿到:
mounted () {

   console.log(this.slides)

}
<slide-show :slides="slides"></slide-show>
- 动态绑定的属性: slides 就是子组件props中的属性
- 绑定的数据 slides 是父组件datas中的数组数据
坑:vue props 传Array/Object类型值,子组件报错解决办法
Array/Object的默认返回值要用工厂形式返回
8.定义数据变量nowIndex,设置默认值为0
 data () {

        return {

            nowIndex: 0

        }

 },
- 在模板中渲染出slides中对应的数据项
<template>

       <div class="slide-show">

            <div class="slide-img">

            <a :href="slides[nowIndex].href">

                <img :src="slides[nowIndex].src">

            </a>

       </div>

       <h2>{{slides[nowIndex].title}}</h2>

       <ul class="slide-pages">

          <li><</li>

          <li v-for="(item, index) in slides"

              :key="index"

              @click="goto(index)">

             <a :class="{on : index === nowIndex}">{{index + 1}}</a>

          </li>

          <li>></li>

       </ul>
     </div>
</template>
- 定义重置nowIndex的方法:
 methods () {

    goto (index) {

        this.nowIndex = index

    }

 }
- 标记当前显示标签高亮:动态绑定class属性on 并判断显示的条件
<a :class="{on : index === nowIndex}">{{index + 1}}</a>
9.点击两个箭头跳转到前一张和后一张
方法一: 分别创建 gotopre() 和 gotonext() 方法 执行+1,-1
方法二: 使用vue的计算属性computed:
computed: {

         prevIndex () {

              if (this.nowIndex === 0) {

                    return this.slides.length - 1

              }else{

                    return this.nowIndex - 1

              }

         },

         nextIndex () {

              if (this.nowIndex === this.slides.length -1) {

                    return 0

              }else{

                    return this.nowIndex + 1

              }

         }

}
- 计算属性的 prevIndex 和 nextIndex 对应的都是数据 nowIndex
- 返回重置后的 nowIndex 可以直接作为方法 goto(index) 的参数
<li @click="goto(prevIndex)"><</li>

<li @click="goto(nextIndex)">></li>
10.自动轮播-setInterval
methods: {

        runInv () {

            this.invId = setInterval(() => {

                   //console.log(123)

                  this.goto(this.nextIndex)

            },this.inv)

        },

        clearInv () {

             clearInterval(this.invId)

        }

}
- 方法在mounted钩子中调用:组件挂载完成后执行的第一个业务逻辑
mounted () {

       console.log(this.slides)

       this.runInv()

}
- this.inv:时间间隔数据仍然从父组件中获取
- 动态绑定的属性: inv 就是子组件props中的属性
- 绑定的数据 slideSpeed 是父组件 datas 中的数组数据
- 鼠标移入时 清除 Interval,鼠标移出时 执行自动轮播
<div class="slide-show" @mouseover="clearInv" @mouseout="runInv">
11.高级效果--移入移除动画
更新Img部分:一定有一个时刻是同时显示两张图片的
<transition name="slide-trans">

           <img v-if="isShow" :src="slides[nowIndex].src">

</transition>

<transform name="slide-trans-old">

           <img v-if="!isShow" :src="slides[nowIndex].src">

</transform>
- datas数据中定义
isShow:true //控制显示的切换
- 坑: 如果没有用 v-if 判断 isShow 条件,无法应用vue自己的 transition动画
方法methods中:
 goto (index) {

        //this.nowIndex -- 旧值

        this.isShow = false

        setTimeout(() => {

            this.isShow = true

            this.nowIndex = index   //新值

        }, 10)

}
- <transform>动画组件对应css属性:
 .slide-trans-enter-active {

        transition: all .5s;

 }

 .slide-trans-enter {

        transform: translateX(900px);

 }

 .slide-trans-old-leave-active {

        transition: all .5s;

        transform: translateX(-900px);

 }
坑:transition 对绝对定位的l eft/right 是无效的
transition 最好是配合 transform 属性使用
12.子组件向父组件传递数据、事件
- slideShow.vue中:this.$emit() 方法传递 onchange事件 和 index参数
goto (index) {

       this.isShow = false

       setTimeout(() => {

           this.isShow = true

           this.nowIndex = index

           this.$emit('onchange', index)

       }, 10)

}
index.vue中:
<slide-show :slides="slides"

            :inv="slideSpeed"

            @onchange="doSomethingOnSlideChange">

methods: {

        doSomethingOnSlideChange () {

            console.log('doSomethingOnSlideChange run!')

        }

},
| 七、首页弹窗组件 |
1.同一个父组件中插入的所有子组件,挂载的节点(div)都必须一致
<template>

        <div></div>

</template>
2.layout.vue文件中使用子组件:
 import Dialog from '../components/base/dialog'

 <my-dialog></my-dialog>

 components: {

         MyDialog: Dialog

 }
注:子组件标签命名:不要和一些html本身的元素重名,否则会报错
3.dialog.vue文件中:
<template>

      <div class="dialog-wrap">

            <div class="dialog-cover" @click="closeMyself"></div>

            <div class="dialog-content">

                 <p class="dialog-close" @click="closeMyself">x</p>

                 <slot>empty</slot>

             </div>

      </div>

</template>
- 通过插槽 <slot>empty</slot> 向 <my-dialog></my-dialog> 插入内容
- 通过props接收父组件的isShow属性,判断弹窗是否显示
props: {

      isShow: {

             type: Boolean,

             default: false

      }

}
- 通过this.$emit()向父组件发送事件,触发父组件中的方法
methods: {

     closeMyself () {

          this.$emit('on-close')

     }

}
4.layout.vue文件中:
<li @click="logClick">登录</li>

<my-dialog :isShow="isShowLogDialog"

                @on-close="closeDialog('isShowLogDialog')">

               <p>Log</p>

</my-dialog>
data () {

      return {

            isShowLogDialog: false,

      }

},

methods: {

      logClick () {

            this.isShowLogDialog = true

      },

      closeDialog (attr) {

             this[attr] = false

      }

}
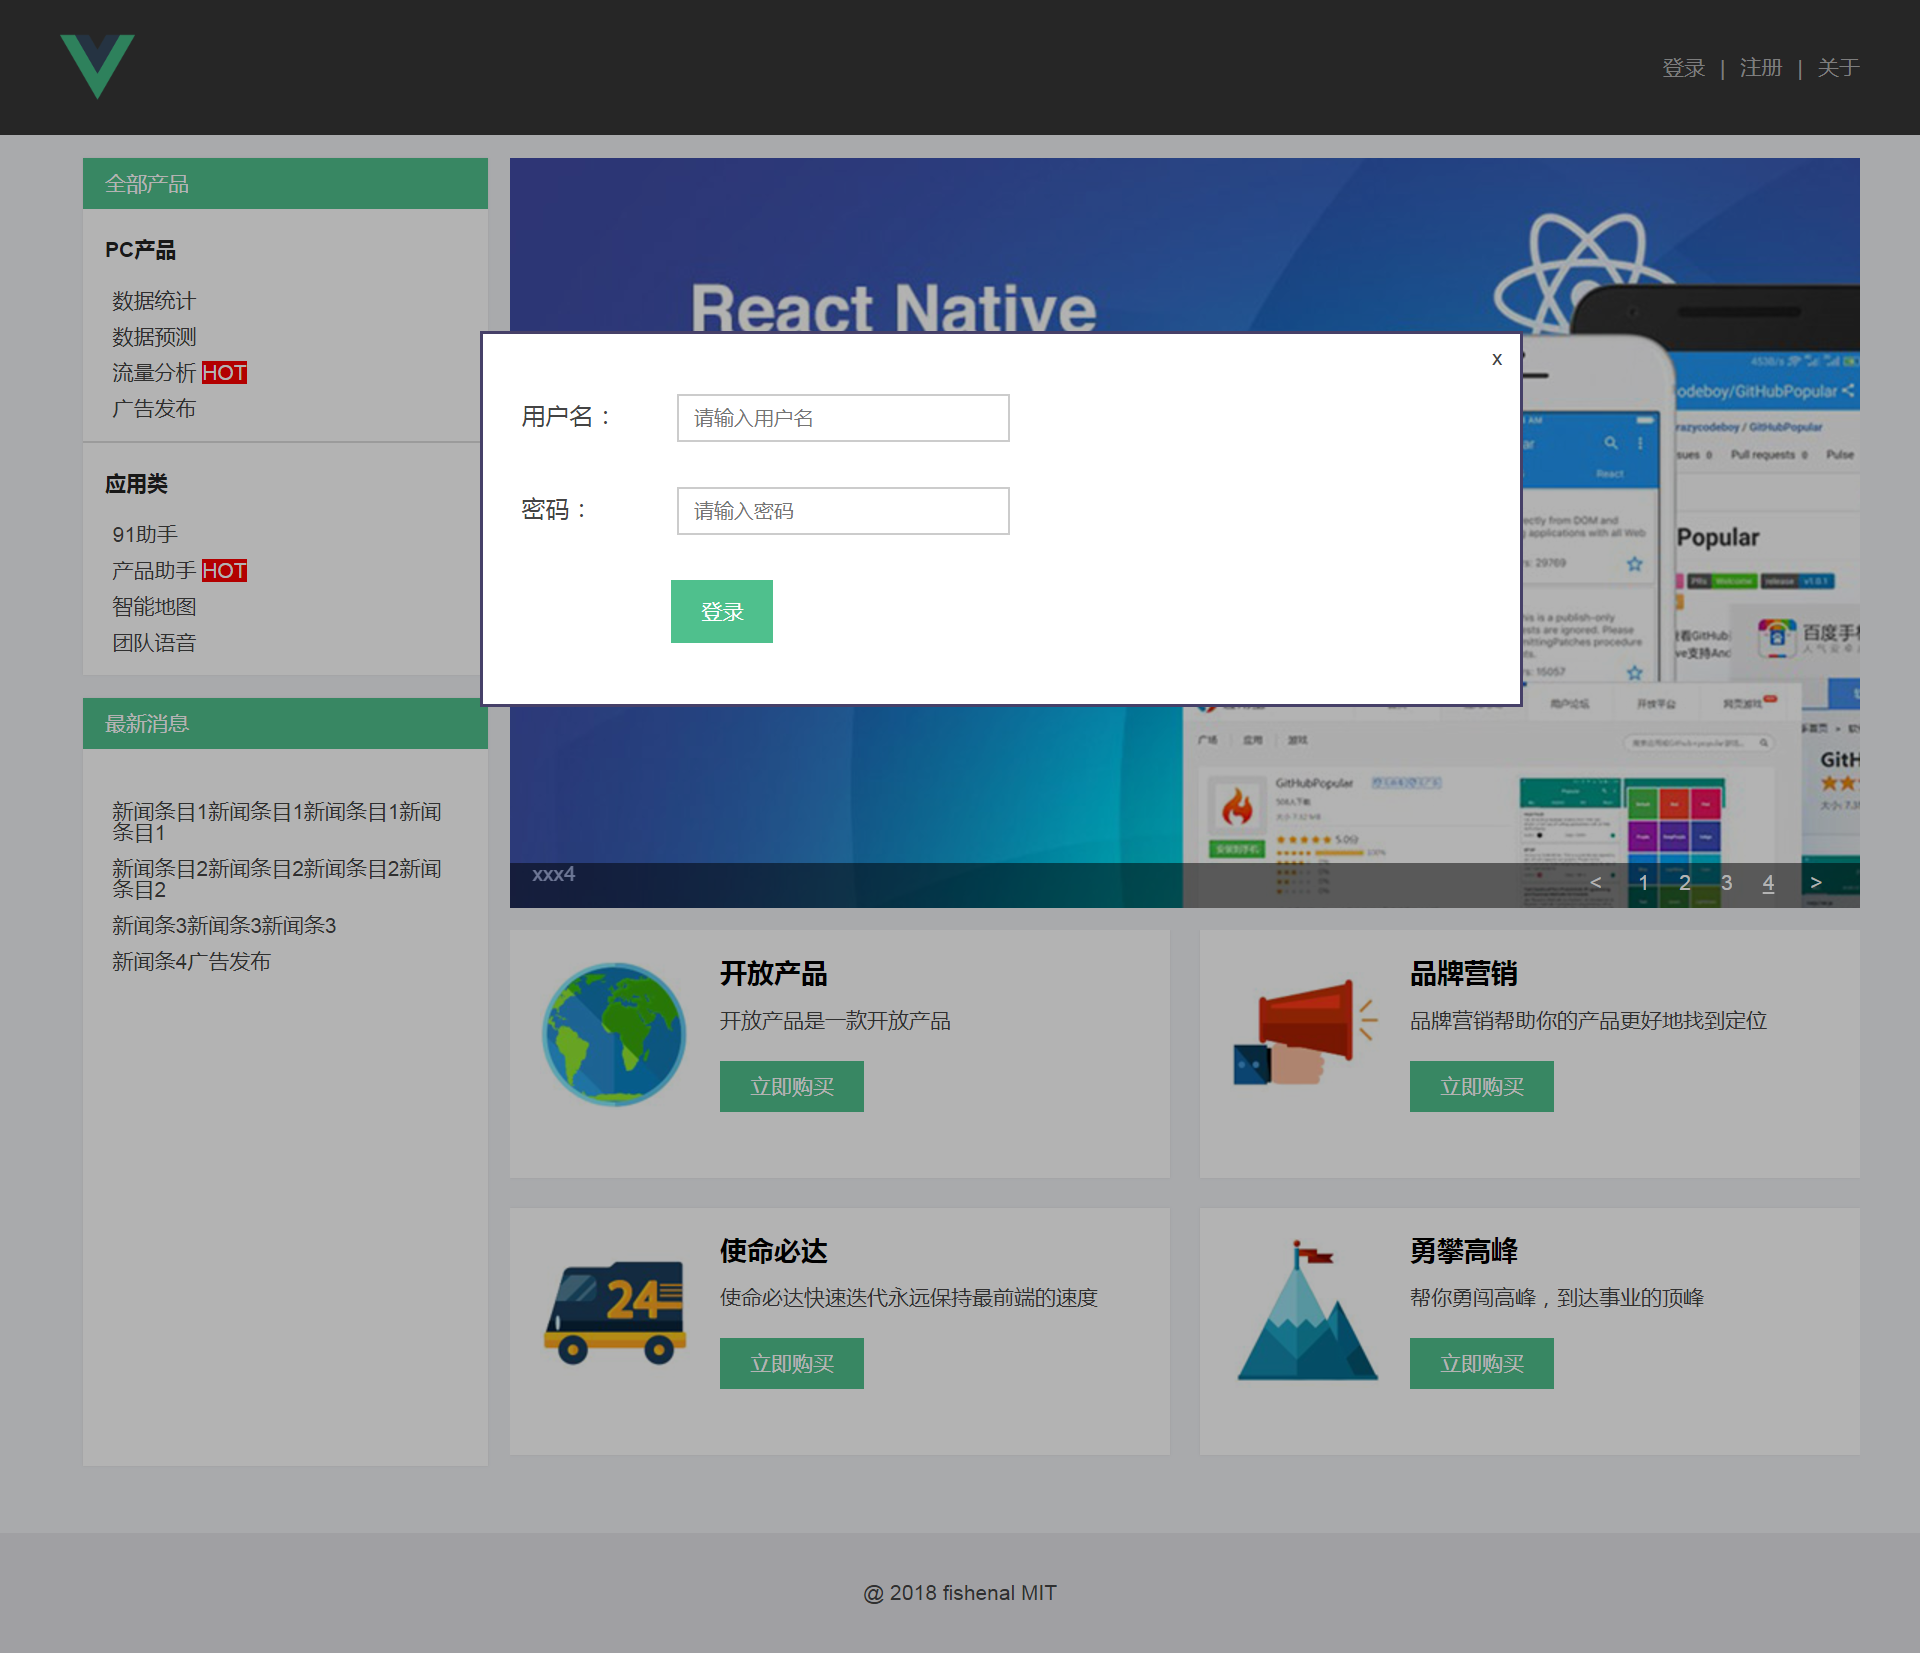
| 八、登录表单-logForm.vue文件 |
1.作为一个表单最重要的是input通过v-model双向绑定数据
<input type="text"

       v-model="usernameModel"

       placeholder="请输入用户名">

<input type="password"

       v-model="passwordModel"

       placeholder="请输入密码">
- 绑定的数据中两个Model:
data () {

     return {

         usernameModel: '',

         passwordModel: ''

         errorText: ''

     }

}
2.表单另一个重要功能:验证数据是否通过
<span class="error">

          {{ userErrors.errorText }}

</span>

<span class="error">

           {{ passwordErrors.errorText }}

</span>
- 通过v-model的改变进行验证,通过计算属性computed关联v-model,
定义一个错误数据的对象,包括出错状态、出错文本(———计算属性的第二种用法)
computed: {

       userErrors () {

          let errorText, status

          if(!/@/g.test(this.usernameModel)){

               status = false

               errorText = '不包括@'

          }

          else {

               status = true

               errorText = ''

          }

          if (!this.userFlag){

               errorText = ''

               this.userFlag = true

          }

          return {

              status,

              errorText

          }

       }

}
- usernameModel每一次改变,都会先进行验证,验证通过发送请求:
methods: {

     onLogin () {

       if (!this.userErrors.status || !this.passwordErrors.status) {

          this.errorText = '用户名或密码错误'

       }else {

          this.errorText = ''

          this.$http.get('api/login')

               .then((res) => {

                    this.$emit('has-log', res.data)

                }, (error) => {

                console.log(error)

          })

       }

    }

}
3.layout.vue文件中:
<log-form @has-log="onSuccessLog"></log-form>

onSuccessLog (data) {

    this.username = data.username

    this.isShowLogDialog = false

}
 |
 |
| 购买详情页 | |
| 九、购买详情页——添加路由/嵌套路由 |
1.router -> index.js文件中配置 路由地图:
import Annalysis from '../pages/detail/analysis'

import Count from '../pages/detail/count'

import Forecast from '../pages/detail/forecast'

import Publish from '../pages/detail/publish'

{

      path: '/detail',

      component: DetailPage,

      children: [

        {

          path: 'annalysis',  //子路由中不可以带‘/’符号,表示根目录

          component: Annalysis

        },

        {

          path: 'count',

          component: Count

        },

        {

          path: 'forecast',

          component: Forecast

        },

        {

          path: 'publish',

          component: Publish

        }

    ]
2. layout的路由的其中一个子页面组件--detail.vue文件中:
<div class="detail-right">

    <keep-alive>

          <router-view></router-view>

    </keep-alive>

</div>
3. 页面跳转:vue-router的内置组件<router-link></router-link>
<ul>

    <router-link v-for="item in products"

                 :key="item.name"

                 :to="{ path: item.path }"

                 tag="li"

                 active-class="active">

         {{ item.name }}

    </router-link>

</ul>
- 对应datas:
 products: [

          {

            name: '数据统计',

            path: 'count',

            icon: require('../assets/images/1.png'),

            active: false

          },

          {

            name: '数据预测',

            path: 'forecast',

            active: false

          }

  ]
4. 头图的映射:随路由的循环而对应显示不同的图片
<img :src="productIcon">
- 数据datas中:
imgMap: {

          '/detail/count': require("../assets/images/1.png"),

          '/detail/forecast': require("../assets/images/2.png"),

          '/detail/analysis': require("../assets/images/3.png"),

          '/detail/publish': require("../assets/images/4.png")

}
- 使用计算属性通过 $router.path 获取 imgMap 中对应的图片路径:
computed: {

        productIcon () {

            return this.imgMap[this.$router.path]

        }

}
- 外层detail页面给它的子路由页面共享样式:<style>不可以加scope
6.路由导航,也可以直接通过<a>标签直接跳转
- index.vue首页 数据datas中:
href: 'detail/analysis'
- 浏览器可直接访问
7.不希望用户访问到/detail 页面:detail.vue只作为一个中介的组件
- 在路由map中,将所有访问到/detail的 redirect一下,访问默认页面
path: '/detail',

component: DetailPage,

redirect: '/detail/count',
| 十、购买详情页——select选项组件 |
<div class="selection-component">

      <div class="selection-show" @click="toggleDrop">

           <span>{{ selections[nowIndex].label }}  </span>

           <div class="arrow"></div>

      </div>

      <div class="selection-list" v-if="isDrop">

          <ul>

             <li v-for="(item, index) in selections"

                  :key="item.label"

                   @click="chooseSelection(index)">

              {{ item.label }}

            </li>

          </ul>

      </div>

</div>
- 关键:通过规定 nowIndex 标记当前选中的选项
data () {

      return {

         nowIndex: 0,

         isDrop: false

      }

}
- 两个方法:显示隐藏、切换selection
methods: {

       toggleDrop () {

           this.isDrop = !this.isDrop

       },

       chooseSelection (index) {

           this.nowIndex = index

           this.isDrop = false

           this.$emit('on-change', this.nowIndex)

                //传到组件外面,告诉外面要购买的是什么

       }

}
- 从父组件获取到的props数据类型、格式:
 props: {

       selections: {

          type: Array,

          default: [{

             label: 'test',

             value: 0

          }]

       }

 }
| 十一、购买详情页——可多选项组件 |
<template>

       <div class="chooser-component">

           <ul class="chooser-list">

              <li v-for="(item, index) in selections"

                  @click="toggleSelection(index)"

                  :title="item.label"

                  :class="{active: checkActive(index)}"

              >{{ item.label }}</li>

           </ul>

       </div>

</template>
1.关键:nowIndex 是一个数组,可以多选
data () {

      return {

          nowIndexs: [0]

      }

}
2、Lodash:是一个一致性、模块化、高性能的 JavaScript实用工具库。
- 通过降低 array、number、objects、string等等的使用难度,从而让 JavaScript变得更简单。
$ npm i --save lodash
import _ from 'lodash'


methods: {

       toggleSelection (index) {

           if (this.nowIndexes.indexOf(index)){

              this.nowIndexes.push(index)

           }

          else {

              this.nowIndexes = _.remove(this.nowIndexes, (idx) => {

                   return idx !== index

              })

          }

          this.$emit('on-change', this.nowIndexes)

        }

}
坑:vue2.0 删除了 vue1.0 中的 $remove方法,官方文档推荐使用第三方工具库
_remove实现,如上:从数组中删除index为this.nowIndexes的值
3.使用一个方法返回是否active,实现多个选项同时active 被激活
:class="{active: checkActive(index)}"
checkActive (index) {

      return this.nowIndexes.indexOf(index) !== -1

}
- 方法判断index在nowIndexes数组中是否存在。
- 返回true,则active:true 选项被激活,返回false.则选项不被激活
| 十二、购买详情页——数组组件 |
<template>

   <div class="counter-component">

       <div class="counter-btn" @click="minus"> - </div>

       <div class="counter-show">

            <input type="text" v-model="number" @keyup="fixNumber">

       </div>

       <div class="counter-btn" @click="add"> + </div>

  </div>

</template>
1.最大值和最小值 由props定义默认值,在不同的调用处由父组件给到
 props: {

    max: {

       type: Number,

       default: 5

    },

    min: {

       type: Number,

       default: 1

    }

 }
2.输入框和数据双向绑定 number, 给定默认值为当前数据的最小值
data () {

    return {

      number: this.min

    }

}
3.watch监听number 每次改变的时候,都会执行$emit->on-change
- 使用监听数据,可以不管数据是在哪儿变的,以及怎么变的
watch: {

    number () {

        this.$emit('on-change', this.number)

    }

}
4.方法中执行‘加’、‘减’以及更换数据
- 当输入框输入String类型时替换掉其中不为数字的部分,然后转为Number
methods: {

    fixNumber () {

      let fix

      if (typeof this.number === 'string') {

        fix = Number(this.number.replace(/\D/g, ''))

      }else {

        fix = this.number

      }

      if(fix > this.max || fix < this.min) {

        fix = this.min

      }

      this.number = fix

    },

    minus () {

      if (this.number <= this.min) {

        return

      }

      this.number --

    },

    add () {

      if (this.number >= this.max) {

        return

      }

      this.number ++

    }

  }
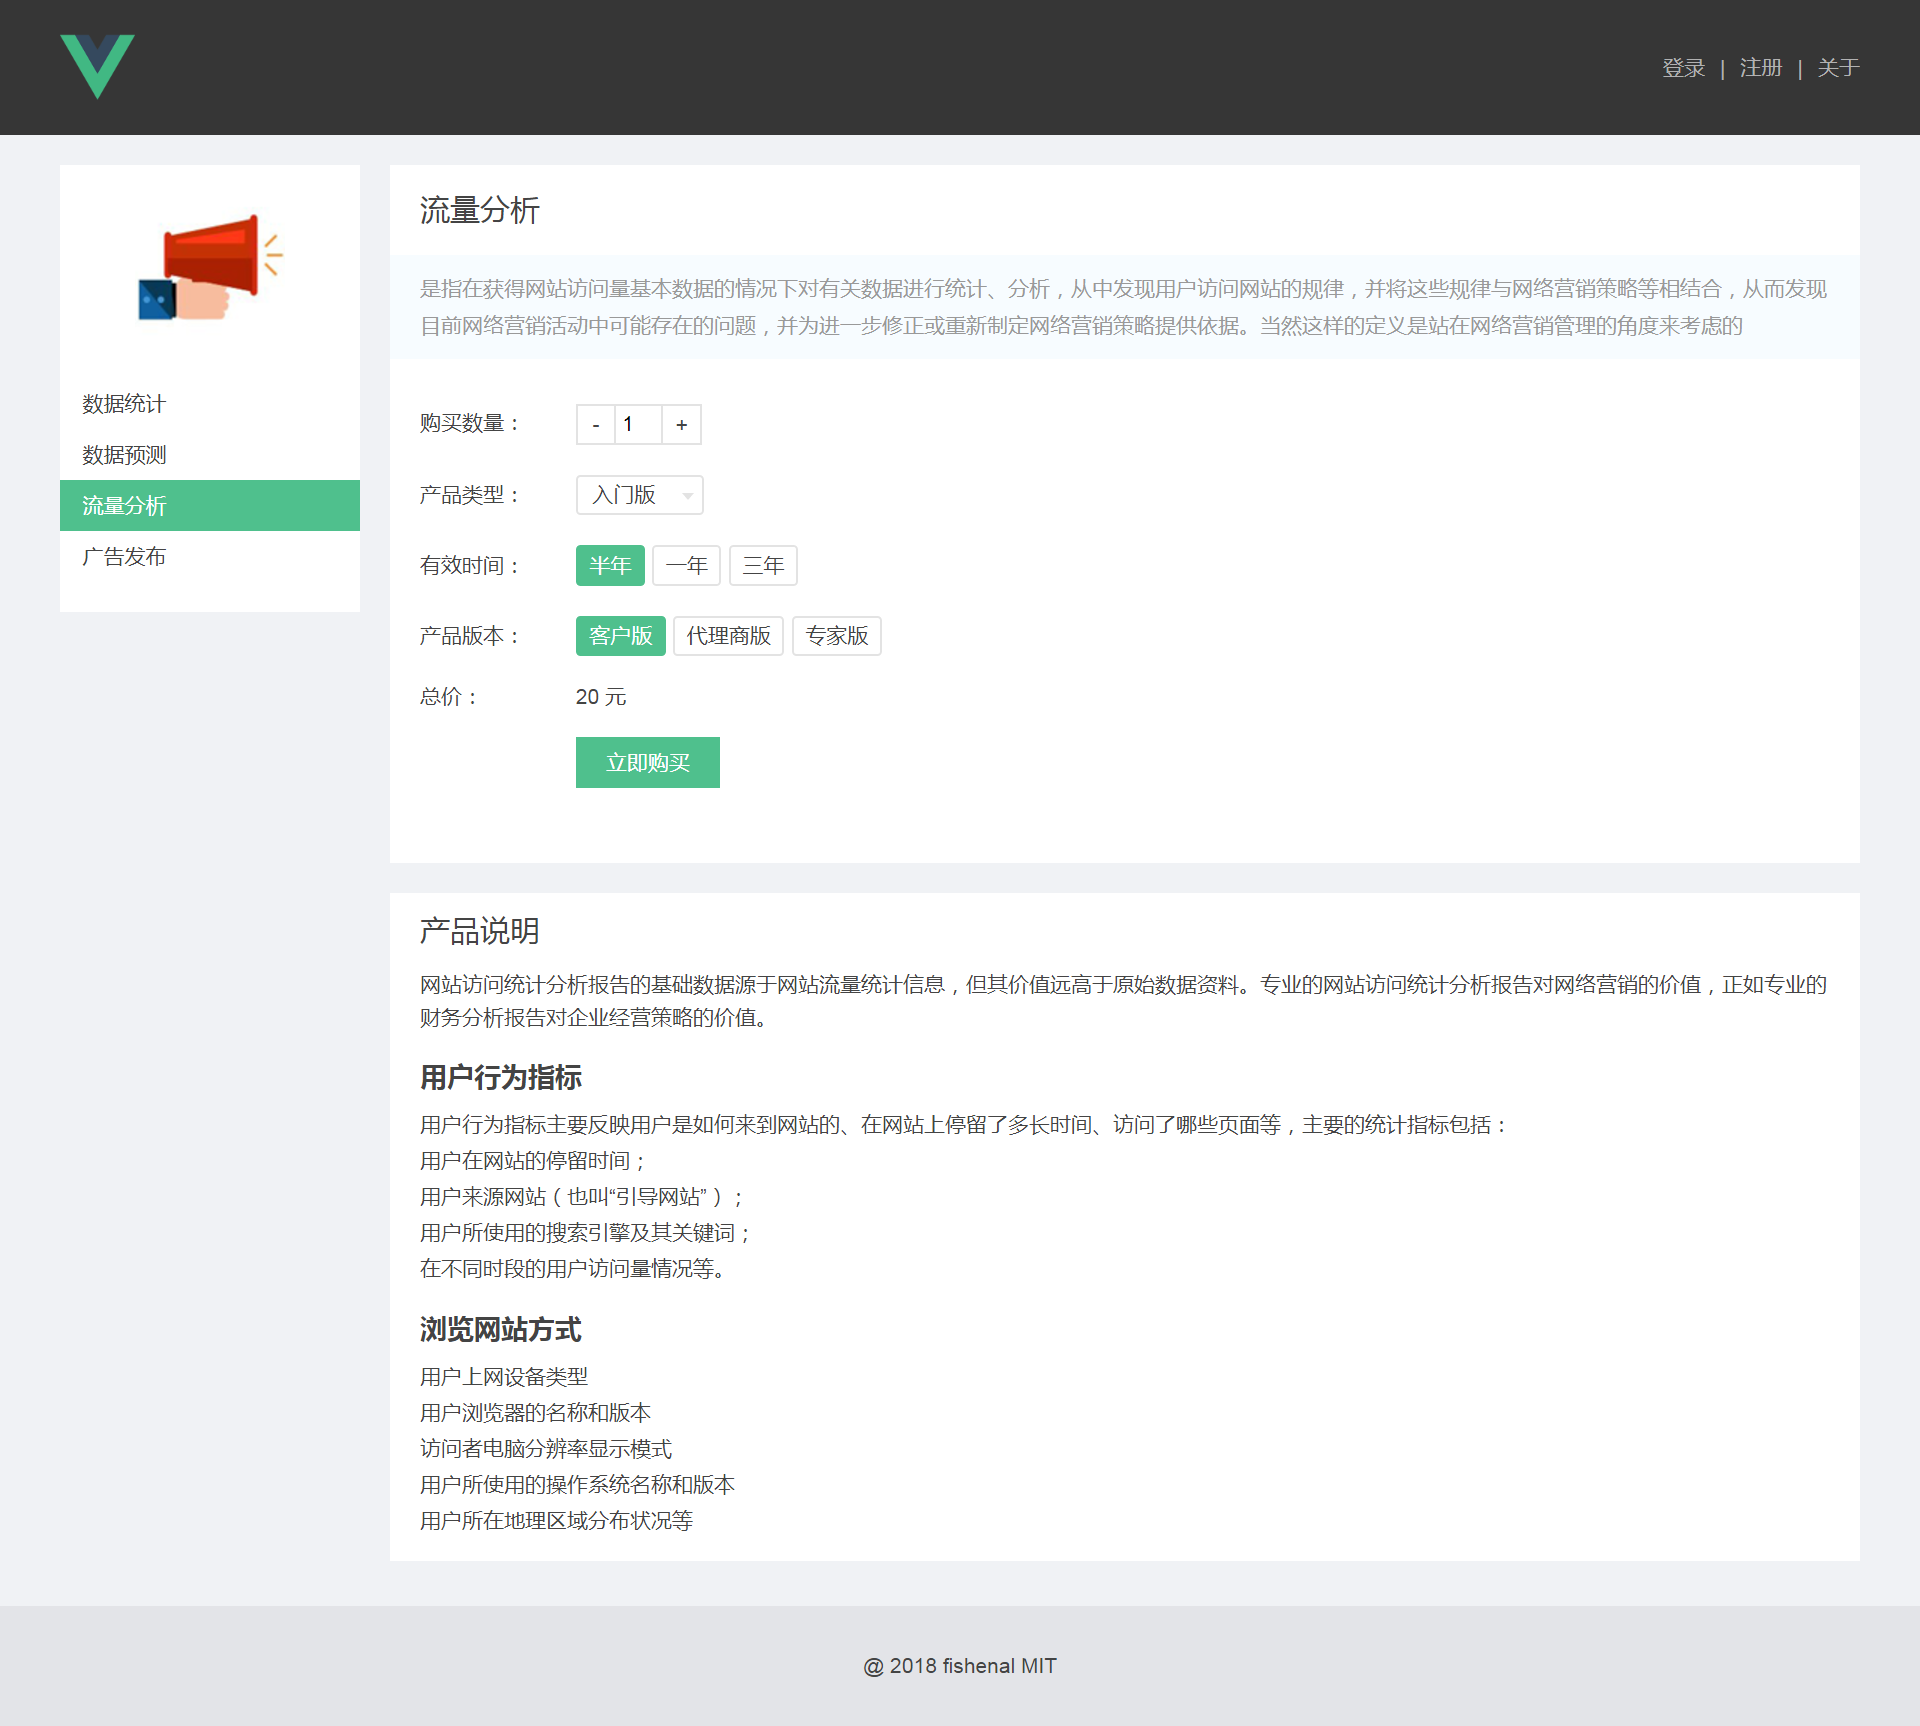
| 十三、购买详情页——总价计算 |
1.关键: 依据每一个页面中所有组件传出来的值,进行计算
counter.vue:
this.$emit('on-change', this.number)
selection.vue:
this.$emit('on-change', this.selections[this.nowIndex])
chooser.vue:
this.$emit('on-change', this.selections[index])
2.analysis.vue页面组件中:
- 调用对应的子组件:
<v-counter @on-change="onParamChange('buyNum', $event)">

</v-counter>

<v-selection :selections="buyTypes"

             @on-change="onParamChange('buyType',$event)">

</v-selection>

<v-chooser :selections="periodList"

           @on-change="onParamChange('period', $event)">

</v-chooser>

<v-mul-chooser :selections="versionList"

               @on-change="onParamChange('versions'$event)">

</v-mul-chooser>
- 各子组件统一使用on-change事件触发同一个参数处理函数
onParamChange (attr, value) {

        this[attr] = value

        //console.log(attr, this[attr])

        this.getPrice()

}
在传参时:
第一个参数attr,用'组件数据如buyType'来标识是哪个组件调用的方法
第二个参数value,用$event来表示 事件on-change带出来的值
3.组件渲染完成之后,第一次进入页面时组件数据都显示默认数据
mounted () {

     this.buyNum = 1

     this.buyType = this.buyTypes[0]

     this.versions = [this.versionList[0]]

     this.period = this.periodList[0]

     this.getPrice()

}
4.一般规定一个接口,传给服务端,处理完成后再通过Ajax传出来金额
- 使用lodash和vue-resource发送post请求:
getPrice () {

      let buyVersionsArray = _.map(this.versions, (item) => {

           return item.value

      })

      let reqParams = {

          buyNum: this.buyNum,

          buyType: this.buyType.value,

          period: this.period.value,

          version: buyVersionsArray.join(',')

      }

      //通过vue-resource 发送Ajax请求

      this.$http.post('/api/getPrice', reqParams)

        .then((res) => {

             //console.log(res)

             //let data = JSON.parse(res.data)

             this.price = res.data.buyNum * 20

      })

}
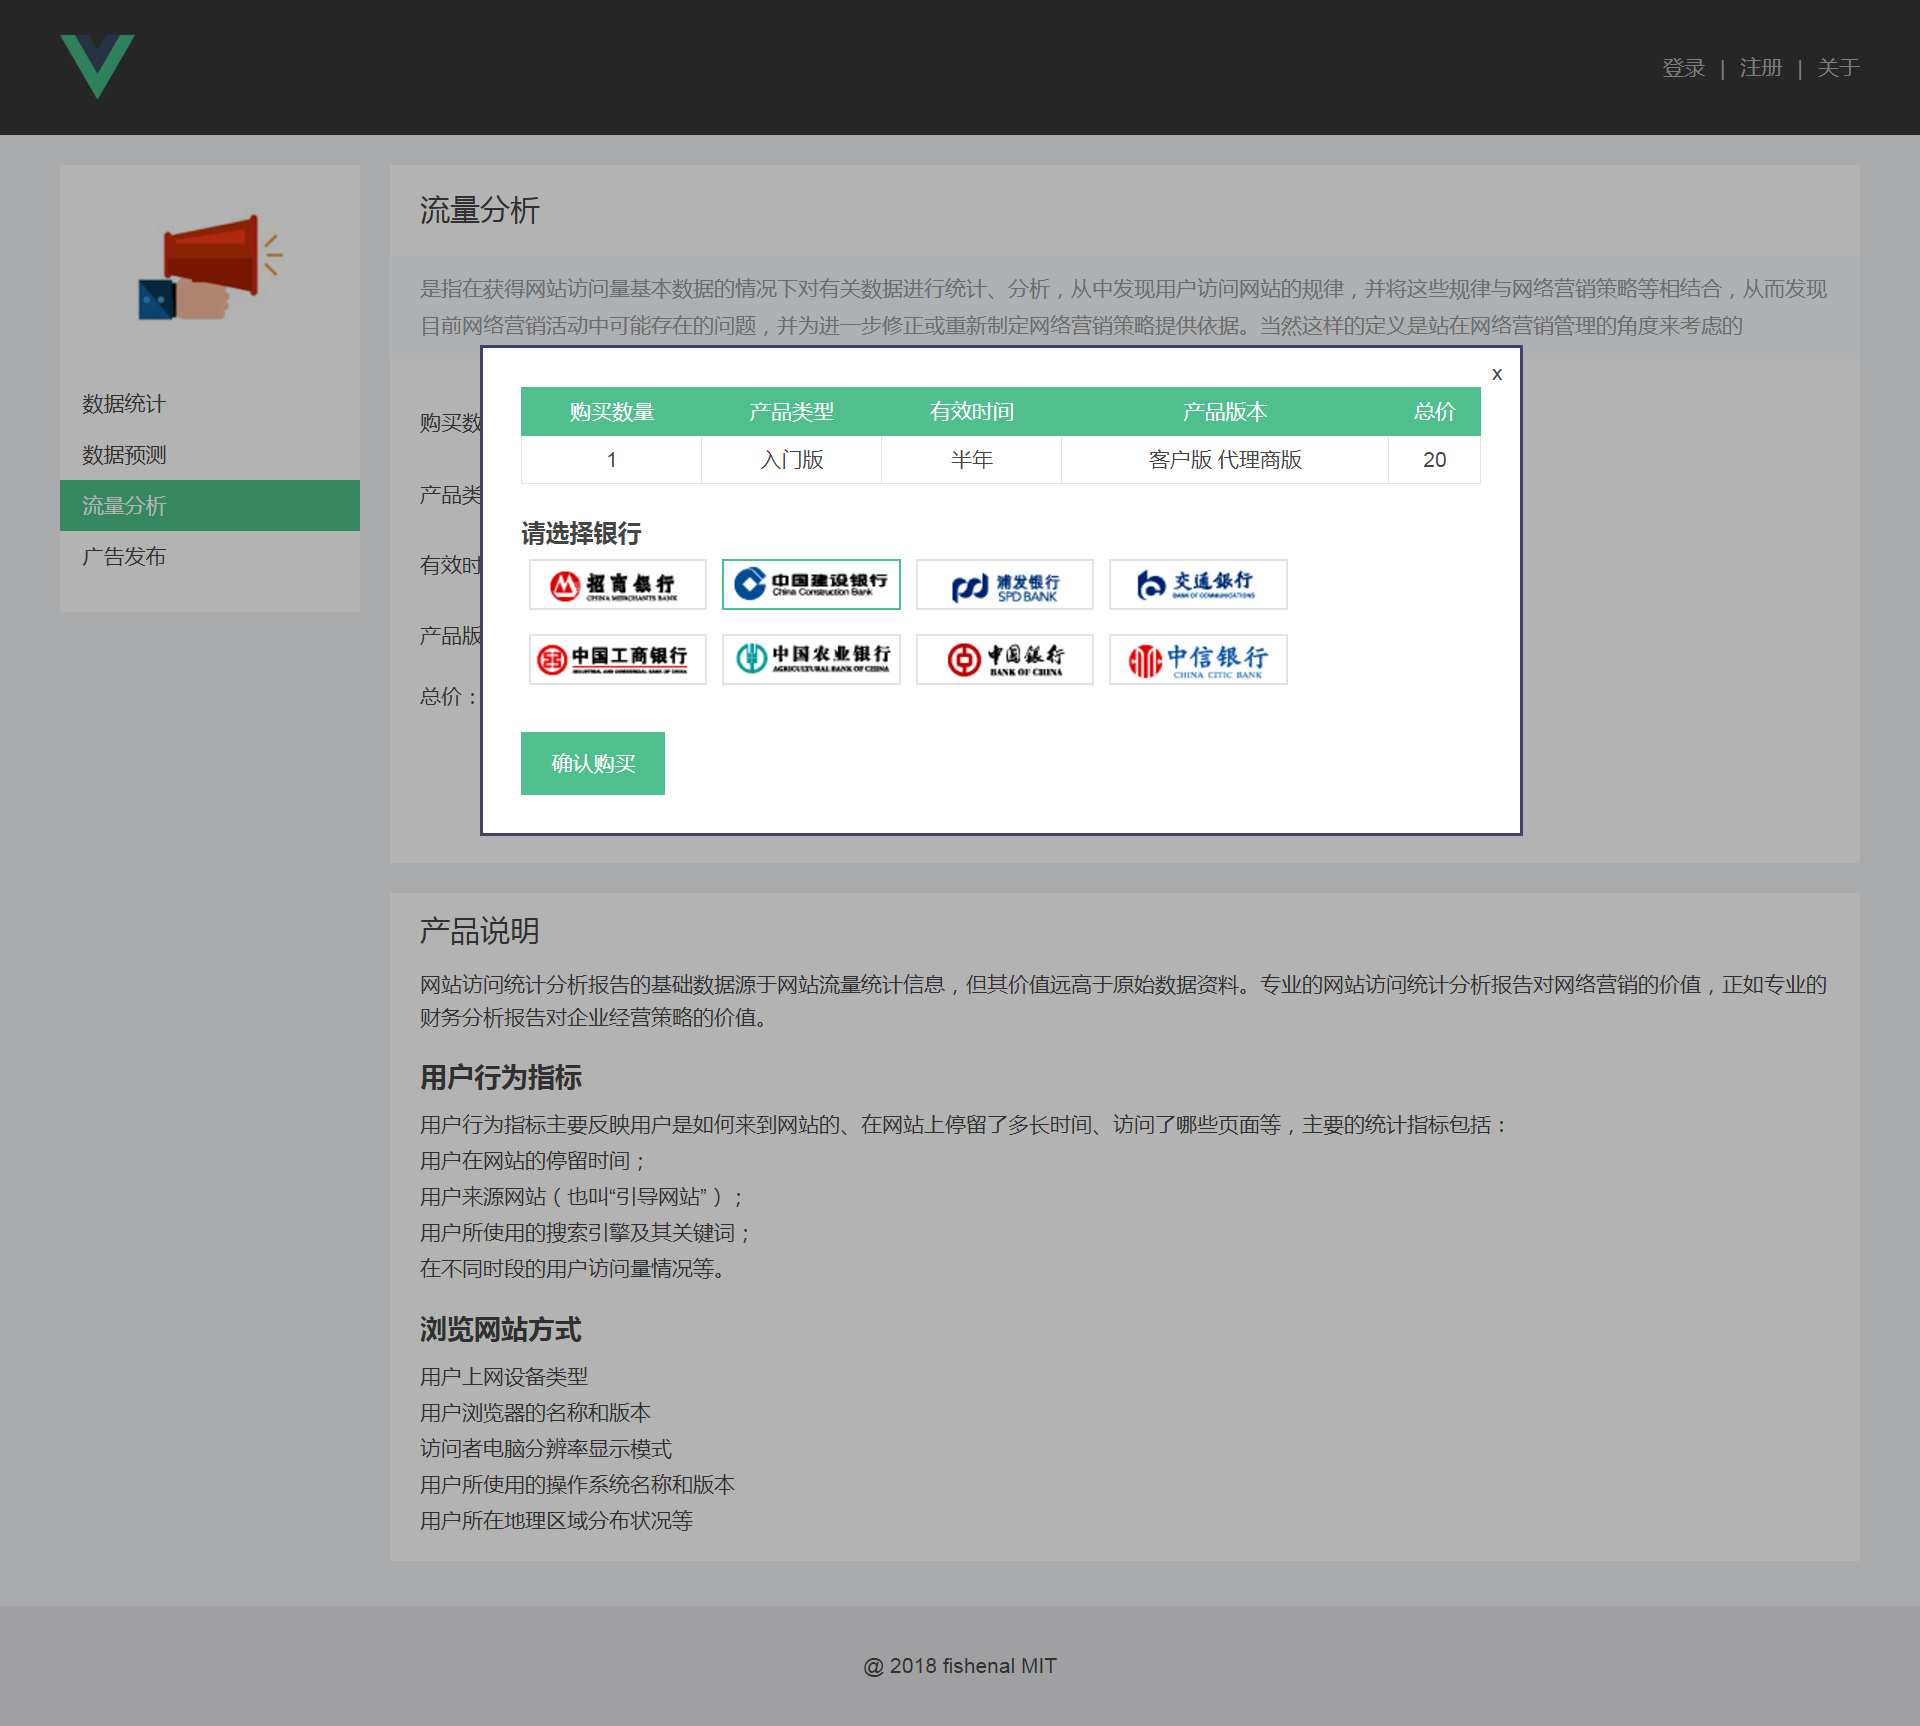
| 十四、购买详情页——购买弹窗、选择银行 |
选择银行:四个页面统一,不随页面本身的选择而改变
——抽出来 以独立的方式载入
 |
 |
| 订单列表 | |
| 十五、订单列表——日历组件 |
安装第三方日历控件-awesome 工具库
npm install vue-date-picker --save //记录到项目里
引入:
import VueDatePicker from 'vue-date-picker'

components: {

      VueDatePicker

}
不足:这个组件只支持vue1.0版本的,需要自己再扩展一下
重新扩展:复制到自己新建的datepicker.vue文件中
修复bug:
1.在script->props中增:
styleObj: { type: Object, default: null }
2.在vue1.0中value是直接传过来的 :value="value",需要改成
v-model="showValue"
datas中对应:
showValue: ' ',
3.在vue1.0中允许给传入的value赋值,但在vue2.0中是不允许的,会报错
this.value = this.stringify(); //后面通过$emit将value值传出来

this.showValue = this.stringify();

this.$emit('on-change', this.showValue);
使用组件:
<v-date-picker  fromat="YYYY-MM-DD"

                @change="changeStartDate">

</v-date-picker>
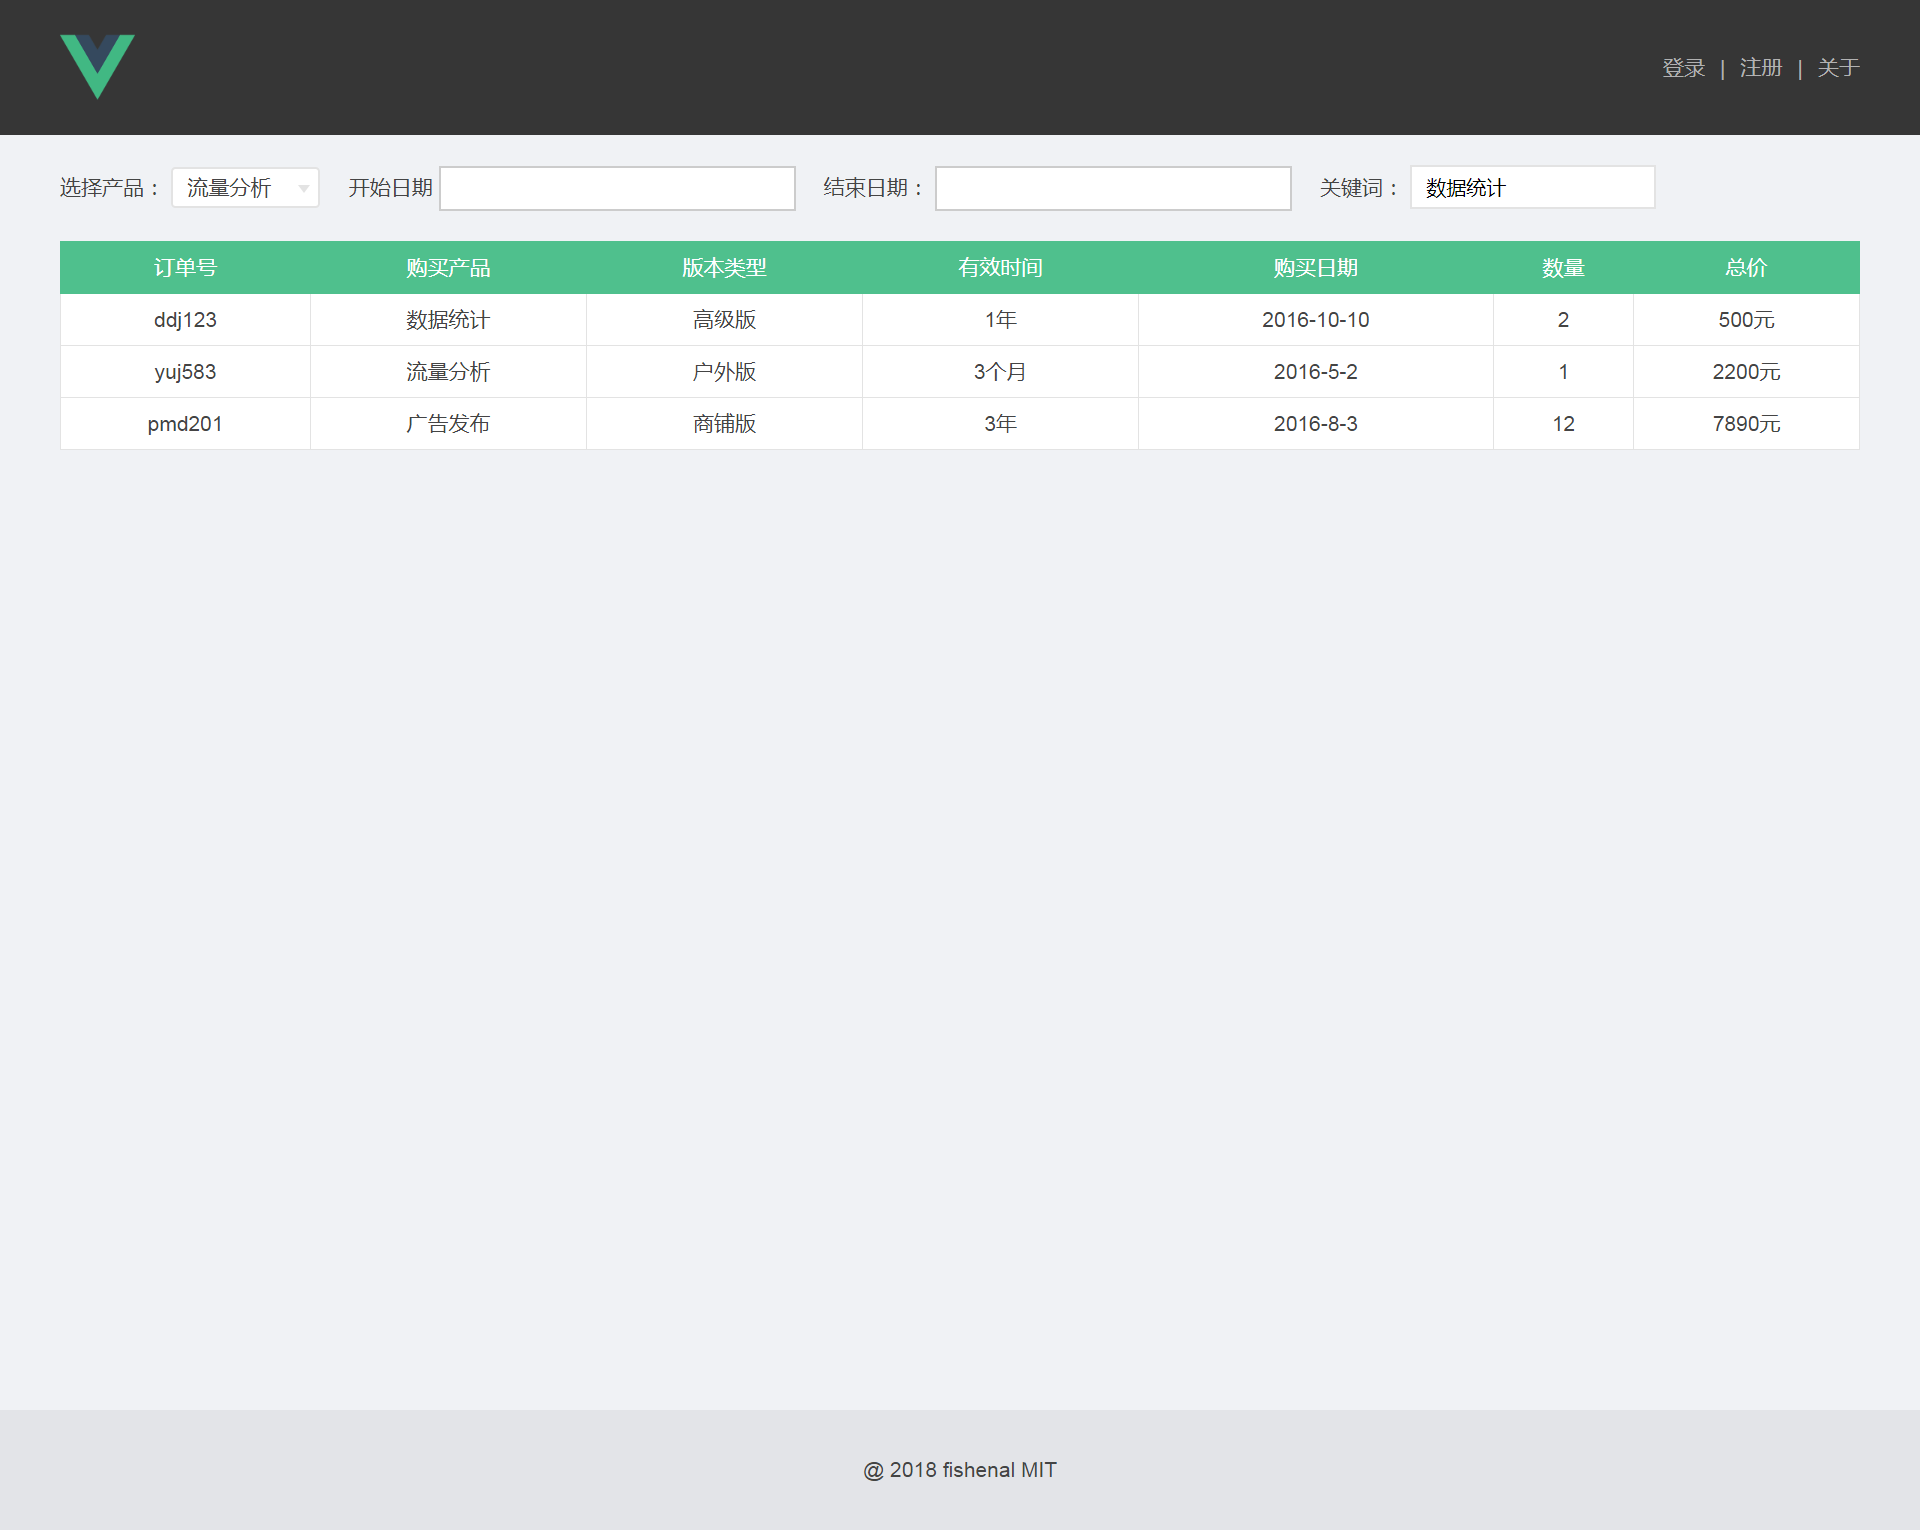
| 十六、订单列表 |
watch监听关键词搜索input框中的query:
<input type="text" v-model.lazy="query" class="order-query">
- 加修饰符 .lazy 使得移除后才触发watch中方法
datas: { query: '', }
watch: {

     query () {

        console.log('on query change')

     }

}
| 十七、订单列表 |
关键:两次遍历——第一次遍历每一条数据对象,包含一行中所有数据
第二次遍历每一条中每一列的单个数据
基础:两个循环渲染——渲染表头<th>、渲染表列<td>
<table>

       <tr>

          <th v-for="head in tableHeads" :key="head.label">

              {{ head.label }}

          </th>

       </tr>

       <tr v-for="item in tableData" :key="item.period">

          <td v-for="head in tableHeads" :key="head.key">

               {{ item[head.key] }}

          </td>

       </tr>

</table>
- 点击表头,实现排序:
changeOrder (headItem) {

        this.tableHeads.map((item) => {   //常用使点击项高亮显示的方法

            Item.active = false

            return item

        })

        headItem.active = true

        if (this.currentOrder === 'asc') {

           this.currentOrder = 'desc'

        }

        else if (this.currentOrder === 'desc') {

           this.currentOrder = 'asc'

        }

        this.tableData = _.orderBy(this.tableData, headItem.key,

      this.currentOrder)

       //_.orderBy的三个参数分别是:

       //要排序的数据、排序根据的列数、排序的方式(正序,倒序)

}
- checkOrder.vue文件:在组件内部进行路由跳转的通用的方法
toOrderList () {

         this.$router.push({path: '/orderList'})

}

//和<router-link>里面to的跳转是一样的
注:项目来自慕课网
最新文章
- cf591d
- WEB打印控件Lodop
- Java初识
- rabbitmq心跳机制与配置
- Laravel 5如何在中间件中获取路由参数?
- [rsync]——rsync文件同步和备份
- Python一日一练05----怒刷点击量
- Go and JSON
- C语言精要总结-指针系列(二)
- 深度优先搜索DFS(一)
- 吉哥系列故事――恨7不成妻 HDU - 4507 数位dp
- 20165220实验二《Java面向对象程序设计》
- 在虚拟机安装windows xp时所需要的序列号
- Practical Node.js摘录(2018版)第1,2章。
- android -------- Android Studio调试运行时ADB not responding
- winform和wpf如何实现鼠标穿透的效果
- powerDesigner根据sql脚本来逆向生成pdm等模型
- Android学习系列(19)--App离线下载
- Linux 进程间通信(posix消息队列 简单)实例
- Code Signal_练习题_arrayChange