java设计模式学习笔记
简介
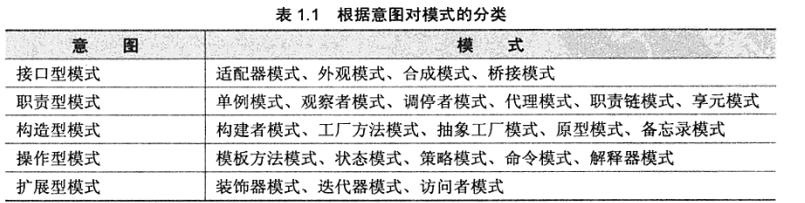
设计模式可以分为五类
- 接口型 模式:适配器模式,外观模式,合成模式,桥接模式
- 职责型 模式:单例模式,观察者模式,调停者模式,代理模式,职责链模式,享元模式
- 构造型 模式:构建者模式,工厂方法模式,抽象工厂模式,原型模式,备忘录模式
- 操作型 模式:模板方法模式,状态模式,策略模式,命令模式,解析器模式
- 扩展型 模式:装饰器模式,迭代器模式,访问者模式。
接口类
适配器模式 通过一个接口来适配类的接口
接口的优点:限制了类之间的协作 , 即使实现类发生巨大变化, 接口的客户端也不受影响
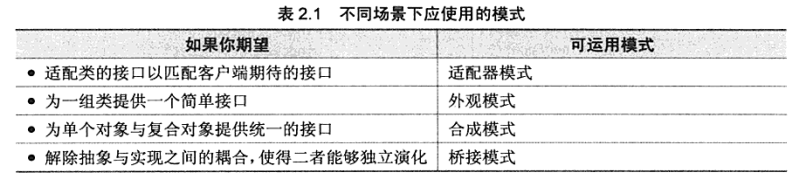
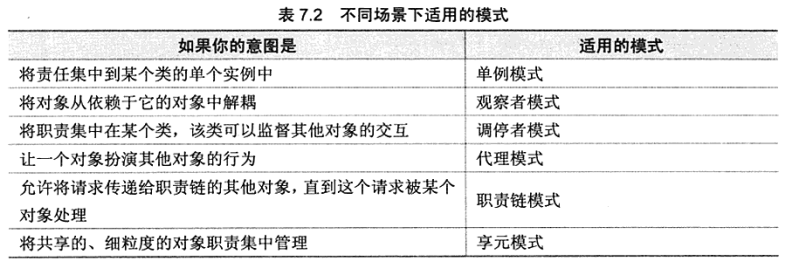
不同场景下使用 的模式
- 适配类的接口,以匹配客户端期待的接口-->适配器模式
- 为一组类提供简单接口-->外观模式
- 为简单对象和复合对象提供统一接口-->合成模式
- 解除抽象与实现之间的耦合,使得二者独立演化-->桥接模式
1. 适配器模式
类适配器
使用继承方式,是静态的继承方式
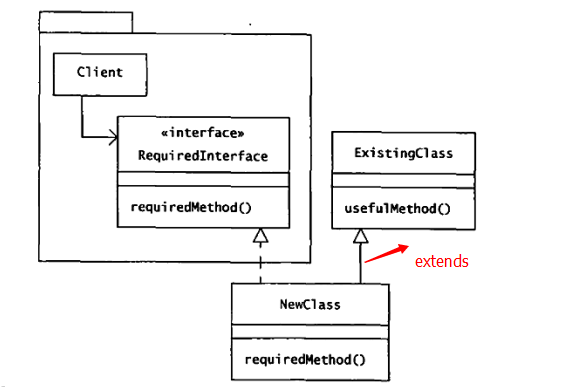
简述 :接口中的方法 分别在父类和子类中实现
写一个demo
接口中有两个方法
public interface Target {

    void firstMethod();

    void secondMethod();

}
adaptee只有一个方法
public class Adaptee {

    public void firstMethod(){

        System.out.println("this is first method.");

    }

}
adapter 继承 adaptee 并实现 secondMethod
public class Adapter extends Adaptee implements Target {

    @Override

    public void secondMethod() {

        System.out.println("this second method.");

    }

}
对象适配器
采用委派的方式
将 adaptee组合到 adpter2中
写个demo
public class Adapter2 implements Target{

    private Adaptee adaptee;

    public Adapter2(Adaptee adaptee) {

        this.adaptee = adaptee;

    }

    @Override

    public void firstMethod() {

         this.adaptee.firstMethod();

    }

    @Override

    public void secondMethod() {

        System.out.println("this second method.");

    }

}
优点:代码复用,扩展 ,灵活 ,强大
缺点:是系统零乱 不易把握
2.外观模式
外观模式的意图是为 子系统 提供提供一个接口, 方便使用
外观类可能全是静态方法
简单描述一下 为复杂的子系统 提供一个 简单的调用门面
网上找了个易于理解的例子 http://www.aichengxu.com/java/681321.htm
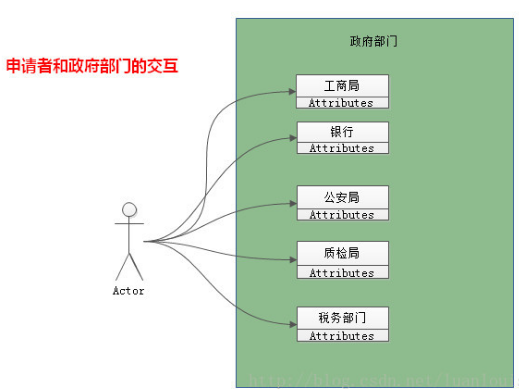
一个人申请开公司 他需要分别 去 工商局,银行,公安局,质监局,税务部门 办理相关手续 特别麻烦
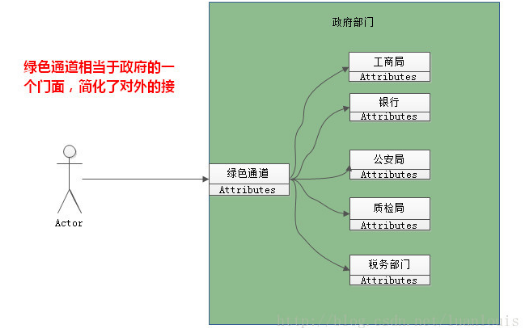
现在 有个绿色通道 ,actor只要 和它对接 既可以完成 上述操作 这个 绿色通道便可以看成是 一个 facade
这样看来 facade 模式 减少了客户端和 各个子系统之间交互,减少耦合。使接入变得简单
写一个简单的demo
工商系统
public class Indutry {

   void regist(){

       System.out.println("indutry registration.");

   }

}
公安系统
public class PoliceStation {

    void regist(){

        System.out.println("police station registration.");

    }

}
税务系统
public class RevenueDepartment {

    void regist(){

        System.out.println("revenue department registration.");

    }

}
facade
public class Facade {

    public void buildCompany() {

        Indutry indutry = new Indutry();

        PoliceStation policeStation = new PoliceStation();

        RevenueDepartment revenueDepartment = new RevenueDepartment();

        indutry.regist();

        policeStation.regist();

        revenueDepartment.regist();

    }

}
3.合成模式
composite :组合对象 ,单对象 。组对象和单对象有共同的行为
组合对象 可以包括其他组合对象,也可以包括单对象。
合成模式 作用:保证客户端调用 单对象与组合对象的一致性
安全合成模式
管理聚集的方法 只出现在树枝构建中
写一个demo
相同接口
public interface Component {

    void printStruct(String preStr);

}
组合
public class Composite implements Component {

    private List<Component> childComponens = new ArrayList<Component>();

    private String name;

    public void add(Component child) {

        childComponens.add(child);

    }

    public void remove(int index) {

        childComponens.remove(index);

    }

    public Composite(String name) {

        this.name = name;

    }

    public List<Component> getChildComponens() {

        return childComponens;

    }

    public void setChildComponens(List<Component> childComponens) {

        this.childComponens = childComponens;

    }

    public String getName() {

        return name;

    }

    public void setName(String name) {

        this.name = name;

    }

    @Override

    public void printStruct(String preStr) {

        System.out.println(preStr + "-->" + name);

        if (childComponens != null) {

            preStr += "      ";

            for (Component child : childComponens) {

                //递归调用

                child.printStruct(preStr);

            }

        }

    }

}
叶子节点
public class Leaf implements Component {

    private String name;

    public Leaf(String name) {

        this.name = name;

    }

    public String getName() {

        return name;

    }

    public void setName(String name) {

        this.name = name;

    }

    @Override

    public void printStruct(String preStr) {

        System.out.println(preStr+"-->"+name);

    }

}
测试
public void test(){
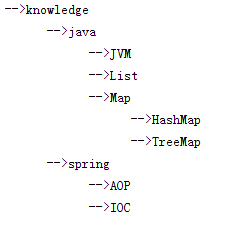
Composite root=new Composite("knowledge");
//java 节点
Composite java=new Composite("java");
Composite map=new Composite("Map");
map.add(new Leaf("HashMap"));
map.add(new Leaf("TreeMap"));
java.add(new Leaf("JVM"));
java.add(new Leaf("List"));
java.add(map);
//spring节点
Composite spring=new Composite("spring");
spring.add(new Leaf("AOP"));
spring.add(new Leaf("IOC"));
// root add
root.add(java);
root.add(spring);
root.printStruct("");
}
运行结果
4. 桥接模式
桥接模式 (bridge)关注抽象
桥接模式的意图 是 将 抽象与抽象方法的实现 相互分离出来, 实现 解耦合,以便二者可以相互独立
简单的说 就是 将对象 与方法分离
书上看到一个例子:现在有 2种设备 分别有 启动 关闭 2个抽象方法。
写个简单的 demo
抽象设备
public abstract class AbstractMachine {

   private MechineMethod mechineMethod;

    public void setMechineMethod(MechineMethod mechineMethod) {

        this.mechineMethod = mechineMethod;

    }

    public MechineMethod getMechineMethod() {

        return mechineMethod;

    }

    abstract void checkMethod();

}
设备A
public class MachineA extends AbstractMachine {

    @Override

    void checkMethod() {

        System.out.println("check machine A ......");

    }

}
设备B
public class MachineB extends AbstractMachine {

    @Override

    void checkMethod() {

        System.out.println("check machine B ......");

    }

}
要检测的功能 的抽象类 (这里对方法的处理 将常规的 竖 转 横,方法平铺 )
public abstract class MechineMethod {

    abstract void methodRun();

}
start功能
public class StartMethod extends MechineMethod {

    @Override

    void methodRun() {

        System.out.println("start method running.");

    }

}
close功能
public class CloseMethod extends MechineMethod {

    @Override

    void methodRun() {

        System.out.println("close method running.");

    }

}
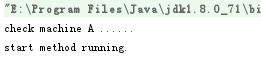
测试 检测 A设备的Start功能
//检测A设备的 start功能

 public void test() {

        //检测A设备的 start功能

        AbstractMachine machine = new MachineA();

        MechineMethod mechineMethod = new StartMethod();

        machine.setMechineMethod(mechineMethod);

        machine.checkMethod();

        machine.getMechineMethod().methodRun();

    }
输出结果
职责类
我们常见的职责模式 如
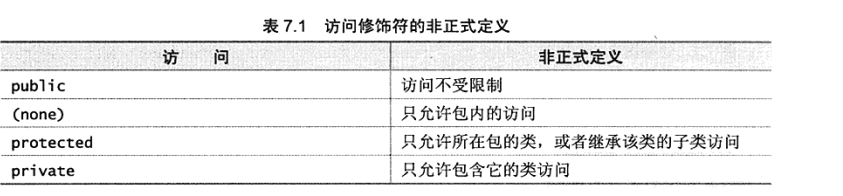
根据可见性控制职责 :java代码中的 public,private,protected
职责设计模式
- 将职责集中到某个类的单个实例中-->单例模式
- 将对象从依赖它的对象中解耦-->观察者模式
- 将职责集中在某个类,该类可以监督其他对象的交互-->调停者模式
- 让一个对象扮演其他对象的行为--代理模式
- 允许将职责链的请求传递给其他对象,直到这个请求被某个对象处理-->职责链模式
- 将共享的 细粒度的职责 进行集中管理-->享元模式
1. 单例模式
单例模式 : 是确保一个类的 有且仅有一个实例,并为它提供一个全局访问点
单例模式中 往往使用 static关键字
static 修饰的变量为 静态变量,静态变量只在类第一次调用的时候加载 ,在内存中只有一个副本。

1.饿汉模式
public class EagerSingleton {

    private static EagerSingleton eagerSingleton=new EagerSingleton();

    private EagerSingleton() {

    }

    public EagerSingleton getSingleton(){

        return eagerSingleton;

    }

}
2.懒加载模式
public class LazzySingleton {

    private static LazzySingleton lazzySingleton;

    private LazzySingleton() {

    }

    //同步方法

    public static synchronized LazzySingleton getSingleton() {

        if (lazzySingleton == null) {

            lazzySingleton = new LazzySingleton();

        }

        return lazzySingleton;

    }

}
3. 支持多线程
public class Singleton {

    private static Singleton singleton;

    private Singleton() {

    }

    public static Singleton getSingleton() {

        //先条件  后程序

        if (singleton == null) {

            //锁 住整个对象

            synchronized (Singleton.class) {

                singleton = new Singleton();

            }

        }

        return singleton;

    }

}
2. 观察者模式
Observer [əbˈzɜ:rvə(r)]
观察者模式:在多个对象之间定义一对多依赖关系,当一个对象的状态发生改变时,通知你依赖于它的对象,并根据新状态做出相应反应。

写一个demo
如 写一个 微博更新自动推送给客户
抽象 WeiBo 父类
public abstract class WeiBo {

    //保存 Observer

    private List<Observer> list = new ArrayList<Observer>();

    public void addObserver(Observer observer) {

        list.add(observer);

    }

    public void delObserver(Observer observer) {

        list.remove(observer);

    }

    //通知所有观察者

    public void notifyObservers(String operation) {

        for (Observer observer : list) {

            observer.update(operation);

        }

    }

}
具体的Video类
public class Video extends WeiBo {

    private String operation;

    public String getOperation() {

        return operation;

    }

    public void change(String operation) {

        this.operation = operation;

        notifyObservers(operation);

    }

}
观察者接口
public interface Observer {

    public void update(String operation);

}
监听文件大小的观察者
public class ObserverSize implements Observer {

    private String operation;

    @Override

    public void update(String operation) {

        this.operation = operation;

        System.out.println("Observer Size : " + operation);

    }

}
写一个测试的demo
 public void test() {

        Video video = new Video();

        Observer observer = new ObserverSize();

        video.addObserver(observer);

        video.change("compress video");//压缩视频

    }
运行结果

推模式
主题发生改变时自动推送给观察者 ,不管观察者是否需要,主题推送的通常是主题对象的全部数据 或部分数据
拉模式
主题发生改变时 只传递少了信息给观察者 ,观察者根据需再向主题拉取数据。
java 提供的观察者支持类
Observable
Observable [əbˈzərvəbəl] 可观察
被观察的类只要继承该类即可。

public class Observable {

    private boolean changed = false;

    private Vector<Observer> obs;

    /** Construct an Observable with zero Observers. */

    public Observable() {

        obs = new Vector<>();

    }

    /**

     * Adds an observer to the set of observers for this object, provided

     * that it is not the same as some observer already in the set.

     * The order in which notifications will be delivered to multiple

     * observers is not specified. See the class comment.

     *

     * @param   o   an observer to be added.

     * @throws NullPointerException   if the parameter o is null.

     */

    public synchronized void addObserver(Observer o) {

        if (o == null)

            throw new NullPointerException();

        if (!obs.contains(o)) {

            obs.addElement(o);

        }

    }

    /**

     * Deletes an observer from the set of observers of this object.

     * Passing <CODE>null</CODE> to this method will have no effect.

     * @param   o   the observer to be deleted.

     */

    public synchronized void deleteObserver(Observer o) {

        obs.removeElement(o);

    }

    /**

     * If this object has changed, as indicated by the

     * <code>hasChanged</code> method, then notify all of its observers

     * and then call the <code>clearChanged</code> method to

     * indicate that this object has no longer changed.

     * <p>

     * Each observer has its <code>update</code> method called with two

     * arguments: this observable object and <code>null</code>. In other

     * words, this method is equivalent to:

     * <blockquote><tt>

     * notifyObservers(null)</tt></blockquote>

     *

     * @see     java.util.Observable#clearChanged()

     * @see     java.util.Observable#hasChanged()

     * @see     java.util.Observer#update(java.util.Observable, java.lang.Object)

     */

    public void notifyObservers() {

        notifyObservers(null);

    }

    /**

     * If this object has changed, as indicated by the

     * <code>hasChanged</code> method, then notify all of its observers

     * and then call the <code>clearChanged</code> method to indicate

     * that this object has no longer changed.

     * <p>

     * Each observer has its <code>update</code> method called with two

     * arguments: this observable object and the <code>arg</code> argument.

     *

     * @param   arg   any object.

     * @see     java.util.Observable#clearChanged()

     * @see     java.util.Observable#hasChanged()

     * @see     java.util.Observer#update(java.util.Observable, java.lang.Object)

     */

    public void notifyObservers(Object arg) {

        /*

         * a temporary array buffer, used as a snapshot of the state of

         * current Observers.

         */

        Object[] arrLocal;

        synchronized (this) {

            /* We don't want the Observer doing callbacks into

             * arbitrary code while holding its own Monitor.

             * The code where we extract each Observable from

             * the Vector and store the state of the Observer

             * needs synchronization, but notifying observers

             * does not (should not).  The worst result of any

             * potential race-condition here is that:

             * 1) a newly-added Observer will miss a

             *   notification in progress

             * 2) a recently unregistered Observer will be

             *   wrongly notified when it doesn't care

             */

            if (!changed)

                return;

            arrLocal = obs.toArray();

            clearChanged();

        }

        for (int i = arrLocal.length-1; i>=0; i--)

            ((Observer)arrLocal[i]).update(this, arg);

    }

    /**

     * Clears the observer list so that this object no longer has any observers.

     */

    public synchronized void deleteObservers() {

        obs.removeAllElements();

    }

    /**

     * Marks this <tt>Observable</tt> object as having been changed; the

     * <tt>hasChanged</tt> method will now return <tt>true</tt>.

     */

    protected synchronized void setChanged() {

        changed = true;

    }

    /**

     * Indicates that this object has no longer changed, or that it has

     * already notified all of its observers of its most recent change,

     * so that the <tt>hasChanged</tt> method will now return <tt>false</tt>.

     * This method is called automatically by the

     * <code>notifyObservers</code> methods.

     *

     * @see     java.util.Observable#notifyObservers()

     * @see     java.util.Observable#notifyObservers(java.lang.Object)

     */

    protected synchronized void clearChanged() {

        changed = false;

    }

    /**

     * Tests if this object has changed.

     *

     * @return  <code>true</code> if and only if the <code>setChanged</code>

     *          method has been called more recently than the

     *          <code>clearChanged</code> method on this object;

     *          <code>false</code> otherwise.

     * @see     java.util.Observable#clearChanged()

     * @see     java.util.Observable#setChanged()

     */

    public synchronized boolean hasChanged() {

        return changed;

    }

    /**

     * Returns the number of observers of this <tt>Observable</tt> object.

     *

     * @return  the number of observers of this object.

     */

    public synchronized int countObservers() {

        return obs.size();

    }

}
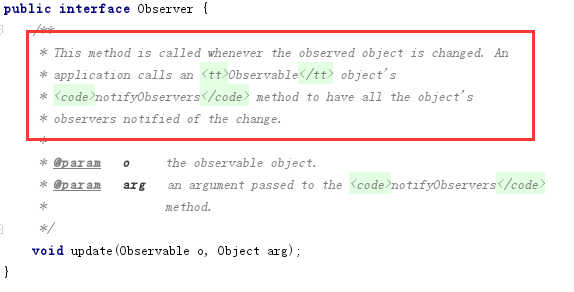
Observer
观察者只要实现该类即可。
3. 调停者模式 Mediator
mediator [ˈmēdēˌātər] :中间人
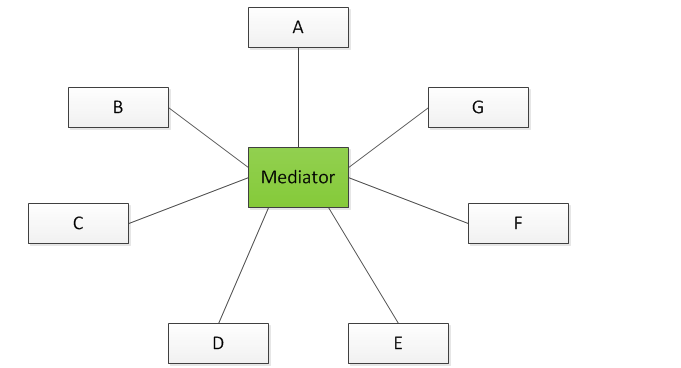
调停者模式:定义一个对象,封装一组对象的交互,从而降低对象间的耦合度,避免了对象之间的显示引用,并且可以独立的改变对象间的行为。
复杂的调用关系
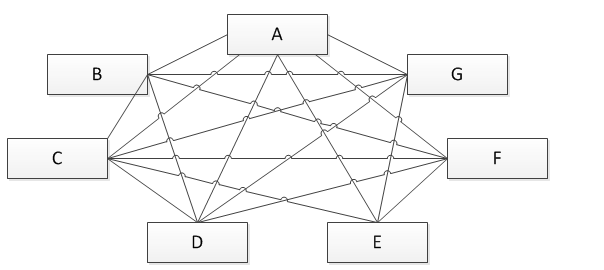
引入 mediator

写个demo
Mediator 接口
public interface Mediator {

    void changed(Component component);

}
将A,B,C...等组件 抽象出一个父类
/**

 * A,B,C,D...抽象出一个父类 叫 Colleague

 * 因为 调停者 要和 A,B,C,D..组件关联 所以将它注入到各组件中(抽象到父类里)

 */

public abstract class Component {

    private Mediator mediator;

    public Component(Mediator mediator) {

        this.mediator = mediator;

    }

    public Mediator getMediator() {

        return mediator;

    }

}
组件A
public class ComponetA extends Component {

    public ComponetA(Mediator mediator) {

        super(mediator);

    }

    public void start(){

        getMediator().changed(this);//通过Mediator 调停者 通知 其他组件

    }

}
组件B
public class ComponetB extends Component {

    public ComponetB(Mediator mediator) {

        super(mediator);

    }

    public void start(){

        getMediator().changed(this);//通过Mediator 调停者 通知 其他组件

    }

}
实现 Mediator 类
public class MediatorConcrete implements Mediator {

    //调停者 要交互 其他组件 所以 其他组件 要注入调停者里面

    private ComponetA colleagueA;

    private ComponetB colleagueB;

    public void setColleague(ComponetA colleagueA, ComponetB colleagueB) {

        this.colleagueA = colleagueA;

        this.colleagueB = colleagueB;

    }

    @Override

    public void changed(Component colleague) {

        //通知给其他组件

        if (colleague instanceof ComponetA) {

            System.out.println("hi B,ComponetA start");

        } else if (colleague instanceof ComponetB) {

            System.out.println("hi A,ComponetB start");

        }

    }

}
测试
public void test(){

        //实例化一个调停者

        MediatorConcrete mediator = new MediatorConcrete();

        //创建两个组件,放入调停者(要通过调停者传递消息)

        ComponetA a = new ComponetA(mediator);

        ComponetB b = new ComponetB(mediator);

        //交互的组件放入 (因为一个组件change,要通知其他组件)

        mediator.setColleague(a,b);

        a.start();//a组件启动

    }
运行结果
4. 代理模式 Proxy
代理对象通常拥有一个几乎和实际对象相同的接口。它常常会控制访问,并将请求合理的转发给底层的真实对象。
Java 代理
- 静态代理
- 动态代理
静态代理
client-->subject-->proxy-->realSubject
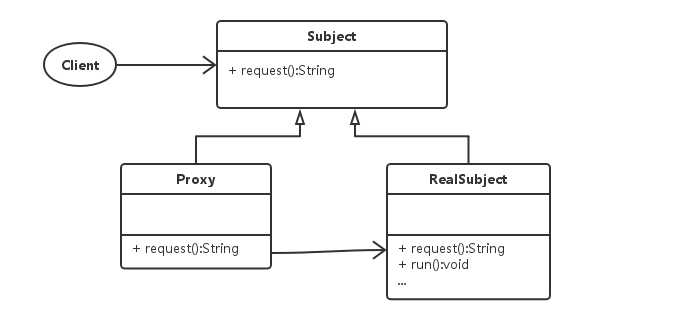
realSubject : 委托类
proxy : 代理类
subject : 委托类和代理类的接口
静态代理中 一个委托类 realSubject 对应一个代理类 proxy 代理类在编译期间就已经确定
动态代理
Java 动态代理
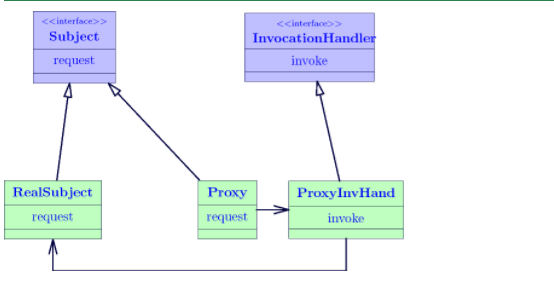
动态代理的代理类 不是在Java代码中实现 是在运行期生成
1.定义接口 SubjectService
public interface SubjectService {

     void add();

}
2.定义委托类 RealSubjectServiceImpl
public class RealSubjectServiceImpl implements SubjectService {

    @Override

    public void add() {

        System.out.println("init real sub service.");

    }

}
3.定义 myInvocationHandler 实现java.lang.reflect.InvocationHandler接口
m.invoke(obj,args) : 对目标对象的调用转发给 包装对象
public class MyInvocationHandler implements InvocationHandler {

    private Object target;//目标对象

    public MyInvocationHandler(Object target) {

        this.target = target;

    }

    @Override

    public Object invoke(Object proxy, Method method, Object[] args) throws Throwable {

        System.out.println(".....before......");

        Object result=method.invoke(target,args);

        System.out.println(".....after......");

        return result;

    }

    public Object getProxy(){

        return Proxy.newProxyInstance(Thread.currentThread().getContextClassLoader(),target.getClass().getInterfaces(),this);

    }
}
4.测试
@Test
public void proxyTest(){
    MyInvocationHandler handler=new MyInvocationHandler(new RealSubjectServiceImpl());
    //proxy
    SubjectService proxy= (SubjectService) handler.getProxy();
    proxy.add();
}
运行结果
cglib动态代理
cglib底层使用 ASM 重写 非 final 方法实现
1.创建 自己的方法拦截器 MyMethodInterceptor 实现 MethodInterceptor
2.通过 net.sf.cglib.proxy.Enhancer 创建代理对象
public class MyMethodInterceptor implements MethodInterceptor {
    private Object target;

    public MyMethodInterceptor(Object target) {
        this.target = target;
    }

    @Override
    public Object intercept(Object obj, Method method, Object[] args, MethodProxy proxy) throws Throwable {
        System.out.println(".....before......");
        Object result=proxy.invokeSuper(obj,args);
        System.out.println(".....before......");
        return result;
    }

    public Object getProxy(){
        Enhancer enhancer=new Enhancer();
        enhancer.setCallback(this);
        enhancer.setSuperclass(target.getClass());
        return enhancer.create();
    }
}
测试.
  @Test

    public void cglibTest(){

        MyMethodInterceptor interceptor=new MyMethodInterceptor(new RealSubjectServiceImpl());

        SubjectService proxy= (SubjectService) interceptor.getProxy();

        proxy.add();

    }
5. 职责链模式 chain of responsibility
职责链模式 通过给予多个对象处理请求的机会,以解除请求的发送者与接收者之间的耦合。
简单的说 :请假3天假-->leader审批-->经理审批-->人事审批
或者
我只请半天假-->leader审批-->人事审批
职责链的节点 可以自由组合
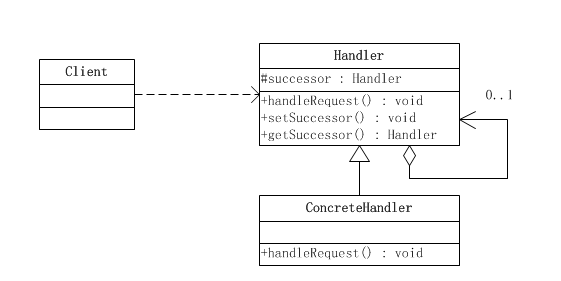
抽象一个Hander父类
public abstract class Handler {

    private Handler next;//后续责任对象

    public Handler getNext() {

        return next;

    }

    public void setNext(Handler next) {

        this.next = next;

    }

    public abstract void handleRequest();//处理请求

}
A节点
public class HanderA extends Handler{
@Override
public void handleRequest() {
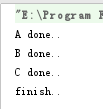
System.out.println("A done..");
if(getNext()!=null){
getNext().handleRequest();
}else {
System.out.println("finish..");
}
}
}
B节点
public class HanderB extends Handler{

    @Override

    public void handleRequest() {

        System.out.println("B done..");

        if(getNext()!=null){

            getNext().handleRequest();

        }else {

            System.out.println("finish..");

        }

    }

}
c节点
public class HanderC extends Handler{

    @Override

    public void handleRequest() {

        System.out.println("C done..");

        if(getNext()!=null){

            getNext().handleRequest();

        }else {

            System.out.println("finish..");

        }

    }

}
测试
public void test(){

        Handler a=new HanderA();

        Handler b=new HanderB();

        Handler c=new HanderC();

        a.setNext(b);

        b.setNext(c);

        a.handleRequest();

    }
执行结果
6. 享元模式 flyweight
享元模式 在客户对象之间提供共享对象,并且为共享对象创建职责
共享对象发生改变 时 不需要通知其他客户端
享元模式的目的是:通过共享来支持大量细粒度对象
1.享元模式 可以 使你共享的访问 大量出现的细粒度对象
2.享元对象必须是不可变的
3.不变的部分提取出来
4.为了确保享元对象共享 ,需要强制客户端通过享元工厂来访问
5.享元工厂 做好权限限制
不变性
可以设置成枚举
java 中的String就是 享元模式
1.单纯享元模式
所有的享元对象都可以共享
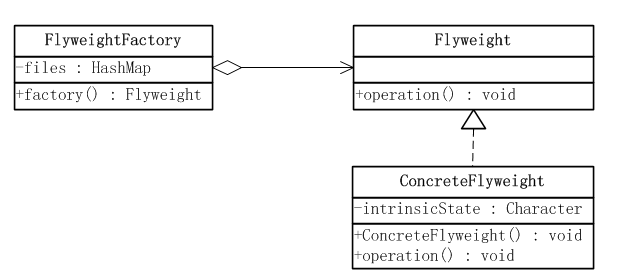
抽象一个接口
public interface Flyweight {

    void operation(String state);

}
实现一个享元对象
public class FlyweightA implements Flyweight {
//共享对象状态
private Character inState;
public FlyweightA(Character inState) {
this.inState = inState;
}
@Override
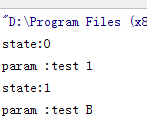
public void operation(String state) {
//state 改变方法的行为 单 不改变 共享对象的状态
System.out.println("param :"+state);
System.out.println("state:"+inState);
}
}
享元工厂
public class FlyweightFactory {

    private Map<Character,Flyweight> files=new HashMap<Character, Flyweight>();

    public Flyweight factory(Character state){

        Flyweight flyweight=files.get(state);

        if(flyweight==null){

            flyweight=new FlyweightA(state);

            files.put(state,flyweight);

        }

        return flyweight;

    }

}
测试
public class FlyweightTest {

    @Test

    public void test() {

        FlyweightFactory factory = new FlyweightFactory();

        Flyweight flyweight = factory.factory(new Character('0'));

        flyweight.operation("test 1");

        flyweight = factory.factory(new Character('1'));

        flyweight.operation("test B");

    }

}
运行结果
2.复合享元模式
复合享元模式 意思是 单个享元对象 组成一个集合,而这个集合本身不是共享的
就是 将上述的例子 instate改成一个集合
demo
接口
public interface Flyweight {

    void operation(String state);

}
单个享元
public class FlyweightA implements Flyweight {

    //共享对象状态

    private Character inState;

    public FlyweightA(Character inState) {

        this.inState = inState;

    }

    @Override

    public void operation(String state) {

        //state 改变方法的行为 单 不改变 共享对象的状态

        System.out.println("param :"+state);

        System.out.println("state:"+inState);

    }

}
复合享元
public class FlyweightB implements Flyweight {

    //复合享元模式

    private Map<Character,Flyweight> files=new HashMap<Character, Flyweight>();

    @Override

    public void operation(String state) {

          for(Flyweight flyweight:files.values()){

              flyweight.operation(state);

          }

    }

    public void add(Character key,Flyweight value){

        files.put(key,value);

    }

}
享元工厂
public class FlyweightFactory {

    private Map<Character,Flyweight> files=new HashMap<Character, Flyweight>();

    //集合工厂

    public Flyweight factory(List<Character> states){

        FlyweightB b=new FlyweightB();

        for(Character c:states){

            //调用 单个构建

            b.add(c,factory(c));

        }

        return b;

    }

    //单参构建

    public Flyweight factory(Character state){

        //先从缓存中查找对象

        Flyweight fly = files.get(state);

        if(fly == null){

            //如果对象不存在则创建一个新的Flyweight对象

            fly = new FlyweightA(state);

            //把这个新的Flyweight对象添加到缓存中

            files.put(state, fly);

        }

        return fly;

    }

}
测试
public void test(){

        //工厂构建数据

        FlyweightFactory flyweightFactory=new FlyweightFactory();

        List<Character> param= Arrays.asList('0','1','2');

        Flyweight flyweight=flyweightFactory.factory(param);

        //操作

        flyweight.operation("test..");

    }
运行结果

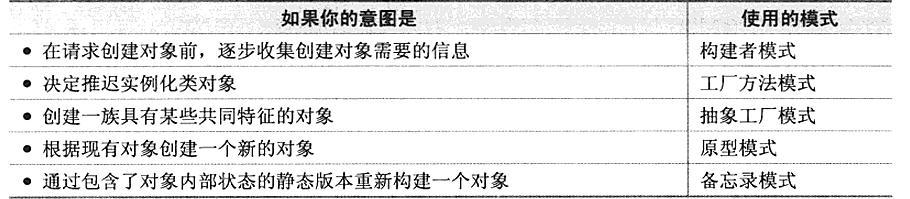
构造类
- 在请求 创建对象之前 ,逐渐收集创建对象的信息-->构建者模式
- 推迟实例化的类对象-->工厂方法模式
- 创建一组 有共同特征的对象-->抽象工厂
- 根据现有对象 创建一个对象-->原型模式
- 通过对象内部静态版本 重构对象-->备忘录模式
1.构建者模式 Builder
构建者模式 :将类的实例化逻辑 转移到类的外部。
构建模式 :将构建与对象分离 。将复杂对象的构建逻辑从对象本身抽离,这样能够简化复杂对象
网上找了个例子http://www.blogjava.net/fancydeepin/archive/2012/08/05/384783.html

我们现在需要生产一个产品 :电脑
简单的描述 就是 产品(电脑) 是一个类,构建(builder) 是一个类
然后 将 产品 放入 builder中构建
看代码:
产品
public abstract class Product {

    protected List<String> parts = new ArrayList<String>();//存储产品的各个部件

    //add

    public void add(String part) {

        parts.add(part);

    }

    //show product

    public void show() {

        for (String s : parts) {

            System.out.println(s);

        }

    }

}
宏碁电脑
public class Acer extends Product {

}
戴尔电脑
public class Dell extends Product {

}
构建者接口
public interface Builder {

    //构建产品 的几个步骤

    void buildCPU();

    void buildMemory();

    void buildGraphicsCard();

    Product getResult();

}
实现 宏碁电脑构建
public class AcerBuilder implements Builder {

    //产品和构建分离

    //创建Acer产品 进行 构建

    private Product product=new Acer();

    @Override

    public void buildCPU() {

        product.add("cpu:i5");

    }

    @Override

    public void buildMemory() {

        product.add("memory:8G");

    }

    @Override

    public void buildGraphicsCard() {

        product.add("graphics card:HD");

    }

    @Override

    public Product getResult() {

        return product;

    }

}
实现戴尔电脑构建
public class DellBuilder implements Builder {

    //产品和构建分离

    //创建Dell产品 进行 构建

    private Product product = new Dell();

    @Override

    public void buildCPU() {

        product.add("cpu:i7");

    }

    @Override

    public void buildMemory() {

        product.add("memory:16G");

    }

    @Override

    public void buildGraphicsCard() {

        product.add("graphics card:HD");

    }

    @Override

    public Product getResult() {

        return product;

    }

}
指导构建过程
public class Director {

    private Builder builder;

    public Director(Builder builder) {

        this.builder = builder;

    }

    public void Construct() {

        //控制 构建逻辑顺序

        builder.buildCPU();

        builder.buildMemory();

        builder.buildGraphicsCard();

    }

}
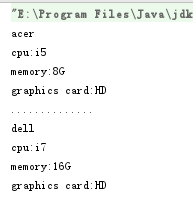
测试
public void test() {

        System.out.println("acer");

        AcerBuilder acerBuilder = new AcerBuilder();

        Director director = new Director(acerBuilder);

        director.Construct();

        //Product show

        acerBuilder.getResult().show();

        System.out.println("..............");

        System.out.println("dell");

        DellBuilder dellBuilder = new DellBuilder();

        director = new Director(dellBuilder);

        director.Construct();

        //Product show

        dellBuilder.getResult().show();

    }
运行结果
2.工厂方法 factory method
工厂方法:让服务提供者 确定实例化哪个类,而不是客户端代码
网上找了个 demo http://blog.csdn.net/jason0539/article/details/23020989
简单工厂模式
简单工厂模式 又称 静态工厂模式
客户需要一辆宝马车,客户不必自己亲自造一辆宝马车 。我们可以建立一个工厂 ,工厂负责宝马车的创建,降低 客户和宝马的耦合
首先我们抽象一个BMW类
public abstract class BMW {

}
有两种型号的 BMW
public class BMW320 extends BMW {

    public BMW320() {

        System.out.println("build bmw 320.");

    }

}
BMW523
public class BMW523 extends BMW {

    public BMW523() {

        System.out.println("build bmw 523.");

    }

}
工厂 根据传参 创建 相应产品
public class SimpleFactory {

    public BMW createBMW(int param) {

        switch (param) {

            case 320:

                return new BMW320();

            case 523:

                return new BMW523();

            default:

                break;

        }

        return null;

    }

}
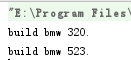
测试
 public void test(){

        SimpleFactory factory=new SimpleFactory();

        factory.createBMW(320);

        factory.createBMW(523);

    }
运行结果
工厂方法模式
简单工厂中 当客户需要 一个新产品时, simpleFactory需修改 case代码 去创建新的代码 ,这样 simpleFactory的代码会频繁改动 很是被动。这也违背了 设计模式的开闭原则。
这时 我们可以把 case部分的 静态代码抽出来,分成不同的子工厂。
Factory接口
public interface Factory {

    BMW createBMW();

}
320子工厂
public class FactoryBMW320 implements Factory {

    @Override

    public BMW createBMW() {

        return new BMW320();

    }

}
523子工厂
public class FactoryBMW523 implements Factory {

    @Override

    public BMW createBMW() {

        return new BMW523();

    }

}
测试
 public void test(){

        FactoryBMW320 factoryBMW320=new FactoryBMW320();

        factoryBMW320.createBMW();

        FactoryBMW523 factoryBMW523=new FactoryBMW523();

        factoryBMW523.createBMW();

    }
运行结果

3.抽象工厂 abstract factory
抽象工厂 创建不同的产品簇
还按上面的例子说 客户不是简单要一个BMW, 每个客户有 不同的 发动机和变速箱需求。
先创建两个类 发动机,变速箱
发动机
public abstract class Engine {

}
4缸发动机
public class Engine4 extends Engine {

    public Engine4() {

        //生产 四缸发动机

        System.out.println("create N46.");

    }

}
12缸发动机
public class Engine12 extends Engine {

    public Engine12() {

        //生产 12缸发动机

        System.out.println("create M73.");

    }

}
变速箱
public abstract class Gearbox {

}
手动变速
public class ManualGearbox extends Gearbox {

    public ManualGearbox() {

        System.out.println("create manual transmission.");

    }

}
自动变速
public class AutomaticGearbox extends Gearbox {

    public AutomaticGearbox() {

        System.out.println("create automatic transmission.");

    }

}
抽象工厂
public interface AbstractFactory {

    Engine createEngine();

    Gearbox createGearbox();

}
产品12工厂:12缸发动机,自动变速箱
public class FactoryBMW12 implements AbstractFactory {

    @Override

    public Engine createEngine() {

        return new Engine12();

    }

    @Override

    public Gearbox createGearbox() {

       return new AutomaticGearbox();

    }

}
产品 46 工厂 :4缸发动机,手动变速
public class FactoryBMW46 implements AbstractFactory {

    @Override

    public Engine createEngine() {

        return new Engine4();

    }

    @Override

    public Gearbox createGearbox() {

       return new ManualGearbox();

    }

}
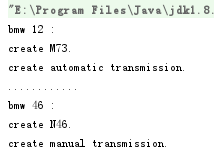
测试
public void test(){

        System.out.println("bmw 12 :");

        FactoryBMW12 factoryBMW12=new FactoryBMW12();

        factoryBMW12.createEngine();

        factoryBMW12.createGearbox();

        System.out.println("............");

        System.out.println("bmw 46 :");

        FactoryBMW46 factoryBMW46=new FactoryBMW46();

        factoryBMW46.createEngine();

        factoryBMW46.createGearbox();

    }
执行结果
4.原型模式 prototype
原型模式使用户复制对象样本来创建对象。而不是通过实例化的方式。
原型模式的核心是克隆方法,java 提供了 Cloneable接口 。
写个demo
public class Student implements Cloneable {

    private String code;

    List<String> courses;

    public List<String> getCourses() {

        return courses;

    }

    public void setCourses(List<String> courses) {

        courses = courses;

    }

    public void addCourse(String course) {

        if(courses==null) courses=new ArrayList<String>();

        courses.add(course);

    }

    public String getCode() {

        return code;

    }

    public void setCode(String code) {

        this.code = code;

    }

    @Override

    protected Student clone() {

        try {

            return (Student) super.clone();

        } catch (CloneNotSupportedException e) {

            e.printStackTrace();

        }

        return null;

    }

    @Override

    public String toString() {

        return this.code

                +",Courses : "+ Arrays.toString(courses.toArray());

    }

}
原型模式 内存二进制流copy,要比直接new性能好 。
new 的时候 也许受权限限制 ,使用原型模式可以访问一些私有对象
浅拷贝
 public void test(){

        Student student=new Student();

        student.setCode("001");

        student.addCourse("math");

        Student studentB=student.clone();

        studentB.setCode("001B");

        studentB.addCourse("java");

        studentB.addCourse("C#");

        System.out.println(student.toString());

        System.out.println(studentB.toString());

    }
输出
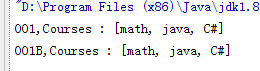
可以发现 studenB的 Courses变化 会影响到 原始Student
因为 Object提供的clone只Copy对象 对象中数组和引用对象都未copy,指向的还是元数据的 地址。
深拷贝
可以通过流式copy进行深copy
public class Teacher implements Serializable{

    private String code;

    List<String> courses;

    public List<String> getCourses() {

        return courses;

    }

    public void setCourses(List<String> courses) {

        courses = courses;

    }

    public void addCourse(String course) {

        if(courses==null) courses=new ArrayList<String>();

        courses.add(course);

    }

    public String getCode() {

        return code;

    }

    public void setCode(String code) {

        this.code = code;

    }

    @Override

    public String toString() {

        return this.code

                +",Courses : "+ Arrays.toString(courses.toArray());

    }

}
流 copy
 public void testDeep(){

        try {

            Teacher teacher=new Teacher();

            teacher.setCode("001");

            teacher.addCourse("tech math");

            //对象  写入缓存 bytes

            //申明缓存空间

            ByteOutputStream bytes=new ByteOutputStream();

            //申明 对象写入

            ObjectOutputStream out=new ObjectOutputStream(bytes);

            //对象写入

            out.writeObject(teacher);

             //bytes中读取对象

            ObjectInputStream inputStream=new ObjectInputStream(new ByteArrayInputStream(bytes.getBytes())) ;

            Teacher teacherB= (Teacher) inputStream.readObject();

            teacherB.setCode("001B");

            teacherB.addCourse("tech java");

            System.out.println(teacher.toString());

            System.out.println(teacherB.toString());

        } catch (Exception e) {

            e.printStackTrace();

        }

    }
运行结果

5.备忘录模式 Memento
备忘录模式的目的是 为对象状态 提供存储和恢复功能。
备忘录模式的结构
Originator [əˈrijəˌnātər]
Caretaker [Care taker] 管理人

- 发起人:记录当前时刻内部状态,负责定义哪些属于备份范围的状态,负责创建和恢复备忘数据。
- 备忘录:负责存储 发起人对象的内部状态,需要的时候提供 发起人需要的内部状态
- 管理角色:对备忘录进行管理,保存和提供备忘数据。
发起人代码
public class Originator {

    private String state="";

    public String getState() {

        return state;

    }

    public void setState(String state) {

        this.state = state;

    }

    //创建备忘状态

    public Memento createMemento(){

        return new Memento(this.state);

    }

    //恢复备忘状态

    public void restoreMemento(Memento memento){

        this.setState(memento.getState());

    }

}
备忘录
public class Memento {

    private String state="";

    public Memento(String state) {

        this.state = state;

    }

    public String getState() {

        return state;

    }

    public void setState(String state) {

        this.state = state;

    }

}
管理者
public class Caretaker {

    private Memento memento;

    public Memento getMemento() {

        return memento;

    }

    public void setMemento(Memento memento) {

        this.memento = memento;

    }

}
测试
public void test(){

        Originator originator=new Originator();

        originator.setState("init");

        System.out.println(originator.getState());

        //管理员 保存 现有状态

        Caretaker caretaker=new Caretaker();

        caretaker.setMemento(originator.createMemento());

        //更新状态

        originator.setState("running");

        System.out.println(originator.getState());

        //恢复状态

        originator.restoreMemento(caretaker.getMemento());

        System.out.println(originator.getState());

    }
执行结果

多状态 备忘
将 对象的属性放在map里
操作类
不同类 实现同一操作时 采用不同的方式 。类似java的多态 ,多态的设计思路被多种设计模式使用。
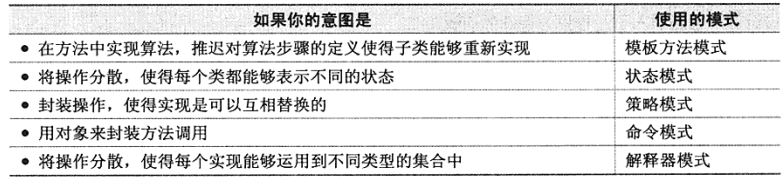
- 在方法中实现算法,推迟对算法步骤的定义,使得子类能够重新实现-->模板方法模式
- 将操作分散,使得每个类都能够表示不同的状态-->状态模式
- 封装操作,使得实现都可以相互替换-->策略模式
- 用对象来封装方法调用-->命令模式
- 将操作分散,使得每个实现运用到不同类型的集合-->解析器模式
1.模板方法模式 template mothed
模板方法:抽象一些步骤或将它定义在接口中,以便其他类可以实现这一步骤。
比如 我们去乘车 大致分为 买票-->进站安检-->检票-->入座
我现在搞一个系统 乘坐汽车,乘坐火车,乘坐地铁 都用该系统
写个demo
先抽象一个公共父类 定义基本的逻辑框架
public abstract class Ride {

    //模板 方法 final类型 子类不可以修改

    public final void action(){

        buyTicket();

        securityCheck();

        checkIn();

        seated();

        doStarted();

    }

    //购票

    protected abstract void buyTicket();

    //进站安检

    protected abstract void securityCheck();

    //检票

    protected abstract void checkIn();

    //入座

    protected abstract void seated();

    //钩子方法 ,子类可以不必要实现,如果有需求可以写

    protected void doStarted(){

        System.out.println("车辆启动..");

    }

}
汽车出行
public class Bus extends Ride {

    @Override

    protected void buyTicket() {

        System.out.println("buy a bus ticket.");

    }

    @Override

    protected void securityCheck() {

        System.out.println("bus station security check.");

    }

    @Override

    protected void checkIn() {

        System.out.println("bus station check in.");

    }

    @Override

    protected void seated() {

        //按票入座

        System.out.println("ticket seat.");

    }

}
地铁出行
public class Subway extends Ride {

    @Override

    protected void buyTicket() {

        System.out.println("buy a subway ticket.");

    }

    @Override

    protected void securityCheck() {

        System.out.println("subway station security check.");

    }

    @Override

    protected void checkIn() {

        System.out.println("subway station check in.");

    }

    @Override

    protected void seated() {

        //随便坐

        System.out.println("Sit casually.");

    }

}
测试
public void test(){
Ride ride=new Bus();
ride.action();
System.out.println(".....");
ride=new Subway();
ride.action();
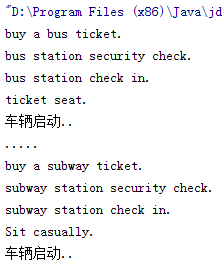
}
运行结果
2.状态模式
程序中 经常 因状态不同,执行的不同逻辑代码 。状态模式: 就是将 这些状态 分为不同的状态对象,
且 这些状态对象 有自己的状态 行为。解耦
网上找了个例子
四种颜色
Red,
White,
Blue,
Black
有 pull和 push两种操作
Color类
public enum  Color {

    Red,

    White,

    Blue,

    Black

}
操作管理类
public class Context {

    private Color color;

    public Context(Color color) {

        this.color = color;

    }

    public void push(){

        //red->white->blue->black

        if(color==Color.Red) color=Color.White;

        else if(color==Color.White) color=Color.Blue;

        else if(color==Color.Blue) color=Color.Black;

    }

    public void pull(){

        //red<-white<-blue<-black

        if(color==Color.Black) color=Color.Blue;

        else if(color==Color.Blue) color=Color.White;

        else if(color==Color.White) color=Color.Red;

    }

}
测试
public void test(){

        Context context=new Context(Color.Red);

        context.push();

        System.out.println(context.getColor().name());

        context.pull();

        System.out.println(context.getColor().name());

    }
结果

改用状态模式
public abstract class State {

    protected abstract void push(Context2 context);

    protected abstract void pull(Context2 context);

    protected abstract Color getColor();

}
public class RedState extends State {

    @Override

    protected void push(Context2 context) {

        context.setState(new WhiteState());

    }

    @Override

    protected void pull(Context2 context) {

        context.setState(new RedState());

    }

    @Override

    protected Color getColor() {

        return Color.Red;

    }

}
public class WhiteState extends State {

    @Override

    protected void push(Context2 context) {

        context.setState(new BlueState());

    }

    @Override

    protected void pull(Context2 context) {

        context.setState(new RedState());

    }

    @Override

    protected Color getColor() {

        return Color.White;

    }

}
public class BlueState extends State {

    @Override

    protected void push(Context2 context) {

        context.setState(new BlackState());

    }

    @Override

    protected void pull(Context2 context) {

        context.setState(new WhiteState());

    }

    @Override

    protected Color getColor() {

        return Color.Blue;

    }

}
public class BlackState extends State {

    @Override

    protected void push(Context2 context) {

        context.setState(new BlackState());

    }

    @Override

    protected void pull(Context2 context) {

        context.setState(new BlueState());

    }

    @Override

    protected Color getColor() {

        return Color.Black;

    }

}
测试
 public void test2(){

        Context2 context2=new Context2(new RedState());

        context2.push();

        System.out.println(context2.getState().getColor());

        context2.pull();

        System.out.println(context2.getState().getColor());

    }
运行结果

3.策略模式 strategy
strategy [ˈstratəjē]
策略模式 就是 将公共操作 ,在不同类中分别实现,也就是继承公共的接口或父类 。再用策略调用者调用自己需要的策略。
demo:
1.策略接口
public interface Strategy {

    void compress();

}
2.rar压缩算法实现
public class RarStrategy implements Strategy {

    @Override

    public void compress() {

        System.out.println("execute rar compression");

    }

}
3.zip压缩算法实现
public class ZipStrategy implements Strategy {

    @Override

    public void compress() {

        System.out.println("execute zip compression");

    }

}
4.调用者类
public class Context {

    private Strategy strategy;

    public Context(Strategy strategy) {

        this.strategy = strategy;

    }

    public void executeCompress(){

        strategy.compress();

    }

}
5.测试
public void test(){

        Context context=new Context(new RarStrategy());

        context.executeCompress();

        context=new Context(new ZipStrategy());

        context.executeCompress();

    }
执行结果

4.命令模式
命令模式的目的是 将请求 封装到 类内部
命令模式可以将请求封装在一个对象中 允许你可以像管理对象一样去 管理方法 ,传递 并且在适合的机会调用它
网上找了个例子 :http://blog.csdn.net/jason0539/article/details/45110355
开关电视机的请求
现在设置 请求命令接口
public interface Command {

    void execute();

}
然后 建立一个 TV对象 作为命令的接收者
public class TV {

    void turnOn(){

        System.out.println("The TV is turn on.");

    }

    void turnOff(){

        System.out.println("The TV is turn off.");

    }

}
开机命令
public class CommandOn implements Command {

    private TV tv;

    public CommandOn(TV tv) {

        this.tv = tv;

    }

    @Override

    public void execute() {

        tv.turnOn();

    }

}
关机命令
public class CommandOff implements Command {

    private TV tv;

    public CommandOff(TV tv) {

        this.tv = tv;

    }

    @Override

    public void execute() {

        tv.turnOff();

    }

}
控制 器 就像遥控器
public class Control {

    private CommandOn commandOn;

    private CommandOff commandOff;

    public Control(CommandOn commandOn, CommandOff commandOff) {

        this.commandOn = commandOn;

        this.commandOff = commandOff;

    }

    public void turnOn(){

        commandOn.execute();

    }

    public void turnOff(){

        commandOff.execute();

    }

}
测试
 public void test() {

        TV tv = new TV();

        CommandOn commandOn = new CommandOn(tv);

        CommandOff commandOff = new CommandOff(tv);

        Control control=new Control(commandOn,commandOff);

        control.turnOn();

        control.turnOff();

    }
执行结果
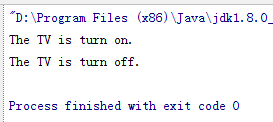
本demo将命令 开机和关机命令 封装 传递 ,并在需要的时候触发
5.解析器模式 Interpreter
扩展型设计模式
- 让开发者动态组合对象行为-->装饰器模式
- 提供一个方法 来顺序访问 集合中的元素-->迭代器模式
- 允许开发者定义新的操作 而无需改变 分层体系中的类-->访问者模式
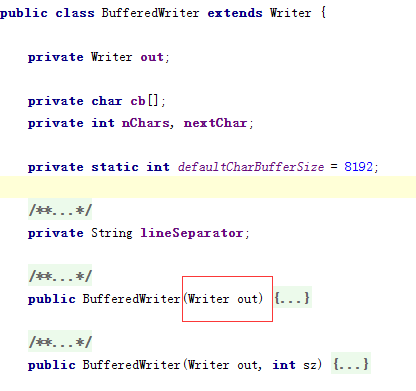
1.装饰器模式 decorator
decorator [ˈdekəˌrātər]
经典的装饰器模式 就是java中的流处理
 public void test(){

        try {

            FileWriter file=new FileWriter(new File("E://test//test.txt"));

            BufferedWriter writer=new BufferedWriter(file);

            writer.write("this is test file.");

            writer.flush();

            writer.close();

        } catch (IOException e) {

            e.printStackTrace();

        }

    }
这段代码中 我们从 FileWriter 组合成BufferWriter 最后输入文本;
通过构造器传入参数 ,产生了新的对象行为。
查看下 源码
2.迭代器模式 Iterator
为顺序访问集合提供一种方式
/*

 * Copyright (c) 1997, 2013, Oracle and/or its affiliates. All rights reserved.

 * ORACLE PROPRIETARY/CONFIDENTIAL. Use is subject to license terms.

 *

 *

 */

package java.util;

import java.util.function.Consumer;

/**

 * An iterator over a collection.  {@code Iterator} takes the place of

 * {@link Enumeration} in the Java Collections Framework.  Iterators

 * differ from enumerations in two ways:

 *

 * <ul>

 *      <li> Iterators allow the caller to remove elements from the

 *           underlying collection during the iteration with well-defined

 *           semantics.

 *      <li> Method names have been improved.

 * </ul>

 *

 * <p>This interface is a member of the

 * <a href="{@docRoot}/../technotes/guides/collections/index.html">

 * Java Collections Framework</a>.

 *

 * @param <E> the type of elements returned by this iterator

 *

 * @author  Josh Bloch

 * @see Collection

 * @see ListIterator

 * @see Iterable

 * @since 1.2

 */

public interface Iterator<E> {

    /**

     * Returns {@code true} if the iteration has more elements.

     * (In other words, returns {@code true} if {@link #next} would

     * return an element rather than throwing an exception.)

     *

     * @return {@code true} if the iteration has more elements

     */

    boolean hasNext();

    /**

     * Returns the next element in the iteration.

     *

     * @return the next element in the iteration

     * @throws NoSuchElementException if the iteration has no more elements

     */

    E next();

    /**

     * Removes from the underlying collection the last element returned

     * by this iterator (optional operation).  This method can be called

     * only once per call to {@link #next}.  The behavior of an iterator

     * is unspecified if the underlying collection is modified while the

     * iteration is in progress in any way other than by calling this

     * method.

     *

     * @implSpec

     * The default implementation throws an instance of

     * {@link UnsupportedOperationException} and performs no other action.

     *

     * @throws UnsupportedOperationException if the {@code remove}

     *         operation is not supported by this iterator

     *

     * @throws IllegalStateException if the {@code next} method has not

     *         yet been called, or the {@code remove} method has already

     *         been called after the last call to the {@code next}

     *         method

     */

    default void remove() {

        throw new UnsupportedOperationException("remove");

    }

    /**

     * Performs the given action for each remaining element until all elements

     * have been processed or the action throws an exception.  Actions are

     * performed in the order of iteration, if that order is specified.

     * Exceptions thrown by the action are relayed to the caller.

     *

     * @implSpec

     * <p>The default implementation behaves as if:

     * <pre>{@code

     *     while (hasNext())

     *         action.accept(next());

     * }</pre>

     *

     * @param action The action to be performed for each element

     * @throws NullPointerException if the specified action is null

     * @since 1.8

     */

    default void forEachRemaining(Consumer<? super E> action) {

        Objects.requireNonNull(action);

        while (hasNext())

            action.accept(next());

    }

}
如果一个类 支持 for循环 必须实现Iterable接口 ,并提供 Iterator方法
public interface Iterable <T>  {

    java.util.Iterator<T> iterator();

    default void forEach(java.util.function.Consumer<? super T> consumer) { /* compiled code */ }

    default java.util.Spliterator<T> spliterator() { /* compiled code */ }

}
比如我们经常使用的 ArrayList

3.访问者 visitor模式
访问者模式的意图是 不改变类层次结构前提下,对该层次结构进行扩展。
最新文章
- 自然语言26_perplexity信息
- 视频控件VideoView的简单使用
- [转]linux,windows 可执行文件(ELF、PE)
- 0x00linux32位汇编初入--前期准备
- Mvc模板页
- Java IO--压缩流
- EXTJS 6 新特性(译文)
- 【PHP高效搜索专题(1)】sphinx&Coreseek的介绍与安装
- 【C#学习笔记】调用C++生成的DLL
- ng-blur失去焦点执行事件
- java-并发之高性能对象
- JS前端无侵入实现防止重复提交请求技术
- MongoDB-副本集搭建与管理
- Linux中编译安装软件的基本流程
- 并发编程(二):全视角解析volatile
- HDU 1166 【线段树 || 树状数组,单点修改 维护区间和】
- JS对象操作
- vue 项目心得
- Java连接Mysql的基本用法
- 算法Sedgewick第四版-第1章基础-011一用链表实现bag、queue、stack