MVC4学习笔记之--身份认证过滤器
过滤器作为MVC模式中面向切面编程应用很广泛,例如身份验证,日志,异常,行为截取等。博客园里面的大神对应过滤器的介绍以及很多,MVC4中不同的过滤器也介绍得很清楚。FlyDragon 辉太 禁止吸烟 如果对过滤器还没有概念的童鞋,不妨先看看前面各位前辈的介绍(前面的文章说得已经很好了,而我是想写一个较为完整的例子)。
此文仅作为个人学习笔记整理,如果有幸对你有所帮助,不胜荣幸。如果文中有错误的地方,感谢指正。
如果在个人前期学习阶段,使用MVC自带的身份验证,给人的感觉就是无法自己达到自己想要的控制效果,掌握起来比较麻烦。往往在一个小的作为学习MVC的项目里面,反而自己写一个过滤器来实现相关的功能,反而觉得整个学习思路比较清晰。该实例的身份验证过滤器支持三种验证方式:
1.游客(每个人都可以访问)
2.用户(注册的用户)
3.管理员(后台管理)
一、先来看看数据库
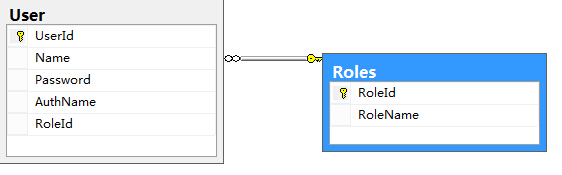
定义了一个基础的用户表,右侧是一个权限表。右侧的权限表是固定的,一开始就把我们的权限规则数据填充在里面。设置RoleId这个字段是为了待会方便我们判断权限。
 using System;

 using System.Collections.Generic;

 using System.ComponentModel;

 using System.ComponentModel.DataAnnotations;

 using System.ComponentModel.DataAnnotations.Schema;

 using System.Linq;

 using System.Web;

 namespace MyAuthorizen.Models

 {

     [Table("User")]

     public class User

     {

         [Key]

         public int UserId { get; set; }

         [DisplayName("用户名")]

         [Required(ErrorMessage="用户名是必填字段")]

         public string Name { get; set; }

         [DisplayName("密码")]

         [DataType(DataType.Password)]

         [Required(ErrorMessage="密码是必填字段")]

         public string Password { get; set; }

         [DisplayName("昵称")]

         public string AuthName { get; set; }

         public int RoleId { get; set; }

         public virtual Roles Role { get; set; }

     }

     public class LoginModel

     {

         [DisplayName("用户名")]

         [Required(ErrorMessage = "用户名是必填字段")]

         public string Name { get; set; }

         [DisplayName("密码")]

         [DataType(DataType.Password)]

         [Required(ErrorMessage = "密码是必填字段")]

         public string Password { get; set; }

     }

     public class RegisterModel

     {

         [DisplayName("用户名")]

         [Required(ErrorMessage = "用户名是必填字段")]

         public string Name { get; set; }

         [DisplayName("密码")]

         [DataType(DataType.Password)]

         [Required(ErrorMessage = "密码是必填字段")]

         public string Password { get; set; }

         [DisplayName("确认密码")]

         [DataType(DataType.Password)]

         [Required(ErrorMessage = "密码是必填字段")]

         [Compare("Password", ErrorMessage = "密码和确认密码不匹配。")]

         public string ConfirmPassword { get; set; }

         public int RoleId { get; set; }

         public virtual Roles Role { get; set; }

     }

 }
 using System;

 using System.Collections.Generic;

 using System.ComponentModel;

 using System.ComponentModel.DataAnnotations;

 using System.ComponentModel.DataAnnotations.Schema;

 using System.Linq;

 using System.Web;

 namespace MyAuthorizen.Models

 {

     [Table("Roles")]

     public class Roles

     {

         [Key]

         public int RoleId { get; set; }

         [Required]

         public string RoleName { get; set; }

         public virtual List<User> Users { get; set; }

     }

 }
由于我们的Roles表需要预先存数据在数据库中,在EF中我们这样添加种子数据
 using System;

 using System.Collections.Generic;

 using System.Data.Entity;

 using System.Linq;

 using System.Web;

 namespace MyAuthorizen.Models

 {

     public class dbContext : DbContext

     {

         public dbContext()

             : base("name=DefaultConnection")

         {

             Database.SetInitializer<dbContext>(new RankDBInitializer());

         }

         public DbSet<User> Users { get; set; }

         public DbSet<Roles> Roles { get; set; }

     }

     public class RankDBInitializer : DropCreateDatabaseAlways<dbContext>

     {

         protected override void Seed(dbContext context)

         {

             List<Roles> Roles = new List<Roles>();

             Roles.Add(new Roles { RoleId = , RoleName = "Admin" });

             Roles.Add(new Roles { RoleId = , RoleName = "User" });

             Roles.Add(new Roles { RoleId = , RoleName = "Anyone" });

             foreach(var item in Roles)

             {

                 context.Roles.Add(item);

             }

             base.Seed(context);

         }

     }

 }
都完成后,我们来开始写我们自己的过滤器了,类名为MyAuthFilter。要实现标签的功能我们需要继承至ActionFilterAttribute类和实现IAuthorizationFilter接口。
using MyAuthorizen.Models;

using System;

using System.Collections.Generic;

using System.Linq;

using System.Web;

using System.Web.Mvc;

using System.Web.Security;

namespace MyAuthorizen.Class

{

    public class MyAuthFilter : ActionFilterAttribute, IAuthorizationFilter

    {

        public string Rank;

        private int RankId = ; //通过用户名称得到的的Rank 这里初始值设定为3是因为我们游客默认的RankId为3

        private int RoleId = ; //通过action的过滤参数的到的RoleId

        public MyAuthFilter(string Rank = "User")

        {

            this.Rank = Rank;

        }

        void IAuthorizationFilter.OnAuthorization(AuthorizationContext filterContext)

        {

            using (var db = new dbContext())

            {

                var session = filterContext.RequestContext.HttpContext.Session["Name"];

                if(session != null)

                {

                    this.RankId = db.Users

                        .Where(w => w.Name == session)

                        .Select(s => s.RoleId)

                        .FirstOrDefault();

                    this.RoleId = db.Roles

                        .Where(w => w.RoleName == this.Rank)

                        .Select(s => s.RoleId)

                        .FirstOrDefault();

                }

            }

            if (this.RankId <= this.RoleId)//如果当前用户权限大于action限制的权限,则执行action 否则跳转至登录页面

                return;

            filterContext.Result = new RedirectResult("/Login/Login");

        }

    }

}
这里我们默认是登录用户权限才可以访问。
增加一个用于登录的控制器Login
 using MyAuthorizen.Models;

 using System;

 using System.Collections.Generic;

 using System.Linq;

 using System.Web;

 using System.Web.Mvc;

 namespace MyAuthorizen.Controllers

 {

     public class LoginController : Controller

     {

         private dbContext db = new dbContext();

         [HttpGet]

         public ActionResult Login()

         {

             return View();

         }

         [HttpPost]

         public ActionResult Login(LoginModel login)

         {

             var Name = db.Users

                 .Where(w => w.Name == login.Name)

                 .Where(w => w.Password == login.Password)

                 .Select(s => s.Name).FirstOrDefault();

             if(Name != null )

             {

                 Session["Name"] = Name;

                 return Redirect("/Home/Index");

             }

             return RedirectToAction("Login");

         }

         [HttpGet]

         public ActionResult Register()

         {

             //ViewBag.model = db.Users.Include("Role").ToList();

             return View();

         }

         [HttpPost]

         public ActionResult Register(RegisterModel regis)

         {

             db.Users.Add(new User { Name=regis.Name,Password=regis.Password,RoleId = regis.RoleId});

             db.SaveChanges();

             return RedirectToAction("Login");

         }

         public ActionResult LoginOut()

         {

             Session.RemoveAll();

             Session.Clear();

             return RedirectToAction("Login","Login");

         }

     }

 }
登录所用到的视图部分的代码各位看官自己添加咯!
新建一个Home控制器来看看效果吧,Home控制器里面有三个方法,分别是Index、About、Admin三个方法分别需要不同的权限。Index每个人都可以访问,About需要登录的用户才能访问,而Admin需要管理员权限的用户才能访问。
 using MyAuthorizen.Class;

 using System;

 using System.Collections.Generic;

 using System.Linq;

 using System.Web;

 using System.Web.Mvc;

 namespace MyAuthorizen.Controllers

 {

     [MyAuthFilter]

     public class HomeController : Controller

     {

         //

         // GET: /Home/

         [MyAuthFilter(Rank="Anyone")]

         public ActionResult Index()

         {

             return View();

         }

         public ActionResult About()

         {

             return View();

         }

         [MyAuthFilter(Rank="Admin")]

         public ActionResult Admin()

         {

             return View();

         }

     }

 }
如代码所示,Index需要需要把Rank的值设置为Anyone才能让每个人都可以访问。而About则不设置。默认需要登录的用户才可以访问。而Admin方法设置为Admin才能达到让管理权限的用户才能访问的功能。
首先,我们注册一个账号001,用户权限。
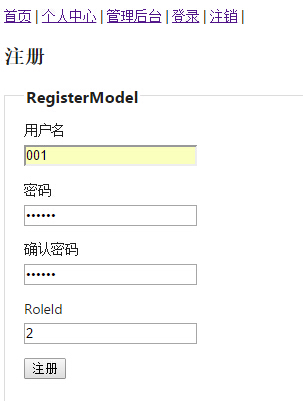 请注意RoleId那个表单,在实际使用中。我们提供给别人注册的表单里面是不能包含这个属性的,需要我们在后台的Action里面手动设置RoleId的值,这里我设置成2表示注册一个普通用户。
 访问个人中心正常(个人中心对应的Action是About),但是我们点击管理后台的时候会自动跳转到登录页面
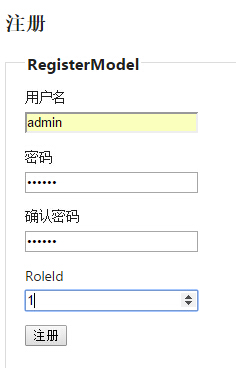
注册一个管理员权限的用户
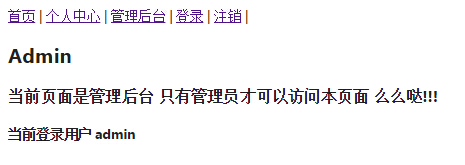 访问管理页面正常
以上
如有需要demo的童鞋 点我下载
第一次写笔记 好紧张好害怕会不会被鄙视
最新文章
- NDT(Normal Distribution Transform) 算法(与ICP对比)和一些常见配准算法
- python脚本基础总结
- vue 一些开发姿势
- Swift - 计算文本高度
- C#中成员初始化顺序
- Visual C#编写3D游戏框架示例
- phpcms 修改后台 主页面的模板
- Android最佳性能实践(一)——合理管理内存
- 计算2的n次方的三种方法(C语言实现)
- 第六百二十一天 how can I 坚持
- C++设计模式之装饰者模式
- boost::asio 连接管理11 如何关闭连接
- MYSQL 函数复习
- markdown中常见的转义字符
- 使用jquery的load方法设计动态加载,并解决浏览器前进、后退、刷新等问题
- JavaScript递归
- jsp页面在Android系统和ISO系统的兼容性问题
- 阿里云盾SSL证书即将到期怎么办?
- 远程调用HBase出错,尝试10次后,报org.apache.hadoop.hbase.MasterNotRunningException错误
- Apache与php快速部署web服务