centos系统和Ubuntu系统命令区别以及常见操作
一.前言
CentOS(Community ENTerprise Operating System)是Linux发行版之一,它是来自于Red Hat Enterprise Linux依照开放源代码规定释出的源代码所编译而成。由于出自同样的源代码,因此有些要求高度稳定性的服务器以CentOS替代商业版的Red Hat Enterprise Linux使用。
Ubuntu是一个以桌面应用为主的Linux操作系统。Ubuntu基于Debian发行版和GNOME桌面环境,与Debian的不同在于它每6个月会发布一个新版本。Ubuntu的目标在于为一般用户提供一个最新的、同时又相当稳定的主要由自由软件构建而成的操作系统。Ubuntu具有庞大的社区力量,用户可以方便地从社区获得帮助。
两者同为目前版本中个人和小团队常用的服务级操作系统,在线提供的软件库中可以很方便的安装到很多开源的软件及库。 两者都使用bash作为基础shell,所以在很多基础命令上,ubuntu与centos的差别不是很明显,而ubuntu在桌面界面上要做的更为出色,很多人如果是从兴趣出发而学习linux的首选一般都是ubuntu,毕竟很多人还是很习惯在桌面图形下操作的。
总而言之,centos更加稳定,Ubuntu对新技术支持度更好。
因为我常用的是centos系统和Red Hat Enterprise Linux系统,本文着重讲解Ubuntu命令,centos/RHEL命令偏少!
二.系统环境
| 服务器版本 | 系统内核版本 | CPU架构 |
|---|---|---|
| Ubuntu 18.04.5 LTS | 4.15.0-112-generic | x86_64 |
三.命令区别
3.1 使用习惯和命令区别
Centos与Ubuntu的使用习惯和命令上有很多的不同,下面简单列举一下:
- centos中新建的非root用户是没有sudo的权限的,如果需要使用sudo权限必须在/etc/sudoers 中加入账户和权限,所以切换到root账号的时候只需要输入su,加入root账号的密码即可;在Ubuntu中,一般使用sudo+命令,如果是第一次使用会提示输入当前用户的密码(而不是root的密码)。
- 在线安装软件中,centos使用的是yum命令,而ubuntu中使用的是apt-get命令(最新推荐的是apt命令)。除此之外yum中还有一个从软件源中搜索某个软件的方法yum search +软件名
- centos是来自于redhat,所以centos支持rpm格式的安装,而ubuntu显然是不支持的。
- 毕竟是不同的公司做的不同的发行版,很多配置文件的位置和默认的文件路径都有很大区别,这个需要使用过程中慢慢体会了。
3.2 服务管理的区别
命令区别总结如下表所示:
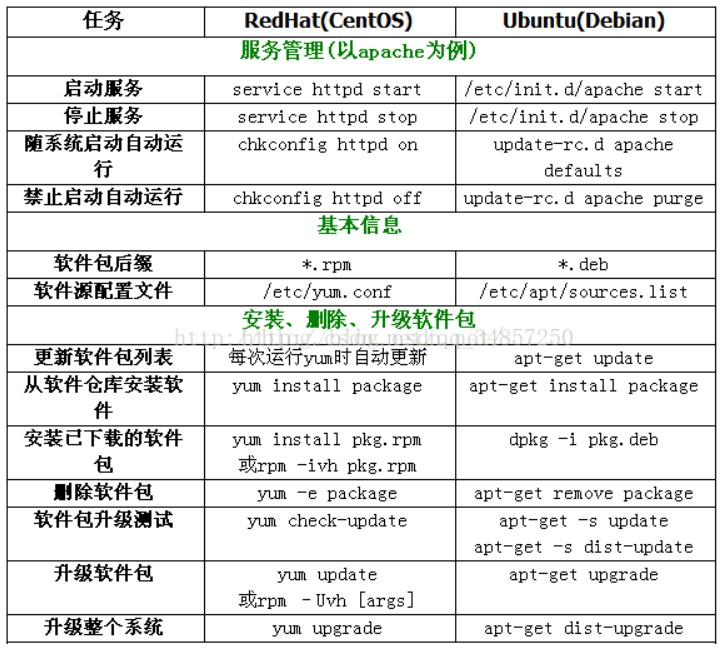
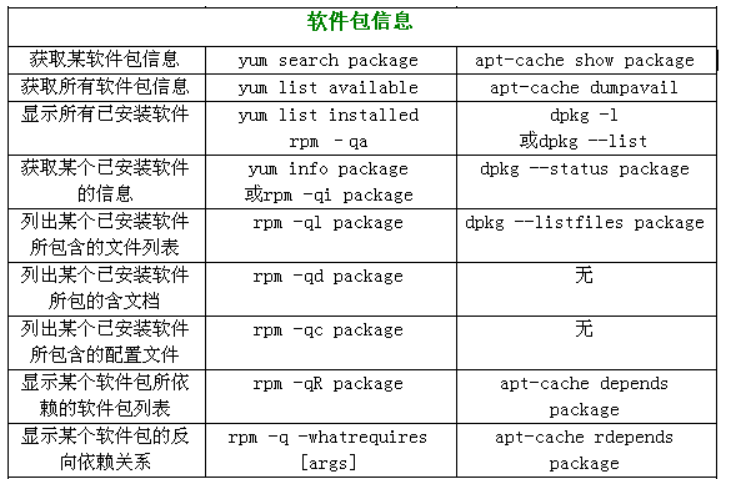
3.3 软件包信息区别
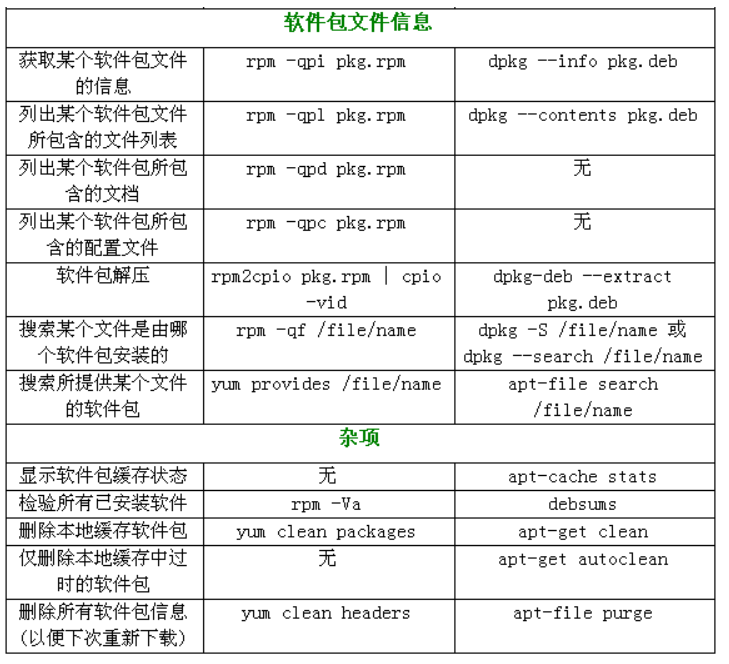
3.4 软件包文件信息区别
示例:Ubuntu系统搜索/sbin/lsmod是由哪个软件包安装的
#kmod: /sbin/lsmod表示/sbin/lsmod由kmod软件包安装的

root@k8scludes3:~# dpkg -S /sbin/lsmod

kmod: /sbin/lsmod
四.Ubuntu系统常见操作
4.1 Ubuntu系统apt和apt-get的区别
- apt命令从Ubuntu 16.04“引入”,许多其他发行版遵循Ubuntu的脚步并开始鼓励用户使用apt而不是apt-get。作为普通的 Linux 用户,优先使用 apt,它是 Linux 发行版推荐的命令。它提供了包管理必要的选项,更重要的是便于记忆。
- apt 是 apt-get 和 apt-cache 的子集,为包管理提供必要的命令。
- 虽然 apt-get 没有被弃用,但是作为普通 Linux 用户,推荐开始频繁的使用 apt。
4.2 apt-get remove,apt-get purge,apt-get autoremove的区别
- apt-get remove :卸载软件包;
- apt-get autoremove :会卸载所有自动安装且不再使用的软件包,一般用来清理依赖项(慎用);
- apt-get purge:卸载并清除软件包的配置;
4.3 Ubuntu18防火墙
Ubuntu18默认使用UFW管理防火墙,即Uncomplicated Firewall,是基于iptables实现的防火墙管理工具,旨在简化配置防火墙的过程,所以实际上UFW修改的是iptables的规则。
4.3.1 Ubuntu防火墙UFW常见命令
安装ufw
#查看Ubuntu版本

root@localhost:~# lsb_release -a

No LSB modules are available.

Distributor ID:	Ubuntu

Description:	Ubuntu 18.04.5 LTS

Release:	18.04

Codename:	bionic

#安装ufw

#apt-get install ufw
查看ufw版本
root@localhost:~# ufw --version

ufw 0.36

Copyright 2008-2015 Canonical Ltd.
查看ufw是否被安装
root@localhost:~# dpkg -l | grep ufw

ii  ufw                                    0.36-0ubuntu0.18.04.1                           all          program for managing a Netfilter firewall
查看防火墙状态
#Status: inactive说明防火墙关闭

root@localhost:~# ufw status

Status: inactive
关闭防火墙
root@localhost:~# ufw disable

Firewall stopped and disabled on system startup

root@localhost:~# ufw status

Status: inactive
启动防火墙
root@localhost:~# ufw enable

Command may disrupt existing ssh connections. Proceed with operation (y|n)? y

Firewall is active and enabled on system startup

#可以看到一条防火墙规则:允许外界访问本机的22端口

root@localhost:~# ufw status

Status: active

To                         Action      From

--                         ------      ----

22                         ALLOW       Anywhere

22 (v6)                    ALLOW       Anywhere (v6)
UFW重新加载配置文件
root@localhost:~# ufw reload
重置UFW
ufw reset
4.3.2 UFW防火墙常用规则
防火墙开启/禁用语法
ufw allow|deny [service]
默认情况下,UFW将阻止所有传入连接并允许所有出站连接。 这意味着任何试图访问您的服务器的用户都将无法连接,除非您专门打开该端口,而服务器上运行的所有应用程序和服务都将能够访问外部世界。
默认策略在/etc/default/ufw文件中定义,可以使用sudo ufw default。
#关闭所有外部对本机的访问,但本机访问外部正常

ufw default deny
打开或关闭某个端口
ufw allow 8000:8100/tcp  允许端口范围

ufw allow smtp 允许所有的外部IP访问本机的25/tcp (smtp)端口

ufw allow 22/tcp 允许所有的外部IP访问本机的22/tcp (ssh)端口

ufw allow 53 允许外部访问53端口(tcp/udp)

ufw allow from 192.168.1.100 允许此IP访问所有的本机端口

ufw deny proto tcp from 10.0.0.0/8 to 192.168.0.1 port 要拒绝所有的流量从TCP的10.0.0.0/8 到端口22的地址192.168.0.1

ufw deny smtp 禁止外部访问smtp服务

ufw delete allow smtp 删除上面建立的某条规则
查看端口状态
root@localhost:~# lsof -i:22

COMMAND  PID USER   FD   TYPE DEVICE SIZE/OFF NODE NAME

sshd     883 root    3u  IPv4  26893      0t0  TCP *:ssh (LISTEN)

sshd     883 root    4u  IPv6  26895      0t0  TCP *:ssh (LISTEN)

sshd    1744 root    3u  IPv4  27581      0t0  TCP linux:ssh->192.168.110.1:60711 (ESTABLISHED)

root@localhost:~# netstat -antup | grep 22

tcp        0      0 0.0.0.0:22              0.0.0.0:*               LISTEN      883/sshd

tcp        0     36 192.168.110.128:22      192.168.110.1:60711     ESTABLISHED 1744/sshd: root@pts

tcp6       0      0 :::22                   :::*                    LISTEN      883/sshd
列出服务器上可用的所有应用程序配置文件
root@localhost:~# ufw app list

Available applications:

  OpenSSH
4.4 Ubuntu18配置网卡IP地址
Ubuntu Server 18.04采用netplan作为网络配置管理工具。默认的网卡配置文件为01-netcfg.yaml
#01-netcfg.yaml为网卡配置文件

root@localhost:~# ll /etc/netplan/

total 12

drwxr-xr-x  2 root root 4096 Apr 14 15:59 ./

drwxr-xr-x 88 root root 4096 Nov 28  2020 ../

-rw-r--r--  1 root root   84 Apr 14 15:59 01-netcfg.yaml
默认的网络配置信息如下:
root@localhost:~# cat /etc/netplan/01-netcfg.yaml

network:

  version: 2

  renderer: networkd

  ethernets:

    ens32:

      dhcp4: dhcp
4.4.1 使用dhcp动态分配IP地址
如果要使用dhcp动态分配IP,则配置修改如下:
root@localhost:~# cat /etc/netplan/01-netcfg.yaml

network:

  version: 2

  renderer: networkd

  ethernets:

    ens32:

      dhcp4: yes
修改了网卡文件之后需要netplan apply 更新网卡配置
netplan apply
查看IP地址,192.168.110.128就是dhcp服务器动态分配的IP地址
root@localhost:~# ifconfig

ens32: flags=4163<UP,BROADCAST,RUNNING,MULTICAST>  mtu 1500

        inet 192.168.110.128  netmask 255.255.255.0  broadcast 192.168.110.255

        inet6 fe80::20c:29ff:fe92:3462  prefixlen 64  scopeid 0x20<link>

        ether 00:0c:29:92:34:62  txqueuelen 1000  (Ethernet)

        RX packets 28639  bytes 21935140 (21.9 MB)

        RX errors 0  dropped 0  overruns 0  frame 0

        TX packets 16661  bytes 1081505 (1.0 MB)

        TX errors 0  dropped 0 overruns 0  carrier 0  collisions 0

lo: flags=73<UP,LOOPBACK,RUNNING>  mtu 65536

        inet 127.0.0.1  netmask 255.0.0.0

        inet6 ::1  prefixlen 128  scopeid 0x10<host>

        loop  txqueuelen 1000  (Local Loopback)

        RX packets 59906  bytes 4255443 (4.2 MB)

        RX errors 0  dropped 0  overruns 0  frame 0

        TX packets 59906  bytes 4255443 (4.2 MB)

        TX errors 0  dropped 0 overruns 0  carrier 0  collisions 0
查看用netplan配置的网卡信息
root@localhost:~# networkctl status ens32

● 2: ens32

       Link File: /lib/systemd/network/99-default.link

    Network File: /run/systemd/network/10-netplan-ens32.network

            Type: ether

           State: routable (configured)

            Path: pci-0000:02:00.0

          Driver: e1000

          Vendor: Intel Corporation

           Model: 82545EM Gigabit Ethernet Controller (Copper) (PRO/1000 MT Single Port Adapter)

      HW Address: 00:0c:29:92:34:62 (VMware, Inc.)

         Address: 192.168.110.128

                  fe80::20c:29ff:fe92:3462

         Gateway: 192.168.110.2 (VMware, Inc.)

             DNS: 192.168.110.2

  Search Domains: localdomain
4.4.2 给网卡配置静态IP地址
静态IP常用参数解释:
- renderer:指定后端网络服务,支持networkd(Systemd-networkd) 和 NetworkManager两种,默认是networkd。
- ethernets:指定是以太网配置,其他的还包括 wifis 或者 bridges
- ens32:网卡名称
- dhcp4:开启使用ipv4的DHCP,默认是关闭。
- dhcp6:开启使用ipv6的DHCP,默认是关闭。
- addresses:对应网卡配置的静态ip地址,是ip/掩码的格式,支持ipv6地址,例如 addresses: [192.168.14.2/24, "2001:1::1/64"]
- gateway4, gateway6:指定IPv4/6默认网关,使用静态ip配置时使用。例如IPv4: gateway4: 172.16.0.1 例如IPv6: gateway6: "2001:4::1"
- nameservers:设置DNS服务器和搜索域。有两个受支持的字段:addresses:是DNS地址列表,search:是搜索域列表,没有特殊需要可以不配置search这项。
静态IP配置如下
root@localhost:~# cat /etc/netplan/01-netcfg.yaml

network:

  version: 2

  renderer: networkd

  ethernets:

    ens32:

      dhcp4: no

      addresses: [192.168.110.128/24]

      gateway4: 192.168.110.2

      nameservers:

        addresses: [192.168.110.2,114.114.114.114]
修改了网卡文件之后需要netplan apply 更新网卡配置
root@localhost:~# netplan apply
查看用netplan配置的网卡信息
root@localhost:~# networkctl status ens32

● 2: ens32

       Link File: /lib/systemd/network/99-default.link

    Network File: /run/systemd/network/10-netplan-ens32.network

            Type: ether

           State: routable (configured)

            Path: pci-0000:02:00.0

          Driver: e1000

          Vendor: Intel Corporation

           Model: 82545EM Gigabit Ethernet Controller (Copper) (PRO/1000 MT Single Port Adapter)

      HW Address: 00:0c:29:92:34:62 (VMware, Inc.)

         Address: 192.168.110.128

                  fe80::20c:29ff:fe92:3462

         Gateway: 192.168.110.2 (VMware, Inc.)

             DNS: 192.168.110.2

                  114.114.114.114
4.5 Ubuntu18配置软件源
先查看操作系统版本,我们的Ubuntu版本为18.04 bionic,要根据版本添加软件源
root@localhost:~# lsb_release -a

No LSB modules are available.

Distributor ID:	Ubuntu

Description:	Ubuntu 18.04.5 LTS

Release:	18.04

Codename:	bionic
添加阿里云软件源
root@localhost:~# cat /etc/apt/sources.list

deb http://mirrors.aliyun.com/ubuntu/ bionic main restricted universe multiverse

deb-src http://mirrors.aliyun.com/ubuntu/ bionic main restricted universe multiverse

deb http://mirrors.aliyun.com/ubuntu/ bionic-security main restricted universe multiverse

deb-src http://mirrors.aliyun.com/ubuntu/ bionic-security main restricted universe multiverse

deb http://mirrors.aliyun.com/ubuntu/ bionic-updates main restricted universe multiverse

deb-src http://mirrors.aliyun.com/ubuntu/ bionic-updates main restricted universe multiverse

deb http://mirrors.aliyun.com/ubuntu/ bionic-proposed main restricted universe multiverse

deb-src http://mirrors.aliyun.com/ubuntu/ bionic-proposed main restricted universe multiverse

deb http://mirrors.aliyun.com/ubuntu/ bionic-backports main restricted universe multiverse

deb-src http://mirrors.aliyun.com/ubuntu/ bionic-backports main restricted universe multiverse

#这三行是k8s源

deb https://mirrors.aliyun.com/kubernetes/apt/ kubernetes-xenial main

deb [arch=amd64] https://mirrors.aliyun.com/docker-ce/linux/ubuntu bionic stable

# deb-src [arch=amd64] https://mirrors.aliyun.com/docker-ce/linux/ubuntu bionic stable
更新软件源
root@localhost:~# apt-get update

Hit:1 http://mirrors.aliyun.com/ubuntu bionic InRelease

Hit:2 http://mirrors.aliyun.com/ubuntu bionic-security InRelease

Hit:3 http://mirrors.aliyun.com/ubuntu bionic-updates InRelease

Get:4 https://mirrors.aliyun.com/kubernetes/apt kubernetes-xenial InRelease [9,383 B]

Hit:5 http://mirrors.aliyun.com/ubuntu bionic-proposed InRelease

Hit:6 http://mirrors.aliyun.com/ubuntu bionic-backports InRelease

Hit:7 https://mirrors.aliyun.com/docker-ce/linux/ubuntu bionic InRelease

Ign:8 https://mirrors.aliyun.com/kubernetes/apt kubernetes-xenial/main amd64 Packages

Get:8 https://mirrors.aliyun.com/kubernetes/apt kubernetes-xenial/main amd64 Packages [54.7 kB]

Fetched 54.7 kB in 2s (33.3 kB/s)

Reading package lists... Done
五.Ubuntu系统troubleshooting
5.1 xshell连接不上Ubuntu18解决方法
问题描述:
安装了Ubuntu18系统之后,使用xshell连接不上Ubuntu,执行dpkg -l | grep ssh,发现有openssh-client openssh-server openssh-sftp-server ssh-import-id,防火墙也是关闭状态,但是xshell就是连接不上
解决方法:
使用apt-get update 更新软件包列表之后,使用apt-get install ssh安装ssh,注意在安装软件时不执行apt-get update 会报错
apt-get update

apt-get install ssh
ssh安装之后,查看安装的相关ssh程序包
root@localhost:~# dpkg -l | grep ssh

ii  openssh-client                         1:7.6p1-4ubuntu0.7                              amd64        secure shell (SSH) client, for secure access to remote machines

ii  openssh-server                         1:7.6p1-4ubuntu0.7                              amd64        secure shell (SSH) server, for secure access from remote machines

ii  openssh-sftp-server                    1:7.6p1-4ubuntu0.7                              amd64        secure shell (SSH) sftp server module, for SFTP access from remote machines

ii  ssh                                    1:7.6p1-4ubuntu0.7                              all          secure shell client and server (metapackage)

ii  ssh-import-id                          5.7-0ubuntu1.1                                  all          securely retrieve an SSH public key and install it locally
重启ssh
root@localhost:~# /etc/init.d/ssh restart

[ ok ] Restarting ssh (via systemctl): ssh.service.

root@localhost:~# service ssh status

● ssh.service - OpenBSD Secure Shell server

   Loaded: loaded (/lib/systemd/system/ssh.service; enabled; vendor preset: enabled)

   Active: active (running) since Thu 2022-04-14 17:36:39 CST; 28s ago

  Process: 14347 ExecStartPre=/usr/sbin/sshd -t (code=exited, status=0/SUCCESS)

 Main PID: 14348 (sshd)

    Tasks: 1 (limit: 2940)

   CGroup: /system.slice/ssh.service

           └─14348 /usr/sbin/sshd -D
ssh配置文件
root@localhost:~# ls /etc/ssh/sshd_config

/etc/ssh/sshd_config
此时,使用xshell就能连接Ubuntu18.04了
查看ssh端口
root@localhost:~# netstat -antup | grep 22

tcp        0      0 0.0.0.0:22              0.0.0.0:*               LISTEN      14348/sshd

tcp        0     36 192.168.110.128:22      192.168.110.1:55466     ESTABLISHED 14213/sshd: root@pt

tcp6       0      0 :::22                   :::*                    LISTEN      14348/sshd
最新文章
- LeetCode-5LongestPalindromicSubstring(C#)
- 使用ASP.NET Web Api构建基于REST风格的服务实战系列教程【九】——API变了,客户端怎么办?
- 关于格式转换 “%a.bs”
- SQL Server 2012 列存储索引分析(翻译)
- [CSS]图片与文字对齐问题
- ssh公钥免密码登录
- 支持https请求以及https请求的抓包
- C#中npoi操作Excel[版本2.0.1读写2003、2007格式]
- 数据结构(Splay平衡树):HAOI2008 排名系统
- BZOJ 1816: [Cqoi2010]扑克牌( 二分答案 )
- What day is that day?(快速幂,打表找周期,或者求通项公式)
- mysql之TIMESTAMP(时间戳)用法详解 [http://www.jb51.net/article/51794.htm]
- OC中NSFileManager
- 利用PreLoader实现一个平视显示(HUD)效果(可以运用到加载等待效果),并进行简单的讲解
- spring基本知识
- Problem B. Beer Refrigerator
- laravel的日志权限
- 17.基于scrapy-redis两种形式的分布式爬虫
- bzoj3678 简单题
- 解惑《你必须知道的.net》——C#继承关系中【方发表】的创建和调用