Centos7 Nginx+PHP7 配置
Centos7 Nginx+PHP7 配置
内容:
- 源码编译安装Nginx和PHP
- 配置PHP和Nginx,实现Nginx转发到PHP处理
- 测试
- 设置Nginx、PHP开机自启
安装的版本:
- Nginx:1.18.0 读音
engine x - PHP:7.4.8
1. 源码编译安装Nginx和PHP
安装是执行源码编译安装,需要有对应的库工具,如gcc编译和zlib压缩这些,执行命令安装:
shell> yum install -y openssl openssl-devel zlib zlib-devel pcre pcre-devel gcc gcc-c++ libxml2-devel libsqlite3x-devel
如果执行配置时,./configure提示缺少某些库时,可以再复制搜索查询所需的库。
过程:下载->解压->配置->编译->安装
shell> wget http://nginx.org/download/nginx-1.18.0.tar.gz #wget下载nginx源码包,或者使用curl下载:curl -O http://nginx.org/download/nginx-1.18.0.tar.gz -O是--remote-name   Write output to a file named as the remote file

shell> tar -zxvf nginx-1.18.0.tar.gz	#解压下载的源码压缩包 -z(--gzip)针对gzip的压缩,-x(--extract)是提取,-f保留原有压缩包的文件结构,-v打印详情

shell> cd nginx-1.18.0 #进入目录

shell> ./configure --prefix=/usr/local/nginx --with-http_ssl_module #执行configure会检查所需的库,成功后会生成一个Makefile文件,--prefix是执行安装的路径,--with-http_ssl_module是添加ssl模块支持,这里不会用到

shell> make -j 8 #编译,-j为--job,开启8个工作任务

shell> make install #执行安装,这里会把编译生成的程序文件拷贝到安装目录下并创建相关的文件夹
过程:下载->解压->配置->编译->安装
shell> wget https://www.php.net/distributions/php-7.4.8.tar.gz #如果下载慢的话,可以用迅雷粘贴url下载,应该会比这样下载快点

shell> tar -zxvf php-7.4.7.tar.gz	#解压

shell> cd cd php-7.4.7/	#进入解压目录

shell> ./configure --prefix=/usr/local/php -with-config-file-path=/usr/local/php/etc --enable-fpm #执行配置检查,--enable-fpm是开启PHP的fpm资源管理,关于fpm可以查阅资料了解一下

shell> make -j 8	#编译,-j为--job,开启8个工作任务

shell> make install #执行安装

shell> cp php.ini-development /usr/local/php/php.ini #拷贝php初始化配置文件,this file is responsible for configuring many of the aspects of PHP's behavior.
2. 配置PHP和nginx,实现Nginx转发到PHP处理
nginx
shell> cd /usr/local/nginx #进入编译安装的nginx目录

shell> vim conf/nginx.conf #修改nginx的配置文件
修改默认的location块:
location / {

	root   html;

        index  index.html index.htm index.php;	#添加PHP的index首页

}
再添加处理以.php结尾的location块:
location ~* \.php$ {

        fastcgi_index   index.php;		        #PHP index页面

        fastcgi_pass    127.0.0.1:9000;			#配置fastcgi服务器,请求会转发到fastcgi服务器(可以理解为PHP解析器),IP和端口在php中配置

        include         fastcgi_params;			#加入fastcgi_params,如下面的fastcgi_param参数

        fastcgi_param   SCRIPT_FILENAME    $document_root$fastcgi_script_name;

        fastcgi_param   SCRIPT_NAME        $fastcgi_script_name;

}
php
shell> cd /usr/local/php #进入编译安装的php目录

shell> cp etc/php-fpm.d/www.conf{.default,} #拷贝默认的的配置文件,相当于执行了cp etc/php-fpm.d/www.conf.default etc/php-fpm.d/www.conf,配置包括了php解析器的IP和端口,用户和用户组等配置

shell> cp etc/php-fpm.conf.default /usr/local/etc/php-fpm.conf #拷贝默认的php-fpm的启动配置文件

shell> groupadd www-data #创建www-data用户组

shell> useradd -g www-data -s /sbin/nologin www-data #创建www-data用户,属于www-data用户组(-g --group),类型为不可登录(-s --shell)
再修改php www的用户和用户组,设置为www-data,www.conf文件:
; Unix user/group of processes

; Note: The user is mandatory. If the group is not set, the default user's group

;       will be used.

user = www-data

group = www-data
再修改php-fpm的配置文件,设置启动的进程pid文件存储位置,后面设置服务需要用到进程运行IDpid,php-fpm.conf文件:
[global]

; Pid file

; Note: the default prefix is /usr/local/php/var

; Default Value: none

 pid = /usr/local/php/var/run/php-fpm.pid
3. 测试
编写测试的php页面
shell> rm /usr/local/nginx/html/index.html  #删除nginx默认的首页文件

shell> echo "<?php phpinfo(); ?>" >> /usr/local/nginx/html/index.php #创建测试文件,使用php的信息函数显示信息
启动php和nginx
shell> /usr/local/php/sbin/php-fpm	#启动php-fpm

shell> /usr/local/nginx/sbin/nginx	#启动nginx
接着,就可以浏览器输入nginx的服务器ip进行http访问了,我的这里是输入http://172.16.11.141:80,如下图所示:
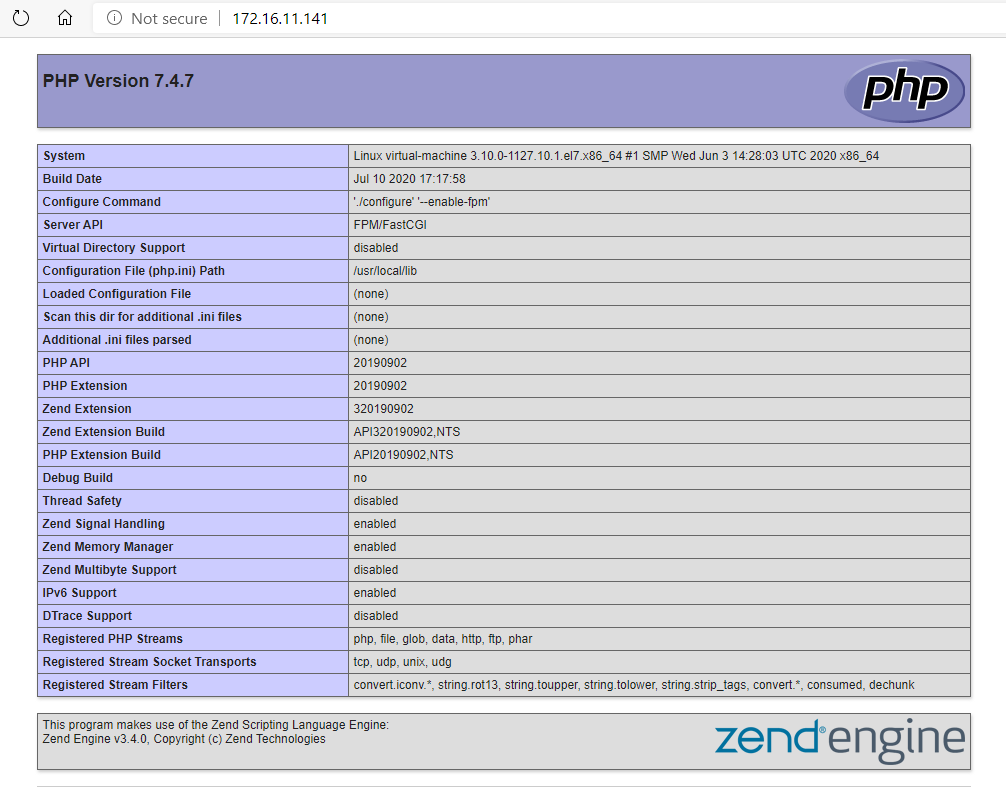
至此,nginx+php的安装和测试成功。
4. 设置Nginx、PHP开机自启
nginx
在centos7中,服务都是使用systemdctl命令而不是service了,即使是使用service命令其实也是链接到systemdctl命令,关于systemd的介绍可以参考阮一峰老师的:Systemd 入门教程:命令篇
shell> cd /lib/systemd/system/	#切换目录到关于系统进程的目录

shell> vim nginx.service	#在目录下新建nginx.service文件,填入以下内容
nginx.service文件
[Unit]

Description=nginx service

After=network.target

[Service]

Type=forking

ExecStart=/usr/local/nginx/sbin/nginx

ExecReload=/usr/local/nginx/sbin/nginx -s reload

ExecStop=/usr/local/nginx/sbin/nginx -s quit

PrivateTmp=true

[Install]

WantedBy=multi-user.target
[Unit]块是这个服务单元的描述;[Service]块是服务的配置,如启动命令,停止命令,其中的Type=forking表示后台执行;[Install]块是安装的配置,multi-user.target是运行级别为3,Linux有0-6歌运行级别。最后,执行命令执行开启开机自启:
shell> systemctl enalbe nginx.service #开启nginx开机自启服务,关闭对应dsiable
关于systemctl的详细使用介绍可以查阅这篇文章:How To Use Systemctl to Manage Systemd Services and Units
php
php的服务也差不多,不过php在5.3.3以后的版本不再支持 (start|stop|reload) 等命令,需要使用Linux的信号量:INT,USR1,USR2,QUIT等。
shell> cd /lib/systemd/system/	#切换目录到关于系统进程的目录

shell> vim php-fpm.service	#在multi-user.target.wants目录下新建php-fpm.service文件,填入以下内容
php-fpm文件:
[Unit]

Description=php-fpm service

After=network.target

[Service]

Type=forking

ExecStart=/usr/local/php/sbin/php-fpm

ExecReload=kill -USR2 $(cat /usr/local/php/var/run/php-fpm.pid)

ExecStop=kill -INT $(cat /usr/local/php/var/run/php-fpm.pid)

PrivateTmp=true

[Install]

WantedBy=multi-user.target
关于Linux的信号量,可以查阅这篇文章介绍:Signals in Linux ,最后开启php-fpm服务:
shell> systemctl enable php-fpm.service #开启php-fpm开机自启服务,关闭对应dsiable
5. 最后
最后重启进行测试:
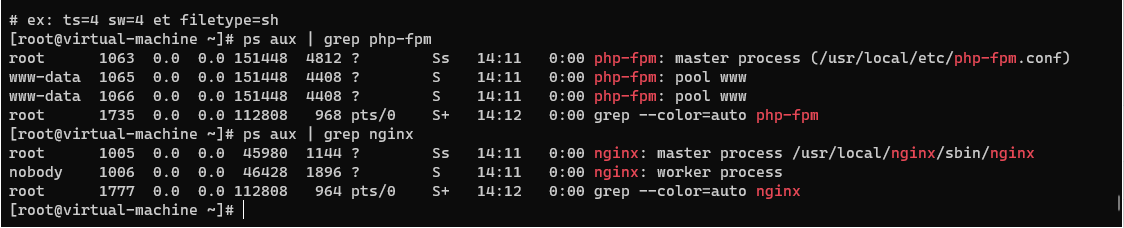
shell> reboot		#重启

shell> ps aux | grep php-fpm	#查看php-fpm相关进程是否运行

shell> ps aux | grep nginx		#查看nginx相关进程是否运行
最新文章
- JavaScript工具代码
- PHP获取当前服务器信息的基本语句
- 通过ABAP的标准功能,寻找源代码中的字符串
- 省常中模拟 day1
- django模型中的抽象类(abstract)
- [转]linux系统磁盘分区之parted
- MySQL MyISAM/InnoDB高并发优化经验
- GIS前端将选中的图形输出为Shapfile文件
- 【Linux】gdb调试
- [转] JSON Web Token in ASP.NET Web API 2 using Owin
- portscaner 多线程、多协程并发端口扫描
- 洛谷 P1879 玉米田(状压DP入门题)
- 单点登录SSO的原理及实现方式总结
- http账户密码的截取
- JavaSE学习总结(二)——Java语言基础
- 『Yaml』配置文件读写包
- goland 文件头注释
- centos7设置grub密码保护
- CentOS7.x 配置开机启动项目
- 配置允许匿名用户登录访问vsftpd服务,进行文档的上传下载、文档的新建删除等操作