rabbitMq交换机direct、topics
2024-10-14 14:22:00
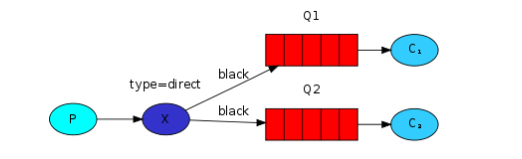
一: direct
上面我用采用了广播的模式进行消息的发送,现在我们采用路由的方式对不同的消息进行过滤
发送端代码

public class RoutingSendDirect {

    private static final String EXCHANGE_NAME = "direct_logs";

    // 路由关键字

    private static final String[] routingKeys = new String[]{"info" ,"warning", "error"};

    public static void main(String[] args) throws IOException, TimeoutException {

        ConnectionFactory factory = new ConnectionFactory();

        factory.setHost("localhost");

        Connection connection = factory.newConnection();

        Channel channel = connection.createChannel();

        //声明交换机

        channel.exchangeDeclare(EXCHANGE_NAME,"direct");//注意是direct

        //发送信息

        for (String routingKey:routingKeys){

            String message = "RoutingSendDirect Send the message level:" + routingKey;

            channel.basicPublish(EXCHANGE_NAME,routingKey,null,message.getBytes());

            System.out.println("RoutingSendDirect Send"+routingKey +"':'" + message);

        }

        channel.close();

        connection.close();

    }

}
ReceiveLogsDirect1 消费者代码
public class ReceiveLogsDirect1 {

    // 交换器名称

    private static final String EXCHANGE_NAME = "direct_logs";

    // 路由关键字

    private static final String[] routingKeys = new String[]{"info" ,"warning"};

    public static void main(String[] args) throws IOException, TimeoutException {

        ConnectionFactory factory = new ConnectionFactory();

        factory.setHost("localhost");

        Connection connection = factory.newConnection();

        Channel channel = connection.createChannel();

        //声明交换器

        channel.exchangeDeclare(EXCHANGE_NAME, "direct");

        //获取匿名队列名称

        String queueName=channel.queueDeclare().getQueue();

        //根据路由关键字进行绑定

        for (String routingKey:routingKeys){

            channel.queueBind(queueName,EXCHANGE_NAME,routingKey);

            System.out.println("ReceiveLogsDirect1 exchange:"+EXCHANGE_NAME+"," +

                    " queue:"+queueName+", BindRoutingKey:" + routingKey);

        }

        System.out.println("ReceiveLogsDirect1  Waiting for messages");

        Consumer consumer = new DefaultConsumer(channel) {

            @Override

            public void handleDelivery(String consumerTag, Envelope envelope, AMQP.BasicProperties properties, byte[] body) throws IOException {

                String message = new String(body, "UTF-8");

                System.out.println("ReceiveLogsDirect1 Received '" + envelope.getRoutingKey() + "':'" + message + "'");

            }

        };

        channel.basicConsume(queueName, true, consumer);

    }
ReceiveLogsDirect2消费者代码
public class ReceiveLogsDirect2 {

    // 交换器名称

    private static final String EXCHANGE_NAME = "direct_logs";

    // 路由关键字

    private static final String[] routingKeys = new String[]{"error"};

    public static void main(String[] argv) throws Exception {

        ConnectionFactory factory = new ConnectionFactory();

        factory.setHost("localhost");

        Connection connection = factory.newConnection();

        Channel channel = connection.createChannel();

        //声明交换器

        channel.exchangeDeclare(EXCHANGE_NAME, "direct");

        //获取匿名队列名称

        String queueName = channel.queueDeclare().getQueue();

        //根据路由关键字进行多重绑定

        for (String severity : routingKeys) {

            channel.queueBind(queueName, EXCHANGE_NAME, severity);

            System.out.println("ReceiveLogsDirect2 exchange:"+EXCHANGE_NAME+", queue:"+queueName+", BindRoutingKey:" + severity);

        }

        System.out.println("ReceiveLogsDirect2 Waiting for messages");

        Consumer consumer = new DefaultConsumer(channel) {

            @Override

            public void handleDelivery(String consumerTag, Envelope envelope, AMQP.BasicProperties properties, byte[] body) throws UnsupportedEncodingException {

                String message = new String(body, "UTF-8");

                System.out.println("ReceiveLogsDirect2 Received '" + envelope.getRoutingKey() + "':'" + message + "'");

            }

        };

        channel.basicConsume(queueName, true, consumer);

    }

}
上面代码可以看出这里是通过路由来找个这个对列的。我们看下结果


二:Topics
这种应该属于模糊匹配
* :可以替代一个词
#:可以替代0或者更多的词
现在我们继续看看代码来理解
发送端
public class TopicSend {

    private static final String EXCHANGE_NAME = "topic_logs";

    public static void main(String[] args) throws IOException, TimeoutException {

        Connection connection = null;

        Channel channel = null;

        try{

            ConnectionFactory factory=new ConnectionFactory();

            factory.setHost("localhost");

            connection=factory.newConnection();

            channel=connection.createChannel();

            //声明一个匹配模式的交换机

            channel.exchangeDeclare(EXCHANGE_NAME,"topic");

            //待发送的消息

            String[] routingKeys=new String[]{

                    "quick.orange.rabbit",

                    "lazy.orange.elephant",

                    "quick.orange.fox",

                    "lazy.brown.fox",

                    "quick.brown.fox",

                    "quick.orange.male.rabbit",

                    "lazy.orange.male.rabbit"

            };

            //发送消息

            for(String severity :routingKeys){

                String message = "From "+severity+" routingKey' s message!";

                channel.basicPublish(EXCHANGE_NAME, severity, null, message.getBytes());

                System.out.println("TopicSend Sent '" + severity + "':'" + message + "'");

            }

        }catch (Exception e){

            e.printStackTrace();

            if (connection!=null){

                channel.close();

                connection.close();

            }

        }finally {

            if (connection!=null){

                channel.close();

                connection.close();

            }

        }

    }

}
消费者1:
public class ReceiveLogsTopic1 {

    private static final String EXCHANGE_NAME = "topic_logs";

    public static void main(String[] args) throws IOException, TimeoutException {

        ConnectionFactory factory = new ConnectionFactory();

        factory.setHost("localhost");

        Connection connection = factory.newConnection();

        Channel channel = connection.createChannel();

        //声明一个匹配模式的交换机

        channel.exchangeDeclare(EXCHANGE_NAME, "topic");

        String queueName = channel.queueDeclare().getQueue();

        //路由关键字

        String[] routingKeys = new String[]{"*.orange.*"};

        //绑定路由

        for (String routingKey : routingKeys) {

            channel.queueBind(queueName, EXCHANGE_NAME, routingKey);

            System.out.println("ReceiveLogsTopic1 exchange:" + EXCHANGE_NAME + ", queue:" + queueName + ", BindRoutingKey:" + routingKey);

        }

        System.out.println("ReceiveLogsTopic1 Waiting for messages");

        Consumer consumer = new DefaultConsumer(channel) {

            @Override

            public void handleDelivery(String consumerTag, Envelope envelope, AMQP.BasicProperties properties, byte[] body) throws IOException {

                String message = new String(body, "UTF-8");

                System.out.println("ReceiveLogsTopic1 Received '" + envelope.getRoutingKey() + "':'" + message + "'");

            }

        };

        channel.basicConsume(queueName, true, consumer);

    }

}
消费者2:
复制代码

ublic class ReceiveLogsTopic2 {

    private static final String EXCHANGE_NAME = "topic_logs";

    public static void main(String[] argv) throws IOException, TimeoutException {

        ConnectionFactory factory = new ConnectionFactory();

        factory.setHost("localhost");

        Connection connection = factory.newConnection();

        Channel channel = connection.createChannel();

//      声明一个匹配模式的交换器

        channel.exchangeDeclare(EXCHANGE_NAME, "topic");

        String queueName = channel.queueDeclare().getQueue();

        // 路由关键字

        String[] routingKeys = new String[]{"*.*.rabbit", "lazy.#"};

//      绑定路由关键字

        for (String bindingKey : routingKeys) {

            channel.queueBind(queueName, EXCHANGE_NAME, bindingKey);

            System.out.println("ReceiveLogsTopic2 exchange:"+EXCHANGE_NAME+", queue:"+queueName+", BindRoutingKey:" + bindingKey);

        }

        System.out.println("ReceiveLogsTopic2 Waiting for messages");

        Consumer consumer = new DefaultConsumer(channel) {

            @Override

            public void handleDelivery(String consumerTag, Envelope envelope, AMQP.BasicProperties properties, byte[] body) throws UnsupportedEncodingException  {

                String message = new String(body, "UTF-8");

                System.out.println("ReceiveLogsTopic2 Received '" + envelope.getRoutingKey() + "':'" + message + "'");

            }

        };

        channel.basicConsume(queueName, true, consumer);

    }

}
三,远程调用
public class RPCServer {

    private static final String RPC_QUEUE_NAME = "rpc_queue";

    private static int fib(int n) {

        if (n == 0) {

            return 0;

        }

        if (n == 1) {

            return 1;

        }

        return fib(n - 1) + fib(n - 1);

    }

    public static void main(String[] args) throws IOException, InterruptedException, TimeoutException {

        ConnectionFactory factory = new ConnectionFactory();

        factory.setHost("localhost");

        Connection connection = factory.newConnection();

        Channel channel = connection.createChannel();

        channel.queueDeclare(RPC_QUEUE_NAME, false, false, false, null);

        channel.basicQos(1);

        QueueingConsumer consumer = new QueueingConsumer(channel);

        channel.basicConsume(RPC_QUEUE_NAME, false, consumer);

        System.out.println("RPCServer Awating RPC request");

        while (true) {

            QueueingConsumer.Delivery delivery = consumer.nextDelivery();

            BasicProperties props = delivery.getProperties();

            BasicProperties replyProps = new AMQP.BasicProperties.Builder().

                    correlationId(props.getCorrelationId()).build();

            String message = new String(delivery.getBody(), "UTF-8");

            int n = Integer.parseInt(message);

            System.out.println("RPCServer fib(" + message + ")");

            String response = "" + fib(n);

            channel.basicPublish( "", props.getReplyTo(), replyProps, response.getBytes());

            channel.basicAck(delivery.getEnvelope().getDeliveryTag(), false);

        }

    }

}
服务器代码比较简单
1:建立连接,通道,队列
2:我们可能运行多个服务器进程,为了分散负载服务器压力,我们设置channel.basicQos(1);
3:我们用basicconsume访问队列。然后进入循环,在其中我们等待请求消息并处理消息然后发送响应。
public class RPCClient {

    private Connection connection;

    private Channel channel;

    private String requestQueueName = "rpc_queue";

    private String replyQueueName;

    private QueueingConsumer consumer;

    public RPCClient() throws IOException, TimeoutException {

        ConnectionFactory factory = new ConnectionFactory();

        factory.setHost("localhost");

        connection = factory.newConnection();

        channel = connection.createChannel();

        replyQueueName = channel.queueDeclare().getQueue();

        consumer = new QueueingConsumer(channel);

        channel.basicConsume(replyQueueName, true, consumer);

    }

    public String call(String message) throws IOException, InterruptedException {

        String response;

        String corrID = UUID.randomUUID().toString();

        AMQP.BasicProperties props = new AMQP.BasicProperties().builder()

                .correlationId(corrID).replyTo(replyQueueName).build();

        channel.basicPublish("", requestQueueName, props, message.getBytes("UTF-8"));//发送消息等待服务端返回

        while (true) {

            QueueingConsumer.Delivery delivery = consumer.nextDelivery();//服务端响应后 阻塞解除

            if (delivery.getProperties().getCorrelationId().equals(corrID)) {

                response = new String(delivery.getBody(), "UTF-8");

                break;

            }

        }

        return response;

    }

    public void close() throws Exception {

        connection.close();

    }

    public static void main(String[] args) throws Exception {

        RPCClient rpcClient = null;

        String response;

        try {

            rpcClient = new RPCClient();

            System.out.println("RPCClient  Requesting fib(20)");

            response = rpcClient.call("20");

            System.out.println("RPCClient  Got '" + response + "'");

        } catch (Exception e) {

            e.printStackTrace();

        } finally {

            if (rpcClient != null) {

                rpcClient.close();

            }

        }

    }

}
客户端代码解读
1:建立一个连接和通道,并声明了一个唯一的“回调”队列的答复
2:我们订阅回调队列,这样就可以得到RPC的响应
3:定义一个call方法用于发送当前的回调请求
4:生成一个唯一的correlationid,然后通过while循环来捕获合适的回应
5:我们请求信息,发送2个属性,replyTo 和correlationId
6:然后就是等待直到有合适的回应到达
7:while循环是做一个非常简单的工作,对于每一个响应消息,它检查是否有correlationid然后进行匹配。然后是就进行响应。
8:最后把响应返回到客户端。
最新文章
- csharp: Download SVN source
- Mvc中域的添加和不同域之间的跳转
- Python底层socket库
- iOS 8.1.3 “各路助手挺尸”、“封杀一切助手
- CoreData数据库迁移的操作
- sprint 1 的总结
- java_easyui体系之目录 [转]
- mysql 将null转代为0
- SQL优化之索引
- hibernate映射关系之多对多
- 特征提取方法: one-hot 和 IF-IDF
- Lintcode393 Best Time to Buy and Sell Stock IV solution 题解
- Android 自定义ViewGroup手把手教你实现ArcMenu
- 二进制安装MongoDB
- (转)Java并发编程:线程池的使用
- Delphi中封装ADO之我重学习记录
- Thrift 源码学习一——源码结构
- Seaching TreeVIew WPF
- Linux 管道
- mongo 杀掉慢的程序killMyRunningOps("12.23.32.21") #####这个是客户端的ip