React Native的生命周期解析
2024-09-04 13:16:52
在React Native中使用组件来封装界面模块时,整个界面就是一个大的组件,开发过程就是不断优化和拆分界面组件、构造整个组件树的过程。
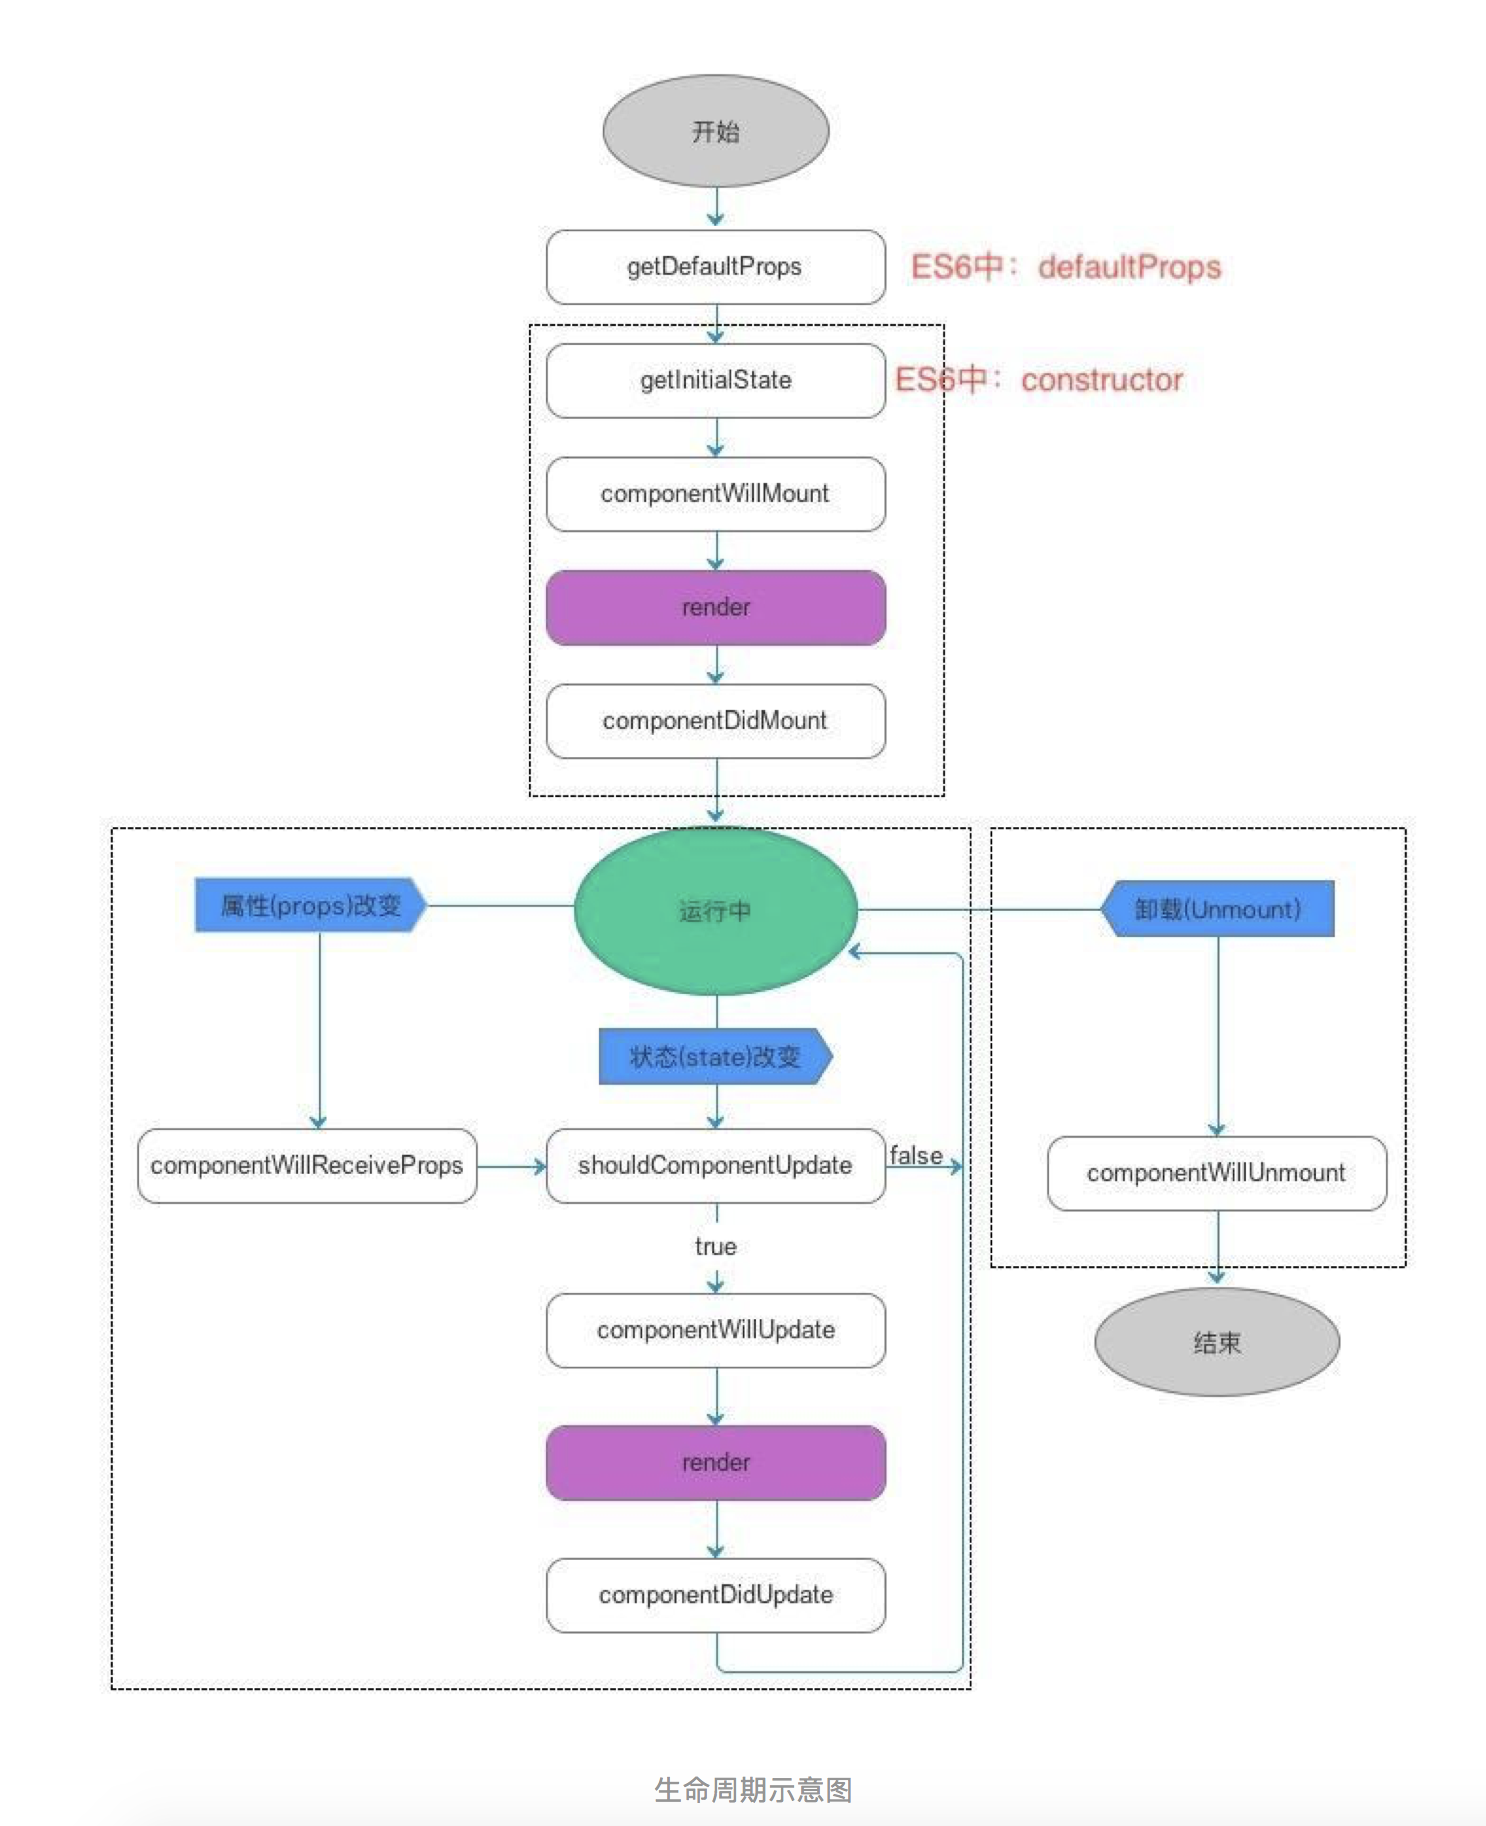

上张图涵盖了一个组件从创建、运行到销毁的整个过程。大家可以看到,初始化的时候会调用5个函数(按先后顺序)。这5个函数在整个组件被创建到销毁的过程中只调用一次。初始化完毕后,当组件的props或者state改变都会触发不同的钩子函数,继而引发组件的重新渲染。现在我们把这过程拆开一点一点来分析。
初始化
我们先来看初始化,在初始化的过程中,会按顺序调用下面5个函数。
getDefaultProps:组件实例创建前调用,多个实例间共享引用。注意:如果父组件传递过来的Props和你在该函数中定义的Props的key一样,将会被覆盖。
在组件中,我们可以利用this.props获取在这里初始化它的属性,由于组件初始化后,再次使用该组件不会调用getDefaultProps函数,所以组件自己不可以修改props,只可由其他组件调用它时再外部进行修改。

getInitalState:组件示例创建的时候调用的第一个函数。主要用于初始化state。注意:为了在使用中不出现空值,建议初始化state的时候尽可能给每一个可能用到的值都赋一个初始值。
该函数不同于getDefaultProps,在以后的过程中,会再次调用,所以可以将控制控件状态的一些变量放在这里初始化,比如控件上显示的文字,可以通过this.state来获取值,通过this.setState来修改state值。注意:一旦调用了this.setState方法,组件一定会调用render方法,对组件进行再次渲染,不过,React框架会根据DOM的状态自动判断是否需要真正渲染。
componentWillMount:在render前,getInitalState之后调用。仅调用一次,可以用于改变state操作。
render:组件渲染函数,会返回一个Virtual DOM,只允许返回一个最外层容器组件。render函数尽量保持纯净,只渲染组件,不修改状态,不执行副操作(比如计时器)。

componentDidMount:在render渲染之后,React会根据Virtual DOM来生成真实DOM,生成完毕后会调用该函数。
在浏览器端(React),我们可以通过this.getDOMNode()来拿到相应的DOM节点。然而我们在RN中并用不到,在RN中主要在该函数中执行网络请求,定时器开启等相关操作
在调用了render方法,组件加载成功并被成功渲染出来之后,所要执行的后续操作,一般都会在这个函数中进行,比如经常要面对的网络请求等加载数据操作
运行中
初始化完成之后,组件将会进入到运行中状态,运行中状态我们将会遇到如下几个函数:
componentWillReceiveProps(nextProps):props改变(父容器来更改或是redux),将会调用该函数。新的props将会作为参数传递进来,老的props可以根据this.props来获取。我们可以在该函数中对state作一些处理。注意:在该函数中更新state不会引起二次渲染。

boolean shouldComponentUpdate(object nextProps, object nextState):该函数传递过来两个参数,新的state和新的props。state和props的改变都会调到该函数。该函数主要对传递过来的nextProps和nextState作判断。如果返回true则重新渲染,如果返回false则不重新渲染。在某些特定条件下,我们可以根据传递过来的props和state来选择更新或者不更新,从而提高效率。

componentWillUpdate(object nextProps, object nextState):与componentWillMount方法类似,组件上会接收到新的props或者state渲染之前,调用该方法。但是不可以在该方法中更新state和props。

render:跟初始化的时候功能一样。

componentDidUpdate(object prevProps,object prevState):和初始化时期的componentDidMount类似,在render之后,真实DOM生成之后调用该函数。传递过来的是当前的props和state。在该函数中同样可以使用this.getDOMNode()来拿到相应的DOM节点。如果你需要在运行中执行某些副操作,请在该函数中完成。
销毁
销毁阶段只有一个函数,很简单
componentWillUnmount:组件DOM中移除的时候调用。在这里进行一些相关的销毁操作,比如定时器,监听等等。
案例代码
import React, {Component} from 'react';

import {

  View,

  Text,

  StyleSheet,

  TouchableOpacity

} from 'react-native';

import {Actions} from 'react-native-router-flux';

import Student from './Student';

export default class Home extends Component {

  constructor(props) {

    super(props);

    this.state = {

      clickText: "开始点击按钮",

      count: 1,

      detailContent: true

    }

  }

  componentWillMount() {

    console.log("componentWillMount1111");

  }

  shouldComponentUpdate(nextProps, nextState){

    console.log(this.state.detailContent,'detailContent');

    if (this.state.count !== nextState.count) {

      console.log("shouldComponentUpdate1111---组件需要更新");

      return true;

    }

    return false;

  }

  componentWillUpdate(){

    console.log("componentWillUpdate1111---组件将要更新");

  }

  componentDidUpdate(){

    console.log("componentDidUpdate1111---组件更新完毕");

  }

  componentDidMount() {

    console.log("componentDidMount1111");

  }

  componentWillUnmount() {

    console.log("componentWillUnmount1111");

  }

  clickButton(){

    const { count } = this.state;

    this.setState({

      clickText: "我点击了按钮",

      count: count + 1,

      detailContent: false

    })

  }

  render() {

    console.log("render1111");

    return (

      <View style={styles.container}>

        <Text>欢迎来到首页</Text>

        <TouchableOpacity

          onPress={() => Actions.notice()}

        >

          <Text>跳转到公告页</Text>

        </TouchableOpacity>

        <Text style={{color: 'blue', fontSize: 40}}>{this.state.count}</Text>

        <TouchableOpacity

          style={styles.button}

          onPress={() => this.clickButton()}

        >

          <Text>{this.state.clickText}</Text>

        </TouchableOpacity>

        <Student detailContent={this.state.detailContent}/>

      </View>

    )

  }

}

const styles = StyleSheet.create({

  container: {

    flex: 1,

    alignItems: "center",

    justifyContent: "center"

  },

  button: {

    width: 250,

    height: 60,

    backgroundColor: 'red',

    borderRadius: 10,

    alignItems: 'center',

    justifyContent: 'center'

  }

});
import React, {Component} from 'react';

import {

  View,

  Text,

  StyleSheet

} from 'react-native';

export default class Student extends Component {

  constructor(props) {

    super(props);

    this.state = {}

  }

  componentWillMount() {

  }

  componentWillReceiveProps(nextProps){

    console.log(this.props.detailContent,'this--->>componentWillReceiveProps');

    console.log(nextProps.detailContent,'next--->>componentWillReceiveProps')

  }

  componentDidMount() {

  }

  componentWillUnmount() {

  }

  render() {

    return (

      <View style={styles.container}>

        <Text>欢迎HomeDetails</Text>

      </View>

    )

  }

}

const styles = StyleSheet.create({

  container: {

    flex: 1,

    alignItems: "center",

    justifyContent: "center"

  }

});
最新文章
- android editText 监听事件
- .Net元编程【Metaprogramming in NET】 序-翻译
- .Net分布式异常报警系统-客户端及服务端API
- Web前端开发基础 第一天(Html和CSS)
- macbook 快捷键
- url 参数的加号变成空格处理
- 版本和API Level对照表
- prototype constructor __proto__
- CentOS6.4 安装 Oracle11g
- Loadrunner初学
- JavaEE HttpServlet 解析
- 工频相位无线同步模块PSYN5000系列在高压设备状态检测和局部放电故障定位的应用方案
- php开发之系统函数
- Hbase数据表解析
- 用javascript来实现前端简单路由
- BUG——Celery ValueError: not enough values to unpack
- NYOJ_1274_信道安全 -
- 《深入理解java虚拟机》第六章 类文件结构
- 20. --erg--=--org--=--urg-- 做,工作 (词20、21)
- 【AT1219】历史研究