Ubuntu16.04+TensorFlow r1.12环境搭建指南
一、操作系统安装
OS版本:Ubuntu 16.04 (ubuntu-16.04.5-server-amd64.iso)
CPU:4Core以上
内存:4GB以上
磁盘空间:80G以上
二、基础环境准备
1、为了提高apt安装速度,更新apt为国内阿里云源
(1)复制原文件备份
sudo cp /etc/apt/source.list /etc/apt/source.list.bak
(2)编辑源列表文件
sudo
vim /etc/apt/source.list
(3)将原来的列表删除,添加如下内容
deb
http://mirrors.aliyun.com/ubuntu/ vivid main restricted universe
multiverse
deb http://mirrors.aliyun.com/ubuntu/ vivid-security main restricted universe
multiverse
deb http://mirrors.aliyun.com/ubuntu/ vivid-updates main restricted universe
multiverse
deb http://mirrors.aliyun.com/ubuntu/ vivid-proposed main restricted universe
multiverse
deb http://mirrors.aliyun.com/ubuntu/ vivid-backports main restricted universe
multiverse
deb-src http://mirrors.aliyun.com/ubuntu/ vivid main restricted universe
multiverse
deb-src http://mirrors.aliyun.com/ubuntu/ vivid-security main restricted
universe multiverse
deb-src http://mirrors.aliyun.com/ubuntu/ vivid-updates main restricted
universe multiverse
deb-src http://mirrors.aliyun.com/ubuntu/ vivid-proposed main restricted
universe multiverse
deb-src http://mirrors.aliyun.com/ubuntu/ vivid-backports main restricted
universe multiverse
(4)运行sudo apt-get update
2、为了提高pip安装速度,更新pip为国内阿里云源
mkdir
~/.pip
vi
~/.pip/pip.conf
编辑pip.conf文件:
[global]
index-url = http://mirrors.aliyun.com/pypi/simple/
[install]
trusted-host = mirrors.aliyun.com
3、安装gnome桌面(显示视频窗口需要)
sudo
apt install ubuntu-gnome-desktop
4、安装git
sudo
apt install git
5、加配SWAP到4GB以上(避免编译过程中分配内存失败,如果已经有超过4GB的swap空间,或者安装操作系统过程中已配置较大swap,可跳过这步)
sudo
dd if=/dev/zero of=/swap bs=4096 count=1M
sudo
mkswap /swap
sudo
swapon /swap
sudo
echo "/swap swap swap sw 0 0" >> /etc/fstab
三、安装编译工具Bazel
1、安装依赖包
sudo
apt-get install pkg-config zip g++ zlib1g-dev unzip
2、下载Bazel安装包
wget
https://github.com/bazelbuild/bazel/releases/download/0.18.1/bazel-0.18.1-installer-linux-x86_64.sh
3、安装Bazel
chmod
+x bazel-0.18.1-installer-linux-x86_64.sh
./
bazel-0.18.1-installer-linux-x86_64.sh --user
4、设置环境变量
sudo
vi ~/.bashrc
在文件最后添加:
export
PATH=$PATH":~/bin"
source
~/.bashrc
四、安装TensorFlowflow
1、安装virtualenv、virtualenvwrapper
pip
install --user virtualenv
pip
install --user virtualenvwrapper
mkdir
-p ~/Envs
sudo
vi ~/.bashrc
在文件最后添加:
export
WORKON_HOME=~/Envs
source
/usr/local/bin/virtualenvwrapper.sh
source
~/.bashrc
创建虚拟环境:mkvirtualenv tfenv
进入虚拟环境:workon tfenv
退出虚拟环境:deactivate
2、安装依赖包:
(1)准备Python依赖
pip
install -U six numpy wheel mock portpicker scipy futures scikit-learn grpcio
grpcio-tools enum34
pip
install -U keras_applications==1.0.5 --no-deps
pip
install -U keras_preprocessing==1.0.3 --no-deps
pip
install -U --upgrade setuptools
easy_install
distribute
pip
install -U --upgrade distribute
修正虚拟环境中的pkg_resources包
workon
tfenv
cdsitepackages
vi
pkg_resources/__init__.py
找到:from . import py31compat
替换为:from pkg_resources import py31compat
rm
-f pkg_resources/__init__.pyc
(2)准备go环境
移除老版本:sudo apt remove golang-go
安装go1.10
sudo
add-apt-repository ppa:gophers/archive
sudo
apt-get update
sudo
apt-get install golang-1.10-go
设置go环境变量
sudo
vi ~/.bashrc
在文件最后添加:
找到export PATH=$PATH":~/bin"
替换为:export PATH="$PATH:~/bin:/usr/lib/go-1.10/bin"
source
~/.bashrc
3、准备TensorFlow源码
git
clone https://github.com/tensorflow/tensorflow.git
cd
tensorflow
git
checkout r1.12 # r1.9, r1.10, etc.
4、编译前测试
bazel
test -c opt -- //tensorflow/... -//tensorflow/compiler/...
-//tensorflow/contrib/lite/...
如果告警提示支持avx、avx2、fma、sse4.1、sse4.2,则使用如下命令:
bazel
test -c opt --copt=-mavx --copt=-mavx2 --copt=-mfma --copt=-msse4.1 --copt=-msse4.2
--copt=-mfpmath=both -- //tensorflow/...
-//tensorflow/compiler/... -//tensorflow/contrib/lite/...
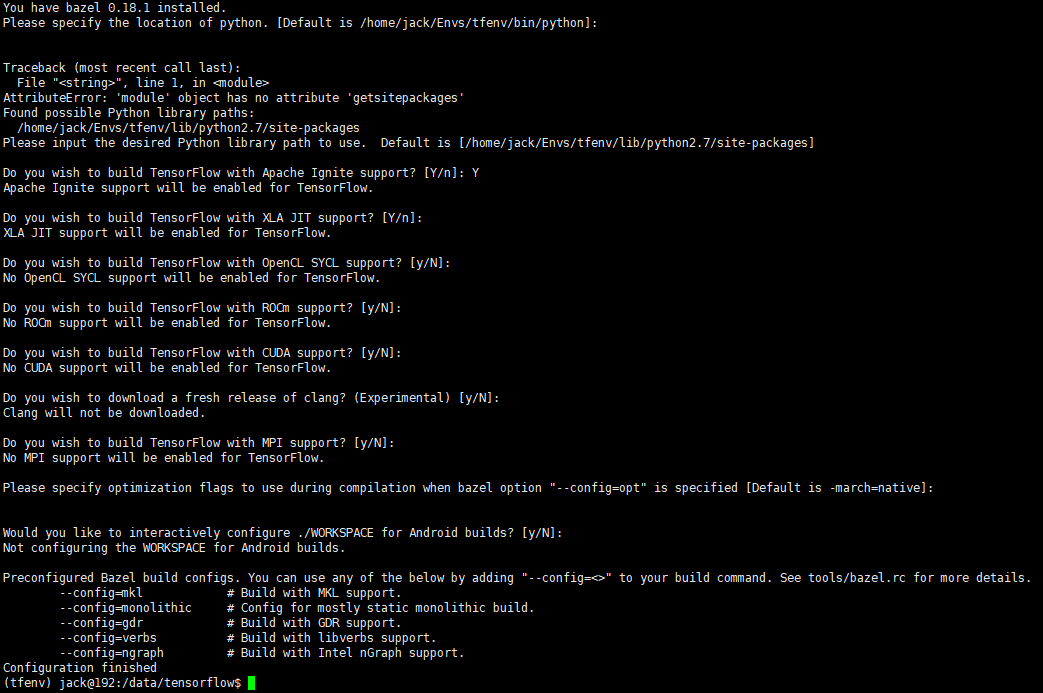
5、编译配置
在tensorflow源码根目录运行:
./configure
配置如下:
6、Build the pip package
bazel
build --config=opt //tensorflow/tools/pip_package:build_pip_package
7、Build the package
./bazel-bin/tensorflow/tools/pip_package/build_pip_package
/tmp/tensorflow_pkg
8、Install the package
pip
install /tmp/tensorflow_pkg/tensorflow-version-tags.whl
参考:
https://www.tensorflow.org/install/source?hl=zh-cn
https://docs.bazel.build/versions/master/install-ubuntu.html
https://github.com/golang/go/wiki/Ubuntu
最新文章
- SQLCMD备忘录:执行文件夹所有Sql文件
- 关于访问链接返回XML的获取数据
- [转载] javascript实现深度克隆
- iOS中的上传、下载流程心得
- JS重要知识点
- spring mvc 配置文件信息记录
- sasscore学习之_mixin.scss
- PHP的几个常用加密函数(转载 https://jellybool.com/post/php-encrypt-functions)
- Android || IOS录制mp3语音文件方法
- volatile之一--volatile不能保证原子性
- HTTP缓存是如何实现
- SecureCRT恢复默认字体
- Bootstrap学习——起步
- DedeCMS中最重要的四类表
- mysql System Tablespace
- perl 爬取同花顺数据
- File中操作路径的API(转)
- 编写高效的JavaScript
- Ubuntu下 fatal error: Python.h: No such file or directory 解决方法
- [ZZ] 基于Matlab的标记分水岭分割算法