GitLab一键式安装bitnami 专题
git lab developer角色不能提交到master分支的问题
错误提示:

git -c diff.mnemonicprefix=false -c core.quotepath=false push -v origin master:master

Pushing to http://xxx/xxx/xxx_HTML.git

POST git-receive-pack (47642 bytes)

remote: GitLab: You don‘t have permission[K

To http://xxx/xxx/xxx_HTML.git

! [remote rejected] master -> master (pre-receive hook declined)

error: failed to push some refs to ‘http://xxx/xxx/xxx_HTML.git‘
解决方案:
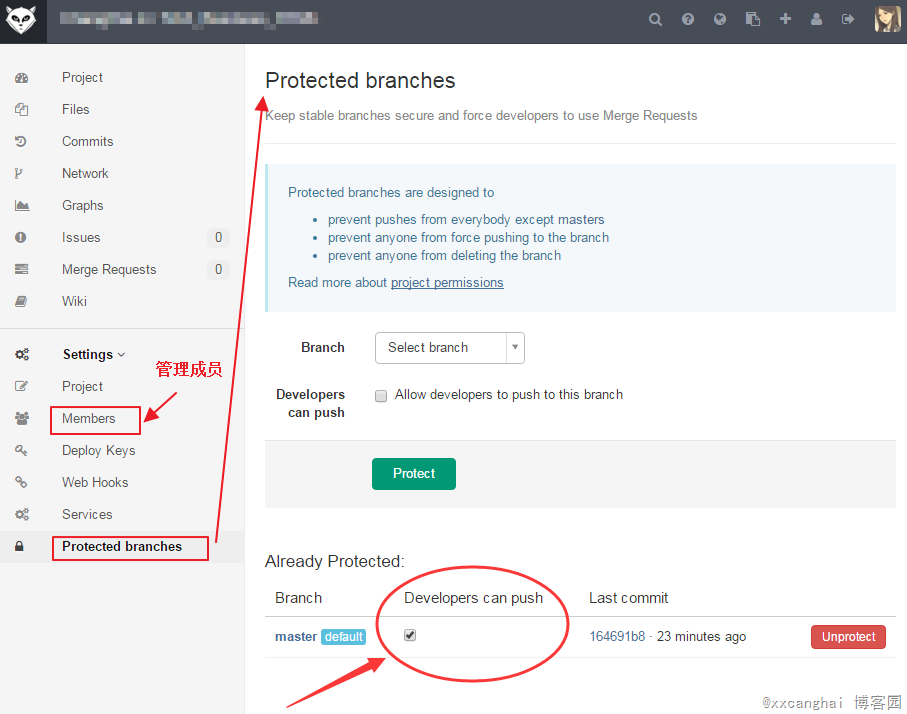
默认 master 分支是处于被保护状态下的,develop 角色是没有权限提交到 master 分支的,Gitlab 更推荐遵循 Gitflow 的方式,临时解决的方式是 Setting中 => Protected branches 启用 master 分支可被 develop 角色提交即可。
研究了下Gitlab,最终解决方案是:
在项目的【Setting】中的【Protected branches】可以设置哪些分支是被保护的,默认情况下【master】分支是处于被保护状态下的,develop角色的人是无法提交到master分支的,在下面的【Developers can push】打上钩就可以了。
http://www.mamicode.com/info-detail-1134129.html
https://bitnami.com/stack/gitlab/installer
https://bitnami.com/redirect/to/96764/bitnami-gitlab-8.5.1-0-linux-x64-installer.run
                    Bitnami GitLab Stack 8.5.1-0

                  ==============================

1. OVERVIEW

The Bitnami Project was created to help spread the adoption of freely

available, high quality, open source web applications. Bitnami aims to make

it easier than ever to discover, download and install open source software

such as document and content management systems, wikis and blogging

software.

You can learn more about Bitnami at https://bitnami.com

GitLab allows you to keep your code secure on your own server, manage

repositories, users and access permissions, communicate through issues,

line-commens, wiki pages and perform code reviw with merge requests. It is

powered by Ruby on Rails and completely free and open source (MIT license).

You can learn more about GitLab at http://gitlab.org

The Bitnami GitLab Stack is an installer that greatly simplifies the

installation of GitLab and runtime dependencies. It includes ready-to-run

versions of Apache, PostgreSQL and Ruby On Rails. GitLab Stack is distributed

for free under the Apache 2.0 license. Please see the appendix for the specific

licenses of all open source components included.

You can learn more about Bitnami Stacks at https://bitnami.com/stacks/

2. FEATURES

- Easy to Install

Bitnami Stacks are built with one goal in mind: to make it as easy as

possible to install open source software. Our installers completely automate

the process of installing and configuring all of the software included in

each Stack, so you can have everything up and running in just a few clicks.

- Independent

Bitnami Stacks are completely self-contained, and therefore do not interfere

with any software already installed on your system. For example, you can

upgrade your system's PostgreSQL or Apache without fear of 'breaking' your

Bitnami Stack.

- Integrated

By the time you click the 'finish' button on the installer, the whole stack

will be integrated, configured and ready to go.

- Relocatable

Bitnami Stacks can be installed in any directory. This allows you to have

multiple instances of the same stack, without them interfering with each other.

3. COMPONENTS

Bitnami GitLab Stack ships with the following software versions:

  - GitLab 8.5.1

  - Apache 2.4.18

  - ImageMagick 6.7.5

  - PostgreSQL 9.4.6

  - Git 2.6.1

  - Ruby 2.1.8

  - Rails 4.2.5.1

  - RubyGems 1.8.12

4. REQUIREMENTS

To install Bitnami GitLab Stack you will need:

    - Intel x86 or compatible processor

    - Minimum of 2048 MB RAM

    - Minimum of 150 MB hard drive space

    - TCP/IP protocol support

    - Compatible operantig systems:

      - An x86 Linux operating system.

5. INSTALLATION

The Bitnami GitLab Stack is distributed as a binary executable installer.

It can be downloaded from:

https://bitnami.com/stacks/

The downloaded file will be named something similar to:

bitnami-gitlab-8.5.1-0-linux-installer.run on Linux or

bitnami-gitlab-8.5.1-0-linux-x64-installer.run on Linux 64 bit.

On Linux, you will need to give it executable permissions:

chmod 755 bitnami-gitlab-8.5.1-0-linux.run

To begin the installation process, double-click on that file, and you will

be greeted by the 'Welcome' screen. Pressing 'Next' will take you to the

Component Selection screen.

The next screen is the Installation Folder, where you can select where Bitnami

stack will be installed. If the destination directory does not exist, it will

be created as part of the installation.

The next screen will prompt you for data necessary to create the initial

admin user:

Username and password: You will use this information to log-in into the

administrative interface. The password you provide here will also be used to

protect other parts of the installation. Please see the section named

"Usernames and Passwords" later in this document.

Email address: Your email address.

The next screen will vary, depending on whether the ports needed by the

bundled Apache and PostgreSQL are already taken. The default listening port for

Apache is 80 and for PostgreSQL is 5432. If those ports are already in use by

other applications, you will be prompted for alternate ports to use.

The next screen will allow you to configure the final details of your

GitLab installation:

Hostname: The hostname for your blog, such as www.example.com. This

information will be used by GitLab when creating certain links. You can

use an IP address but there were login issues using different browsers. It

is advisable to use a fully qualified domain name.

Once the information has been entered, the installation will proceed to copy

the files to the target installation directory and configure the different

components. One this process has  been completed, you will see the

'Installation Finished' page. You can choose to launch Bitnami GitLab

Stack at this point. If you do so, your default web browser will open and

display the Welcome page for the Bitnami GitLab Stack.

If you received an error message during installation, please refer to

the Troubleshooting section.

The rest of this guide assumes that you installed Bitnami GitLab

Stack in /home/user/gitlab-8.5.1-0 on Linux.

6. STARTING AND STOPPING BITNAMI GITLAB STACK

To start/stop/restart application on Linux you can use the included ctlscript.sh

utility, as shown below:

       ./ctlscript.sh (start|stop|restart)

       ./ctlscript.sh (start|stop|restart) postgres

       ./ctlscript.sh (start|stop|restart) redis

       ./ctlscript.sh (start|stop|restart) apache

       ./ctlscript.sh (start|stop|restart) sidekiq

  start      - start the service(s)

  stop       - stop  the service(s)

  restart    - restart or start the service(s)

That will start Apache service. Once started, you can open your

browser and access the following URL on Linux:

http://127.0.0.1:80/

If you are accessing the machine remotely, you will need to replace

127.0.0.1 with the appropriate IP address or hostname.

7. DIRECTORY STRUCTURE

The installation process will create several subfolders under the main

installation directory:

	apache2/: Apache Web server.

	ruby/: Ruby language.

	redis/: Redis server.

	postgresql/: PostgreSQL Database.

	apps/

	  gitlab/: GitLab application folder

	    conf/: GitLab Apache configuration files

	    htdocs/: GitLab application files

8. DEFAULT USERNAMES AND PASSWORDS

The GitLab administrative user and password are the ones you set at

installation time.

PostgreSQL admin user is called 'postgres', and its password is the same as the

GitLab administrative user password.

The default PostresSQL non-root account used to access the database is named

bitnami, and its password is randomly generated during installation.

9. TROUBLESHOOTING

This version of the Bitnami GitLab stack is a preview version, and as

such, may contain a number of bugs and be a little bit rough around the

edges. We are working on the next release, which will contain several

improvements along with expanded documentation. In addition to the resources

provided below, we encourage you to post your questions and suggestions at:

https://community.bitnami.com/

We also encourage you to sign up for our newsletter, which we'll use to

announce new releases and new stacks. To do so, just register at:

https://bitnami.com/newsletter.

9.1 Installer

# Installer Payload Error

If you get the following error while trying to run the installer from the

command line:

"Installer payload initialization failed. This is likely due to an

incomplete or corrupt downloaded file"

The installer binary is not complete, likely because the file was

not downloaded correctly. You will need to download the file and

repeat the installation process.

9.2 Apache

If you find any problem starting Apache, the first place you should check is

the Apache error log file:

/home/user/gitlab-8.5.1-0/apache2/logs/error.log on Linux or

/Applications/gitlab-8.5.1-0/apache2/logs/error.log.

10. LICENSES

GitLab is distributed under the MIT License,

which is located at

https://github.com/gitlabhq/gitlabhq/blob/master/LICENSE

Redis is distributed under the terms of the three clause BSD license,

wich is located at

http://redis.io/topics/license

Apache Web Server is distributed under the Apache License v2.0, which

is located at http://www.apache.org/licenses/LICENSE-2.0

PostgreSQL is distributed under the GNU General Public License v2, which is

located at http://www.gnu.org/licenses/old-licenses/gpl-2.0.html

Ruby is released under the Ruby License and GPL, wich is located at

http://www.ruby-lang.org/en/LICENSE.txt

Rails is released under the MIT license, which is located

http://www.opensource.org/licenses/mit-license.php

Subversion is released under Subversion License / released under the

terms of the Apache License, which is located at

http://subversion.tigris.org/license-1.html

RubyGems is released under the Ruby License, which is located at

http://www.ruby-lang.org/en/LICENSE.txt

Rake is released under the Ruby License, which is located at

http://www.ruby-lang.org/en/LICENSE.txt

Thin Web Server is released under the Ruby License, which

is located at http://www.ruby-lang.org/en/LICENSE.txt

ImageMagick has its own license, which is located at

https://www.imagemagick.org/subversion/ImageMagick/trunk/LICENSE

Rmagick is released under the MIT license, which is located

http://www.opensource.org/licenses/mit-license.php

Capistrano is released under the MIT/X Consortium License, whic is

located at http://dev.rubyonrails.org/browser/tools/capistrano/MIT-LICENSE?rev=5270

OpenSSL is released under the terms of the Apache License, which is

located at http://www.openssl.org/source/license.html

Ncurses is released under the MIT license, which is located at

http://www.opensource.org/licenses/mit-license.php

Readline is released under the GPL license, which is located at

http://www.gnu.org/copyleft/gpl.html

Zlib is released under the zlib License (a free software license/compatible

with GPL), which is located at http://www.gzip.org/zlib/zlib_license.html

Libiconv is released under the LGPL license, which is located at

http://www.gnu.org/licenses/lgpl.html

Expat is released under the MIT license, which is located at

http://www.opensource.org/licenses/mit-license.php

Neon is released under the GNU General Public License, which is located at

http://www.gnu.org/copyleft/gpl.html

RedCloth is released under the BSD License, which is located at

http://www.opensource.org/licenses/bsd-license.php

ImageMagick has its own license, which is located at

https://www.imagemagick.org/subversion/ImageMagick/trunk/LICENSE

Rmagick is released under the MIT license, which is located

http://www.opensource.org/licenses/mit-license.php

Freetype is released under The Freetype Project License, that is located at

http://freetype.sourceforge.net/FTL.TXT
https://bitnami.com/stack/gitlab/README.txt
http://www.oschina.net/news/62813/gitlab-7-10-5-7-11-3-released
Gitlab 7.10.5/7.11.3 发布,这两个版本官方目前还没有给出更新信息。想获得更多 Gitlab 的更新信息请关注它们的更新日志。
这两个版本现已提供下载:
7.10.5:
https://github.com/gitlabhq/gitlabhq/archive/v7.10.5.zip
7.11.3:
https://github.com/gitlabhq/gitlabhq/archive/v7.11.3.zip
开源中国代码托管平台 git.oschina.net 就是基于 GitLab 项目搭建。
GitLab是一个利用 Ruby on Rails 开发的开源应用程序,实现一个自托管的Git项目仓库,可通过Web界面进行访问公开的或者私人项目。
它拥有与Github类似的功能,能够浏览源代码,管理缺陷和注释。可以管理团队对仓库的访问,它非常易于浏览提交过的版本并提供一个文件历史库。团队成员可以利用内置的简单聊天程序(Wall)进行交流。它还提供一个代码片段收集功能可以轻松实现代码复用,便于日后有需要的时候进行查找。
GitLab 5.0以前版本要求服务器端采用 Gitolite 搭建,5.0版本以后不再使用 Gitolite ,采用自己开发的 gitlab-shell 来实现。如果你觉得安装麻烦可以使用 GitLab Installers 一键安装程序。
系统要求:
最新文章
- 欧拉回路(hdu3018)
- 自己翻译 delegation 官方文档
- angularJs:双向数据绑定
- 【转】表删除时 Cannot delete or update a parent row: a foreign key constraint fails 异常处理
- DPDK内存管理-----(三)rte_malloc内存管理
- Oracle inactive session (last_call_et)
- 批处理find&findstr命令--众里寻他一次度
- bzoj3637: Query on a tree VI
- SqlServer存储过程传入Table参数
- Server Tomcat v7.0 Server at localhost was unable to start within 45 seconds解
- oracle 11g高级 安装图解(摘自网络)
- Android---->RelativeLayout相对对齐方式布局
- PHP MYSQL 搜索周边坐标,并计算两个点之间的距离
- 201621123057 《Java程序设计》第14周学习总结
- @Scheduled cron表达式
- Python序列化操作与反序列操作
- Day1 基础知识
- 使用Newlife网络库管道模式解决数据粘包(二)
- XSS报警机制(前端防火墙:第二篇)
- js获取上一页、当前页及域名url