ansible简单入门
2024-09-05 08:38:18
1,结构框架
Ansible 使用的是无代理体系结构,这种体系结构可以通过防止节点轮询控制机器来减少网络开销。Ansible 提供的结果框架如下所示:
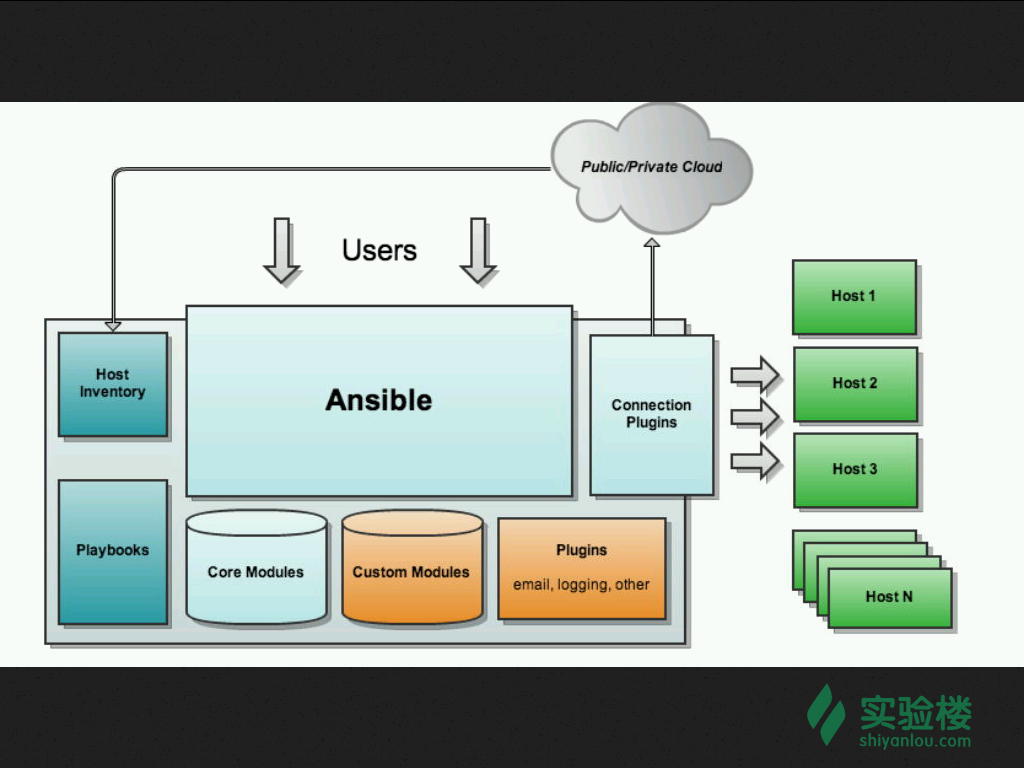
- Ansible :运行在中央计算机上;
- Connection Plugins :连接插件,主要用于本地与操作端之间的连接与通信;
- Host Inventory:指定操作的主机,是一个配置文件里面定义监控的主机;
- Modules:核心模块、自定义模块等等;
- Plugins :使用插件来完成记录日志、邮件等功能;
- Playbooks:执行多任务,通过 SSH 部署模块到节点上,可多个节点也可以单个节点。
2,安装
#安装ansible

[root@ansible ~]# apt install -y ansible
3,配置主机清单
root@DESKTOP-9SJGER3:~# vim /etc/ansible/hosts

[54.103-compute]

192.168.54.148  ansible_ssh_user=root ansible_ssh_pass=*********

192.168.54.150  ansible_ssh_user=root ansible_ssh_pass=*********

[54.103-controller]

192.168.54.103   ansible_ssh_user=root ansible_ssh_pass=*********
主机连接:
ansible_connection连接到主机的类型,任何可能的连接插件名称,例如,SSH 协议类型中有:ssh、smart或paramiko。
一般连接:
ansible_host要连接的主机名称。ansible_portssh 端口号。ansible_user默认 ssh 用户名。
具体的 SSH 连接:
ansible_ssh_passssh密码ansible_ssh_private_key_file由 ssh 使用的私钥文件。
4,简单测试、
1,ping
root@DESKTOP-9SJGER3:~# ansible 54.103-compute -m ping

192.168.54.148 | SUCCESS => {

    "ansible_facts": {

        "discovered_interpreter_python": "/usr/bin/python"

    },

    "changed": false,

    "ping": "pong"

}

192.168.54.149 | SUCCESS => {

    "ansible_facts": {

        "discovered_interpreter_python": "/usr/bin/python"

    },

    "changed": false,

    "ping": "pong"

}

192.168.54.150 | SUCCESS => {

    "ansible_facts": {

        "discovered_interpreter_python": "/usr/bin/python"

    },

    "changed": false,

    "ping": "pong"

}

root@DESKTOP-9SJGER3:~#

root@DESKTOP-9SJGER3:~# ansible all  -m ping

 SUCCESS => {

    "ansible_facts": {

        "discovered_interpreter_python": "/usr/bin/python"

    },

    "changed": false,

    "ping": "pong"

}

192.168.54.148 | SUCCESS => {

    "ansible_facts": {

        "discovered_interpreter_python": "/usr/bin/python"

    },

    "changed": false,

    "ping": "pong"

}

192.168.54.150 | SUCCESS => {

    "ansible_facts": {

        "discovered_interpreter_python": "/usr/bin/python"

    },

    "changed": false,

    "ping": "pong"

}

192.168.54.103 | SUCCESS => {

    "ansible_facts": {

        "discovered_interpreter_python": "/usr/bin/python"

    },

    "changed": false,

    "ping": "pong"

}

root@DESKTOP-9SJGER3:~#
2,执行命令
root@DESKTOP-9SJGER3:~# ansible all -m shell -a 'free -h'

192.168.54.150 | CHANGED | rc=0 >>

              total        used        free      shared  buff/cache   available

Mem:           7.6G        2.7G        211M        350M        4.8G        4.3G

Swap:          8.0G        2.7M        8.0G

192.168.54.148 | CHANGED | rc=0 >>

              total        used        free      shared  buff/cache   available

Mem:           7.6G        2.4G        178M        358M        5.0G        4.6G

Swap:          8.0G         10M        8.0G

192.168.54.149 | CHANGED | rc=0 >>

              total        used        free      shared  buff/cache   available

Mem:           7.6G        3.2G        1.9G        358M        2.5G        3.8G

Swap:          8.0G        575M        7.4G

192.168.54.103 | CHANGED | rc=0 >>

              total        used        free      shared  buff/cache   available

Mem:            15G         13G        330M        703M        1.5G        731M

Swap:          8.0G        7.6G        387M
最新文章
- Node.js 给前端带来了什么
- ICommand相关知识
- solr添加安全设置
- PHP是什么
- React(JSX语法)-----JSX基本语法
- const变量初始化问题
- iOS 设置系统屏幕亮度
- Linux DHCP通过OPTION43为H3C的AP下发AC地址
- JBOSS通过Apache负载均衡方法二:使用mod_cluster
- Linux下用来获取各种系统信息的C++类
- Javascript实例技巧精选(6)—滚动鼠标中键读取Json数据分页显示网页内容
- ural 1698. Square Country 5(记忆化搜索)
- Universal-Image-Loader源码分析,及常用的缓存策略
- NPM 安装速度慢,镜像修改
- HTML入门2
- Laravel发送邮箱消息验证
- 基于Eureka的服务治理
- IISEXPRESS64位运行
- Python学习(十三) —— 网络编程
- Mongodb 基础 查询表达式
热门文章
- 在SqlServer和Oralce中创建索引
- yum安装mysql-server
- linux命令 - nohup
- C#中 委托和事件的关系
- Logstash工作原理
- move post process stack from package to asset
- GLSLPROGRAM METALPROGRAM unity
- Qt disconnect函数
- Codeforces Round #591 (Div. 2, based on Technocup 2020 Elimination Round 1) C. Save the Nature
- 请求出现Referrer Policy: no-referrer-when-downgrade