微信小程序:流程/步骤流/时间轴自定义组件
2024-09-20 00:17:55
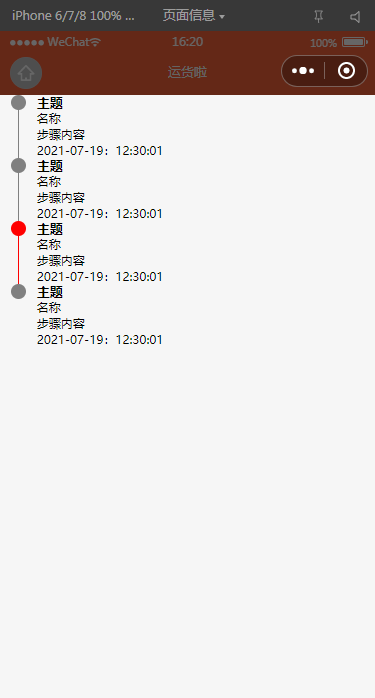
效果图:
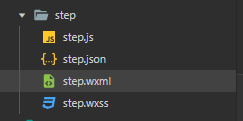
1.首先在小程序components目录下新建一个名为step的文件夹,再建step组件名。结构如下。
直接上代码
step.wxml
<view class="step" wx:key="{{item}}" wx:for="{{stepList}}">

    <view class="item_left">

        <view class="line {{item.status==0?'':'active'}}" hidden="{{index==stepList.length-1}}"></view>

        <view class="iconbox">

            <view class="circle {{item.status==0?'':'active'}}"></view>

        </view>

    </view>

    <view class="item_right">

        <view class="item_title" hidden="{{item.title==''}}">{{item.title}}</view>

        <view class="item_content">

            <view class='cntext' hidden="{{item.name==''}}">{{item.name}}</view>

            <view class='cntext' hidden="{{item.event==''}}">{{item.event}}</view>

            <view class='cntext' hidden="{{item.time==''}}">{{item.time}}</view>

        </view>

    </view>

</view>
step.wxss
.step {

    display: flex;

    flex-direction: row;

}

.item_left {

    width: 60rpx;

    display: flex;

    justify-content: center;

    position: relative;

    margin-left: 10rpx;

}

.line {

    width: 2rpx;

    height: 85%;

    align-self: flex-end;

    background-color: gray;

}

.iconbox {

    width: 100%;

    height: 60rpx;

    position: absolute;

    display: flex;

    justify-content: center;

}

.circle {

    width: 30rpx;

    height: 30rpx;

    border-radius: 50%;

    background-color: gray;

    flex-shrink: 0;

}

.active {

    background-color: red;

}

.item_right {

    width: 100%;

    display: flex;

    flex-direction: column;

    margin-left: 10rpx;

    margin-right: 10rpx;

}

.item_title {

    width: 100%;

    height: 30rpx;

    display: flex;

    align-items: center;

    font-weight: bold;

    font-size: 26rpx;

}

.item_content {

    width: 100%;

}

.cntext {

    width: 100%;

    font-size: 24rpx;

}
step.js
Component({

    /**

     * 组件的属性列表

     */

    properties: {

        //步骤条数据

        stepList: {

            type: Array,

            value: [

                {

                    title: "主题",

                    name: "名称",

                    event: "步骤内容",

                    time: "2021-07-19:12:30:01",

                    status: "0"

                },

                {

                    title: "主题",

                    name: "名称",

                    event: "步骤内容",

                    time: "2021-07-19:12:30:01",

                    status: "0"

                },

                {

                    title: "主题",

                    name: "名称",

                    event: "步骤内容",

                    time: "2021-07-19:12:30:01",

                    status: "1"

                },

                {

                    title: "主题",

                    name: "名称",

                    event: "步骤内容",

                    time: "2021-07-19:12:30:01",

                    status: "0"

                }

            ]

        }

    },

    /**

     * 组件的初始数据

     */

    data: {

    },

    /**

     * 组件的方法列表

     */

    methods: {

    }

})
step.json
{

    "component": true,

    "usingComponents": {}

}
2.引用:
全局引用:在app.json文件中添加代码
    "usingComponents": {

        "step": "/components/step/step"

    },
局部引用:在想要引用的页面json文件中添加代码
"usingComponents": {

    "step": "/components/step/step"

  },
3.(1)在wxml里使用
<step class="stepitem" id="step" stepList="{{stepList}}"></step>
(2)js添加数据
    data: {

        stepList: [

            {

                title: "已接单",

                name: "名称",

                event: "步骤内容",

                time: "2021-07-19:12:30:01",

                status: "0"

            },

            {

                title: "待支付",

                name: "名称",

                event: "步骤内容",

                time: "2021-07-19:12:30:01",

                status: "0"

            },

            {

                title: "待提货",

                name: "名称",

                event: "步骤内容",

                time: "2021-07-19:12:30:01",

                status: "0"

            },

            {

                title: "提货中",

                name: "名称",

                event: "步骤内容",

                time: "2021-07-19:12:30:01",

                status: "0"

            },

            {

                title: "送货中",

                name: "名称",

                event: "步骤内容",

                time: "2021-07-19:12:30:01",

                status: "0"

            },

            {

                title: "已签收",

                name: "名称",

                event: "步骤内容",

                time: "2021-07-19:12:30:01",

                status: "0"

            },

        ]

    },
4.到此结束。
最新文章
- GreenPlum高效去除表重复数据
- Windows 双网卡指定网络出口
- xampp环境搭建+bugfree
- 用node.js给图片加水印
- 【高级功能】使用Web存储
- Code Contracts for .NET
- CSS布局概述
- wordpress页面前端添加编辑按钮
- c++自己困惑之处
- python 之 模拟GET/POST提交
- How to achieve dialog with lookup control
- c3p0详细配置
- ListView的优化
- Android 仿微信滑动删除
- angular2 日期格式化
- 为什么Java大数据是最火爆的编程语言?
- JetBrains 注册码
- GnuPGP介绍
- Webpack 2 视频教程 001 - Webpack 简介
- Storm流处理项目案例