Vue生命周期整理
这篇博客将会从下面四个常见的应用诠释组件的生命周期,以及各个生命周期应该干什么事
单组件的生命周期
父子组件的生命周期
兄弟组件的生命周期
宏mixin的生命周期
生命周期:Vue 实例从开始创建、初始化数据、编译模板、挂载Dom→渲染、更新→渲染、卸载等一系列过程,我们称这是 Vue 的生命周期,各个阶段有相对应的事件钩子
1. 生命周期钩子函数
下面这张图是vue生命周期各个阶段的执行情况:
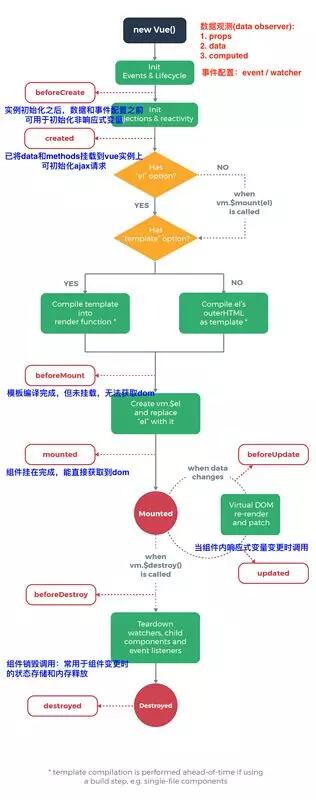

注意:
created阶段的ajax请求与mounted请求的区别:前者页面视图未出现,如果请求信息过多,页面会长时间处于白屏状态
mounted 不会承诺所有的子组件也都一起被挂载。如果你希望等到整个视图都渲染
完毕,可以用 vm.$nextTick
vue2.0之后主动调用$destroy()不会移除dom节点,作者不推荐直接destroy这种做法,如果实在需要这样用可以在这个生命周期钩子中手动移除dom节点
2. 单个组件的生命周期
现根据实际代码执行情况分析:
<template>

    <div>

        <h3>单组件</h3>

        <el-button @click="dataVar += 1">更新 {{dataVar}}</el-button>

        <el-button @click="handleDestroy">销毁</el-button>

    </div>

</template>

export default {

    data() {

        return {

            dataVar: 1

        }

    },

    beforeCreate() {

        this.compName = 'single'

        console.log(`--${this.compName}--beforeCreate`)

    },

    created() {

        console.log(`--${this.compName}--created`)

    },

    beforeMount() {

        console.log(`--${this.compName}--beforeMount`)

    },

    mounted() {

        console.log(`--${this.compName}--mounted`)

    },

    beforeUpdate() {

        console.log(`--${this.compName}--beforeUpdate`)

    },

    updated() {

        console.log(`--${this.compName}--updated`)

    },

    beforeDestroy() {

        console.log(`--${this.compName}--beforeDestroy`)

    },

    destroyed() {

        console.log(`--${this.compName}--destroyed`)

    },

    methods: {

        handleDestroy() {

            this.$destroy()

        }

    }

}
初始化组件时,打印:

当data中的值变化时,打印:

当组件销毁时,打印:

从打印结果可以看出:
初始化组件时,仅执行了beforeCreate/Created/beforeMount/mounted四个钩子函数
当改变data中定义的变量(响应式变量)时,会执行beforeUpdate/updated钩子函数
当切换组件(当前组件未缓存)时,会执行beforeDestory/destroyed钩子函数
初始化和销毁时的生命钩子函数均只会执行一次,beforeUpdate/updated可多次执行
3. 父子组件的生命周期
将单组件作为基础组件(由于props在beforeCreate()中未初始化),需要做如下更改:
props: {

    compName: {

        type: String,

        default: 'single'

    }

},

beforeCreate() {

    // this.compName = 'single'

    // console.log(`--${this.compName}--beforeCreate`)

    console.log(` --data未初始化--beforeCreate`)

},
父组件代码如下:
<template>

    <div class="complex">

        <h3>复杂组件</h3>

        <lifecycle-single compName="child"></lifecycle-single>

    </div>

</template>

const COMPONENT_NAME = 'complex'

import LifecycleSingle from './LifeCycleSingle'

export default {

    beforeCreate() {

        console.log(`--${COMPONENT_NAME}--beforeCreate`)

    },

    created() {

        console.log(`--${COMPONENT_NAME}--created`)

    },

    beforeMount() {

        console.log(`--${COMPONENT_NAME}--beforeMount`)

    },

    mounted() {

        console.log(`--${COMPONENT_NAME}--mounted`)

    },

    beforeUpdate() {

        console.log(`--${COMPONENT_NAME}--beforeUpdate`)

    },

    updated() {

        console.log(`--${COMPONENT_NAME}--updated`)

    },

    beforeDestroy() {

        console.log(`--${COMPONENT_NAME}--beforeDestroy`)

    },

    destroyed() {

        console.log(`--${COMPONENT_NAME}--destroyed`)

    },

    components: {

        LifecycleSingle

    }

}
初始化组件时,打印:

当子组件data中的值变化时,打印:

当父组件data中的值变化时,打印:

当props改变时,打印:
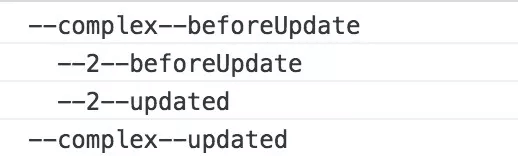
当子组件销毁时,打印:

当父组件销毁时,打印:

从打印结果可以看出:
仅当子组件完成挂载后,父组件才会挂载
当子组件完成挂载后,父组件会主动执行一次beforeUpdate/updated钩子函数(仅首次)
父子组件在data变化中是分别监控的,但是在更新props中的数据是关联的(可实践)
销毁父组件时,先将子组件销毁后才会销毁父组件
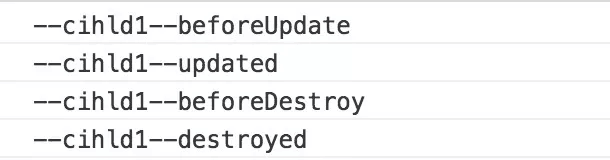
4. 兄弟组件的生命周期
在上面的基础上,复杂组件做如下更改
<template>

    <div class="complex">

        <h3>复杂组件</h3>

        <lifecycle-single compName="cihld1"></lifecycle-single>

        <lifecycle-single compName="child2"></lifecycle-single>

        <el-button @click="dataVar += 1">complex更新 {{dataVar}}</el-button>

        <el-button @click="handleDestroy">complex销毁</el-button>

    </div>

</template>
初始化组件时,打印:

当child1更新和销毁时,打印:
当child2更新和销毁时,打印:
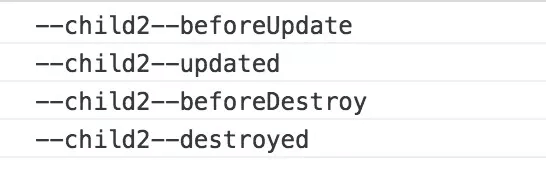
当父组件销毁时,打印
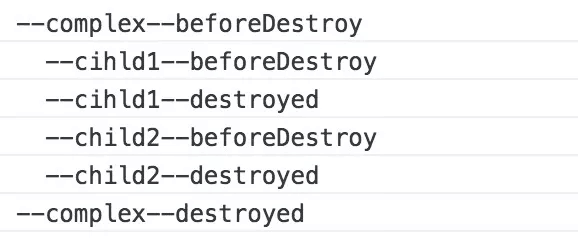
从打印结果可以看出:
组件的初始化(mounted之前)分开进行,挂载是从上到下依次进行
当没有数据关联时,兄弟组件之间的更新和销毁是互不关联的
5. 宏mixin的生命周期
在上面的基础上,添加一个mixin.js文件,内容如下:
const COMPONENT_NAME = 'lifecycleMixin'

export default {

    name: COMPONENT_NAME,

    beforeCreate() {

        console.log(`--${COMPONENT_NAME}--beforeCreate`)

    },

    created() {

        console.log(`--${COMPONENT_NAME}--created`)

    },

    beforeMount() {

        console.log(`--${COMPONENT_NAME}--beforeMount`)

    },

    mounted() {

        console.log(`--${COMPONENT_NAME}--mounted`)

    },

    beforeUpdate() {

        console.log(`--${COMPONENT_NAME}--beforeUpdate`)

    },

    updated() {

        console.log(`--${COMPONENT_NAME}--updated`)

    },

    beforeDestroy() {

        console.log(`--${COMPONENT_NAME}--beforeDestroy`)

    },

    destroyed() {

        console.log(`--${COMPONENT_NAME}--destroyed`)

    }

}
同样的,复杂组件做如下更改:
import lifecycleMixin from './mixin'

export default {

    mixins: [lifecycleMixin],

    // ...

}
组件初始化时,打印:

组件销毁时,打印:

从打印结果可以看出:
mixin中的生命周期与引入该组件的生命周期是仅仅关联的,且mixin的生命周期优先执行
参考:
vue官网教程
vue官网API
Vue2.0生命周期(组件钩子函数与路由守卫)
最新文章
- nfs挂载配置
- linux hosts文件详+mac主机名被莫名其妙修改
- HalconMFC(二)之VS2010下配置Halcon11教程
- oracle查询中文数据出现乱码
- 根据商品名称、价格区间检索商品的SQL语句
- nios II--实验6——串口软件部分
- 35 网络相关函数(三)——live555源码阅读(四)网络
- [ThingWorx] Install Guideline
- asp.net中Response对象鱼Request对象
- 永久关闭防火墙和selinux
- 使用CAShapeLayer绘图
- STM32的内存管理
- 【Codeforces】【网络流】【线段树】【扫描线】Oleg and chess (CodeForces - 793G)
- 科学计算库Numpy(1)
- Eclipse新建Java工程出现红色感叹号怎么解决?
- python3实现感知器,简单神经网络
- idea中lombok安装
- Linux基础命令---dumpe2fs
- 加固apk的开发者最常面对的十种问题
- java设计模式-----6、建造者模式