kvm linux虚拟机在线扩展磁盘
说明:
1) vmware ESXi虚拟化平台也支持这台在线扩展磁盘功能。
2) kvm虚拟机也支持在线扩展磁盘功能,在线扩展有特定的使用环境,主要用于不能随便停用的生产环境中。
3) 经过测试KVM在线扩展磁盘功能只适用于RHEL/CentOS/OEL6.x环境,5.x不支持在线的扩展磁盘,其它ubuntu等其它Linux我没有测试,不做评论。
本文为了测试,专门安装了OEL6.3虚拟机。
1. 安装oel6.3虚拟机
安装oeltest02虚拟机
# qemu-img create -f qcow2  /data/test02.qcow2  7G

# virt-install --name=oeltest02 --os-variant=RHEL6. --ram  --vcpus= --disk path=/data/test01.qcow2,format=qcow2,size=,bus=virtio --accelerate --cdrom /data/iso/oel63x64.iso --vnc --vncport= --vnclisten=0.0.0.0 --network bridge=br0,model=virtio --noautoconsole
目的是使用实验环境磁盘改为virtio驱动下的vda磁盘,这种scsi磁盘可以热插拨,可以动态添加。
整个安装过程略,虚拟机各种配置略,可以参考系列文章前面的内容。
2. 给oeltest02虚拟机在线添加磁盘
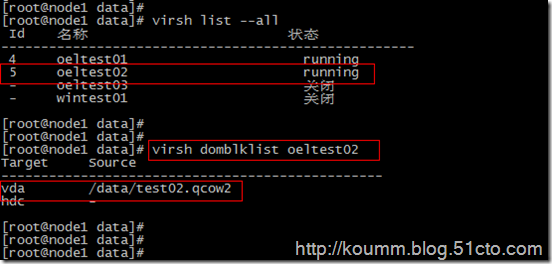
(1) 查看现有磁盘
[root@node1 data]# virsh domblklist oeltest02
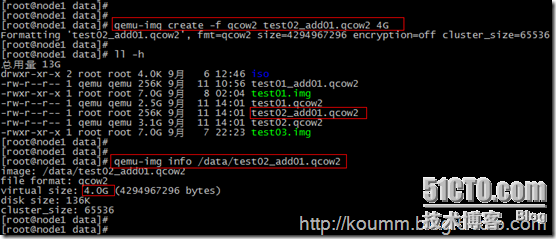
(2) 创建一块qcow2虚拟磁盘
[root@node1 data]# qemu-img create -f qcow2 test02_add01.qcow2 4G
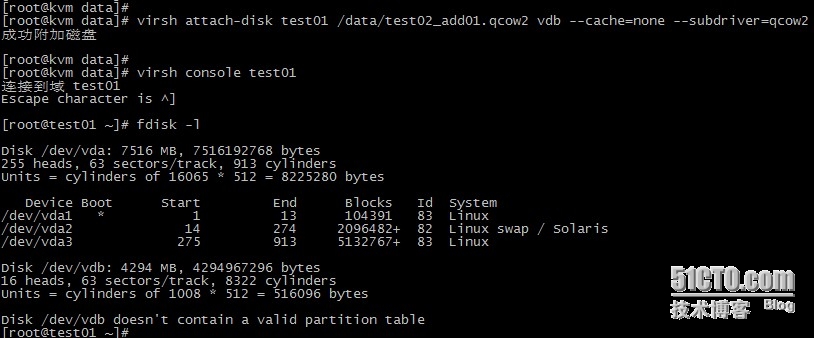
(3) 在线添加这台qcow2虚拟磁盘
# virsh attach-disk oeltest02 /data/test02_add01.qcow2 vdb --cache=none --subdriver=qcow2

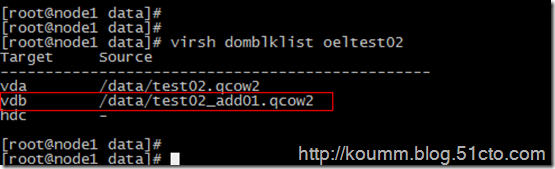
(4) 进入oeltest02虚拟机查看添加磁盘情况
[root@node1 data]#

[root@node1 data]# virsh console oeltest02

连接到域 oeltest02

Escape character is ^]

Oracle Linux Server release 6.3

Kernel 2.6.-.el6.x86_64 on an x86_64

test02 login: root

Password:

Last login: Thu Sep  :: on ttyS0

[root@test02 ~]#

[root@test02 ~]# fdisk –l
即可看到刚才添加的磁盘已经被虚拟机适别到了。
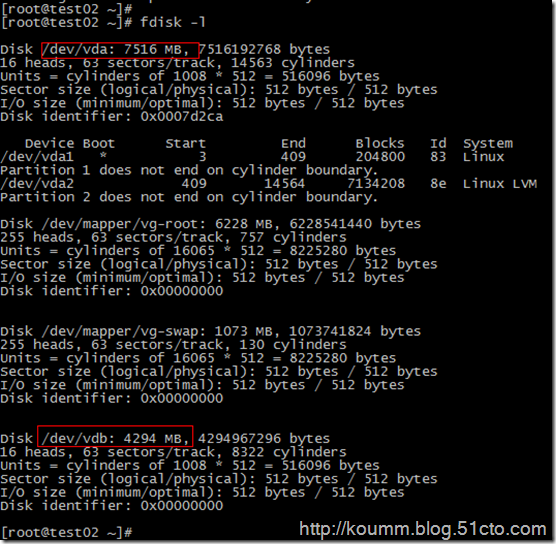
可以看到有两个scsi存储设备。
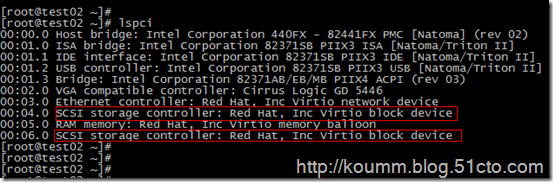
注:再次说明只有RHEL/CentOS/OEL6.x版本在线添加磁盘,虚拟机直接可以在线识别。
(5) 修改虚拟机配置文件添加新增磁盘配置
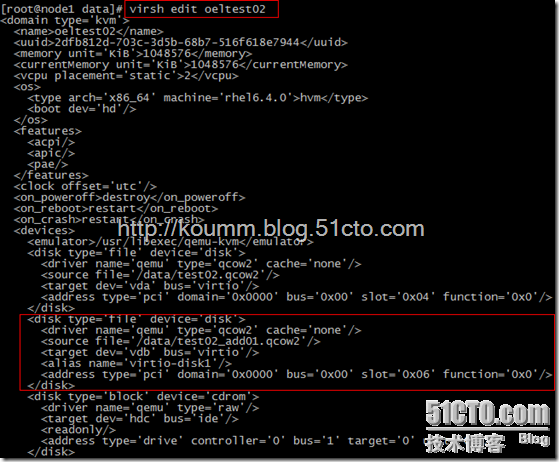
1) 查看当前虚拟机配置文件
这里查看到的虚拟机配置文件是内存中存放的配置,重启后会消失,需要将新添的磁盘配置保存到配置文件中。
[root@node1 data]# virsh dumpxml oeltest02

<domain type='kvm' id=''>

  <name>oeltest02</name>

  <uuid>2dfb812d-703c-3d5b-68b7-516f618e7944</uuid>

  <memory unit='KiB'></memory>

  <currentMemory unit='KiB'></currentMemory>

  <vcpu placement='static'></vcpu>

  <os>

    <type arch='x86_64' machine='rhel6.4.0'>hvm</type>

    <boot dev='hd'/>

  </os>

  <features>

    <acpi/>

    <apic/>

    <pae/>

  </features>

  <clock offset='utc'/>

  <on_poweroff>destroy</on_poweroff>

  <on_reboot>restart</on_reboot>

  <on_crash>restart</on_crash>

  <devices>

    <emulator>/usr/libexec/qemu-kvm</emulator>

    <disk type='file' device='disk'>

      <driver name='qemu' type='qcow2' cache='none'/>

      <source file='/data/test02.qcow2'/>

      <target dev='vda' bus='virtio'/>

      <alias name='virtio-disk0'/>

      <address type='pci' domain='0x0000' bus='0x00' slot='0x04' function='0x0'/>

    </disk>

    <disk type='file' device='disk'>

      <driver name='qemu' type='qcow2' cache='none'/>

      <source file='/data/test02_add01.qcow2'/>

      <target dev='vdb' bus='virtio'/>

      <alias name='virtio-disk1'/>

      <address type='pci' domain='0x0000' bus='0x00' slot='0x06' function='0x0'/>

    </disk>

    <disk type='block' device='cdrom'>

      <driver name='qemu' type='raw'/>

      <target dev='hdc' bus='ide'/>

      <readonly/>

      <alias name='ide0-1-0'/>

      <address type='drive' controller='' bus='' target='' unit=''/>

    </disk>

    <controller type='usb' index=''>

      <alias name='usb0'/>

      <address type='pci' domain='0x0000' bus='0x00' slot='0x01' function='0x2'/>

    </controller>

    <controller type='ide' index=''>

      <alias name='ide0'/>

      <address type='pci' domain='0x0000' bus='0x00' slot='0x01' function='0x1'/>

    </controller>

    <interface type='bridge'>

      <mac address='52:54:00:ff:2f:70'/>

      <source bridge='br0'/>

      <target dev='vnet1'/>

      <model type='virtio'/>

      <alias name='net0'/>

      <address type='pci' domain='0x0000' bus='0x00' slot='0x03' function='0x0'/>

    </interface>

    <serial type='pty'>

      <source path='/dev/pts/3'/>

      <target port=''/>

      <alias name='serial0'/>

    </serial>

    <console type='pty' tty='/dev/pts/3'>

      <source path='/dev/pts/3'/>

      <target type='serial' port=''/>

      <alias name='serial0'/>

    </console>

    <input type='mouse' bus='ps2'/>

    <graphics type='vnc' port='' autoport='no' listen='0.0.0.0'>

      <listen type='address' address='0.0.0.0'/>

    </graphics>

    <video>

      <model type='cirrus' vram='' heads=''/>

      <alias name='video0'/>

      <address type='pci' domain='0x0000' bus='0x00' slot='0x02' function='0x0'/>

    </video>

    <memballoon model='virtio'>

      <alias name='balloon0'/>

      <address type='pci' domain='0x0000' bus='0x00' slot='0x05' function='0x0'/>

    </memballoon>

  </devices>

  <seclabel type='none'/>

</domain>

[root@node1 data]#
2) 保存新增磁盘配置
[root@node1 data]# virsh edit oeltest02
说明:对RHEL/CentOS/OEL5.x版本虚拟机在线添加磁盘按照第4小节处理。
3. 将新增磁盘并入虚拟机逻辑卷中
(1) 分区过程如下
[root@test02 ~]# fdisk /dev/vdb

[root@test02 ~]# partprobe
(2) 创建逻辑卷过程如下
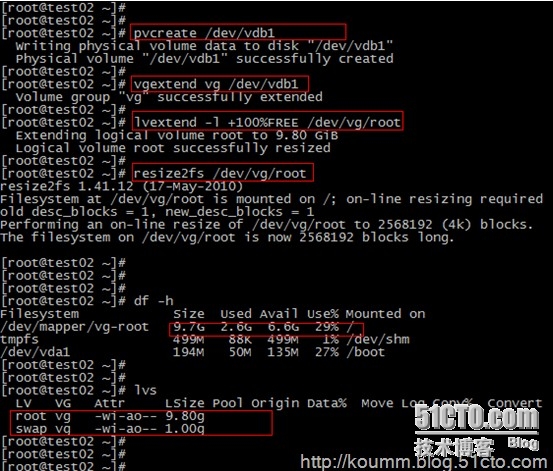
到此oeltest02虚拟机在线添加磁盘并在线扩展磁盘成功。
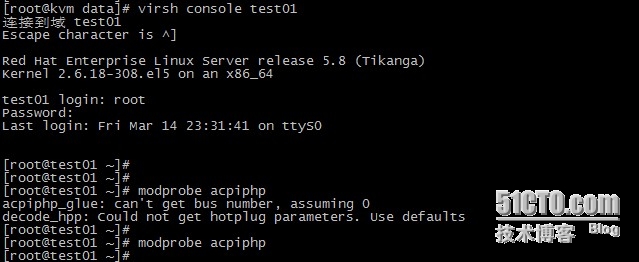
4. OEL/RHEL/CentOS5.x虚拟机在线添加磁盘过程
说明:OEL/RHEL/CentOS5.x虚拟机按照上面的过程在线添加磁盘,磁盘识别不出来,需要在添加磁盘后,修改配置文件后重启,不能在线识别到磁盘。需要采用如下方式处理,即可以实现在线添加磁盘的功能。
(1) 先登录进虚拟机执行两次如下命令
modprobe acpiphp

modprobe acpiphp
(2) 虚拟主机上创建磁盘并添加磁盘
最新文章
- 自定义Angular插件 - 网站用户引导
- HashTable 简述
- IntelliJ IDEA 编译方式介绍
- Arduino开发常见错误
- SQL SERVER:开窗函数 SUM() OVER() 数据统计中一例使用
- sql有几种删除表数据的方式
- git撤销提交到remote的commit
- [Node.js] node-persist: localStorage on the server
- Linux 命令学习之dpkg命令详解
- 冒泡排序 - vb.net
- English Learning - Vampire bats
- Microsoft Visual Studio | VS打开解决方案时加载失败,或者出现错误提示
- Sql查询某个字段是否包含小写字母
- [Swift]LeetCode670. 最大交换 | Maximum Swap
- OO第二次博客作业(第二单元总结)
- Mysql优化要点
- AlloyDesigner 使用
- 一些常用的c++系统函数
- JavaWeb温习之HttpServletResquest对象
- ruby 记一次查看方法定义位置