高并发编程-CountDownLatch深入解析
要点解说
CountDownLatch允许一个或者多个线程一直等待,直到一组其它操作执行完成。在使用CountDownLatch时,需要指定一个整数值,此值是线程将要等待的操作数。当某个线程为了要执行这些操作而等待时,需要调用await方法。await方法让线程进入休眠状态直到所有等待的操作完成为止。当等待的某个操作执行完成,它使用countDown方法来减少CountDownLatch类的内部计数器。当内部计数器递减为0时,CountDownLatch会唤醒所有调用await方法而休眠的线程们。
实例演示
下面代码演示了CountDownLatch简单使用。演示的场景是5位运动员参加跑步比赛,发令枪打响后,5个计时器开始分别计时,直到所有运动员都到达终点。
public class CountDownLatchDemo {

    public static void main(String[] args) {

        Timer timer = new Timer(5);

        new Thread(timer).start();

        for (int athleteNo = 0; athleteNo < 5; athleteNo++) {

            new Thread(new Athlete(timer, "athlete" + athleteNo)).start();

        }

    }

}

class Timer implements Runnable {

    CountDownLatch timerController;

    public Timer(int numOfAthlete) {

        this.timerController = new CountDownLatch(numOfAthlete);

    }

    public void recordResult(String athleteName) {

        System.out.println(athleteName + " has arrived");

        timerController.countDown();

        System.out.println("There are " + timerController.getCount() + " athletes did not reach the end");

    }

    @Override

    public void run() {

        try {

            System.out.println("Start...");

            timerController.await();

            System.out.println("All the athletes have arrived");

        } catch (InterruptedException e) {

            e.printStackTrace();

        }

    }

}

class Athlete implements Runnable {

    Timer timer;

    String athleteName;

    public Athlete(Timer timer, String athleteName) {

        this.timer = timer;

        this.athleteName = athleteName;

    }

    @Override

    public void run() {

        try {

            System.out.println(athleteName + " start running");

            long duration = (long) (Math.random() * 10);

            Thread.sleep(duration * 1000);

            timer.recordResult(athleteName);

        } catch (InterruptedException e) {

            e.printStackTrace();

        }

    }

}
输出结果如下所示:
Start...

athlete0 start running

athlete1 start running

athlete2 start running

athlete3 start running

athlete4 start running

athlete0 has arrived

There are 4 athletes did not reach the end

athlete3 has arrived

There are 3 athletes did not reach the end

athlete2 has arrived

athlete1 has arrived

There are 1 athletes did not reach the end

There are 2 athletes did not reach the end

athlete4 has arrived

There are 0 athletes did not reach the end

All the athletes have arrived
方法解析
1.构造方法
CountDownLatch(int count)构造一个指定计数的CountDownLatch,count为线程将要等待的操作数。
2.await()
调用await方法后,使当前线程在锁存器(内部计数器)倒计数至零之前一直等待,进入休眠状态,除非线程被中断。如果当前计数递减为零,则此方法立即返回,继续执行。
3.await(long timeout, TimeUnit unit)
调用await方法后,使当前线程在锁存器(内部计数器)倒计数至零之前一直等待,进入休眠状态,除非线程被 中断或超出了指定的等待时间。如果当前计数为零,则此方法立刻返回true值。
3.acountDown()
acountDown方法递减锁存器的计数,如果计数到达零,则释放所有等待的线程。如果当前计数大于零,则将计数减少。如果新的计数为零,出于线程调度目的,将重新启用所有的等待线程。
4.getCount()
调用此方法后,返回当前计数,即还未完成的操作数,此方法通常用于调试和测试。
源码解析
进入源码分析之前先看一下CountDownLatch的类图,
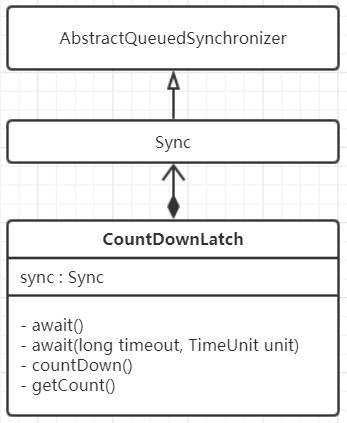
Sync是CountDownLatch的一个内部类,它继承了AbstractQueuedSynchronizer。
CountDownLatch(int count)、await()和countDown()三个方法是CountDownLatch的核心方法,本篇将深入分析这三个方法的具体实现原理。
1.CountDownLatch(int count)
    public CountDownLatch(int count) {

        if (count < 0) throw new IllegalArgumentException("count < 0");

        this.sync = new Sync(count);

    }
该构造方法根据给定count参数构造一个CountDownLatch,内部创建了一个Sync实例。Sync是CountDownLatch的一个内部类,其构造方法代码如下:
    Sync(int count) {

        setState(count);

    }
setState方法继承自AQS,给Sync实例的state属性赋值。
    protected final void setState(int newState) {

        state = newState;

    }
这个state就是CountDownLatch的内部计数器。
2.await()
当await()方法被调用时,当前线程会阻塞,直到内部计数器的值等于零或当前线程被中断,下面深入代码分析。
    public void await() throws InterruptedException {

        sync.acquireSharedInterruptibly(1);

    }

    public final void acquireSharedInterruptibly(int arg)

            throws InterruptedException {

        //如果当前线程中断,则抛出InterruptedException

        if (Thread.interrupted())

            throw new InterruptedException();

        //尝试获取共享锁,如果可以获取到锁直接返回;

        //如果获取不到锁,执行doAcquireSharedInterruptibly

        if (tryAcquireShared(arg) < 0)

            doAcquireSharedInterruptibly(arg);

    }

    //如果当前内部计数器等于零返回1,否则返回-1;

    //内部计数器等于零表示可以获取共享锁,否则不可以;

    protected int tryAcquireShared(int acquires) {

        return (getState() == 0) ? 1 : -1;

    }

    //返回内部计数器当前值

    protected final int getState() {

        return state;

    }

    //该方法使当前线程一直等待,直到当前线程获取到共享锁或被中断才返回

    private void doAcquireSharedInterruptibly(int arg)

        throws InterruptedException {

        //根据当前线程创建一个共享模式的Node节点

        //并把这个节点添加到等待队列的尾部

        //AQS等待队列不熟悉的可以查看AQS深入解析的内容

        final Node node = addWaiter(Node.SHARED);

        boolean failed = true;

        try {

            for (;;) {

                //获取新建节点的前驱节点

                final Node p = node.predecessor();

                //如果前驱节点是头结点

                if (p == head) {

                    //尝试获取共享锁

                    int r = tryAcquireShared(arg);

                    //获取到共享锁

                    if (r >= 0) {

                        //将前驱节点从等待队列中释放

                        //同时使用LockSupport.unpark方法唤醒前驱节点的后继节点中的线程

                        setHeadAndPropagate(node, r);

                        p.next = null; // help GC

                        failed = false;

                        return;

                    }

                }

                //当前节点的前驱节点不是头结点,或不可以获取到锁

                //shouldParkAfterFailedAcquire方法检查当前节点在获取锁失败后是否要被阻塞

                //如果shouldParkAfterFailedAcquire方法执行结果是当前节点线程需要被阻塞,则执行parkAndCheckInterrupt方法阻塞当前线程

                if (shouldParkAfterFailedAcquire(p, node) &&

                    parkAndCheckInterrupt())

                    throw new InterruptedException();

            }

        } finally {

            if (failed)

                cancelAcquire(node);

        }

    }

    private Node addWaiter(Node mode) {

        //根据当前线程创建一个共享模式的Node节点

        Node node = new Node(Thread.currentThread(), mode);

        // Try the fast path of enq; backup to full enq on failure

        Node pred = tail;

        //如果尾节点不为空(等待队列不为空),则新节点的前驱节点指向这个尾节点

        //同时尾节点指向新节点

        if (pred != null) {

            node.prev = pred;

            if (compareAndSetTail(pred, node)) {

                pred.next = node;

                return node;

            }

        }

        //如果尾节点为空(等待队列是空的)

        //执行enq方法将节点插入到等待队列尾部

        enq(node);

        return node;

    }

    //这里如果不熟悉的可以查看AQS深入解析的内容

    Node(Thread thread, Node mode) { // Used by addWaiter

        this.nextWaiter = mode;

        this.thread = thread;

    }

    private Node enq(final Node node) {

        //使用循环插入尾节点,确保成功插入

        for (;;) {

            Node t = tail;

            //尾节点为空(等待队列是空的)

            //新建节点并设置为头结点

            if (t == null) { // Must initialize

                if (compareAndSetHead(new Node()))

                    tail = head;

            } else {

                //否则,将节点插入到等待队列尾部

                node.prev = t;

                if (compareAndSetTail(t, node)) {

                    t.next = node;

                    return t;

                }

            }

        }

    }

    //获取当前节点的前驱节点

    final Node predecessor() throws NullPointerException {

        Node p = prev;

        if (p == null)

            throw new NullPointerException();

        else

            return p;

    }

    //判断当前节点里的线程是否需要被阻塞

    private static boolean shouldParkAfterFailedAcquire(Node pred, Node node) {

        //前驱节点线程的状态

        int ws = pred.waitStatus;

        //如果前驱节点线程的状态是SIGNAL,返回true,需要阻塞线程

        if (ws == Node.SIGNAL)

            return true;

        //如果前驱节点线程的状态是CANCELLED,则设置当前节点的前去节点为"原前驱节点的前驱节点"

        //因为当前节点的前驱节点线程已经被取消了

        if (ws > 0) {

            do {

                node.prev = pred = pred.prev;

            } while (pred.waitStatus > 0);

            pred.next = node;

        } else {

            //其它状态的都设置前驱节点为SIGNAL状态

            compareAndSetWaitStatus(pred, ws, Node.SIGNAL);

        }

        return false;

    }

    //通过使用LockSupport.park阻塞当前线程

    //同时返回当前线程是否中断

    private final boolean parkAndCheckInterrupt() {

        LockSupport.park(this);

        return Thread.interrupted();

    }
3.countDown()
内部计数器减一,如果计数达到零,唤醒所有等待的线程。
    public void countDown() {

        sync.releaseShared(1);

    }

    public final boolean releaseShared(int arg) {

        //如果内部计数器状态值递减后等于零

        if (tryReleaseShared(arg)) {

            //唤醒等待队列节点中的线程

            doReleaseShared();

            return true;

        }

        return false;

    }

    //尝试释放共享锁,即将内部计数器值减一

    protected boolean tryReleaseShared(int releases) {

        for (;;) {

            //获取内部计数器状态值

            int c = getState();

            if (c == 0)

                return false;

            //计数器减一

            int nextc = c-1;

            //使用CAS修改state值

            if (compareAndSetState(c, nextc))

                return nextc == 0;

        }

    }

    private void doReleaseShared() {

        for (;;) {

            //从头结点开始

            Node h = head;

            //头结点不为空,并且不是尾节点

            if (h != null && h != tail) {

                int ws = h.waitStatus;

                if (ws == Node.SIGNAL) {

                    if (!compareAndSetWaitStatus(h, Node.SIGNAL, 0))

                        continue;

                    //唤醒阻塞的线程

                    unparkSuccessor(h);

                }

                else if (ws == 0 &&

                        !compareAndSetWaitStatus(h, 0, Node.PROPAGATE))

                    continue;

            }

            if (h == head)

                break;

        }

    }

    private void unparkSuccessor(Node node) {

        int ws = node.waitStatus;

        if (ws < 0)

            compareAndSetWaitStatus(node, ws, 0);

        Node s = node.next;

        if (s == null || s.waitStatus > 0) {

            s = null;

            for (Node t = tail; t != null && t != node; t = t.prev)

                if (t.waitStatus <= 0)

                    s = t;

        }

        if (s != null)

            //通过使用LockSupport.unpark唤醒线程

            LockSupport.unpark(s.thread);

    }
原理总结
使用CountDownLatch(int count)构建CountDownLatch实例,将count参数赋值给内部计数器state,调用await()方法阻塞当前线程,并将当前线程封装加入到等待队列中,直到state等于零或当前线程被中断;调用countDown()方法使state值减一,如果state等于零则唤醒等待队列中的线程。
实战经验
实际工作中,CountDownLatch适用于如下使用场景:
客户端的一个同步请求查询用户的风险等级,服务端收到请求后会请求多个子系统获取数据,然后使用风险评估规则模型进行风险评估。如果使用单线程去完成这些操作,这个同步请求超时的可能性会很大,因为服务端请求多个子系统是依次排队的,请求子系统获取数据的时间是线性累加的。此时可以使用CountDownLatch,让多个线程并发请求多个子系统,当获取到多个子系统数据之后,再进行风险评估,这样请求子系统获取数据的时间就等于最耗时的那个请求的时间,可以大大减少处理时间。
面试考点
CountDownLatch和CyclicBarrier的异同?
相同点:都可以实现线程间的等待。
不同点:
1.侧重点不同,CountDownLatch一般用于一个线程等待一组其它线程;而CyclicBarrier一般是一组线程间的相互等待至某同步点;
2.CyclicBarrier的计数器是可以重用的,而CountDownLatch不可以。

最新文章
- 导航效果css
- SampleDateFormat进行日期格式化
- C语言 线性表 顺序表结构 实现
- Angular:手动脏检查/$apply/$digest和监控对象/$watch
- oracle建索引的可选项
- Javascript 日期时间超强正则表达式
- UVA 10041 Vito's Family (中位数)
- fcntl,F_GETFL,F_SETFL,flags
- Http的四种post方式
- linux c编程获得当前进程的进程名和执行路径
- 网站常用js代码搜集
- JS URI Encode
- [LeetCode] Maximum Average Subarray I 子数组的最大平均值
- [UOJ]#36. 【清华集训2014】玛里苟斯
- Ubuntu部署python3.7的开发和运行环境
- [Swift]LeetCode990. 等式方程的可满足性 | Satisfiability of Equality Equations
- jquery扩展代码少的分页bar
- Spring Boot 项目中常见注解
- centos6 下 yum 升级php5 到 php7
- P3587 [POI2015]POD
热门文章
- 微服务SpringCloud之GateWay服务化和过滤器
- 我跟上家老板说过的最后一句话:转.NET Core吧
- Appium+python自动化(三十九)-Appium自动化测试框架综合实践 - 代码实现(超详解)
- Spring mvc之源码 handlerMapping和handlerAdapter分析
- 2019年10月13日 linux习题 wangqingchao
- Java ->在mybatis和PostgreSQL Json字段作为查询条件的解决方案
- yum.rpm一点点
- scipy.sparse的csc_matrix、csr_matrix与coo_matrix区别与应用(思维导图)
- Openlayers Overlay使用心得
- GeoServer 安装教程