201871010111-刘佳华《面向对象程序设计(java)》第十三周学习总结
201871010111-刘佳华《面向对象程序设计(java)》第十三周学习总结
实验十一 图形界面事件处理技术
实验时间 2019-11-22
第一部分:理论知识总结
1.事件源:能够产生事件的对象都可以成为事件源,如文本框,按钮等。一个事件源是一个能够注册监听器并向监听器发送事件对象的对象。
2.事件监听器:事件监听器对象接收事件源发送的通告(事件对象),并对发生的事件作出响应。一个监听器对象就是一个实现了专门监听器接口的类实例,该类必须实现接口中的方法,这些方法当事件发生时,被自动执行。
3.事件对象:Java将事件的相关信息封装在一个事件对象中,所有的事件对象都最终被派生于Java.util.EventObject类。不同的事件源可以产生不同类别的事件。
2.AWT事件处理机制的概要;
监听器对象 :是一个实现了特定监听器接口 ( listener interface )的类实例 。
当事件发生时,事件源将事件对象自动传递给所有注册的监听器 。
监听器对象利用事件对象中的信息决定如何对事件做出响应。
3.事件源与监听器之间的关系:
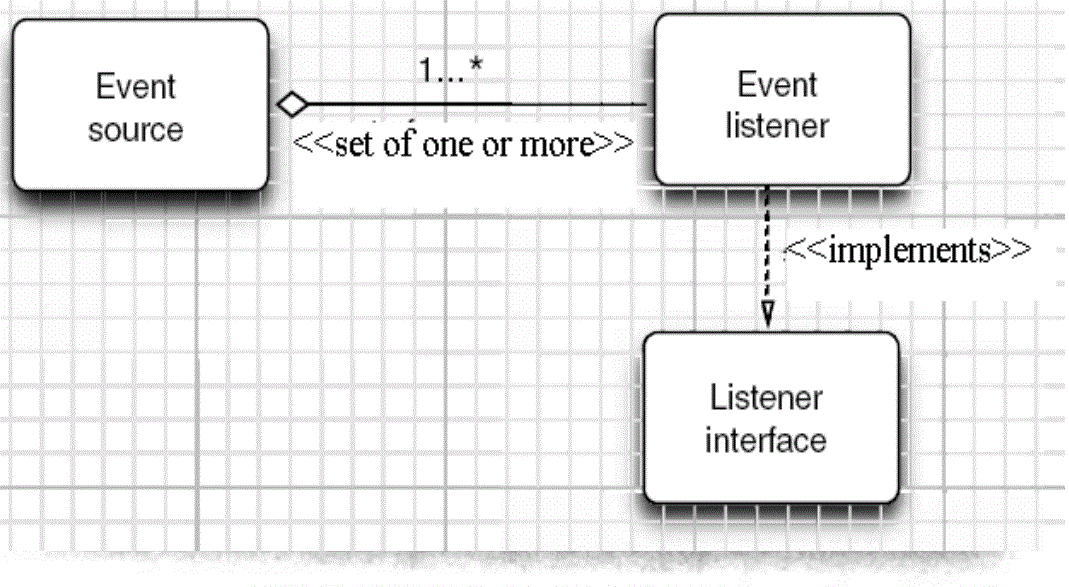
4.GUI设计中,程序员需要对组件的某种事件进行响应和处理时,必须完成两个步骤;
(1)定义实现某事件监听器接口的事件监听器类,并具体化接口中声明的事件的处理抽象方法。
(2)为组件注册实现了规定接口的事件监听器对象;
5.注册监听器方法:eventSourceObject.addEventListener(eventListenerObject)
6.动态事件:当特定组件动作(点击按钮)发生时,该组件生成此动作事件。
该事件被传递给组件注册的每一个ActionListener对象,并调用监听器对象的actionPerformed方法以接受这类事件对象。
能够触发事件动作的动作,主要包括:
(1)点击按钮
(2)双击一个列表中的选项
(3)选择菜单项
(4)在文本框中输入回车
7.监听器接口的实现
监听器类必须实现与事件源相对应的接口,即必须提供接口中方法的实现。
监听器接口的方法实现
class MyListener implenments ActionListener
{
public void actionPerformed(ActionEvent event)
{......}
}
8.命令按钮Jbutton主要API
(1)创建按钮对象
Jbutton类常用的一组构造方法;
(1) JButton(String text):创建一个带文本的按钮。
(2) JButton(Icon icon) :创建一个带图标的按钮。
(3)JButton(String text, Icon icon) :创建一个带文本和图标
的按钮
(2)按钮对象的常用方法:
① getLabel( ):返回按钮的标签字符串;
② setLabel(String s):设置按钮的标签为字符串s。
9. 用匿名类、lambda表达式简化程序
例ButtonTest.java中,各按钮需要同样的处理:
1) 使用字符串构造按钮对象;
2) 把按钮添加到面板上;
3) 用对应的颜色构造一个动作监听器;
4) 注册动作监听器
10.适配器类
当程序用户试图关闭一个框架窗口时,Jframe
对象就是WindowEvent的事件源。
⚫ 捕获窗口事件的监听器:
WindowListener listener=…..;
frame.addWindowListener(listener);
⚫ 窗口监听器必须是实现WindowListener接口的
类的一个对象,WindowListener接口中有七个
方法,它们的名字是自解释的。
11.鉴于代码简化的要求,对于有不止一个方法的AWT监听器接口都有一个实现了它的所有方法,但却
不做任何工作的适配器类。
例:WindowAdapter类。
适配器类动态地满足了Java中实现监视器类的技术要求。
⚫ 通过扩展适配器类来实现窗口事件需要的动作
12.注册事件监听器
可将一个Terminator对象注册为事件监听器:
WindowListener listener=new Terminator();
frame.addWindowListener(listener);
⚫ 只要框架产生一个窗口事件,该事件就会传递给
监听器对象。
创建扩展于WindowAdapter的监听器类是很好的
改进,但还可以进一步将上面语句也可简化为:
frame.addWindowListener(new Terminator());
13.动作事件
(1)激活一个命令可以有多种方式,如用户可以通过
菜单、击键或工具栏上的按钮选择特定的功能。
(2)在AWT事件模型中,无论是通过哪种方式下达命
令(如:点击按钮、菜单选项、按下键盘),其
操作动作都是一样的。
14.动作接口及其类
Swing包提供了非常实用的机制来封装命令,并将它
们连接到多个事件源,这就是Action接口。
⚫ 动作对象是一个封装下列内容的对象:
–命令的说明:一个文本字符串和一个可选图标;
–执行命令所需要的参数。
⚫ Action是一个接口,而不是一个类,实现这个接
口的类必须要实现它的7个方法。
⚫ AbstractAction 类 实 现 了 Action 接 口 中 除
actionPerformed方法之外的所有方法,这个类存
储了所有名/值对,并管理着属性变更监听器。
在 动 作 事 件 处 理 应 用 中 , 可 以 直 接 扩 展
AbstractAction 类 , 并 在 扩 展 类 中 实 现
actionPerformed方法。
15.鼠标事件
⚫ 鼠标事件
– MouseEvent
⚫ 鼠标监听器接口
– MouseListener
– MouseMotionListener
⚫ 鼠标监听器适配器
– MouseAdapter
– MouseMotionAdapter
用户点击鼠标按钮时,会调用三个监听器方法:
– 鼠标第一次被按下时调用mousePressed方法;
– 鼠标被释放时调用mouseReleased方法;
– 两个动作完成之后,调用mouseClicked方法。
⚫ 鼠标在组件上移动时,会调用mouseMoved方法。
如果鼠标在移动的时候还按下了鼠标,则会调用
mouseDragged方法
⚫ 鼠标事件返回值
– 鼠标事件的类型是MouseEvent,当发生鼠标事件时:
MouseEvent类自动创建一个事件对象,以及事件发生
位置的x和y坐标,作为事件返回值。
MouseEvent类中的重要方法
– public int getX( );
– public int getY( );
– public Point getPoint( );
– public int getClickCount( );
第二部分:实验部分
1、实验目的与要求
(1) 掌握事件处理的基本原理,理解其用途;
(2) 掌握AWT事件模型的工作机制;
(3) 掌握事件处理的基本编程模型;
(4) 了解GUI界面组件观感设置方法;
(5) 掌握WindowAdapter类、AbstractAction类的用法;
(6) 掌握GUI程序中鼠标事件处理技术。
2、实验内容和步骤
实验1: 导入第11章示例程序,测试程序并进行代码注释。
测试程序1:
l 在elipse IDE中调试运行教材443页-444页程序11-1,结合程序运行结果理解程序;
l 在事件处理相关代码处添加注释;
l 用lambda表达式简化程序;
l 掌握JButton组件的基本API;
l 掌握Java中事件处理的基本编程模型。
源代码:
 package Damo;

 import java.awt.*;

 import javax.swing.*;

 /**

  * @version 1.35 2018-04-10

  * @author Cay Horstmann

  */

 public class ButtonTest

 {

    public static void main(String[] args)

    {

       EventQueue.invokeLater(() -> {

          var frame = new ButtonFrame();

          frame.setTitle("ButtonTest");

          frame.setDefaultCloseOperation(JFrame.EXIT_ON_CLOSE);

          frame.setVisible(true);

       });

    }

 }
ButtonTest
 package Damo;

 import java.awt.*;

 import java.awt.event.*;

 import javax.swing.*;

 /**

  * A frame with a button panel.

  */

 public class ButtonFrame extends JFrame

 {

    private JPanel buttonPanel;

    private static final int DEFAULT_WIDTH = 300;

    private static final int DEFAULT_HEIGHT = 200;

    public ButtonFrame()

    {

       setSize(DEFAULT_WIDTH, DEFAULT_HEIGHT);//设定大小

       // create buttons

       var yellowButton = new JButton("Yellow");//设置组件

       var blueButton = new JButton("Blue");

       var redButton = new JButton("Red");

       buttonPanel = new JPanel();//面板

       // add buttons to panel

       buttonPanel.add(yellowButton);//组件添加至面板之中

       buttonPanel.add(blueButton);

       buttonPanel.add(redButton);

       // add panel to frame

       add(buttonPanel);//再将面板添加至frame中

       // create button actions

       var yellowAction = new ColorAction(Color.YELLOW);//设置事件监听器

       var blueAction = new ColorAction(Color.BLUE);

       var redAction = new ColorAction(Color.RED);

       // associate actions with buttons

       yellowButton.addActionListener(yellowAction);//注册  .addActionListener(对象)

       blueButton.addActionListener(blueAction);

       redButton.addActionListener(redAction);

    }

    /**

     * An action listener that sets the panel's background color.

     */

    private class ColorAction implements ActionListener

    {

       private Color backgroundColor;

       public ColorAction(Color c)

       {

          backgroundColor = c;

       }

       public void actionPerformed(ActionEvent event)//响应事件改变背景颜色

       {

          buttonPanel.setBackground(backgroundColor);

       }

    }

 }
ButtonFrame
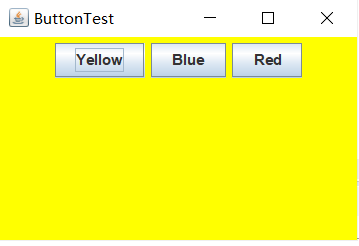
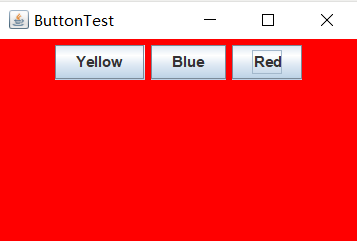
运行截图:

通过lambda表达式简化后的代码:
 package button;

 import java.awt.*;

 import java.awt.event.*;

 import javax.swing.*;

 /**

  * A frame with a button panel.

  */

 public class ButtonFrame extends JFrame

 {

    private JPanel buttonPanel;

    private static final int DEFAULT_WIDTH = 300;

    private static final int DEFAULT_HEIGHT = 200;

    public ButtonFrame()

    {

       setSize(DEFAULT_WIDTH, DEFAULT_HEIGHT);

            buttonPanel = new JPanel();

       makeButton("yellow",Color.YELLOW);

       makeButton("blue",Color.BLUE);

       makeButton("red",Color.RED);

             add(buttonPanel);

    }

     public void makeButton(String name,Color backgroundColor)//将所有的创建组件,注册类容全部放置在makebutton方法中,只需要方法调用即可

    {

        JButton button=new JButton(name);

        buttonPanel.add(button);

        button.addActionListener(event->

            buttonPanel.setBackground(backgroundColor));//event - button.ButtonFrame.makeButton(...).() -> {...} ActionListener.actionPerformed(ActionEvent)

    }

 }
ButtonFrame
运行结果与源程序一致。
测试程序2:
l 在elipse IDE中调试运行教材449页程序11-2,结合程序运行结果理解程序;
l 在组件观感设置代码处添加注释;
l 了解GUI程序中观感的设置方法。
代码如下:
 package Damo;

 import java.awt.*;

 import javax.swing.*;

 /**

  * @version 1.32 2015-06-12

  * @author Cay Horstmann

  */

 public class PlafTest

 {

    public static void main(String[] args)

    {

       EventQueue.invokeLater(() -> {

          JFrame frame = new PlafFrame();

          frame.setTitle("PlafTest");

          frame.setDefaultCloseOperation(JFrame.EXIT_ON_CLOSE);

          frame.setVisible(true);

       });

    }

 }
PlafTest
 package Damo;

 import javax.swing.JButton;

 import javax.swing.JFrame;

 import javax.swing.JPanel;

 import javax.swing.SwingUtilities;

 import javax.swing.UIManager;

 /**

  * A frame with a button panel for changing look-and-feel

  */

 public class PlafFrame extends JFrame

 {

    private JPanel buttonPanel;

    public PlafFrame()

    {

       buttonPanel = new JPanel();

       //UIManager管理组件观感

       UIManager.LookAndFeelInfo[] infos = UIManager.getInstalledLookAndFeels();

       for (UIManager.LookAndFeelInfo info : infos)

          makeButton(info.getName(), info.getClassName());

       add(buttonPanel);

       pack();

    }

    /**

     * Makes a button to change the pluggable look-and-feel.

     * @param name the button name

     * @param className the name of the look-and-feel class

     */

    private void makeButton(String name, String className)

    {

       // 添加按钮至Panel

       JButton button = new JButton(name);

       buttonPanel.add(button);

       // 建立按钮操作

       button.addActionListener(event -> {

          // 按钮操作: 选择一个新的外观

          try

          {

             UIManager.setLookAndFeel(className);

             SwingUtilities.updateComponentTreeUI(this);

             pack();//根据窗口里面的布局及组件的preferredSize来确定frame的最佳大小。

          }

          catch (Exception e)

          {

             e.printStackTrace();

          }

       });

    }

 }
PlafFrame
运行截图:


测试程序3:
l 在elipse IDE中调试运行教材457页-458页程序11-3,结合程序运行结果理解程序;
l 掌握AbstractAction类及其动作对象;
l 掌握GUI程序中按钮、键盘动作映射到动作对象的方法。
 package Damo;

 import java.awt.*;

 import javax.swing.*;

 /**

  * @version 1.34 2015-06-12

  * @author Cay Horstmann

  */

 public class ActionTest

 {

    public static void main(String[] args)

    {

       EventQueue.invokeLater(() -> {

          var frame = new ActionFrame();

          frame.setTitle("ActionTest");

          frame.setDefaultCloseOperation(JFrame.EXIT_ON_CLOSE);

          frame.setVisible(true);

       });

    }

 }
ActionTest
 package Damo;

 import java.awt.*;

 import java.awt.event.*;

 import javax.swing.*;

 /**

  * A frame with a panel that demonstrates color change actions.

  */

 public class ActionFrame extends JFrame

 {

    private JPanel buttonPanel;

    private static final int DEFAULT_WIDTH = 300;

    private static final int DEFAULT_HEIGHT = 200;

    public ActionFrame()

    {

       setSize(DEFAULT_WIDTH, DEFAULT_HEIGHT);

       buttonPanel = new JPanel();

       // 定义操作

       var yellowAction = new ColorAction("Yellow", new ImageIcon("C:\\Users\\83583\\Desktop\\java\\corejava\\v1ch11\\yellow-ball.gif"),

             Color.YELLOW);

       var blueAction = new ColorAction("Blue", new ImageIcon("C:\\Users\\83583\\Desktop\\java\\corejava\\v1ch11\\blue-ball.gif"), Color.BLUE);

       var redAction = new ColorAction("Red", new ImageIcon("C:\\Users\\83583\\Desktop\\java\\corejava\\v1ch11\\red-ball.gif"), Color.RED);

       // 为这些操作添加按钮

       buttonPanel.add(new JButton(yellowAction));//注册

       buttonPanel.add(new JButton(blueAction));

       buttonPanel.add(new JButton(redAction));

       // 将 panel 添加置 frame

       add(buttonPanel);

       // 将Y、B和R键与名称关联

       InputMap inputMap = buttonPanel.getInputMap(JComponent.WHEN_ANCESTOR_OF_FOCUSED_COMPONENT);

       inputMap.put(KeyStroke.getKeyStroke("ctrl Y"), "panel.yellow");

       inputMap.put(KeyStroke.getKeyStroke("ctrl B"), "panel.blue");

       inputMap.put(KeyStroke.getKeyStroke("ctrl R"), "panel.red");

       // 将名称与操作关联

       ActionMap actionMap = buttonPanel.getActionMap();

       actionMap.put("panel.yellow", yellowAction);

       actionMap.put("panel.blue", blueAction);

       actionMap.put("panel.red", redAction);

    }

    public class ColorAction extends AbstractAction

    {

       /**

        * Constructs a color action.

        * @param name the name to show on the button

        * @param icon the icon to display on the button

        * @param c the background color

        */

       public ColorAction(String name, Icon icon, Color c)

       {

          putValue(Action.NAME, name);

          putValue(Action.SMALL_ICON, icon);

          putValue(Action.SHORT_DESCRIPTION, "Set panel color to " + name.toLowerCase());

          putValue("color", c);

       }

       public void actionPerformed(ActionEvent event)

       {

          var color = (Color) getValue("color");

          buttonPanel.setBackground(color);

       }

    }

 }
ActionFrame
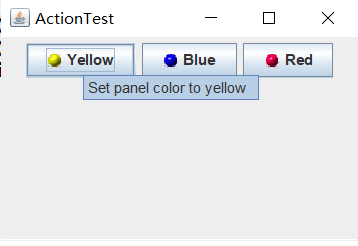
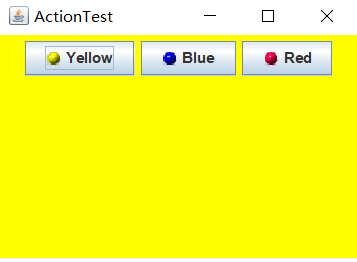
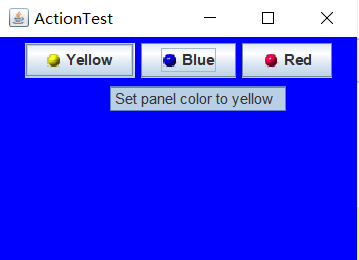
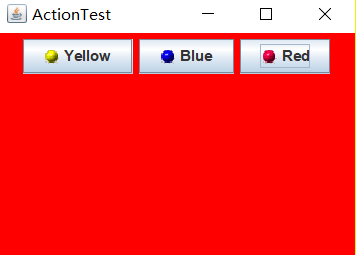
将键盘事件与鼠标时间一起连接到了该按钮上,在鼠标单击该按钮时,会改变panel的颜色,在按住Ctrl+y,r,b时也会改变panel的颜色。
测试程序4:
l 在elipse IDE中调试运行教材462页程序11-4、11-5,结合程序运行结果理解程序;
l 掌握GUI程序中鼠标事件处理技术。
 package Damo;

 import java.awt.*;

 import javax.swing.*;

 /**

  * @version 1.35 2018-04-10

  * @author Cay Horstmann

  */

 public class MouseTest

 {

    public static void main(String[] args)

    {

       EventQueue.invokeLater(() -> {

          var frame = new MouseFrame();

          frame.setTitle("MouseTest");

          frame.setDefaultCloseOperation(JFrame.EXIT_ON_CLOSE);

          frame.setVisible(true);

       });

    }

 }
MouseTest
 package Damo;

 import javax.swing.*;

 /**

  * A frame containing a panel for testing mouse operations

  */

 public class MouseFrame extends JFrame

 {

    public MouseFrame()

    {

       add(new MouseComponent());

       pack();

    }

 }
MouseFrame
 package Damo;

 import java.awt.*;

 import java.awt.event.*;

 import java.awt.geom.*;

 import java.util.*;

 import javax.swing.*;

 /**

  * A component with mouse operations for adding and removing squares.

  */

 public class MouseComponent extends JComponent

 {

    private static final int DEFAULT_WIDTH = 300;

    private static final int DEFAULT_HEIGHT = 200;

    private static final int SIDELENGTH = 10;

    private ArrayList<Rectangle2D> squares;

    private Rectangle2D current; // 包含鼠标光标的正方形

    public MouseComponent()

    {

       squares = new ArrayList<>();

       current = null;

       addMouseListener(new MouseHandler());

       addMouseMotionListener(new MouseMotionHandler());

    }

    public Dimension getPreferredSize()

    {

       return new Dimension(DEFAULT_WIDTH, DEFAULT_HEIGHT);

    }

    public void paintComponent(Graphics g)

    {

       var g2 = (Graphics2D) g;

       // 绘制所有正方形

       for (Rectangle2D r : squares)

          g2.draw(r);

    }

    /**

     * Finds the first square containing a point.

     * @param p a point

     * @return the first square that contains p

     */

    public Rectangle2D find(Point2D p)

    {

       for (Rectangle2D r : squares)

       {

          if (r.contains(p)) return r;

       }

       return null;

    }

    /**

     * Adds a square to the collection.

     * @param p the center of the square

     */

    public void add(Point2D p)

    {

       double x = p.getX();

       double y = p.getY();

       current = new Rectangle2D.Double(x - SIDELENGTH / 2, y - SIDELENGTH / 2,

          SIDELENGTH, SIDELENGTH);

       squares.add(current);

       repaint();

    }

    /**

     * Removes a square from the collection.

     * @param s the square to remove

     */

    public void remove(Rectangle2D s)

    {

       if (s == null) return;

       if (s == current) current = null;

       squares.remove(s);

       repaint();

    }

    private class MouseHandler extends MouseAdapter

    {

       public void mousePressed(MouseEvent event)

       {

          // 如果光标不在正方形内,则添加新的正方形

          current = find(event.getPoint());

          if (current == null) add(event.getPoint());

       }

       public void mouseClicked(MouseEvent event)

       {

          // 如果双击,则删除当前正方形

          current = find(event.getPoint());

          if (current != null && event.getClickCount() >= 2) remove(current);

       }

    }

    private class MouseMotionHandler implements MouseMotionListener

    {

       public void mouseMoved(MouseEvent event)

       {

          // 如果鼠标光标位于矩形内,请将其设置为十字光标

          if (find(event.getPoint()) == null) setCursor(Cursor.getDefaultCursor());

          else setCursor(Cursor.getPredefinedCursor(Cursor.CROSSHAIR_CURSOR));

       }

       public void mouseDragged(MouseEvent event)

       {

          if (current != null)

          {

             int x = event.getX();

             int y = event.getY();

             // 拖动当前矩形使其居中(x,y)

             current.setFrame(x - SIDELENGTH / 2, y - SIDELENGTH / 2, SIDELENGTH, SIDELENGTH);

             repaint();

          }

       }

    }

 }
MouseComponent
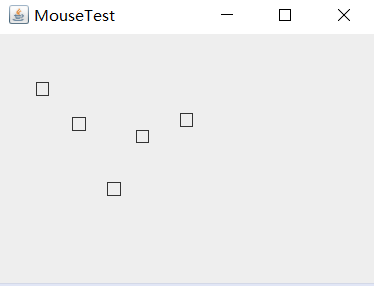
运行结果:
实验2:结对编程练习
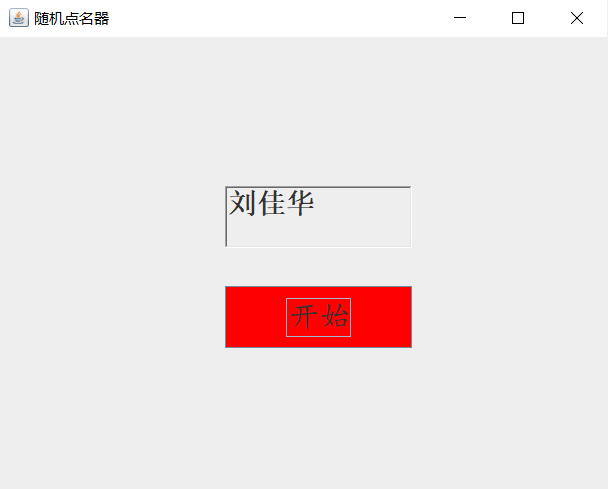
利用班级名单文件、文本框和按钮组件,设计一个有如下界面(图1)的点名器,要求用户点击开始按钮后在文本输入框随机显示2018级计算机科学与技术(1)班同学姓名,如图2所示,点击停止按钮后,文本输入框不再变换同学姓名,此同学则是被点到的同学姓名,如图3所示。

图1 点名器启动界面
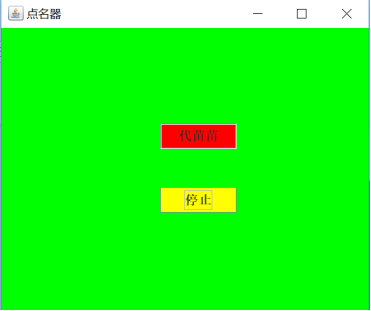
图2 点名器随机显示姓名界面
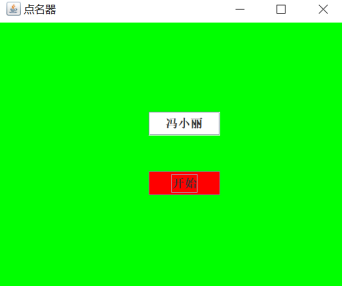
图3 点名器点名界面
1)结对编程整体思路:
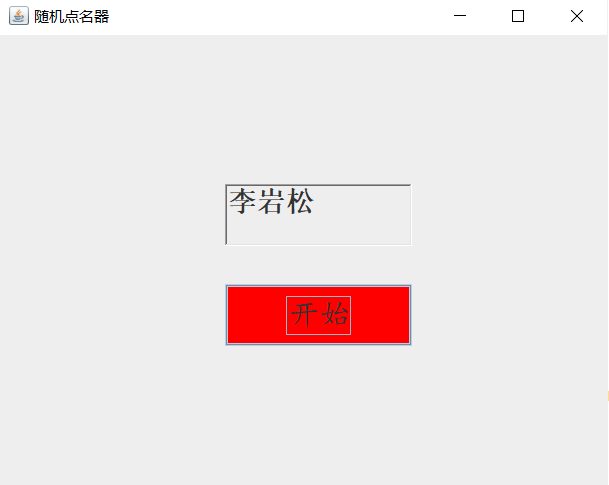
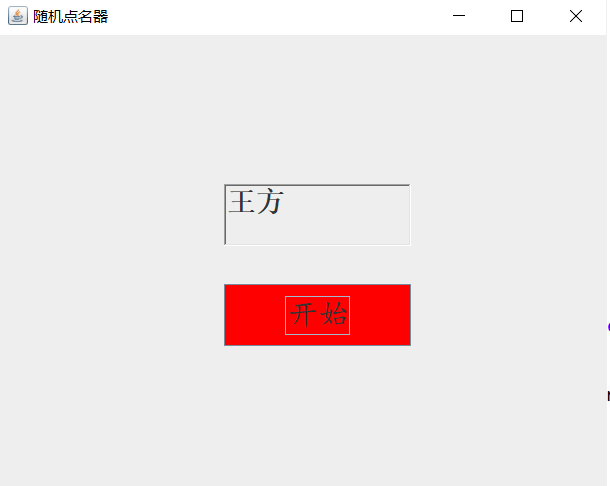
我们先设计了一个GUI图形界面,然后将学生信息读取后存储带一个数组当中,在实现监听器类actionPerformed方法时,采用随机数下标获取学生信息数组中的值,再重写timer类的schedule类中的run方法实现定时器功能。当button中的内容为“开始”时,启动定时器,当button中的内容为“停止”时,则调用timer类对象的cancel方法停用定时器,这样就完成了对点名器的代码编程。
结对编程整体代码:
 package Pearwork2;

 import java.awt.Color;

 import java.awt.event.*;

 import java.awt.EventQueue;

 import java.awt.Font;

 import java.awt.GridLayout;

 import java.awt.Panel;

 import java.awt.TextField;

 import java.io.File;

 import java.util.Scanner;

 import java.util.Timer;

 import java.util.TimerTask;

 import java.io.BufferedReader;

 import java.io.FileInputStream;

 import java.io.FileNotFoundException;

 import java.io.IOException;

 import java.io.InputStreamReader;

 import javax.swing.JButton;

 import javax.swing.JFrame;

 public class Teamwork01 {

     public static void main(String[] args) {

         String[] name = new String[35];

         Scanner scanner = new Scanner(System.in);

         File file = new File("C:\\Users\\83583\\Desktop\\2019studentlist.txt");

         try {

             FileInputStream F = new FileInputStream(file);

             BufferedReader in = new BufferedReader(new InputStreamReader(F));

             String temp = null;

             int i = 0;

             while ((temp = in.readLine()) != null) {

                 name[i] = temp;

                 i++;

             }

         } catch (FileNotFoundException e) {

             System.out.println("文件未找到!! ");

             e.printStackTrace();

         } catch (IOException e) {

             e.printStackTrace();

         }

         EventQueue.invokeLater(() -> {

             JFrame frame = new nameFrame(name);

             frame.setTitle("随机点名器 ");

             // frame.setBackground(Color.green);

             frame.setDefaultCloseOperation(JFrame.EXIT_ON_CLOSE);

             frame.setVisible(true);

         });

     }

 }

 class nameFrame extends JFrame {

     private JButton button;

     private TextField text;

     private Panel panel1;

     private Panel panel2;

     private String[] name;

     public nameFrame(String[] name) {

         this.name = name;

         this.setSize(500, 400);

         this.setLayout(null);

         button = new JButton("开始");

         button.setFont(new Font("楷体", Font.PLAIN, 25));

         button.setBackground(Color.red);

         text = new TextField("随机点名器");

         text.setFont(new java.awt.Font("随机点名器", 1, 22));

         panel1 = new Panel();

         panel1.setLayout(new GridLayout(1, 1));

         panel1.setBounds(180, 120, 150, 50);

         panel1.add(text);

         panel2 = new Panel();

         panel2.setLayout(new GridLayout(1, 1));

         panel2.setBounds(180, 200, 150, 50);

         panel2.add(button);

         this.add(panel1);

         this.add(panel2);

         buttonAction ba = new buttonAction();

         randNameAction ra = new randNameAction();

         button.addActionListener(ba);

         button.addActionListener(ra);

     }

     public class buttonAction implements ActionListener {

         public void actionPerformed(ActionEvent event) {

             if (button.getText() == "开始") {

                 button.setText("结束");

                 text.setBackground(Color.red);

                 button.setBackground(Color.yellow);

             } else {

                 button.setText("开始");

                 text.setBackground(null);

                 button.setBackground(Color.red);

             }

         }

     }

     public class randNameAction implements ActionListener {

         private Timer time;

         public void actionPerformed(ActionEvent event) {

             if (button.getText() == "开始") {

                 time = new Timer();

                 time.schedule(new TimerTask() {

                     public void run() {

                         int a = (int) (Math.random() * name.length);

                         text.setText(name[a]);

                     }

                 }, 0, 50);

             } else {

                 time.cancel();

             }

         }

     }

 }
Teamwork01
2)运行截图:
3) 结对编程讨论图片:

三、实验总结:
通过本周学习,我基本掌握了事件处理的基本原理及AWT事件模型的工作机制;掌握事件处理的基本编程模型;并用多种方法简化代码,在老师和同伴的教导进一步理解了匿名内部类,但对于 GUI界面组件观感设置方法还不太理解; 掌握了AbstractAction类的用法及GUI程序中鼠标事件处理技术。此外,在本次结对编程中也遇到了一些问题,比如说在终止timer时,不知道如何终止timer.在查阅了一些资料后了解到了cancel方法停用定时器,达到结束产生随机数组下标的目的;相信会对以后的学习会产生帮助。
最新文章
- HTML5入门以及新标签
- iOS 向客户发送xcarchive文件(整理中)
- eclipse 导入工程报错Unable to execute dex: Multiple dex files define Landroid/annotation/SuppressLint
- HTML-embed标签详解
- (原创)Python文件与文件系统系列(4)——文件描述字操作
- php比较加赋值语句
- 使用duplicate target database ... from active database复制数据库
- 20145103《java程序设计》第五周学习总结
- linux list all users.
- java虚拟机涉及内存溢出
- .NET2.0下的对象生成JSON数据
- hdu3033I love sneakers! (分组背包,错了很多次)
- jenkins+ANT+jmeter 接口测试环境搭建
- nodejs 初次链接 mongodb 的详细细节
- 读汤姆大叔《JavaScript变量对象》笔记
- 平时作业六 java
- soapUI启动报错:The JVM could not be started. The maximum heap size (-Xmx) might be too large or an antivirus or firewall tool could block the execution.
- [js]d3.js绘制拓扑树
- 【Idea】Intellij Idea debug 模式如果发现异常,即添加异常断点在发生异常处
- laravel的filter()方法的使用 (方法使用给定的回调函数过滤集合的内容,只留下那些通过给定真实测试的内容)