FCN笔记
FCN.py
- tensorflow命令行参数
FLAGS = tf.flags.FLAGS

tf.flags.DEFINE_integer("batch_size", "2", "batch size for training")

tf.flags.DEFINE_string("logs_dir", "logs/", "path to logs directory")

tf.flags.DEFINE_string("data_dir", "Data_zoo/MIT_SceneParsing/", "path to dataset")

tf.flags.DEFINE_float("learning_rate", "1e-5", "Learning rate for Adam Optimizer")

tf.flags.DEFINE_string("model_dir", "Model_zoo/", "Path to vgg model mat")

tf.flags.DEFINE_bool('debug', "False", "Debug mode: True/ False")

tf.flags.DEFINE_string('mode', "train", "Mode train/ test/ visualize")
深度学习神经网络往往有过多的Hyperparameter需要调优,优化算法、学习率、卷积核尺寸等很多参数都需要不断调整,使用命令行参数是非常方便的。有两种实现方式,一是调用tensorflow自带的app.flags(FCN用到的),一是利用python的argparse包实现。
1.利用tf.app.flags组件
TensorFlow项目例子中经常出现tf.app.flags,这个好像和tf.flags是一样,加不加中间的app没区别(要是不是这样还请大家指出错误之处),它支持应用从命令行接受参数,可以用来指定集群配置等。下面是个例子。
import tensorflow as tf

#调用flags内部的DEFINE_string函数来制定解析规则

tf.flags.DEFINE_string("para_name_1","default_val", "description")

tf.flags.DEFINE_integer("batch_size", 64, "Batch Size (default: 64)")

tf.flags.DEFINE_integer("num_epochs", 10, "Number of training epochs (default: 10)")

#FLAGS是一个对象,保存了解析后的命令行参数

FLAGS = tf.flags.FLAGS

FLAGS._parse_flags()#进行解析,加上这一句可以把FLAGS.__flags变成一个字典

print(FLAGS.batch_size)#运行结果输出64

print(FLAGS.__flags)#运行结果见下图

重点:它可以从命令行接受参数。
python FCN.py --mode=visualize
2.利用python的argparse包
import argparse

parser = argparse.ArgumentParser()

parser.add_argument("--echo", type=str,help="echo the string you use here")

parser.add_argument("--square", type=int, help="display a square of a given number")

args = parser.parse_args()

print(args.echo)

print(args.square**2)
这里第一个参数调用了系统的echo工具,将函数名称后的字符串打印在控制台显示。第二个参数做了平方运算。运行:
python argparse_example.py --echo ‘hello!’ --square 4

- 调用VGG
def vgg_net(weights, image):

    ## fcn的前五层网络就是vgg网络

    layers = (

        'conv1_1', 'relu1_1', 'conv1_2', 'relu1_2', 'pool1',

        'conv2_1', 'relu2_1', 'conv2_2', 'relu2_2', 'pool2',

        'conv3_1', 'relu3_1', 'conv3_2', 'relu3_2', 'conv3_3',

        'relu3_3', 'conv3_4', 'relu3_4', 'pool3',

        'conv4_1', 'relu4_1', 'conv4_2', 'relu4_2', 'conv4_3',

        'relu4_3', 'conv4_4', 'relu4_4', 'pool4',

        'conv5_1', 'relu5_1', 'conv5_2', 'relu5_2', 'conv5_3',

        'relu5_3', 'conv5_4', 'relu5_4'

    )

    net = {}

    current = image

    for i, name in enumerate(layers):

        kind = name[:4]

        if kind == 'conv':

            kernels, bias = weights[i][0][0][0][0]

            # matconvnet: weights are [width, height, in_channels, out_channels]

            # tensorflow: weights are [height, width, in_channels, out_channels]

            kernels = utils.get_variable(np.transpose(kernels, (1, 0, 2, 3)), name=name + "_w")

            bias = utils.get_variable(bias.reshape(-1), name=name + "_b")

            current = utils.conv2d_basic(current, kernels, bias)

        elif kind == 'relu':

            current = tf.nn.relu(current, name=name)

            if FLAGS.debug:

                utils.add_activation_summary(current)

        elif kind == 'pool':

            current = utils.avg_pool_2x2(current)

        net[name] = current

    return net
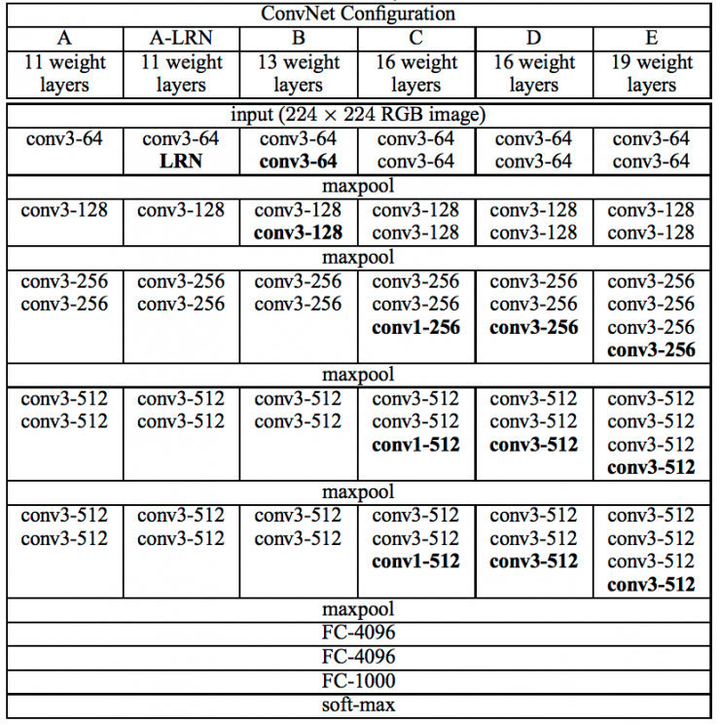 VGGNet各级别网络结构图,FCN用VGG-19
1.kernels, bias = weights[i][0][0][0][0]
weights 是vgg网络各层的权重集合,存储格式mat:MODEL_URL = 'http://www.vlfeat.org/matconvnet/models/beta16/imagenet-vgg-verydeep-19.mat'
kernels的获取方式是weights[第i层][0][0][0][0][0],形状为[width, height, in_channels, out_channels],bias的获取方式是weights[0][0][0][0][0],形状为[1,out_channels]。对于VGG-19的卷积,全部采用了3X3的filters,所以width为3,height为3。注意,这里面的层数i,指的是最细粒度的层数,包括conv、relu、pool、fc各种操作。因此,i=0为卷积核,i=1为relu,i=2为卷积核,i=3为relu,i=4为pool,i=5为卷积核……,i=37为全连接层,以此类推。VGG-19的pooling采用了长宽为2X2的max-pooling。
若是卷积层,如conv1_1:
print(weights[0][0][0][0][0])
得到的是参数矩阵和偏置:
[ array([[[[ 0.39416704, -0.08419707, -0.03631314, ..., -0.10720515,

          -0.03804016,  0.04690642],

         [ 0.46418372,  0.03355668,  0.10245045, ..., -0.06945956,

          -0.04020201,  0.04048637],

         [ 0.34119523,  0.09563112,  0.0177449 , ..., -0.11436455,

          -0.05099866, -0.00299793]],

        [[ 0.37740308, -0.07876257, -0.04775979, ..., -0.11827433,

          -0.19008617, -0.01889699],

         [ 0.41810837,  0.05260524,  0.09755926, ..., -0.09385028,

          -0.20492788, -0.0573062 ],

         [ 0.33999205,  0.13363543,  0.02129423, ..., -0.13025227,

          -0.16508926, -0.06969624]],

        [[-0.04594866, -0.11583115, -0.14462094, ..., -0.12290562,

          -0.35782176, -0.27979308],

         [-0.04806903, -0.00658076, -0.02234544, ..., -0.0878844 ,

          -0.3915486 , -0.34632796],

         [-0.04484424,  0.06471398, -0.07631404, ..., -0.12629718,

          -0.29905206, -0.28253639]]],

       [[[ 0.2671299 , -0.07969447,  0.05988706, ..., -0.09225675,

           0.31764674,  0.42209673],

         [ 0.30511212,  0.05677647,  0.21688674, ..., -0.06828708,

           0.3440761 ,  0.44033417],

         [ 0.23215917,  0.13365699,  0.12134422, ..., -0.1063385 ,

           0.28406844,  0.35949969]],

        [[ 0.09986369, -0.06240906,  0.07442063, ..., -0.02214639,

           0.25912452,  0.42349899],

         [ 0.10385381,  0.08851637,  0.2392226 , ..., -0.01210995,

           0.27064082,  0.40848857],

         [ 0.08978214,  0.18505956,  0.15264879, ..., -0.04266965,

           0.25779948,  0.35873157]],

        [[-0.34100872, -0.13399366, -0.11510294, ..., -0.11911335,

          -0.23109646, -0.19202407],

         [-0.37314063, -0.00698938,  0.02153259, ..., -0.09827439,

          -0.2535741 , -0.25541356],

         [-0.30331427,  0.08002605, -0.03926321, ..., -0.12958746,

          -0.19778992, -0.21510386]]],

       [[[-0.07573577, -0.07806503, -0.03540679, ..., -0.1208065 ,

           0.20088433,  0.09790061],

         [-0.07646758,  0.03879711,  0.09974211, ..., -0.08732687,

           0.2247974 ,  0.10158388],

         [-0.07260918,  0.10084777,  0.01313597, ..., -0.12594968,

           0.14647409,  0.05009392]],

        [[-0.28034249, -0.07094654, -0.0387974 , ..., -0.08843154,

           0.18996507,  0.07766484],

         [-0.31070709,  0.06031388,  0.10412455, ..., -0.06832542,

           0.20279962,  0.05222717],

         [-0.246675  ,  0.1414054 ,  0.02605635, ..., -0.10128672,

           0.16340195,  0.02832468]],

        [[-0.41602272, -0.11491341, -0.14672887, ..., -0.13079506,

          -0.1379628 , -0.26588449],

         [-0.46453714, -0.00576723, -0.02660675, ..., -0.10017379,

          -0.15603794, -0.32566148],

         [-0.33683276,  0.06601517, -0.08144748, ..., -0.13460518,

          -0.1342358 , -0.27096185]]]], dtype=float32)

 array([[ 0.73017758,  0.06493629,  0.03428847,  0.8260386 ,  0.2578029 ,

         0.54867655, -0.01243854,  0.34789944,  0.55108708,  0.06297145,

         0.60699058,  0.26703122,  0.649414  ,  0.17073655,  0.47723091,

         0.38250586,  0.46373144,  0.21496128,  0.46911287,  0.23825859,

         0.47519219,  0.70606434,  0.27007523,  0.68552732,  0.03216552,

         0.60252881,  0.35034859,  0.446798  ,  0.77326518,  0.58191687,

         0.39083108,  1.75193536,  0.66117406,  0.30213955,  0.53059655,

         0.67737472,  0.33273223,  0.49127793,  0.26548928,  0.18805602,

         0.07412001,  1.10810876,  0.28224325,  0.86755145,  0.19422948,

         0.810332  ,  0.36062282,  0.50720042,  0.42472315,  0.49632648,

         0.15117475,  0.79454446,  0.33494323,  0.47283995,  0.41552398,

         0.08496041,  0.37947032,  0.60067391,  0.47174454,  0.81309211,

         0.45521152,  1.08920074,  0.47757268,  0.4072122 ]], dtype=float32)]
若是激活函数,如relu1_1:
print(weights[1][0][0][0][0])
输出:
relu
若是池化层,如pool1:
print(weights[4][0][0][0][0])
输出:
pool1
2.由于 imagenet-vgg-verydeep-19.mat 中的参数矩阵和我们定义的长宽位置颠倒了,所以需要交换↓
matconvnet: weights are [width, height, in_channels, out_channels]
tensorflow: weights are [height, width, in_channels, out_channels]
np.transpose(kernels, (1, 0, 2, 3))
2.bias.reshape(-1)
numpy.reshape(a, newshape, order='C')[source],参数`newshape`是啥意思?
根据Numpy文档(https://docs.scipy.org/doc/numpy/reference/generated/numpy.reshape.html#numpy-reshape)的解释:
newshape : int or tuple of ints
The
new shape should be compatible with the original shape. If an integer,
then the result will be a 1-D array of that length. One shape dimension
can be -1. In this case, **the value is inferred from the length of the array and remaining dimensions**.
大意是说,数组新的shape属性应该要与原来的配套,如果等于-1的话,那么Numpy会根据剩下的维度计算出数组的另外一个shape属性值。
所以reshape(-1)=不分行列,改成1串;reshape(-1, 1)=我也不知道几行,反正是1列。
- tensorflow可视化
keep_probability = tf.placeholder(tf.float32, name="keep_probabilty")
image = tf.placeholder(tf.float32, shape=[None, IMAGE_SIZE, IMAGE_SIZE, 3], name="input_image")
annotation = tf.placeholder(tf.int32, shape=[None, IMAGE_SIZE, IMAGE_SIZE, 1], name="annotation")

pred_annotation, logits = inference(image, keep_probability)
tf.summary.image("input_image", image, max_outputs=2)
tf.summary.image("ground_truth", tf.cast(annotation, tf.uint8), max_outputs=2)
tf.summary.image("pred_annotation", tf.cast(pred_annotation, tf.uint8), max_outputs=2)
loss = tf.reduce_mean((tf.nn.sparse_softmax_cross_entropy_with_logits(logits=logits,
                                                                      labels=tf.squeeze(annotation, squeeze_dims=[3]),
                                                                      name="entropy")))
loss_summary = tf.summary.scalar("entropy", loss)

trainable_var = tf.trainable_variables()
if FLAGS.debug:
    for var in trainable_var:
        utils.add_to_regularization_and_summary(var)
train_op = train(loss, trainable_var)

print("Setting up summary op...")
summary_op = tf.summary.merge_all()

print("Setting up image reader...")
train_records, valid_records = scene_parsing.read_dataset(FLAGS.data_dir)
print(len(train_records))
print(len(valid_records))

print("Setting up dataset reader")
image_options = {'resize': True, 'resize_size': IMAGE_SIZE}
if FLAGS.mode == 'train':
    train_dataset_reader = dataset.BatchDatset(train_records, image_options)
validation_dataset_reader = dataset.BatchDatset(valid_records, image_options)

sess = tf.Session()

print("Setting up Saver...")
saver = tf.train.Saver()

# create two summary writers to show training loss and validation loss in the same graph
# need to create two folders 'train' and 'validation' inside FLAGS.logs_dir
train_writer = tf.summary.FileWriter(FLAGS.logs_dir + '/train', sess.graph)
validation_writer = tf.summary.FileWriter(FLAGS.logs_dir + '/validation')

sess.run(tf.global_variables_initializer())
ckpt = tf.train.get_checkpoint_state(FLAGS.logs_dir)
if ckpt and ckpt.model_checkpoint_path:
    saver.restore(sess, ckpt.model_checkpoint_path)
    print("Model restored...")
1.summary
tensorflow的可视化是使用summary和tensorboard合作完成的。
基本用法
首先明确一点,summary也是op.
输出网络结构
with tf.Session() as sess:

  writer = tf.summary.FileWriter(your_dir, sess.graph)
命令行运行tensorboard --logdir your_dir,然后浏览器输入127.0.1.1:6006注:tf1.1.0 版本的tensorboard端口换了(0.0.0.0:6006)
这样你就可以在tensorboard中看到你的网络结构图了
可视化参数
#ops

loss = ...

tf.summary.scalar("loss", loss)

merged_summary = tf.summary.merge_all()

init = tf.global_variable_initializer()

with tf.Session() as sess:

  writer = tf.summary.FileWriter(your_dir, sess.graph)

  sess.run(init)

  for i in xrange(100):

    _,summary = sess.run([train_op,merged_summary], feed_dict)

    writer.add_summary(summary, i)
这时,打开tensorboard,在EVENTS可以看到loss随着i的变化了,如果看不到的话,可以在代码最后加上writer.flush()试一下,原因后面说明。
函数介绍
tf.summary.merge_all: 将之前定义的所有summary op整合到一起FileWriter: 创建一个file writer用来向硬盘写summary数据,tf.summary.scalar(summary_tags, Tensor/variable, collections=None): 用于标量的summarytf.summary.image(tag, tensor, max_images=3, collections=None, name=None):tensor,必须4维,形状[batch_size, height, width, channels],max_images(最多只能生成3张图片的summary),觉着这个用在卷积中的kernel可视化很好用.max_images确定了生成的图片是[-max_images: ,height, width, channels],还有一点就是,TensorBord中看到的image summary永远是最后一个global step的tf.summary.histogram(tag, values, collections=None, name=None):values,任意形状的tensor,生成直方图summarytf.summary.audio(tag, tensor, sample_rate, max_outputs=3, collections=None, name=None)
- 训练、可视化、测试(测试自己加的)
if FLAGS.mode == "train":
    for itr in xrange(MAX_ITERATION):
        train_images, train_annotations = train_dataset_reader.next_batch(FLAGS.batch_size)
        feed_dict = {image: train_images, annotation: train_annotations, keep_probability: 0.85}

        sess.run(train_op, feed_dict=feed_dict)

        if itr % 10 == 0:
            train_loss, summary_str = sess.run([loss, loss_summary], feed_dict=feed_dict)
            print("Step: %d, Train_loss:%g" % (itr, train_loss))
            train_writer.add_summary(summary_str, itr)

        if itr % 500 == 0:
            valid_images, valid_annotations = validation_dataset_reader.next_batch(FLAGS.batch_size)
            valid_loss, summary_sva = sess.run([loss, loss_summary], feed_dict={image: valid_images, annotation: valid_annotations,
                                                   keep_probability: 1.0})
            print("%s ---> Validation_loss: %g" % (datetime.datetime.now(), valid_loss))

            # add validation loss to TensorBoard
            validation_writer.add_summary(summary_sva, itr)
            saver.save(sess, FLAGS.logs_dir + "model.ckpt", itr)

elif FLAGS.mode == "visualize":
    valid_images, valid_annotations = validation_dataset_reader.get_random_batch(FLAGS.batch_size)
    pred = sess.run(pred_annotation, feed_dict={image: valid_images, annotation: valid_annotations,
                                                keep_probability: 1.0})
    valid_annotations = np.squeeze(valid_annotations, axis=3)
    pred = np.squeeze(pred, axis=3)

    for itr in range(FLAGS.batch_size):
        utils.save_image(valid_images[itr].astype(np.uint8), FLAGS.logs_dir, name="inp_" + str(5+itr))
        utils.save_image(valid_annotations[itr].astype(np.uint8), FLAGS.logs_dir, name="gt_" + str(5+itr))
        utils.save_image(pred[itr].astype(np.uint8), FLAGS.logs_dir, name="pred_" + str(5+itr))
        print("Saved image: %d" % itr)
这个部分是容易理解的。
最新文章
- background-image和img的区别
- Android NDK常见配置问题的解决方案
- linux command file/type which/whereis
- 【转载】Serial NOR Flash and U-Boot
- SQL单表查询
- openstack network
- 【原】 Spark中Worker源码分析(一)
- 暴力破解UltraEdit v21 无需注册
- rownum的使用-分页
- Codeforces Round #256 (Div. 2)——Multiplication Table
- springMVC servlet 静态资源加载
- devexpress实现单元格合并以及依据条件合并单元格
- [HNOI2009]最小圈(分数规划+SPFA判负环)
- CF715B. Complete The Graph
- HTML5 History API & URL 重定向
- 如何删除GitHub或者GitLab 上的文件夹
- Windows 8风格应用-触控输入
- Fiddler抓包连接失败502的解决方法
- WPF/SL: lazy loading TreeView
- svn异常处理