从头学pytorch(十六):VGG NET
VGG
AlexNet在Lenet的基础上增加了几个卷积层,改变了卷积核大小,每一层输出通道数目等,并且取得了很好的效果.但是并没有提出一个简单有效的思路.
VGG做到了这一点,提出了可以通过重复使⽤简单的基础块来构建深度学习模型的思路.
论文地址:https://arxiv.org/abs/1409.1556
vgg的结构如下所示:
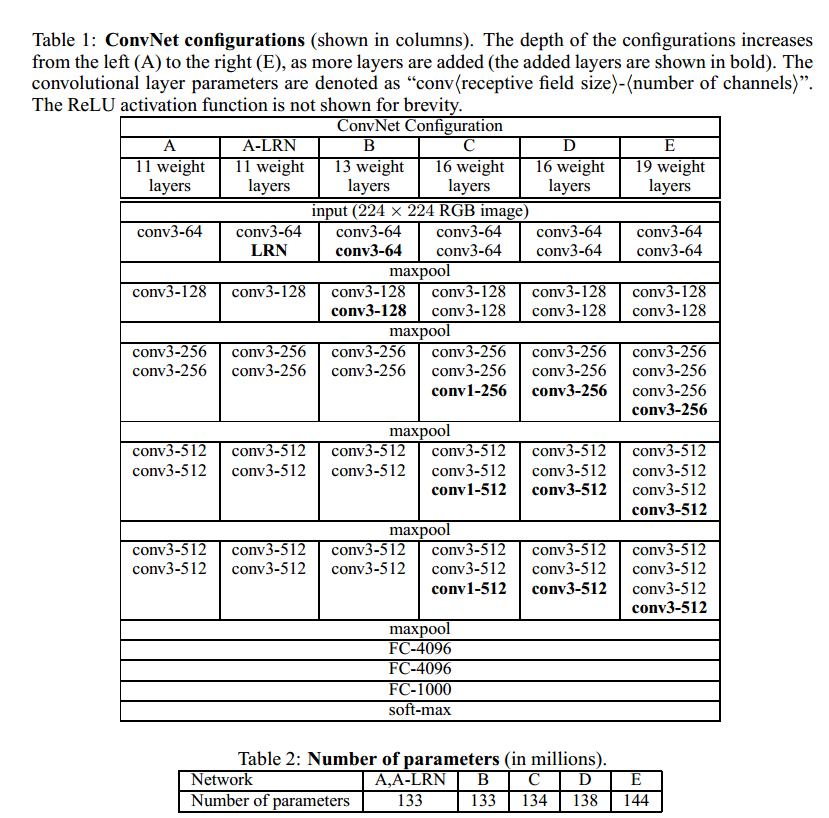
上图给出了不同层数的vgg的结构.也就是常说的vgg16,vgg19等等.
VGG BLOCK
vgg的设计思路是,通过不断堆叠3x3的卷积核,不断加深模型深度.vgg net证明了加深模型深度对提高模型的学习能力是一个很有效的手段.
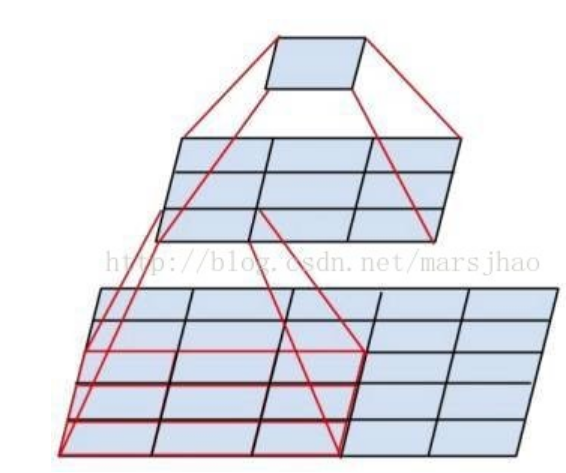
看上图就能发现,连续的2个3x3卷积,感受野和一个5x5卷积是一样的,但是前者有两次非线性变换,后者只有一次!,这就是连续堆叠小卷积核能提高
模型特征学习的关键.此外,2个3x3的参数数量也比一个5x5少.(2x3x3 < 5x5)
vgg的基础组成模块,每一个卷积层都由n个3x3卷积后面接2x2的最大池化.池化层的步幅为2.从而卷积层卷积后,宽高不变,池化后,宽高减半.
我们可以有以下代码:
def make_layers(in_channels,cfg):

    layers = []

    previous_channel = in_channels #上一层的输出的channel数量

    for v in cfg:

        if v == 'M':

            layers.append(nn.MaxPool2d(kernel_size=2,stride=2))

        else:

            layers.append(nn.Conv2d(previous_channel,v,kernel_size=3,padding=1))

            layers.append(nn.ReLU())

            previous_channel = v

    conv = nn.Sequential(*layers)

    return conv

cfgs = {

    'A': [64, 'M', 128, 'M', 256, 256, 'M', 512, 512, 'M', 512, 512, 'M'],

    'B': [64, 64, 'M', 128, 128, 'M', 256, 256, 'M', 512, 512, 'M', 512, 512, 'M'],

    'D': [64, 64, 'M', 128, 128, 'M', 256, 256, 256, 'M', 512, 512, 512, 'M', 512, 512, 512, 'M'],

    'E': [64, 64, 'M', 128, 128, 'M', 256, 256, 256, 256, 'M', 512, 512, 512, 512, 'M', 512, 512, 512, 512, 'M'],

}
cfgs定义了不同的vgg模型的结构,比如'A'代表vgg11. 数字代表卷积后的channel数. 'M'代表Maxpool
我们可以给出模型定义
class VGG(nn.Module):

    def __init__(self,input_channels,cfg,num_classes=10, init_weights=True):

        super(VGG, self).__init__()

        self.conv = make_layers(input_channels,cfg) # torch.Size([1, 512, 7, 7])

        self.fc = nn.Sequential(

            nn.Linear(512*7*7,4096),

            nn.ReLU(),

            nn.Linear(4096,4096),

            nn.ReLU(),

            nn.Linear(4096,num_classes)

        )

    def forward(self, img):

        feature = self.conv(img)

        output = self.fc(feature.view(img.shape[0], -1))

        return output
卷积层的输出可由以下测试代码得出
# conv = make_layers(1,cfgs['A'])

# X = torch.randn((1,1,224,224))

# out = conv(X)

# #print(out.shape)
加载数据
batch_size,num_workers=4,4

train_iter,test_iter = learntorch_utils.load_data(batch_size,num_workers,resize=224)
这里batch_size调到8我的显存就不够了...
定义模型
net = VGG(1,cfgs['A']).cuda()
定义损失函数
loss = nn.CrossEntropyLoss()
定义优化器
opt = torch.optim.Adam(net.parameters(),lr=0.001)
定义评估函数
def test():

    acc_sum = 0

    batch = 0

    for X,y in test_iter:

        X,y = X.cuda(),y.cuda()

        y_hat = net(X)

        acc_sum += (y_hat.argmax(dim=1) == y).float().sum().item()

        batch += 1

    #print('acc_sum %d,batch %d' % (acc_sum,batch))

    return 1.0*acc_sum/(batch*batch_size)
训练
num_epochs = 3

def train():

    for epoch in range(num_epochs):

        train_l_sum,batch,acc_sum = 0,0,0

        start = time.time()

        for X,y in train_iter:

            # start_batch_begin = time.time()

            X,y = X.cuda(),y.cuda()

            y_hat = net(X)

            acc_sum += (y_hat.argmax(dim=1) == y).float().sum().item()

            l = loss(y_hat,y)

            opt.zero_grad()

            l.backward()

            opt.step()

            train_l_sum += l.item()

            batch += 1

            mean_loss = train_l_sum/(batch*batch_size) #计算平均到每张图片的loss

            start_batch_end = time.time()

            time_batch = start_batch_end - start

            print('epoch %d,batch %d,train_loss %.3f,time %.3f' %

                (epoch,batch,mean_loss,time_batch))

        print('***************************************')

        mean_loss = train_l_sum/(batch*batch_size) #计算平均到每张图片的loss

        train_acc = acc_sum/(batch*batch_size)     #计算训练准确率

        test_acc = test()                           #计算测试准确率

        end = time.time()

        time_per_epoch =  end - start

        print('epoch %d,train_loss %f,train_acc %f,test_acc %f,time %f' %

                (epoch + 1,mean_loss,train_acc,test_acc,time_per_epoch))

train()
全连接层4096个神经元,参数太多,训练缓慢.4G的GTX 1050显卡,训练一个epoch大概一个多小时.
完整代码:https://github.com/sdu2011/learn_pytorch
batch=4,收敛极慢,迭代次数不够的话,欠拟合严重.在训练集上的train accuracy也很低.
由于全连接层的存在,参数极多,造成训练慢,显存占用多,导致batch_size调不大.模型修改为
class VGG(nn.Module):

    def __init__(self,input_channels,cfg,num_classes=10, init_weights=True):

        super(VGG, self).__init__()

        self.conv = make_layers(input_channels,cfg) # torch.Size([1, 512, 7, 7])

        self.fc = nn.Sequential(

            nn.Linear(512*7*7,512),

            nn.ReLU(inplace=True), #inplace作用:节省显存 https://www.cnblogs.com/wanghui-garcia/p/10642665.html

            nn.Dropout(p=0.5),

            nn.Linear(512,512),

            nn.ReLU(inplace=True),

            nn.Dropout(p=0.5),

            nn.Linear(512,num_classes)

        )

    def forward(self, img):

        feature = self.conv(img)

        output = self.fc(feature.view(img.shape[0], -1))

        return output
全连接层调整为512个神经元.batch_size调到16.训练快多了.
最新文章
- 什么是hasLayout?
- C语言->实验室->指针数组
- Centos上的安装openoffice+unoconv+swftools (转)
- 腾讯DBA官方博客开通了
- Free Slideshow, Gallery And Lightboxes Scripts
- Linux Kernel Synchronization && Mutual Exclusion、Linux Kernel Lock Mechanism Summarize
- [BIM]BIM中IFC介绍
- 02_使用WebMagic爬虫获取CSDN推荐专家的个人博客信息
- 一个QT 3D转动控件
- office文件的预览
- ios 初体验<真机调试>
- GIT入门笔记(19)GIT 小结
- 使用spring中4.2.6版本使用@Value取值失败,结果为${xxx}的情况
- Hbase常见错误解决方法
- centos7部署.net core2.1
- WEB服务器搭建(Apache+Tomcat+eclipse)
- javascript语法(一) 极客时间
- 783. Minimum Distance Between BST Node
- uva12298(生成函数)
- [CC-XXOR]Chef and Easy Problem