Linux 上利用Nginx代理uWSGI处理Flask web应用
一、介绍
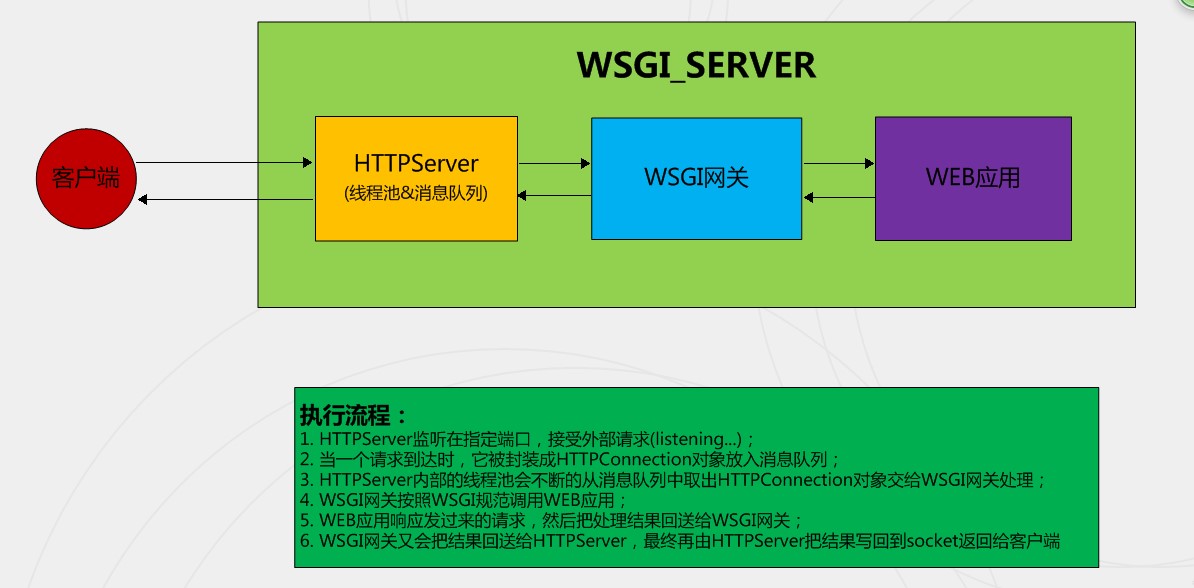
最近开发要用一个测试环境,是这样的Nginx+uwsgi+flask 的一个结构。下面是一些记录,在Centos 系统上使用Flask 架构部署一个简单的Python应用。然后使用Nginx作为前端反向代理,设置uWSGI应用网关处理web应用程序。
二、条件
1) 环境要求
- Server OS:最小化安装 Centos 6.8
- Nginx :反向代理
- Python2.6~2.7:开发语言
- Flask/uWSGI:框架
- Pip:python包管理工具
- iptables&selinux:开放用到的端口,关闭selinux。
2) 安装必备的开发工具以及环境
更新系统:
[root@hcloud ~]# yum update -y

[root@hcloud ~]# yum groupinstall "Development tools" -y
更新完成后,记得重启系统,然后安装工具:
[root@hcloud ~]# yum install wget vim telnet python-devel zlib-devel openssl-devel bzip-devel -y

[root@hcloud ~]# yum install zlib-devel bzip2-devel pcre-devel openssl-devel ncurses-devel sqlite-devel readline-devel tk-devel python-devel libxml2  libxml2-devel  python-setuptools  zlib-devel wget openssl-devel pcre pcre-devel sudo gcc make autoconf automake

 -y
3) 安装python 包管理工具-pip
[root@hcloud ~]# wget https://bootstrap.pypa.io/get-pip.py && python get-pip.py
或者参考此网站
4) 安装uWSGI与Flask
下载软件
[root@hcloud ~]# mkdir soft

[root@hcloud ~]# cd soft

[root@hcloud soft]# wget https://pypi.python.org/packages/0c/1c/44849e293e367a157f1ad863cee02b4b865840543254d8fae3ecdebdbdb9/uwsgi-2.0.12.tar.gz

[root@hcloud soft]# wget https://pypi.python.org/packages/db/9c/149ba60c47d107f85fe52564133348458f093dd5e6b57a5b60ab9ac517bb/Flask-0.10.1.tar.gz
如果下载该软件比较慢,可以在/etc/reslov.conf dns中添加一个8.8.8.8 ,很快的哦。
安装软件(开发要求固定版本,如果不介意版本的话,可以直接使用pip install packge 即可安装,相当于linux中的yum)
[root@hcloud soft]# tar -xf Flask-0.10..tar.gz

[root@hcloud ~]# cd Flask-0.10.

[root@hcloud Flask-0.10.]# python setup.py install

[root@hcloud soft]# tar -xf uwsgi-2.0..tar.gz

[root@hcloud soft]# cd uwsgi-2.0.

[root@hcloud uwsgi-2.0.]# python setup.py install
5) 创建一个测试应用
创建一个Web应用程序存放的文件夹
[root@hcloud ~]# mkdir -pv /usr/local/webtest

[root@hcloud ~]# cd /usr/local/webtest
创建一个python 脚本,内容如下:
[root@hcloud webtest]# cat myproject.py

from flask import Flask

application = Flask(__name__)

@application.route("/")

def hello():

    return "<h1 style='color:blue'>Hello Flask!</h1>"

if __name__ == "__main__":

    application.run(host='0.0.0.0')
创建WSGI入口点文件,名字为:wsgi.py,内容如下
[root@hcloud webtest]# cat wsgi.py

from myproject import application

if __name__ == "__main__":

    application.run()
6) 配置uWSGI服务器网关服务运行方式,运行端口等。
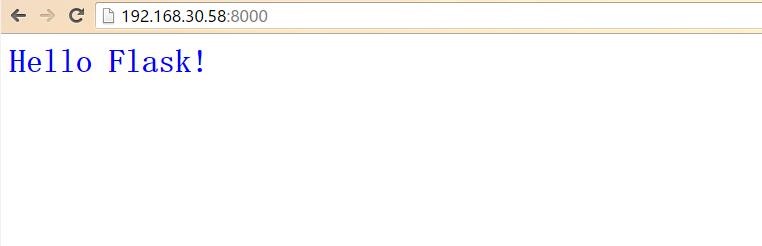
上述两个python脚本文件创建完成后,uwsgi命令启动,运行在8000端口上,指定协议http,运行时会出现一些警告,暂时可以忽略,是因为当前是root账户运行的uwsgi,后面从配置文件启动时会配置普通用户nginx即可。
[root@hcloud webtest]# uwsgi --socket 0.0.0.0: --protocol=http -w wsgi

验证下,看下监听端口

[root@hcloud webtest]# netstat -aultnp | grep

tcp               0.0.0.0:                0.0.0.0:*                   LISTEN      /uwsgi

tcp               192.168.30.58:          192.168.30.65:         TIME_WAIT   -
可以打开浏览器访问测试一下:http://192.168.30.58:8000
7) 创建uWSGI配置文件
以.ini格式为uwsgi启动配置文件(还有xml,json,等多种格式),这样就不用在命令行输入一大堆命令了,用uwsgi命令启动,后面可以创建uwsgi启动脚本,加入到系统服务
在项目的目录中,创建uwsgi.ini:
[root@hcloud webtest]# cat uwsgi.ini

[uwsgi]

uid = nginx

gid = nginx

socket = 127.0.0.1:

master = true

vhost = true

workers =

reload-mercy =

vacuum = true

max-requests =

limit-as =

buffer-sizi =

pidfile = /var/run/uwsgi.pid

daemonize = /var/log/uwsgi/uwsgi.log

chdir = /usr/local/webtest

module = wsgi

chmod-socket =

enable-threads = true
保存并退出。配置文件参考:http://heipark.iteye.com/blog/1847421
大致的解释下:
uid 、gid :以哪个用户、组启动服务
socket:监听的ip及端口
master: 启动主进程
workes:服务器启动的进程数
reload-mercy:平滑的重启
pidfile :启动时的pid 文件。
daemonize :启动日志
module :web应用的入口模块名称
enable-threads : 启用线程模式
8) 创建开机系统启动脚本文件,名字为uwsgid。
#! /bin/sh

# chkconfig:

# Description: Startup script for uwsgi webserver on Debian. Place in /etc/init.d and

# run 'update-rc.d -f uwsgi defaults', or use the appropriate command on your

# distro. For CentOS/Redhat run: 'chkconfig --add uwsgi'

### BEGIN INIT INFO

# Provides:          uwsgid

# Required-Start:    $all

# Required-Stop:     $all

# Default-Start:

# Default-Stop:

# Short-Description: starts the uwsgi web server

# Description:       starts uwsgi using start-stop-daemon

### END INIT INFO

# Author:   licess

# website:  http://lnmp.org

PATH=/usr/local/sbin:/usr/local/bin:/sbin:/bin:/usr/sbin:/usr/bin

DESC="uwsgi daemon"

NAME=uwsgi

DAEMON=/usr/bin/uwsgi

CONFIGFILE=/usr/local/webtest/$NAME.ini

PIDFILE=/var/run/$NAME.pid

SCRIPTNAME=/etc/init.d/uwsgid

set -e

[ -x "$DAEMON" ] || exit

do_start() {

    $DAEMON $CONFIGFILE || echo -n "uwsgi already running"

}

do_stop() {

    $DAEMON --stop $PIDFILE || echo -n "uwsgi not running"

    rm -f $PIDFILE

    echo "$DAEMON STOPED."

}

do_reload() {

    $DAEMON --reload $PIDFILE || echo -n "uwsgi can't reload"

}

do_status() {

    ps aux|grep $DAEMON | grep -v grep

}

case "$1" in

 status)

    echo -en "Status $NAME: \n"

    do_status

 ;;

 start)

    echo -en "Starting $NAME: \n"

    do_start

 ;;

 stop)

    echo -en "Stopping $NAME: \n"

    do_stop

 ;;

 reload|graceful)

    echo -en "Reloading $NAME: \n"

    do_reload

 ;;

 *)

    echo "Usage: $SCRIPTNAME {start|stop|reload}" >&

    exit

 ;;

esac

exit
uwsgid
创建完成后,赋予执行权限,加入开机启动
[root@hcloud ~]# chmod +x /etc/init.d/uwsgid

[root@hcloud ~]# chkconfig --add uwsgid
[root@hcloud ~]# chkconfig --level 2345 uwsgid on
检查下
[root@hcloud ~]# chkconfig --list uwsgid

uwsgid             :off    :off    :on    :on    :on    :on    :off
启动uwsgid
[root@hcloud ~]# service uwsgid start

Starting uwsgi:

[uWSGI] getting INI configuration from /usr/local/webtest/uwsgi.ini
验证下监听端口(注:这里我们使用127.0.0.1 作监听,是为了后期在使用时,对外只有nginx可以访问web应用):
[root@hcloud ~]# netstat -aultnp | grep :

tcp               127.0.0.1:              0.0.0.0:*                   LISTEN      /uwsgi
9) 安装Nginx配置代理
先下载安装6.6的epel源
[root@hcloud ~]# wget https://dl.fedoraproject.org/pub/epel/6/x86_64/epel-release-6-8.noarch.rpm

[root@hcloud ~]# rpm -ivh epel-release--.noarch.rpm
安装nginx
[root@hcloud ~]# yum install nginx -y
安装完成后,修改nginx默认配置文件default.conf,修改之前可以先备份下源文件噢。完整内容如下:
[root@hcloud ~]# cat /etc/nginx/conf.d/default.conf

server {

        listen       ;

        server_name  192.168.30.58;

        location / {

            include  uwsgi_params;

            uwsgi_pass  127.0.0.1:;

            uwsgi_param UWSGI_SCRIPT wsgi;

            uwsgi_param UWSGI_CHDIR /usr/local/webtest;

            index  index.html index.htm;

            client_max_body_size 35m;

        }

}
以上内容代理了uwsgi的端口,客户端通过访问nginx的80端口,然后nginx在将请求转发到后台flask应用的8000端口上。
启动nginx
[root@hcloud ~]# service nginx start

Starting nginx:                                            [  OK  ]
在浏览器内测试访问一下nginx:http://192.168.30.58

最新文章
- 【原】javascript事件流
- 116、Android获取Manifest中<meta-data>元素的值
- [转]oracle pump expdp impdp使用
- github上一款特别的侧滑
- StringBuffer中的flush()方法作用
- 串行通讯之.NET SerialPort
- 【Shell脚本学习12】Shell字符串
- Improving Lock Performance in Java--reference
- Vijos1523贪吃的九头龙【树形DP】
- swipe使用及竖屏页面滚动方法
- 服务器端发送邮件签名采用Data URI scheme包含图片
- sqler sql 转rest api 的工具试用
- bzoj4980: 第一题
- LOJ.2721.[NOI2018]屠龙勇士(扩展CRT 扩展欧几里得)
- Luban 鲁班 图片压缩 MD
- Mavlink地面站编写之二--Mission Planner编译
- sql server内置存储过程、查看系统信息
- 右值引用和std::move函数(c++11)
- 关于SizeOf、Length
- Android学习系列(2)--App自动更新之通知栏下载