Spring源码分析(十八)创建bean
本文结合《Spring源码深度解析》来分析Spring 5.0.6版本的源代码。若有描述错误之处,欢迎指正。
目录
一、创建bean的实例
1. autowireConstructor
2 . instantiateBean
3 . 实例化策略
二、记录创建bean的ObjectFactory
三、属性注入
1. autowireByName
2. autowireByType
3. applyPropertyValues
四、初始化bean
1. 激活 Aware 方法
2. 处理器的应用
3. 激活自定义的 init 方法
五、注册 DisposableBean
介绍了循环依赖以及Spring中的循环依赖的处理方式后,我们继续Spring源码分析(十六)准备创建bean的内容。当经历过resolveBeforelnstantiation方法后,程序有两个选择,如果创建了代理或者说重写了InstantiationAwareBeanPostProcessor的postProcessBeforelnstantiation方法并在方法postProcessBeforelnstantiation中改变了 bean,则直接返回就可以了,否则需要进行常规bean的创建。而 这常规bean的创建就是在doCreateBean中完成的。
protected Object doCreateBean(final String beanName, final RootBeanDefinition mbd, final @Nullable Object[] args)

        throws BeanCreationException {

    // Instantiate the bean.

    BeanWrapper instanceWrapper = null;

    if (mbd.isSingleton()) {

        instanceWrapper = this.factoryBeanInstanceCache.remove(beanName);

    }

    if (instanceWrapper == null) {

        // 根据指定bean使用对应的策略创建新的实例,如:工厂方法、构造函数自动注人、简单初始化

        instanceWrapper = createBeanInstance(beanName, mbd, args);

    }

    final Object bean = instanceWrapper.getWrappedInstance();

    Class<?> beanType = instanceWrapper.getWrappedClass();

    if (beanType != NullBean.class) {

        mbd.resolvedTargetType = beanType;

    }

    // Allow post-processors to modify the merged bean definition.

    synchronized (mbd.postProcessingLock) {

        if (!mbd.postProcessed) {

            try {

                // 应用MergedBeanDefinitionPostProcessor

                applyMergedBeanDefinitionPostProcessors(mbd, beanType, beanName);

            }

            catch (Throwable ex) {

                throw new BeanCreationException(mbd.getResourceDescription(), beanName,

                        "Post-processing of merged bean definition failed", ex);

            }

            mbd.postProcessed = true;

        }

    }

    // Eagerly cache singletons to be able to resolve circular references

    // even when triggered by lifecycle interfaces like BeanFactoryAware.

    // 是否需要提早曝光:单例 & 允许循环依赖 & 当前bean正在创建中,检测循环依赖

    boolean earlySingletonExposure = (mbd.isSingleton() && this.allowCircularReferences &&

            isSingletonCurrentlyInCreation(beanName));

    if (earlySingletonExposure) {

        if (logger.isDebugEnabled()) {

            logger.debug("Eagerly caching bean '" + beanName +

                    "' to allow for resolving potential circular references");

        }

        // 为避免后期循环依赖,可以在bean初始化完成前将创建实例的ObjectFactory加入工厂

        /**

         * getEarlyBeanReference(beanName, mbd, bean)方法:

         * 对bean再一次依赖引用,主要应用SmartInstantiationAwareBeanPostProcessor

         * 其中我们熟知的AOP就是在这里将advice动态织入bean中,若没有则直接返回bean,不做任何处理

         */

        addSingletonFactory(beanName, () -> getEarlyBeanReference(beanName, mbd, bean));

    }

    // Initialize the bean instance.

    Object exposedObject = bean;

    try {

        // 对bean进行填充,将各个属性值注入,其中,可能存在依赖于其他bean的属性,则会递归初始依赖bean

        populateBean(beanName, mbd, instanceWrapper);

        // 调用初始化方法,比如init-method

        exposedObject = initializeBean(beanName, exposedObject, mbd);

    }

    catch (Throwable ex) {

        if (ex instanceof BeanCreationException && beanName.equals(((BeanCreationException) ex).getBeanName())) {

            throw (BeanCreationException) ex;

        }

        else {

            throw new BeanCreationException(

                    mbd.getResourceDescription(), beanName, "Initialization of bean failed", ex);

        }

    }

    if (earlySingletonExposure) {

        Object earlySingletonReference = getSingleton(beanName, false);

        // earlySingletonReference只有在检测到有循环依赖的情况下才会不为空

        if (earlySingletonReference != null) {

            // 如果exposedObject没有在初始化方法中被改变,也就是没有被增强

            if (exposedObject == bean) {

                exposedObject = earlySingletonReference;

            }

            else if (!this.allowRawInjectionDespiteWrapping && hasDependentBean(beanName)) {

                String[] dependentBeans = getDependentBeans(beanName);

                Set<String> actualDependentBeans = new LinkedHashSet<>(dependentBeans.length);

                for (String dependentBean : dependentBeans) {

                    // 检测依赖

                    if (!removeSingletonIfCreatedForTypeCheckOnly(dependentBean)) {

                        actualDependentBeans.add(dependentBean);

                    }

                }

                /**

                 * 因为bean创建后其所依赖的bean一定是已经创建的,actualDependentBeans不为空则表示当前bean创建后

                 * 其依赖的bean却没有全部创建完,也就是说存在循环依赖

                 */

                if (!actualDependentBeans.isEmpty()) {

                    throw new BeanCurrentlyInCreationException(beanName,

                            "Bean with name '" + beanName + "' has been injected into other beans [" +

                            StringUtils.collectionToCommaDelimitedString(actualDependentBeans) +

                            "] in its raw version as part of a circular reference, but has eventually been " +

                            "wrapped. This means that said other beans do not use the final version of the " +

                            "bean. This is often the result of over-eager type matching - consider using " +

                            "'getBeanNamesOfType' with the 'allowEagerInit' flag turned off, for example.");

                }

            }

        }

    }

    // Register bean as disposable.

    try {

        // 根据scope注册bean

        registerDisposableBeanIfNecessary(beanName, bean, mbd);

    }

    catch (BeanDefinitionValidationException ex) {

        throw new BeanCreationException(

                mbd.getResourceDescription(), beanName, "Invalid destruction signature", ex);

    }

    return exposedObject;

}
尽管日志与异常的内容非常重要,但是在阅读源码的时候似乎大部分人都会直接忽略掉。在此不深入探讨日志及异常的设计,我们看看整个函数的概要思路。
(1)如果是单例则需要首先清除缓存 。
(2)实例化 bean , 将 BeanDefinition 转换为 BeanWrapper 。转换是一个复杂的过程,但是我们可以尝试概括大致的功能,如下所示。
- 如果存在工厂方法则使用工厂方法进行初始化。
- 一个类有多个构造函数,每个构造函数都有不同的参数,所以需要根据参数锁定构造函数并进行初始化。
- 如果既不存在工厂方法也不存在带有参数的构造函数,则使用默认的构造函数进行 bean 的实例化。
(3)MergedBeanDefinitionPostProcessor的应用。
bean合并后的处理, Autowired 注解正是通过此方法实现诸如类型的预解析。
(4)依赖处理。
在 Spring 中会有循环依赖的情况,例如,当 A 中含有 B 的属性,而 B 中又含有 A 的属性时就会构成一个循环依赖,此时如果 A 和 B 都是单例,那么在 Spring 中的处理方式就是当创建 B 的时候,涉及自动注人 A 的步骤时,并不是直接去再次创建 A ,而是通过放入缓存中的ObjectFactory来创建实例,这样就解决了循环依赖的问题。
(5)属性填充。
将所有属性填充至 bean 的实例中。
(6)循环依赖检查。
之前有提到过,在 Sping 中解决循环依赖只对单例有效,而对于 prototype 的 bean , spring 没有好的解决办法,唯一要做的就是抛出异常。在这个步骤里面会检测已经加载的 bean 是否已经出现了依赖循环,并判断是否需要抛出异常。
(7)注册 DisposableBean 。
如果配置了 dcstroy-method ,这里需要注册以便一于在销毁时候调用。
(8)完成创建并返回。
可以看到上面的步骤非常的繁琐,每一步骤都使用了大量的代码来完成其功能,最复杂也是最难以理解的当属循环依赖的处理,在真正进人 doCreateBcan 前我们有必要先了解下循环依赖。
一、创建bean的实例
当我们了解了循环依赖以后就可以深入分析创建 bean 的每个步骤了,首先我们从 createBeanlnstance 开始。
protected BeanWrapper createBeanInstance(String beanName, RootBeanDefinition mbd, @Nullable Object[] args) {

    // Make sure bean class is actually resolved at this point.

    // 解析class

    Class<?> beanClass = resolveBeanClass(mbd, beanName);

    if (beanClass != null && !Modifier.isPublic(beanClass.getModifiers()) && !mbd.isNonPublicAccessAllowed()) {

        throw new BeanCreationException(mbd.getResourceDescription(), beanName,

                "Bean class isn't public, and non-public access not allowed: " + beanClass.getName());

    }

    Supplier<?> instanceSupplier = mbd.getInstanceSupplier();

    if (instanceSupplier != null) {

        return obtainFromSupplier(instanceSupplier, beanName);

    }

    // 如果工厂方法不为空则使用工厂方法初始化策略

    if (mbd.getFactoryMethodName() != null)  {

        return instantiateUsingFactoryMethod(beanName, mbd, args);

    }

    // Shortcut when re-creating the same bean...

    boolean resolved = false;

    boolean autowireNecessary = false;

    if (args == null) {

        synchronized (mbd.constructorArgumentLock) {

            // 一个类有多个构造函数,每个构造函数都有不同的参数,所以调用前需要先根据参数锁定构造函数或对应的工厂方法

            if (mbd.resolvedConstructorOrFactoryMethod != null) {

                resolved = true;

                autowireNecessary = mbd.constructorArgumentsResolved;

            }

        }

    }

    // 如果已经解析过则使用解析好的构造函数

    if (resolved) {

        if (autowireNecessary) {

            // 构造函数自动注入

            return autowireConstructor(beanName, mbd, null, null);

        }

        else {

            // 使用默认构造函数构造

            return instantiateBean(beanName, mbd);

        }

    }

    // Need to determine the constructor...

    // 需要根据参数解析构造函数

    Constructor<?>[] ctors = determineConstructorsFromBeanPostProcessors(beanClass, beanName);

    if (ctors != null ||

            mbd.getResolvedAutowireMode() == RootBeanDefinition.AUTOWIRE_CONSTRUCTOR ||

            mbd.hasConstructorArgumentValues() || !ObjectUtils.isEmpty(args))  {

        // 构造函数自动注入

        return autowireConstructor(beanName, mbd, ctors, args);

    }

    // No special handling: simply use no-arg constructor.

    // 使用默认构造函数构造

    return instantiateBean(beanName, mbd);

}
虽然代码中实例化的细节非常复杂,但是在 CreateBeanlntance 方法中我们还是可以清晰地看到实例化的逻辑的。
(1)如果在 RootBeanDefinition 中存在 factoryMethodName 属性,或者说在配置文件中配置了 factory-method,那么 Spring会尝试使用instantiateUsingFactoryMethod(beanName, mbd, args)方法根据 RootBeanDefinition 中的配置生成 bean 的实例。
(2)解析构造函数并进行构造函数的实例化。因为一个 bean 对应的类中可能会有多个构造函数,而每个构造函数的参数不同, Spring 在根据参数及类型去判断最终会使用哪个构造函数进行实例化。但是,判断的过程是个比较消耗性能的步骤,所以采用缓存机制,如果已经解析过则不需要重复解析而是直接从RootBeanDefinition中的属性resolvedConstructorOrFactoryMethod缓存的值去取,否则需要再次解析,并将解析的结果添加至RootBeanDefinition中的属性resolvedConstructorOrFactoryMethod中。
1. autowireConstructor
对于实例的创建Spring中分成了两种情况,一种是通用的实例化,另一种是带有参数的实例化。带有参数的实例化过程相当复杂,因为存在这不确定性,所以在判断对应参数上做了大量工作。
public BeanWrapper autowireConstructor(final String beanName, final RootBeanDefinition mbd,

        @Nullable Constructor<?>[] chosenCtors, @Nullable final Object[] explicitArgs) {

    BeanWrapperImpl bw = new BeanWrapperImpl();

    this.beanFactory.initBeanWrapper(bw);

    Constructor<?> constructorToUse = null;

    ArgumentsHolder argsHolderToUse = null;

    Object[] argsToUse = null;

    // explicitArgs通过getBean方法传入

    // 如果getBean方法调用的时候指定方法参数,那么直接使用

    if (explicitArgs != null) {

        argsToUse = explicitArgs;

    }

    else {

        // 如果在getBean方法调用的时候没有指定则尝试从配置文件中解析

        Object[] argsToResolve = null;

        // 尝试从缓存中获取

        synchronized (mbd.constructorArgumentLock) {

            constructorToUse = (Constructor<?>) mbd.resolvedConstructorOrFactoryMethod;

            if (constructorToUse != null && mbd.constructorArgumentsResolved) {

                // Found a cached constructor...

                // 从缓存中取

                argsToUse = mbd.resolvedConstructorArguments;

                if (argsToUse == null) {

                    // 配置的构造函数参数

                    argsToResolve = mbd.preparedConstructorArguments;

                }

            }

        }

        // 如果缓存中存在

        if (argsToResolve != null) {

            // 解析参数类型,如给定方法的构造函数A(int, int)则通过此方法后就会把配置中的("1", "1")转换为(1, 1)

            // 缓存中的值可能是原始值也可能是最终值

            argsToUse = resolvePreparedArguments(beanName, mbd, bw, constructorToUse, argsToResolve, true);

        }

    }

    // 没有被缓存

    if (constructorToUse == null) {

        // Need to resolve the constructor.

        boolean autowiring = (chosenCtors != null ||

                mbd.getResolvedAutowireMode() == RootBeanDefinition.AUTOWIRE_CONSTRUCTOR);

        ConstructorArgumentValues resolvedValues = null;

        int minNrOfArgs;

        if (explicitArgs != null) {

            minNrOfArgs = explicitArgs.length;

        }

        else {

            // 提取配置文件中的配置的构造函数参数

            ConstructorArgumentValues cargs = mbd.getConstructorArgumentValues();

            // 用于承载解析后的构造函数参数的值

            resolvedValues = new ConstructorArgumentValues();

            // 能解析到的参数个数

            minNrOfArgs = resolveConstructorArguments(beanName, mbd, bw, cargs, resolvedValues);

        }

        // Take specified constructors, if any.

        Constructor<?>[] candidates = chosenCtors;

        if (candidates == null) {

            Class<?> beanClass = mbd.getBeanClass();

            try {

                candidates = (mbd.isNonPublicAccessAllowed() ?

                        beanClass.getDeclaredConstructors() : beanClass.getConstructors());

            }

            catch (Throwable ex) {

                throw new BeanCreationException(mbd.getResourceDescription(), beanName,

                        "Resolution of declared constructors on bean Class [" + beanClass.getName() +

                        "] from ClassLoader [" + beanClass.getClassLoader() + "] failed", ex);

            }

        }

        // 排序给定的构造函数,public构造函数优先参数数量降序、非public构造函数参数数量降序

        AutowireUtils.sortConstructors(candidates);

        int minTypeDiffWeight = Integer.MAX_VALUE;

        Set<Constructor<?>> ambiguousConstructors = null;

        LinkedList<UnsatisfiedDependencyException> causes = null;

        for (Constructor<?> candidate : candidates) {

            Class<?>[] paramTypes = candidate.getParameterTypes();

            if (constructorToUse != null && argsToUse.length > paramTypes.length) {

                // 如果已经找到选用的构造函数或者需要的参数个数小于当前的构造函数参数个数则终止,因为已经按照参数个数降序排列

                // Already found greedy constructor that can be satisfied ->

                // do not look any further, there are only less greedy constructors left.

                break;

            }

            if (paramTypes.length < minNrOfArgs) {

                // 参数个数不相等

                continue;

            }

            ArgumentsHolder argsHolder;

            if (resolvedValues != null) {

                // 有参数则根据值构造对应参数类型的参数

                try {

                    // 注释上获取参数名称

                    String[] paramNames = ConstructorPropertiesChecker.evaluate(candidate, paramTypes.length);

                    if (paramNames == null) {

                        // 获取参数名称探索器

                        ParameterNameDiscoverer pnd = this.beanFactory.getParameterNameDiscoverer();

                        if (pnd != null) {

                            // 获取指定构造函数的参数名称

                            paramNames = pnd.getParameterNames(candidate);

                        }

                    }

                    // 根据名称和数据类型创建参数持有者

                    argsHolder = createArgumentArray(beanName, mbd, resolvedValues, bw, paramTypes, paramNames,

                            getUserDeclaredConstructor(candidate), autowiring, candidates.length == 1);

                }

                catch (UnsatisfiedDependencyException ex) {

                    if (logger.isTraceEnabled()) {

                        logger.trace("Ignoring constructor [" + candidate + "] of bean '" + beanName + "': " + ex);

                    }

                    // Swallow and try next constructor.

                    if (causes == null) {

                        causes = new LinkedList<>();

                    }

                    causes.add(ex);

                    continue;

                }

            }

            else {

                // Explicit arguments given -> arguments length must match exactly.

                if (paramTypes.length != explicitArgs.length) {

                    continue;

                }

                // 构造函数没有参数的情况

                argsHolder = new ArgumentsHolder(explicitArgs);

            }

            // 探测是否有不确定性的构造函数存在,例如不同构造函数的参数为父子关系

            int typeDiffWeight = (mbd.isLenientConstructorResolution() ?

                    argsHolder.getTypeDifferenceWeight(paramTypes) : argsHolder.getAssignabilityWeight(paramTypes));

            // Choose this constructor if it represents the closest match.

            // 如果它代表着当前最接近的匹配则选择作为构造函数

            if (typeDiffWeight < minTypeDiffWeight) {

                constructorToUse = candidate;

                argsHolderToUse = argsHolder;

                argsToUse = argsHolder.arguments;

                minTypeDiffWeight = typeDiffWeight;

                ambiguousConstructors = null;

            }

            else if (constructorToUse != null && typeDiffWeight == minTypeDiffWeight) {

                if (ambiguousConstructors == null) {

                    ambiguousConstructors = new LinkedHashSet<>();

                    ambiguousConstructors.add(constructorToUse);

                }

                ambiguousConstructors.add(candidate);

            }

        }

        if (constructorToUse == null) {

            if (causes != null) {

                UnsatisfiedDependencyException ex = causes.removeLast();

                for (Exception cause : causes) {

                    this.beanFactory.onSuppressedException(cause);

                }

                throw ex;

            }

            throw new BeanCreationException(mbd.getResourceDescription(), beanName,

                    "Could not resolve matching constructor " +

                    "(hint: specify index/type/name arguments for simple parameters to avoid type ambiguities)");

        }

        else if (ambiguousConstructors != null && !mbd.isLenientConstructorResolution()) {

            throw new BeanCreationException(mbd.getResourceDescription(), beanName,

                    "Ambiguous constructor matches found in bean '" + beanName + "' " +

                    "(hint: specify index/type/name arguments for simple parameters to avoid type ambiguities): " +

                    ambiguousConstructors);

        }

        if (explicitArgs == null) {

            // 将解析的构造函数加入缓存

            argsHolderToUse.storeCache(mbd, constructorToUse);

        }

    }

    try {

        final InstantiationStrategy strategy = this.beanFactory.getInstantiationStrategy();

        Object beanInstance;

        if (System.getSecurityManager() != null) {

            final Constructor<?> ctorToUse = constructorToUse;

            final Object[] argumentsToUse = argsToUse;

            beanInstance = AccessController.doPrivileged((PrivilegedAction<Object>) () ->

                    strategy.instantiate(mbd, beanName, this.beanFactory, ctorToUse, argumentsToUse),

                    this.beanFactory.getAccessControlContext());

        }

        else {

            beanInstance = strategy.instantiate(mbd, beanName, this.beanFactory, constructorToUse, argsToUse);

        }

        // 将构建的实例加入BeanWrapper中

        bw.setBeanInstance(beanInstance);

        return bw;

    }

    catch (Throwable ex) {

        throw new BeanCreationException(mbd.getResourceDescription(), beanName,

                "Bean instantiation via constructor failed", ex);

    }

}
逻辑很复杂,函数代码量很大,不知道你是否坚持读完了整个函数并理解了整个功能呢?这里要先叶个槽,笔者觉得这个函数的写法完全不符合 Spring 的一贯风格,如果你一直跟随笔者的分析思路到这里,相信你或多或少对 SPring 的编码风格有所了解, Spring的一贯做法是将复杂的逻辑分解,分成 N 个小函数的嵌套,每一层都是对下一层逻辑的总结及概要,这样使得每一层的逻辑会变得简单容易理解。在上面的函数中,包含着很多的逻辑实现,笔者觉得至少应该将逻辑封装在不同函数中而使得在 autowireConstructor 中的逻辑清晰明了。
我们总览一下整个函数,其实现的功能考虑了以下几个方面。
(1)构造函数参数的确定。
1)根据explicitArgs参数判断。
如果传人的参数explicitArgs不为空,那么可以直接确定参数,因为 explicitArgs参数是在调用 Bean 的时候用户指定的,在 BeanFactory 类中存在这样的方法:Object getBean(String name, Object... args) throws BeansException;
在获取 bean 的时候,用户不但可以指定 bean 的名称还可以指定 bean 所对应类的构造函数或者工厂方法的方法参数,主要用于静态工厂方法的调用,而这里是需要给定完全匹配的参数的,所以,便可以判断,如果传人参数 explicitArgs不为空,则可以确定构造函数参数就是它。
2)缓存中获取。
除此之外,确定参数的办法如果之前已经分析过,也就是说构造函数参数已经记录在缓存中,那么便可以直接拿来使用。而且,这里要提到的是,在缓存中缓存的可能是参数的最终类型也可能是参数的初始类型,例如:构造函数参数要求的是 int 类型,但是原始的参数值可能是 String 类型的“1” ,那么即使在缓存中得到了参数,也需要经过类型转换器的过滤以确保参数类型与对应的构造函数参数类型完全对应。
3)配置文件获取。
如果不能根据传人的参数 explicitArgs确定构造函数的参数也无法在缓存中得到相关信息,那么只能开始新一轮的分析了。
分析从获取配置文件中配置的构造函数信息开始,经过之前的分析,我们知道, Spring配置文件中的信息经过转换都会通过 BeanDefinition 实例承载,也就是参数 mbd 中包含,那么可以通过调用 mbd.getConstructorArgumentValues()来获取配置的构造函数信息。有了配置中的信息便可以获取对应的参数值信息了,获取参数值的信息包括直接指定值,如:直接指定构造函数中某个值为原始类型 String 类型,或者是一个对其他 bean 的引用,而这一处理委托给 resolveConstruotorArgumcnts 方法,并返回能解析到的参数的个数。
( 2 )构造函数的确定。
经过了第一步后已经确定了构造函数的参数,接下来的任务就是根据构造函数参数在所有构造函数中锁定对应的构造函数,而匹配的方法就是根据参数个数匹配,所以在匹配之前需要先对构造函数按照 public 构造函数优先参数数量降序、非 public 构造函数参数数量降序。这样可以在遍历的情况下迅速判断排在后面的构造函数参数个数是否符合条件。
由于在配置文件中并不是唯一限制使用参数位置索引的方式去创建,同样还支持指定参数名称进行设定参数值的情况,如< constructor-arg name = "hello" > ,那么这种情况就需要首先确定构造函数中的参数名称。
获取参数名称可以有两种方式,一种是通过注解的方式直接获取,另一种就是使用 Spring 中提供的工具类 ParameterNameDiscoverer来获取。构造函数、参数名称、参数类型、参数值都确定后就可以锁定构造函数以及转换对应的参数类型了。
(3)根据确定的构造函数转换对应的参数类型。
主要是使用Spring 中提供的类型转换器或者用户提供的自定义类型转换器进行转换。
(4)构造函数不确定性的验证。
当然,有时候即使构造函数、参数名称、参数类型、参数值都确定后也不一定会直接锁定构造函数,不同构造函数的参数为父子关系,所以 Spring 在最后又做了一次验证。
(5)根据实例化策略以及得到的构造函数及构造函数参数实例化 Bean 。后面章节中将进行讲解。
2 . instantiateBean
经历了带有参数的构造函数的实例构造,相信你会非常轻松愉快地理解不带参数的构造函数的实例化过程。
protected BeanWrapper instantiateBean(final String beanName, final RootBeanDefinition mbd) {

    try {

        Object beanInstance;

        final BeanFactory parent = this;

        if (System.getSecurityManager() != null) {

            beanInstance = AccessController.doPrivileged((PrivilegedAction<Object>) () ->

                    getInstantiationStrategy().instantiate(mbd, beanName, parent),

                    getAccessControlContext());

        }

        else {

            beanInstance = getInstantiationStrategy().instantiate(mbd, beanName, parent);

        }

        BeanWrapper bw = new BeanWrapperImpl(beanInstance);

        initBeanWrapper(bw);

        return bw;

    }

    catch (Throwable ex) {

        throw new BeanCreationException(

                mbd.getResourceDescription(), beanName, "Instantiation of bean failed", ex);

    }

}
你会发现,此方法并没有什么实质性的逻辑,带有参数的实例构造中,Spring 把精力都放在了构造函数以及参数的匹配上,所以如果没有参数的话那将是非常简单的一件事,直接调用实例化策略进行实例化就可以了。
3 . 实例化策略
实例化过程中反复提到过实例化策略,那这又是做什么用的呢?其实,经过前面的分析,我们已经得到了足以实例化的所有相关信息,完全可以使用最简单的反射方法直接反射来构造实例对象,但是 Spring 却并没有这么做。
SimpleInstantiationStrategy.java
@Override

public Object instantiate(RootBeanDefinition bd, @Nullable String beanName, BeanFactory owner) {

    // Don't override the class with CGLIB if no overrides.

    // 如果有需要覆盖或者动态替换的方法则当然需要使用cglib进行动态代码,因为可以在创建代理的同时将动态方法织入类中

    // 但是如果没有需要动态改变的方法,为了方便直接反射就可以了

    if (!bd.hasMethodOverrides()) {

        Constructor<?> constructorToUse;

        synchronized (bd.constructorArgumentLock) {

            constructorToUse = (Constructor<?>) bd.resolvedConstructorOrFactoryMethod;

            if (constructorToUse == null) {

                final Class<?> clazz = bd.getBeanClass();

                if (clazz.isInterface()) {

                    throw new BeanInstantiationException(clazz, "Specified class is an interface");

                }

                try {

                    if (System.getSecurityManager() != null) {

                        constructorToUse = AccessController.doPrivileged(

                                (PrivilegedExceptionAction<Constructor<?>>) clazz::getDeclaredConstructor);

                    }

                    else {

                        constructorToUse =    clazz.getDeclaredConstructor();

                    }

                    bd.resolvedConstructorOrFactoryMethod = constructorToUse;

                }

                catch (Throwable ex) {

                    throw new BeanInstantiationException(clazz, "No default constructor found", ex);

                }

            }

        }

        return BeanUtils.instantiateClass(constructorToUse);

    }

    else {

        // Must generate CGLIB subclass.

        return instantiateWithMethodInjection(bd, beanName, owner);

    }

}
CglibSubclassingInstantiationStrategy.java
public Object instantiate(@Nullable Constructor<?> ctor, @Nullable Object... args) {

    Class<?> subclass = createEnhancedSubclass(this.beanDefinition);

    Object instance;

    if (ctor == null) {

        instance = BeanUtils.instantiateClass(subclass);

    }

    else {

        try {

            Constructor<?> enhancedSubclassConstructor = subclass.getConstructor(ctor.getParameterTypes());

            instance = enhancedSubclassConstructor.newInstance(args);

        }

        catch (Exception ex) {

            throw new BeanInstantiationException(this.beanDefinition.getBeanClass(),

                    "Failed to invoke constructor for CGLIB enhanced subclass [" + subclass.getName() + "]", ex);

        }

    }

    // SPR-10785: set callbacks directly on the instance instead of in the

    // enhanced class (via the Enhancer) in order to avoid memory leaks.

    Factory factory = (Factory) instance;

    factory.setCallbacks(new Callback[] {NoOp.INSTANCE,

            new LookupOverrideMethodInterceptor(this.beanDefinition, this.owner),

            new ReplaceOverrideMethodInterceptor(this.beanDefinition, this.owner)});

    return instance;

}
看了上面两个函数后似乎我们已经感受到了 Spring 的良苦用心以及为了能更方便地使用 Spring 而做了大量的工作。程序中,首先判断如果 bd.hasMethodOverrides为空也就是用户没有使用 replace 或者 lookup的配置方法,那么直接使用反射的方式,简单快捷,但是如果使用了这两个特性,在直接使用反射的方式创建实例就不妥了,因为需要将这两个配置提供的功能切入进去,所以就必须要使用动态代理的方式将包含两个特性所对应的逻辑的拦截增强器设置进去,这样才可以保证在调用方法的时候会被相应的拦截器增强,返回值为包含拦截器的代理实例。
二、记录创建bean的ObjectFactory
在doCreate函数中有这样一段代码:
boolean earlySingletonExposure = (mbd.isSingleton() && this.allowCircularReferences &&

        isSingletonCurrentlyInCreation(beanName));

if (earlySingletonExposure) {

    if (logger.isDebugEnabled()) {

        logger.debug("Eagerly caching bean '" + beanName +

                "' to allow for resolving potential circular references");

    }

    // 为避免后期循环依赖,可以在bean初始化完成前将创建实例的ObjectFactory加入工厂

    /**

     * getEarlyBeanReference(beanName, mbd, bean)方法:

     * 对bean再一次依赖引用,主要应用SmartInstantiationAwareBeanPostProcessor

     * 其中我们熟知的AOP就是在这里将advice动态织入bean中,若没有则直接返回bean,不做任何处理

     */

    addSingletonFactory(beanName, () -> getEarlyBeanReference(beanName, mbd, bean));

}
这段代码不是很复杂,但是很多人不是太理解这段代码的作用,而且,这段代码仅从此函数中去理解也很难弄懂其中的含义,我们需要从全局的角度去思考 Spring 的依赖解决办法。
- earlySingletonExposure :从字面的意思理解就是提早曝光的单例,我们暂不定义它的学名叫什么,我们感兴趣的是有哪些条件影响这个值。
- mbd.isSingleton() :没有太多可以解释的,此 RootBeanDefinition 代表的是否是单例。
- this.allowCircularReferences :是否允许循环依赖,很抱歉,并没有找到在配置文件中如何配置,但是在 AbstractRefreshableApplicationContext 中提供了设置函数,可以通过硬编码的方式进行设置或者可以通过自定义命名空间进行配置,其中硬编码的方式代码如下。
ClassPathXmlApplicationContext bf = ClassPathXmlApplicationContext("aspectTest.xml" ); bt.setAllowBeanDefinitionOverriding(false);
- isSingletonCurrentlylncreation(beanName) :该 bean 是否在创建中。在 Spring 中,会有个专门的属性默认为 DefaultSingletonBeanRegistry的 singletonsCurrentlylnCreation 来记录 bean 的加载状态,在 bean 开始创建前会将 beanName 记录在属性中,在 bean 创建结束后会将 beanName 从属性中移除。那么我们跟随代码一路走来可是对这个属性的记录并没有多少印象,这个状态是在哪里记录的呢?不同 scope 的记录位置并不一样,我们以 singleton 为例,在 singleton 下记录属性的函数是在 DefaultSingletonBeanRegistry的 public Object getSingleton(String beanName, ObjectFactory singletonFactory)函数的 beforeSingletonCreation(beanName)和 afterSingletonCreation(beanName)中,在这两段函数中分别this.singletonCurrentlylnCreation.add(beanName)与 this.singletonCurrentlylnCreation.remove(beanName)来进行状态的记录与移除。
经过以上分析我们了解变量 earl earlySingletonExposure 是否是单例、是否允许循环依赖、是否对应的 bean 正在创建的条件的综合。当这 3 个条件都满足时会执行 addSingletonFactory操作,那么加入 SingletonFactory的作用是什么呢?又是在什么时候调用呢?
我们还是以最简单的AB循环依赖为例,类A中含有属性类B,而类B中又会含有属性类A,那么初始化beanA的过程如下图所示:
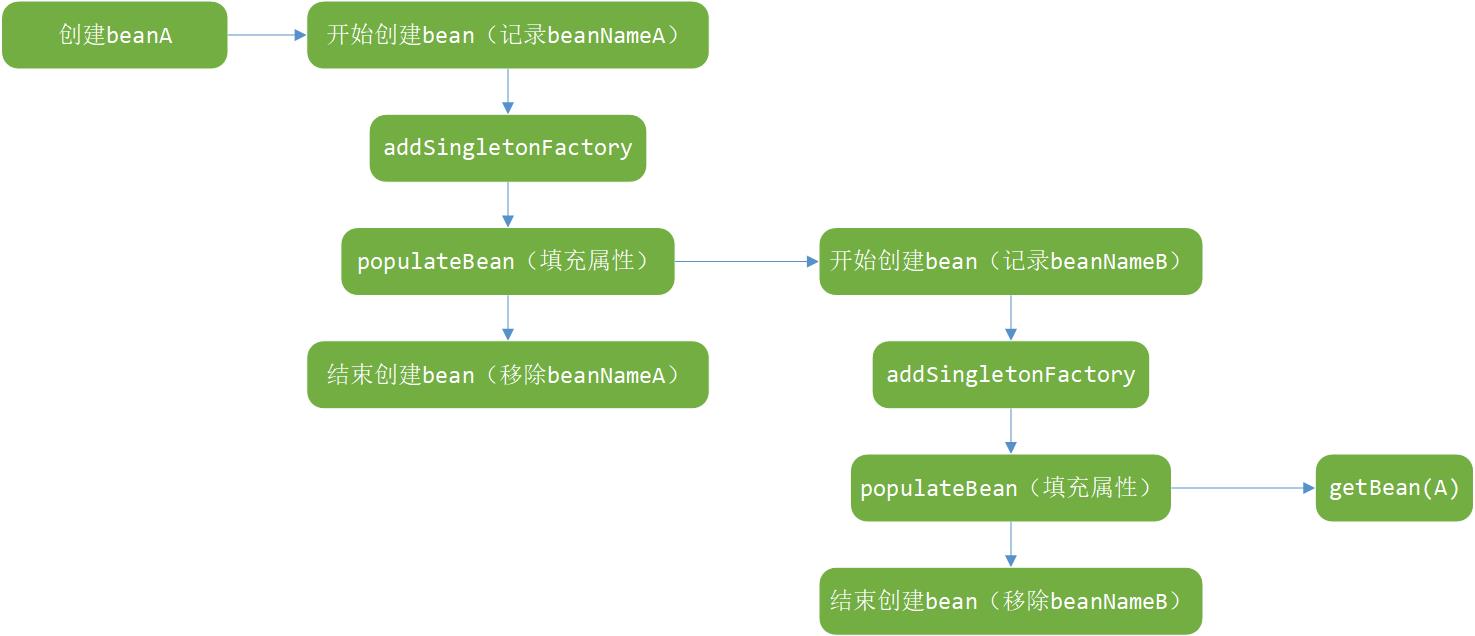
上图展示了创建 beanA 的流程,图中我们看到,在创建 A 的时候首先会记录类 A 所对应的 beanName,并将beanA的创建工厂加入缓存中,而在对 A的属性填充也就是调用populate方法的时候又会再一次的对 B 进行递归创建。同样的,因为在 B 中同样存在 A 属性,因此在实例化 B 的的 populate 方法中又会再次地初始化 A ,也就是图形的最后,调用 getBean(A)。关键是在这里,有心的同学可以去找找这个代码的实现方式,我们之前已经讲过,在这个函数中并不是直接去实例化 A ,而是先去检测缓存中是否有已经创建好的对应的 bean ,或者是否已经创建好的 ObjectFactory,而此时对于A的 ObjectFactory我们早已经创建,所以便不会再去向后执行,而是直接调用 ObjectFactory去创建 A 。这里最关键的是 ObjectFactory的实现。
/**

 * getEarlyBeanReference(beanName, mbd, bean)方法:

 * 对bean再一次依赖引用,主要应用SmartInstantiationAwareBeanPostProcessor

 * 其中我们熟知的AOP就是在这里将advice动态织入bean中,若没有则直接返回bean,不做任何处理

 */

addSingletonFactory(beanName, () -> getEarlyBeanReference(beanName, mbd, bean));
其中getEarlyBeanReference的代码如下:
protected Object getEarlyBeanReference(String beanName, RootBeanDefinition mbd, Object bean) {

    Object exposedObject = bean;

    if (!mbd.isSynthetic() && hasInstantiationAwareBeanPostProcessors()) {

        for (BeanPostProcessor bp : getBeanPostProcessors()) {

            if (bp instanceof SmartInstantiationAwareBeanPostProcessor) {

                SmartInstantiationAwareBeanPostProcessor ibp = (SmartInstantiationAwareBeanPostProcessor) bp;

                exposedObject = ibp.getEarlyBeanReference(exposedObject, beanName);

            }

        }

    }

    return exposedObject;

}
在 getEarlyBeanReference 函数中并没有太多的逻辑处理,或者说除了后处理器的调用外没有别的处理工作,根据以上分析,基本可以理清 spring 处理循环依赖的解决办法,在 B 中创建依赖 A 时通过 ObjectFactory 提供的实例化方法来中断 A 中的属性填充,使 B 中持有的 A 仅仅是刚刚初始化并没有填充任何属性的 A ,而这正初始化 A 的步骤还是在最开始创建 A 的时候进行的,但是因为 A 与 B 中的 A 所表示的属性地址是一样的,所以在 A 中创建好的属性填充自然可以通过 B 中的 A 获取,这样就解决了循环依赖的问题。
三、属性注入
在了解循环依赖的时候,我们曾经反复提到了 populateBean 这个函数,也多少了解了这个函数的主要功能就是属性填充,那么究竟是如何实现填充的呢?
protected void populateBean(String beanName, RootBeanDefinition mbd, @Nullable BeanWrapper bw) {

    if (bw == null) {

        if (mbd.hasPropertyValues()) {

            throw new BeanCreationException(

                    mbd.getResourceDescription(), beanName, "Cannot apply property values to null instance");

        }

        else {

            // Skip property population phase for null instance.

            // 没有可填充的属性

            return;

        }

    }

    // Give any InstantiationAwareBeanPostProcessors the opportunity to modify the

    // state of the bean before properties are set. This can be used, for example,

    // to support styles of field injection.

    // 给InstantiationAwareBeanPostProcessors最后一次机会在属性设置前来改变bean

    // 如:可以用来支持属性注入的类型

    boolean continueWithPropertyPopulation = true;

    if (!mbd.isSynthetic() && hasInstantiationAwareBeanPostProcessors()) {

        for (BeanPostProcessor bp : getBeanPostProcessors()) {

            if (bp instanceof InstantiationAwareBeanPostProcessor) {

                InstantiationAwareBeanPostProcessor ibp = (InstantiationAwareBeanPostProcessor) bp;

                // 返回值为是否继续填充bean

                if (!ibp.postProcessAfterInstantiation(bw.getWrappedInstance(), beanName)) {

                    continueWithPropertyPopulation = false;

                    break;

                }

            }

        }

    }

    // 如果后处理器发出停止填充命令则终止后续的执行

    if (!continueWithPropertyPopulation) {

        return;

    }

    PropertyValues pvs = (mbd.hasPropertyValues() ? mbd.getPropertyValues() : null);

    if (mbd.getResolvedAutowireMode() == RootBeanDefinition.AUTOWIRE_BY_NAME ||

            mbd.getResolvedAutowireMode() == RootBeanDefinition.AUTOWIRE_BY_TYPE) {

        MutablePropertyValues newPvs = new MutablePropertyValues(pvs);

        // Add property values based on autowire by name if applicable.

        // 根据名称自动注入

        if (mbd.getResolvedAutowireMode() == RootBeanDefinition.AUTOWIRE_BY_NAME) {

            autowireByName(beanName, mbd, bw, newPvs);

        }

        // Add property values based on autowire by type if applicable.

        // 根据类型自动注入

        if (mbd.getResolvedAutowireMode() == RootBeanDefinition.AUTOWIRE_BY_TYPE) {

            autowireByType(beanName, mbd, bw, newPvs);

        }

        pvs = newPvs;

    }

    // 后处理器已经初始化

    boolean hasInstAwareBpps = hasInstantiationAwareBeanPostProcessors();

    // 需要依赖检查

    boolean needsDepCheck = (mbd.getDependencyCheck() != RootBeanDefinition.DEPENDENCY_CHECK_NONE);

    PropertyDescriptor[] filteredPds = null;

    if (hasInstAwareBpps) {

        if (pvs == null) {

            pvs = mbd.getPropertyValues();

        }

        for (BeanPostProcessor bp : getBeanPostProcessors()) {

            if (bp instanceof InstantiationAwareBeanPostProcessor) {

                InstantiationAwareBeanPostProcessor ibp = (InstantiationAwareBeanPostProcessor) bp;

                PropertyValues pvsToUse = ibp.postProcessProperties(pvs, bw.getWrappedInstance(), beanName);

                if (pvsToUse == null) {

                    if (filteredPds == null) {

                        filteredPds = filterPropertyDescriptorsForDependencyCheck(bw, mbd.allowCaching);

                    }

                    // 对所有需要依赖检查的属性进行后处理

                    pvsToUse = ibp.postProcessPropertyValues(pvs, filteredPds, bw.getWrappedInstance(), beanName);

                    if (pvsToUse == null) {

                        return;

                    }

                }

                pvs = pvsToUse;

            }

        }

    }

    if (needsDepCheck) {

        // 依赖检查,对应depend-on属性,3.0已经弃用此属性

        if (filteredPds == null) {

            filteredPds = filterPropertyDescriptorsForDependencyCheck(bw, mbd.allowCaching);

        }

        checkDependencies(beanName, mbd, filteredPds, pvs);

    }

    if (pvs != null) {

        // 将属性应用到bean中

        applyPropertyValues(beanName, mbd, bw, pvs);

    }

}
在 populateBean 函数中提供了这样的处理流程。
(1)InstantiationAwareBeanPostProcessor处理器的postProcessAfterInstantiation函数的应用,此函数可以控制程序是否继续进行属性填充。
(2)根据注入类型(byName/byType) ,提取依赖的 bean ,并统一存入 PropertyValues 中。
(3)应用InstantiationAwareBeanPostProcessor 处理器的postProcessPropertyValues方法,对属性获取完毕填充前对属性的再次处理,典型应用是 RequiredAnnotationBeanPostProccssor 类中对属性的验证。
(4)将所有PropertyValues中的属性填充至 BeanWrapper中。
在上面的步骤中有几个地方是我们比较感兴趣的,它们分别是依赖注人(autowireByName/autowireByType)以及属性填充,那么,接下来进一步分析这几个功能的实现细节。
1. autowireByName
上文提到根据注人类型(byName/byType) ,提取依赖的 bean ,并统一存入PropertyValues中,那么我们首先了解下 byName 功能是如何实现的。
protected void autowireByName(

        String beanName, AbstractBeanDefinition mbd, BeanWrapper bw, MutablePropertyValues pvs) {

    // 寻找bw中需要依赖注入的属性

    String[] propertyNames = unsatisfiedNonSimpleProperties(mbd, bw);

    for (String propertyName : propertyNames) {

        if (containsBean(propertyName)) {

            // 递归初始化相关的bean

            Object bean = getBean(propertyName);

            pvs.add(propertyName, bean);

            // 注册依赖

            registerDependentBean(propertyName, beanName);

            if (logger.isDebugEnabled()) {

                logger.debug("Added autowiring by name from bean name '" + beanName +

                        "' via property '" + propertyName + "' to bean named '" + propertyName + "'");

            }

        }

        else {

            if (logger.isTraceEnabled()) {

                logger.trace("Not autowiring property '" + propertyName + "' of bean '" + beanName +

                        "' by name: no matching bean found");

            }

        }

    }

}
如果读者之前了解过autowire的使用方法,相信理解这个函数的功能不会太困难,无非是在传入参数pvs中找出已经加载的bean,并递归实例化,进而加入到pvs中。
2. autowireByType
autowireByName与autowireByType对于我们理解与使用来说复杂程度都很相似,但是其实现功能的复杂度却完全不一样。
protected void autowireByType(

        String beanName, AbstractBeanDefinition mbd, BeanWrapper bw, MutablePropertyValues pvs) {

    TypeConverter converter = getCustomTypeConverter();

    if (converter == null) {

        converter = bw;

    }

    Set<String> autowiredBeanNames = new LinkedHashSet<>(4);

    // 寻找bw中需要依赖注入的属性

    String[] propertyNames = unsatisfiedNonSimpleProperties(mbd, bw);

    for (String propertyName : propertyNames) {

        try {

            PropertyDescriptor pd = bw.getPropertyDescriptor(propertyName);

            // Don't try autowiring by type for type Object: never makes sense,

            // even if it technically is a unsatisfied, non-simple property.

            if (Object.class != pd.getPropertyType()) {

                // 探测指定属性的set方法

                MethodParameter methodParam = BeanUtils.getWriteMethodParameter(pd);

                // Do not allow eager init for type matching in case of a prioritized post-processor.

                boolean eager = !PriorityOrdered.class.isInstance(bw.getWrappedInstance());

                DependencyDescriptor desc = new AutowireByTypeDependencyDescriptor(methodParam, eager);

                // 解析指定beanName的属性所匹配的值,并把解析到的属性名称存储在autowiredBeanNames中,如:

                // @Autowired private List<A> list; 将会找到所有匹配A类型的bean并将其注入

                Object autowiredArgument = resolveDependency(desc, beanName, autowiredBeanNames, converter);

                if (autowiredArgument != null) {

                    pvs.add(propertyName, autowiredArgument);

                }

                for (String autowiredBeanName : autowiredBeanNames) {

                    // 注册依赖

                    registerDependentBean(autowiredBeanName, beanName);

                    if (logger.isDebugEnabled()) {

                        logger.debug("Autowiring by type from bean name '" + beanName + "' via property '" +

                                propertyName + "' to bean named '" + autowiredBeanName + "'");

                    }

                }

                autowiredBeanNames.clear();

            }

        }

        catch (BeansException ex) {

            throw new UnsatisfiedDependencyException(mbd.getResourceDescription(), beanName, propertyName, ex);

        }

    }

}
实现根据名称自动匹配的第一步就是寻找 bw 中需要依赖注入的属性,同样对于根据类型自动匹配的实现来讲第一步也是寻找 bw 中需要依赖注入的属性,然后遍历这些属性并寻找类型匹配的 bean ,其中最复杂的就是寻找类型匹配的 bean。同时,Spri ng 中提供了对集合的类型注人的支持,如使川注解的方式:
@Autowired

private List<Test> tests;
Spring 将会把所有与 Test 匹配的类型找出来并注人到 tests 属性中,正是由于这一因素,所以在 autowireByType 函数中,新建了局部遍历 autowiredBeanNames,用于存储所有依赖的 bean ,如果只是对非集合类的属性注人来说,此属性并无用处。
对于寻找类型匹配的逻辑实现封装在了 resolveDependency 函数中。
@Override

@Nullable

public Object resolveDependency(DependencyDescriptor descriptor, @Nullable String requestingBeanName,

        @Nullable Set<String> autowiredBeanNames, @Nullable TypeConverter typeConverter) throws BeansException {

    descriptor.initParameterNameDiscovery(getParameterNameDiscoverer());

    if (Optional.class == descriptor.getDependencyType()) {

        return createOptionalDependency(descriptor, requestingBeanName);

    }

    else if (ObjectFactory.class == descriptor.getDependencyType() ||

            ObjectProvider.class == descriptor.getDependencyType()) {

        // ObjectFactory类注入的特殊处理

        return new DependencyObjectProvider(descriptor, requestingBeanName);

    }

    else if (javaxInjectProviderClass == descriptor.getDependencyType()) {

        // javaxInjectProviderClass类注入的特殊处理

        return new Jsr330Factory().createDependencyProvider(descriptor, requestingBeanName);

    }

    else {

        Object result = getAutowireCandidateResolver().getLazyResolutionProxyIfNecessary(

                descriptor, requestingBeanName);

        if (result == null) {

            // 通用处理逻辑

            result = doResolveDependency(descriptor, requestingBeanName, autowiredBeanNames, typeConverter);

        }

        return result;

    }

}

@Nullable

public Object doResolveDependency(DependencyDescriptor descriptor, @Nullable String beanName,

        @Nullable Set<String> autowiredBeanNames, @Nullable TypeConverter typeConverter) throws BeansException {

    InjectionPoint previousInjectionPoint = ConstructorResolver.setCurrentInjectionPoint(descriptor);

    try {

        Object shortcut = descriptor.resolveShortcut(this);

        if (shortcut != null) {

            return shortcut;

        }

        Class<?> type = descriptor.getDependencyType();

        // 用于支持Spring中新增的注解@Value

        Object value = getAutowireCandidateResolver().getSuggestedValue(descriptor);

        if (value != null) {

            if (value instanceof String) {

                String strVal = resolveEmbeddedValue((String) value);

                BeanDefinition bd = (beanName != null && containsBean(beanName) ? getMergedBeanDefinition(beanName) : null);

                value = evaluateBeanDefinitionString(strVal, bd);

            }

            TypeConverter converter = (typeConverter != null ? typeConverter : getTypeConverter());

            return (descriptor.getField() != null ?

                    converter.convertIfNecessary(value, type, descriptor.getField()) :

                    converter.convertIfNecessary(value, type, descriptor.getMethodParameter()));

        }

        Object multipleBeans = resolveMultipleBeans(descriptor, beanName, autowiredBeanNames, typeConverter);

        if (multipleBeans != null) {

            return multipleBeans;

        }

        // 根据属性类型找到beanFactory中所有类型的匹配bean,

        // 返回值的构成为:key=匹配的beanName, value=beanName对应的实例化后的bean(通过getBean(beanName)返回)

        Map<String, Object> matchingBeans = findAutowireCandidates(beanName, type, descriptor);

        if (matchingBeans.isEmpty()) {

            // 如果autowire的require属性为true而找到的匹配项却为空则只能抛出异常

            if (isRequired(descriptor)) {

                raiseNoMatchingBeanFound(type, descriptor.getResolvableType(), descriptor);

            }

            return null;

        }

        String autowiredBeanName;

        Object instanceCandidate;

        if (matchingBeans.size() > 1) {

            autowiredBeanName = determineAutowireCandidate(matchingBeans, descriptor);

            if (autowiredBeanName == null) {

                if (isRequired(descriptor) || !indicatesMultipleBeans(type)) {

                    return descriptor.resolveNotUnique(descriptor.getResolvableType(), matchingBeans);

                }

                else {

                    // In case of an optional Collection/Map, silently ignore a non-unique case:

                    // possibly it was meant to be an empty collection of multiple regular beans

                    // (before 4.3 in particular when we didn't even look for collection beans).

                    return null;

                }

            }

            instanceCandidate = matchingBeans.get(autowiredBeanName);

        }

        else {

            // We have exactly one match.

            // 已经可以确定只有一个匹配项

            Map.Entry<String, Object> entry = matchingBeans.entrySet().iterator().next();

            autowiredBeanName = entry.getKey();

            instanceCandidate = entry.getValue();

        }

        if (autowiredBeanNames != null) {

            autowiredBeanNames.add(autowiredBeanName);

        }

        if (instanceCandidate instanceof Class) {

            instanceCandidate = descriptor.resolveCandidate(autowiredBeanName, type, this);

        }

        Object result = instanceCandidate;

        if (result instanceof NullBean) {

            if (isRequired(descriptor)) {

                raiseNoMatchingBeanFound(type, descriptor.getResolvableType(), descriptor);

            }

            result = null;

        }

        if (!ClassUtils.isAssignableValue(type, result)) {

            throw new BeanNotOfRequiredTypeException(autowiredBeanName, type, instanceCandidate.getClass());

        }

        return result;

    }

    finally {

        ConstructorResolver.setCurrentInjectionPoint(previousInjectionPoint);

    }

}
寻找类型的匹配执行顺序时,首先尝试使用解析器进行解析,如果解析器没有成功解析,那么可能是使用默认的解析器没有做任何处理,或者是使用了自定义的解析器,但是对于集合等类型来说并不在解析范围之内,所以再次对不同类型进行不同情况的处理,虽说对于不同类型处理方式不一致,但是大致的思路还是很相似的,所以函数中只对数组类型进行了详细地注释。
3. applyPropertyValues
程序运行到这里,已经完成了对所有注人属性的获取,但是获取的属性是以 PropertyValues形式存在的,还并没有应用到已经实例化的 bean 中,这一工作是在applyPropertyValues中。
protected void applyPropertyValues(String beanName, BeanDefinition mbd, BeanWrapper bw, PropertyValues pvs) {

    if (pvs.isEmpty()) {

        return;

    }

    if (System.getSecurityManager() != null && bw instanceof BeanWrapperImpl) {

        ((BeanWrapperImpl) bw).setSecurityContext(getAccessControlContext());

    }

    MutablePropertyValues mpvs = null;

    List<PropertyValue> original;

    if (pvs instanceof MutablePropertyValues) {

        mpvs = (MutablePropertyValues) pvs;

        // 如果mpvs中的值已经被转换为对应的类型,那么可以直接设置到beanWrapper中

        if (mpvs.isConverted()) {

            // Shortcut: use the pre-converted values as-is.

            try {

                bw.setPropertyValues(mpvs);

                return;

            }

            catch (BeansException ex) {

                throw new BeanCreationException(

                        mbd.getResourceDescription(), beanName, "Error setting property values", ex);

            }

        }

        original = mpvs.getPropertyValueList();

    }

    else {

        // 如果pvs并不是使用MutablePropertyValues封装的类型,那么直接使用原始的属性获取方法

        original = Arrays.asList(pvs.getPropertyValues());

    }

    TypeConverter converter = getCustomTypeConverter();

    if (converter == null) {

        converter = bw;

    }

    // 获取对应的解析器

    BeanDefinitionValueResolver valueResolver = new BeanDefinitionValueResolver(this, beanName, mbd, converter);

    // Create a deep copy, resolving any references for values.

    List<PropertyValue> deepCopy = new ArrayList<>(original.size());

    boolean resolveNecessary = false;

    // 遍历属性,将属性转换为对应类的对应属性的类型

    for (PropertyValue pv : original) {

        if (pv.isConverted()) {

            deepCopy.add(pv);

        }

        else {

            String propertyName = pv.getName();

            Object originalValue = pv.getValue();

            Object resolvedValue = valueResolver.resolveValueIfNecessary(pv, originalValue);

            Object convertedValue = resolvedValue;

            boolean convertible = bw.isWritableProperty(propertyName) &&

                    !PropertyAccessorUtils.isNestedOrIndexedProperty(propertyName);

            if (convertible) {

                convertedValue = convertForProperty(resolvedValue, propertyName, bw, converter);

            }

            // Possibly store converted value in merged bean definition,

            // in order to avoid re-conversion for every created bean instance.

            if (resolvedValue == originalValue) {

                if (convertible) {

                    pv.setConvertedValue(convertedValue);

                }

                deepCopy.add(pv);

            }

            else if (convertible && originalValue instanceof TypedStringValue &&

                    !((TypedStringValue) originalValue).isDynamic() &&

                    !(convertedValue instanceof Collection || ObjectUtils.isArray(convertedValue))) {

                pv.setConvertedValue(convertedValue);

                deepCopy.add(pv);

            }

            else {

                resolveNecessary = true;

                deepCopy.add(new PropertyValue(pv, convertedValue));

            }

        }

    }

    if (mpvs != null && !resolveNecessary) {

        mpvs.setConverted();

    }

    // Set our (possibly massaged) deep copy.

    try {

        bw.setPropertyValues(new MutablePropertyValues(deepCopy));

    }

    catch (BeansException ex) {

        throw new BeanCreationException(

                mbd.getResourceDescription(), beanName, "Error setting property values", ex);

    }

}
四、初始化bean
大家应该记得在 bean 配置时 bean 中有一个 init-method 的属性,这个属性的作用是在 bean 实例化前调用 init-method 指定的方法来根据用户业务进行相应的实例化。我们现在就已经进入这个方法了,首先看一下这个方法的执行位置, Spring 中程序已经执行过 bean 的实例化,并且进行了属性的填充,而就在这时将会调用用户设定的初始化方法。
protected Object initializeBean(final String beanName, final Object bean, @Nullable RootBeanDefinition mbd) {

    if (System.getSecurityManager() != null) {

        AccessController.doPrivileged((PrivilegedAction<Object>) () -> {

            invokeAwareMethods(beanName, bean);

            return null;

        }, getAccessControlContext());

    }

    else {

        // 对特殊bean处理:Aware、BeanClassLoaderAware、BeanFactoryAware

        invokeAwareMethods(beanName, bean);

    }

    Object wrappedBean = bean;

    if (mbd == null || !mbd.isSynthetic()) {

        // 应用后处理器

        wrappedBean = applyBeanPostProcessorsBeforeInitialization(wrappedBean, beanName);

    }

    try {

        // 激活用户自定义的init方法

        invokeInitMethods(beanName, wrappedBean, mbd);

    }

    catch (Throwable ex) {

        throw new BeanCreationException(

                (mbd != null ? mbd.getResourceDescription() : null),

                beanName, "Invocation of init method failed", ex);

    }

    if (mbd == null || !mbd.isSynthetic()) {

        // 后处理器应用

        wrappedBean = applyBeanPostProcessorsAfterInitialization(wrappedBean, beanName);

    }

    return wrappedBean;

}
虽然说此函数的主要日的是进行客户设定的初始化方法的调用,但是除此之外还有些其他必要的工作。
1. 激活 Aware 方法
在分析其原理之前,我们先了解一下 Aware 的使用。 Spring 中提供一些 Aware 相关接口,比如BeanFactoryAware、 ApplicationContextWware 、ResourceLoaderAware 、ServletContextWware 等,实现这些Aware 接口的 bean 在被初始之后,可以取得一些相对应的资源,例如实现BeanFactoryAware的bean在初始后, Spring 容器将会注入BeanFactory的实例,而实现ApplicationContextWware的 bean,在 bean 被初始后,将会被注入 ApplicationContext 的实例等。我们首先通过示例方法来了解一下 Aware 的使用。
(1)定义普通 bean 。
public class Hello {

    public void say() {

        System.out.println("hello");

    }

}
(2)定义BeanFactoryAware类型的bean。
public class HelloBeanFactory implements BeanFactoryAware {

    private BeanFactory beanFactory;

    // 声明bean的时候Spring会自动注入BeanFactory

    @Override

    public void setBeanFactory(BeanFactory beanFactory) throws BeansException {

        this.beanFactory = beanFactory;

    }

    public void testAware() {

        // 通过hello这个bean id从beanFactory获取实例

        Hello hello = (Hello) beanFactory.getBean("hello");

        hello.say();

    }

}
(3)使用main方法测试。
public static void main(String[] args) {

    ApplicationContext context = new ClassPathXmlApplicationContext("applicationContext.xml");

    HelloBeanFactory factory = (HelloBeanFactory) context.getBean("factory");

    factory.testAware();

}
测试类运行,控制台输出:
hello
按照上面的方法我们可以获取到Spring中BeanFactory,并且可以根据 BeanFactory获取所有 bean,以及进行相关设置。当然还有其他 Aware 的使用方法都大同小异,看一下Spring 的实现方式,相信读者便会使用了。
private void invokeAwareMethods(final String beanName, final Object bean) {

    if (bean instanceof Aware) {

        if (bean instanceof BeanNameAware) {

            ((BeanNameAware) bean).setBeanName(beanName);

        }

        if (bean instanceof BeanClassLoaderAware) {

            ClassLoader bcl = getBeanClassLoader();

            if (bcl != null) {

                ((BeanClassLoaderAware) bean).setBeanClassLoader(bcl);

            }

        }

        if (bean instanceof BeanFactoryAware) {

            ((BeanFactoryAware) bean).setBeanFactory(AbstractAutowireCapableBeanFactory.this);

        }

    }

}
代码简单得已经没有什么好说的了。读者可以自己尝试使用别的 Aware,都比较简单。
2 . 处理器的应用
BeanPostProcessor 相信大家都不陌生,这是 Spring 中开放式架构中一个必不可少的亮点,给用户充足的权限去更改或者扩展 Spring ,而除了 BeanPostProcessor 外还有很多其他的 PostProcessor,当然大部分都是以此为基础,继承自BeanPostProcessor。 BeanPostProcessor的使用位置就是这里,在调用客户自定义初始化方法前以及调用自定义初始化方法后分别会调用 BeanPostProcessor 的 postProcessBeforelnitialization 和postProcessAfterlnitialization 方法,使用户可以根据自己的业务需求进行相应的处理。
@Override

public Object applyBeanPostProcessorsBeforeInitialization(Object existingBean, String beanName)

        throws BeansException {

    Object result = existingBean;

    for (BeanPostProcessor beanProcessor : getBeanPostProcessors()) {

        Object current = beanProcessor.postProcessBeforeInitialization(result, beanName);

        if (current == null) {

            return result;

        }

        result = current;

    }

    return result;

}

@Override

public Object applyBeanPostProcessorsAfterInitialization(Object existingBean, String beanName)

        throws BeansException {

    Object result = existingBean;

    for (BeanPostProcessor beanProcessor : getBeanPostProcessors()) {

        Object current = beanProcessor.postProcessAfterInitialization(result, beanName);

        if (current == null) {

            return result;

        }

        result = current;

    }

    return result;

}
3. 激活自定义的 init 方法
客户定制的初始化方法除了我们熟知的使用配置 init-method 外,还有使自定义的 bean 实现InitializingBean接口,并在afterPropertiesSet中实现自己的初始化业务逻辑。
init-method 与afterPropertiesSet都是在初始化 bean 时执行,执行顺序是 afterPropertiesSet先执行,而 init-method 后执行。
在invokeInitMethods方法中就实现了这两个步骤的初始化方法调用。
protected void invokeInitMethods(String beanName, final Object bean, @Nullable RootBeanDefinition mbd)

        throws Throwable {

    // 首先会检查是否是InitializingBean,如果是,需要调用afterPropertiesSet方法

    boolean isInitializingBean = (bean instanceof InitializingBean);

    if (isInitializingBean && (mbd == null || !mbd.isExternallyManagedInitMethod("afterPropertiesSet"))) {

        if (logger.isDebugEnabled()) {

            logger.debug("Invoking afterPropertiesSet() on bean with name '" + beanName + "'");

        }

        if (System.getSecurityManager() != null) {

            try {

                AccessController.doPrivileged((PrivilegedExceptionAction<Object>) () -> {

                    ((InitializingBean) bean).afterPropertiesSet();

                    return null;

                }, getAccessControlContext());

            }

            catch (PrivilegedActionException pae) {

                throw pae.getException();

            }

        }

        else {

            // 属性初始化后的处理

            ((InitializingBean) bean).afterPropertiesSet();

        }

    }

    if (mbd != null && bean.getClass() != NullBean.class) {

        String initMethodName = mbd.getInitMethodName();

        if (StringUtils.hasLength(initMethodName) &&

                !(isInitializingBean && "afterPropertiesSet".equals(initMethodName)) &&

                !mbd.isExternallyManagedInitMethod(initMethodName)) {

            // 调用自定义初始化方法

            invokeCustomInitMethod(beanName, bean, mbd);

        }

    }

}
五、注册 DisposableBean
Spring 中不但提供了对于初始化方法的扩展入口,同样也提供了销毁方法的扩展入口,对于销毁方法的扩展,除了我们熟知的配置属性 destroy-method 方法外,用户还叮以注册后处理器DestructionAwareBeanPostProcessor来统一处理 bean 的销毁方法,代码如下:
protected void registerDisposableBeanIfNecessary(String beanName, Object bean, RootBeanDefinition mbd) {

    AccessControlContext acc = (System.getSecurityManager() != null ? getAccessControlContext() : null);

    if (!mbd.isPrototype() && requiresDestruction(bean, mbd)) {

        if (mbd.isSingleton()) {

            // Register a DisposableBean implementation that performs all destruction

            // work for the given bean: DestructionAwareBeanPostProcessors,

            // DisposableBean interface, custom destroy method.

            // 单例模式下注册需要销毁的bean,此方法中会处理实现DisposableBean的bean,

            // 并且对所有bean使用DestructionAwareBeanPostProcessor处理

            registerDisposableBean(beanName,

                    new DisposableBeanAdapter(bean, beanName, mbd, getBeanPostProcessors(), acc));

        }

        else {

            // A bean with a custom scope...

            // 自定义scope的处理

            Scope scope = this.scopes.get(mbd.getScope());

            if (scope == null) {

                throw new IllegalStateException("No Scope registered for scope name '" + mbd.getScope() + "'");

            }

            scope.registerDestructionCallback(beanName,

                    new DisposableBeanAdapter(bean, beanName, mbd, getBeanPostProcessors(), acc));

        }

    }

}
最新文章
- ASP.NET MVC搭建项目后台UI框架—7、统计报表
- 如何查看当前使用的Entity Framework版本
- osg绘制一个球体
- Oracle 字符串分割排序冒泡算法
- C语言。自定义函数简单版
- Node.js 学习(七)Node项目部署工具之forever
- JS This关键字
- Objective-C 【多态】
- MFC socket网络通讯核心代码
- 帝国cms后台 不同栏目发布字段不同
- mysql数据库管理工具navicat for mysql怎么用
- logstash filter 处理json
- ffmpeg源码编译安装(Compile ffmpeg with source) Part 1 : 通用部分
- [IR] What is XML
- HDU-1069.MonkeyandBanana(LIS)
- Linux Performance Analysis and Tools(Linux性能分析和工具)
- Nodejs学习笔记(五)—Express安装入门与模版引擎ejs
- input file实现多选,限制文件上传类型,图片上传前预览功能
- java基础26 线程的通讯;wait()、notify()、notifyAll()等方法
- Error measure