SpringMVC_第一个程序
2024-10-19 06:28:56
一、基本代码的完成
补充
1、在myeclipse中 WEB-INF下放的资源和WebRoot下的资源区别:
WEB-INF下放到资源是不能通过浏览器直接访问的,是比较安全的,只能是后台服务端程序进行跳转的时候跳转过去,所以不能重定向到WEB-INF.
2、在使用EL表达式的jsp页面
<%@page isELIgnored="false" %>
3、SpringMVC最全约束
<?xml version="1.0" encoding="UTF-8"?>

<beans xmlns="http://www.springframework.org/schema/beans"

        xmlns:xsi="http://www.w3.org/2001/XMLSchema-instance"

        xmlns:context="http://www.springframework.org/schema/context"

        xmlns:aop="http://www.springframework.org/schema/aop"

        xmlns:tx="http://www.springframework.org/schema/tx"

        xmlns:mvc="http://www.springframework.org/schema/mvc"

        xsi:schemaLocation="http://www.springframework.org/schema/beans

        http://www.springframework.org/schema/beans/spring-beans.xsd

        http://www.springframework.org/schema/context

        http://www.springframework.org/schema/context/spring-context.xsd

        http://www.springframework.org/schema/aop

        http://www.springframework.org/schema/aop/spring-aop.xsd

        http://www.springframework.org/schema/tx

        http://www.springframework.org/schema/tx/spring-tx.xsd

        http://www.springframework.org/schema/mvc

        http://www.springframework.org/schema/mvc/spring-mvc.xsd">

</beans>
public class MyController implements Controller {

    public ModelAndView handleRequest(HttpServletRequest request,

            HttpServletResponse response) throws Exception {

        // TODO Auto-generated method stub

        ModelAndView mv= new ModelAndView();

        mv.addObject("message","hello SpringMVC World!");

        mv.setViewName("/WEB-INF/welcome.jsp");

        return mv;

    }

}
MyController
注册处理器
 <?xml version="1.0" encoding="UTF-8"?>

 <beans xmlns="http://www.springframework.org/schema/beans"

         xmlns:xsi="http://www.w3.org/2001/XMLSchema-instance"

         xmlns:context="http://www.springframework.org/schema/context"

         xmlns:aop="http://www.springframework.org/schema/aop"

         xmlns:tx="http://www.springframework.org/schema/tx"

         xmlns:mvc="http://www.springframework.org/schema/mvc"

         xsi:schemaLocation="http://www.springframework.org/schema/beans

         http://www.springframework.org/schema/beans/spring-beans.xsd

         http://www.springframework.org/schema/context

         http://www.springframework.org/schema/context/spring-context.xsd

         http://www.springframework.org/schema/aop

         http://www.springframework.org/schema/aop/spring-aop.xsd

         http://www.springframework.org/schema/tx

         http://www.springframework.org/schema/tx/spring-tx.xsd

         http://www.springframework.org/schema/mvc

         http://www.springframework.org/schema/mvc/spring-mvc.xsd">

 <!-- 注册处理器 -->

 <bean id="/my.do" class="com.jmu.handlers.MyController"></bean>

 </beans>
springmvc.xml

二、注册中央调度器
在web.xml中
<!--  注册中央调度器 -->

 <servlet>

   <servlet-name>reyco</servlet-name>

   <servlet-class>org.springframework.web.servlet.DispatcherServlet</servlet-class>

 </servlet>

<servlet-mapping>

  <servlet-name>reyco</servlet-name>

  <url-pattern>*.do</url-pattern>

</servlet-mapping>
三、指定SpringMVC配置文件
添加修改
 <servlet>

   <servlet-name>reyco</servlet-name>

   <servlet-class>org.springframework.web.servlet.DispatcherServlet</servlet-class>


     <init-param>

     <param-name>contextConfigLocation</param-name>

     <param-value>classpath:springMVC.xml</param-value>

   </init-param>

 </servlet>
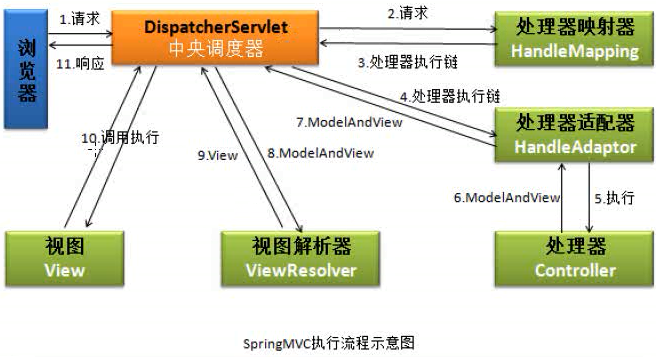
四、springMVC执行流程
五、使用servletloadOnStartup
目的:在Tomcat启动时直接创建当前Servlet
在web.xml中添加
<load-on-startup>1</load-on-startup>
即添加修改
!--  注册中央调度器 -->

 <servlet>

   <servlet-name>springMVC</servlet-name>

   <servlet-class>org.springframework.web.servlet.DispatcherServlet</servlet-class>

   <!-- 指定springMVC配置文件的位置及文件名 -->

   <init-param>

     <param-name>contextConfigLocation</param-name>

     <param-value>classpath:springMVC.xml</param-value>

   </init-param>

   <load-on-startup>1</load-on-startup>

 </servlet>

<servlet-mapping>

  <servlet-name>springMVC</servlet-name>

  <url-pattern>*.do</url-pattern>

</servlet-mapping>
五、使用视图解析器
修改MyController
mv.setViewName("welcome");//welcome为逻辑视图
welcome逻辑视图名通过内部资源适配器InternalResourceViewResolver转换成物理视图
修改springmvc.xml
<!-- 注册视图解析器 -->

<bean class="org.springframework.web.servlet.view.InternalResourceViewResolver">

 <property name="prefix" value="/WEB-INF/jsp/"></property>

  <property name="suffix" value=".jsp"></property>

</bean>
六、整理
 public class MyController implements Controller {

     public ModelAndView handleRequest(HttpServletRequest request,

             HttpServletResponse response) throws Exception {

         // TODO Auto-generated method stub

         ModelAndView mv= new ModelAndView();

         mv.addObject("message","hello SpringMVC World!");

         mv.setViewName("welcome");//welcome为逻辑视图

         return mv;

     }

 }
MyController
 <?xml version="1.0" encoding="UTF-8"?>

 <beans xmlns="http://www.springframework.org/schema/beans"

         xmlns:xsi="http://www.w3.org/2001/XMLSchema-instance"

         xmlns:context="http://www.springframework.org/schema/context"

         xmlns:aop="http://www.springframework.org/schema/aop"

         xmlns:tx="http://www.springframework.org/schema/tx"

         xmlns:mvc="http://www.springframework.org/schema/mvc"

         xsi:schemaLocation="http://www.springframework.org/schema/beans

         http://www.springframework.org/schema/beans/spring-beans.xsd

         http://www.springframework.org/schema/context

         http://www.springframework.org/schema/context/spring-context.xsd

         http://www.springframework.org/schema/aop

         http://www.springframework.org/schema/aop/spring-aop.xsd

         http://www.springframework.org/schema/tx

         http://www.springframework.org/schema/tx/spring-tx.xsd

         http://www.springframework.org/schema/mvc

         http://www.springframework.org/schema/mvc/spring-mvc.xsd">

 <!-- 注册视图解析器 -->

 <bean class="org.springframework.web.servlet.view.InternalResourceViewResolver">

  <property name="prefix" value="/WEB-INF/jsp/"></property>

   <property name="suffix" value=".jsp"></property>

 </bean>

 <!-- 注册处理器 -->

 <bean id="/my.do" class="com.jmu.handlers.MyController"></bean>

 </beans>
springmvc.xml
 <?xml version="1.0" encoding="UTF-8"?>

 <web-app xmlns:xsi="http://www.w3.org/2001/XMLSchema-instance"

     xmlns="http://java.sun.com/xml/ns/javaee"

     xsi:schemaLocation="http://java.sun.com/xml/ns/javaee http://java.sun.com/xml/ns/javaee/web-app_2_5.xsd"

     id="WebApp_ID" version="2.5">

     <display-name>01-springmvc-primary</display-name>

     <!-- 注册中央调度器 -->

     <servlet>

         <servlet-name>springMVC</servlet-name>

         <servlet-class>org.springframework.web.servlet.DispatcherServlet</servlet-class>

         <!-- 指定springMVC配置文件的位置及文件名 -->

         <init-param>

             <param-name>contextConfigLocation</param-name>

             <param-value>classpath:springmvc.xml</param-value>

         </init-param>

         <load-on-startup>1</load-on-startup>

     </servlet>

     <servlet-mapping>

         <servlet-name>springMVC</servlet-name>

         <url-pattern>*.do</url-pattern>

     </servlet-mapping>

     <welcome-file-list>

         <welcome-file>index.jsp</welcome-file>

     </welcome-file-list>

 </web-app>
web.xml
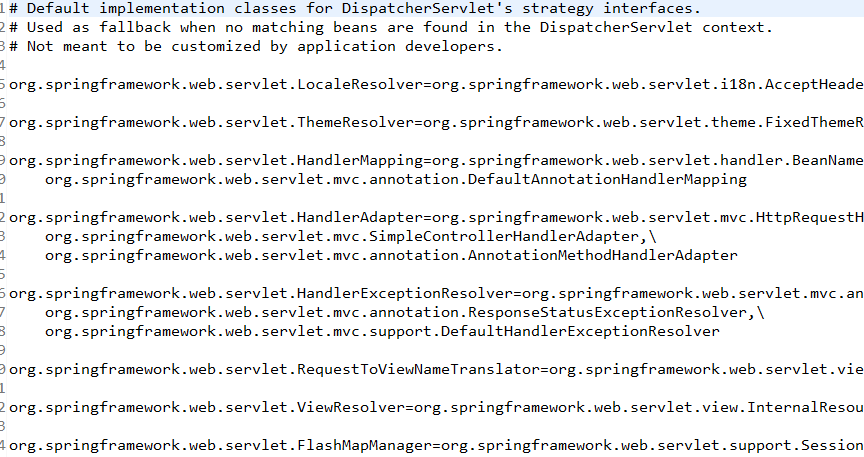
七、DispatcherServlet默认配置

最新文章
- Android开发学习之路-使用annotationProcessor配置Butterknife
- 【Scala】尾递归优化
- (一)WebRTC手记之初探
- leetcode@ [146] LRU Cache (TreeMap)
- 通过yum安装Nagios
- [RxJS] Subject basic
- Ci框架整合smarty模板引擎
- mysql自增
- C51指针小结
- C语到C++注释转换小项目
- Activity 与 springMvc相整合
- CentOS6.7 下安装JDK
- Python后台开发Django(会话控制)
- 测试框架httpclent 2.配置优化方法
- ubuntu中git
- Ch02 控制结构和函数 - 练习
- 周强 201771010141 《面向对象程序设计(java)》第七周学习总结
- SQL——sql年龄段查询
- python遍历某一位置所有文件夹中的文件
- 6.5C++查找字符串