keras实现简单性别识别(二分类问题)
2024-08-27 09:49:25
keras实现简单性别识别(二分类问题)
第一步:准备好需要的库
- tensorflow 1.4.0
- h5py 2.7.0
- hdf5 1.8.15.1
- Keras 2.0.8
- opencv-python 3.3.0
- numpy 1.13.3+mkl
- 所需要的人脸检测模块
- mtcnn和opencv
- https://pan.baidu.com/s/1rhP7mcnAtiojhk8eiLroEw
第二步:准备数据集:
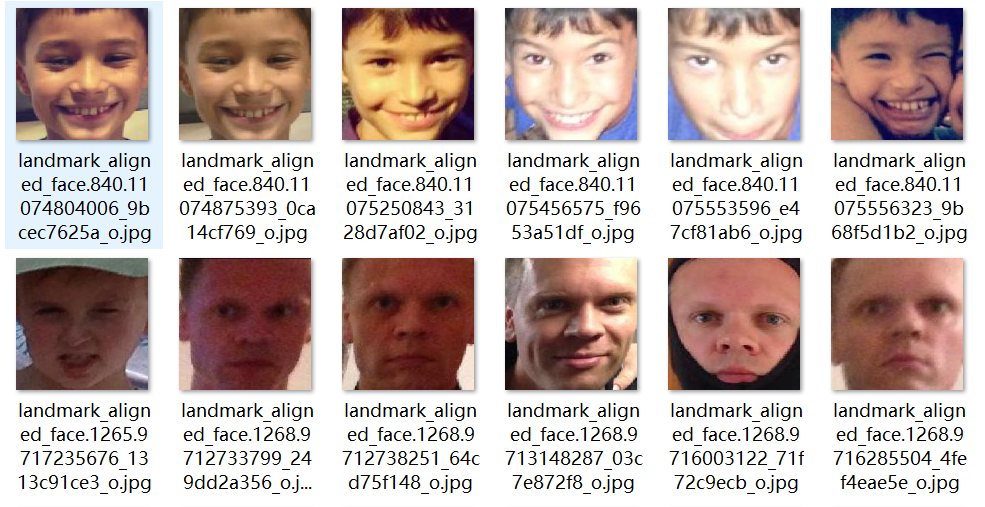
将性别不同的图片按照不同的分类放到不同的文件夹内。


数据集
https://pan.baidu.com/s/1_f36Gw4PWztUXZWH_jLWcw
 import shutil

 # 读取文件中图片信息根据性别分类图片到对应目录中

 dirroot = "D:\\Users\\a\\Pictures\\adience"

 f = open(dirroot+"\\fold_frontal_3_data.txt","r")

 i = 0

 for line in f.readlines():

     line = line.split()

     dir = line[0]

     imgName = "landmark_aligned_face."+ line[2] +'.'+ line[1]

     if i > 0:

         if line[5]== "f":

             print("female")

             shutil.copy(dirroot+'\\faces\\'+dir+'\\'+imgName, "D:\\pycode\\learn\\data\\validation\\"+imgName)

         #     移动图片到female目录

         elif line[5]=="m":

             print("male")

             shutil.copy(dirroot+'\\faces\\'+dir+'\\'+imgName, "D:\\pycode\\learn\\data\\validation\\"+imgName)

         #     移动图片到male目录

         else:

             print("N")

             # 未识别男女

     i += 1

 f.close()
使用ImageDataGenerator,来对图片进行归一化和随机旋转。使用flow_from_directory,来自动产生图片标签生成器。
 class Dataset(object):

     def __init__(self):

         self.train = None

         self.valid = None

     def read(self, img_rows=IMAGE_SIZE, img_cols=IMAGE_SIZE):

         train_datagen = ImageDataGenerator(

             rescale=1. / 255,

             horizontal_flip=True)

         test_datagen = ImageDataGenerator(rescale=1. / 255)

         train_generator = train_datagen.flow_from_directory(

             train_data_dir,

             target_size=(img_rows, img_cols),

             batch_size=batch_size,

             class_mode='binary')

         validation_generator = test_datagen.flow_from_directory(

             validation_data_dir,

             target_size=(img_rows, img_cols),

             batch_size=batch_size,

             class_mode='binary')

         self.train = train_generator

         self.valid = validation_generator
第三部:网络
 class Model(object):

     def __init__(self):

         self.model = Sequential()

         self.model.add(Conv2D(32, (3, 3), input_shape=(IMAGE_SIZE,IMAGE_SIZE,3)))

         self.model.add(Activation('relu'))

         self.model.add(MaxPooling2D(pool_size=(2, 2)))

         self.model.add(Conv2D(32, (3, 3)))

         self.model.add(Activation('relu'))

         self.model.add(MaxPooling2D(pool_size=(2, 2)))

         self.model.add(Conv2D(64, (3, 3)))

         self.model.add(Activation('relu'))

         self.model.add(MaxPooling2D(pool_size=(2, 2)))

         self.model.add(Conv2D(64, (3, 3)))

         self.model.add(Activation('relu'))

         self.model.add(MaxPooling2D(pool_size=(2, 2)))

         self.model.add(Flatten())

         self.model.add(Dense(64))

         self.model.add(Activation('relu'))

         self.model.add(Dropout(0.85))

         self.model.add(Dense(1))

         self.model.add(Activation('sigmoid'))

     def train(self, dataset, batch_size=batch_size, nb_epoch=epochs):

         self.model.compile(loss='binary_crossentropy',

                       optimizer='adam',

                       metrics=['accuracy'])

         self.model.fit_generator(dataset.train,

                                  steps_per_epoch=nb_train_samples // batch_size,

                                  epochs=epochs,

                                  validation_data=dataset.valid,

                                  validation_steps=nb_validation_samples//batch_size)

     def save(self, file_path=FILE_PATH):

         print('Model Saved.')

         self.model.save_weights(file_path)

     def load(self, file_path=FILE_PATH):

         print('Model Loaded.')

         self.model.load_weights(file_path)

     def predict(self, image):

         # 预测样本分类

         img = image.resize((1, IMAGE_SIZE, IMAGE_SIZE, 3))

         img = image.astype('float32')

         img /= 255

         #归一化

         result = self.model.predict(img)

         print(result)

         # 概率

         result = self.model.predict_classes(img)

         print(result)

         # 0/1

         return result[0]

     def evaluate(self, dataset):

         # 测试样本准确率

         score = self.model.evaluate_generator(dataset.valid,steps=2)

         print("样本准确率%s: %.2f%%" % (self.model.metrics_names[1], score[1] * 100))
第四部:主程序
 if __name__ == '__main__':

     dataset = Dataset()

     dataset.read()

     model = Model()

     model.load()

     model.train(dataset)

     model.evaluate(dataset)

     model.save()
第五步:识别程序
opencv检测模块版
 #!/usr/bin/env python

 """

 从摄像头中获取图像实时监测

 """

 import numpy as np

 import cv2

 from GenderTrain import Model

 def detect(img, cascade):

     """

     检测图像是否含有人脸部分

     :param img: 待检测帧图像

     :param cascade: 面部对象检测器

     :return: 面部图像标记

     """

     rects = cascade.detectMultiScale(img, scaleFactor=1.3, minNeighbors=4, minSize=(30, 30),

                                      flags=cv2.CASCADE_SCALE_IMAGE)

     if len(rects) == 0:

         return []

     rects[:,2:] += rects[:,:2]

     return rects

 def draw_rects(img, rects, color):

     """

     根据图像标记人脸区域与性别

     :param img:

     :param rects:

     :param color:

     :return:

     """

     for x, y, w, h in rects:

         face = img[x:x+w,y:y+h]

         face = cv2.resize(face,(224,224))

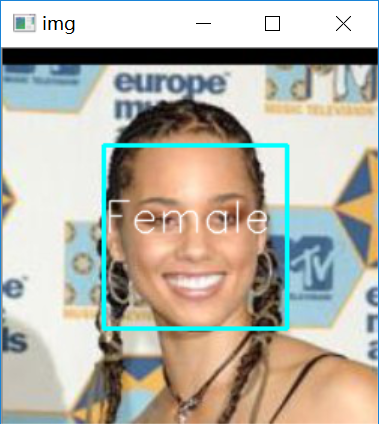
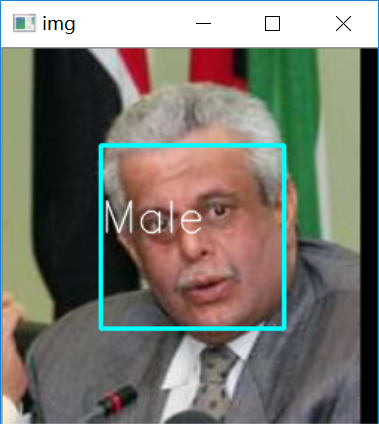
         if gender.predict(face)==1:

             text = "Male"

         else:

             text = "Female"

         cv2.rectangle(img, (x, y), (w, h), color, 2)

         cv2.putText(img, text, (x, h), cv2.FONT_HERSHEY_SIMPLEX, 2.0, (255, 255, 255), lineType=cv2.LINE_AA)

 if __name__ == '__main__':

     haar__cascade_path = "D:\\opencv\\sources\\data\\haarcascades\\haarcascade_frontalface_default.xml"

     cascade = cv2.CascadeClassifier( haar__cascade_path)

     cam = cv2.VideoCapture(0)

     # 获取摄像头视频

     gender = Model()

     gender.load()

     # 加载性别模型

     while True:

         ret, img = cam.read()

         # 读取帧图像

         rects = detect(img, cascade)

         print(rects)

         vis = img.copy()

         draw_rects(vis, rects, (0, 255, 0))

         cv2.imshow('Gender', vis)

         if cv2.waitKey(5) == 27:

             break

     cv2.destroyAllWindows()
MTCNN检测版
"""

从摄像头中获取图像实时监测

"""

import PIL

import numpy as np

import detect_face

import tensorflow as tf

import cv2

from GenderTrain import Model

with tf.Graph().as_default():

    gpu_options = tf.GPUOptions(per_process_gpu_memory_fraction=0.5)

    sess = tf.Session(config=tf.ConfigProto(gpu_options=gpu_options, log_device_placement=False))

    with sess.as_default():

        pnet, rnet, onet = detect_face.create_mtcnn(sess,

                                                    'E:\\pycode\\real-time-deep-face-recognition-master\\20170512-110547')

minsize = 20  # minimum size of face

threshold = [0.6, 0.7, 0.7]  # three steps's threshold

factor = 0.709  # scale factor

margin = 44

frame_interval = 3

batch_size = 1000

image_size = 182

input_image_size = 160

def draw_rects(img, rects, color):

    """

    根据图像标记人脸区域与性别

    :param img:

    :param rects:

    :param color:

    :return:

    """

    for x, y, w, h in rects:

        face = img[x:x+w,y:y+h]

        face = cv2.resize(face,(224,224))

        if gender.predict(face)==1:

            text = "Male"

        else:

            text = "Female"

        cv2.rectangle(img, (x, y), (w, h), color, 2)

        cv2.putText(img, text, (x, h), cv2.FONT_HERSHEY_SIMPLEX, 2.0, (255, 255, 255), lineType=cv2.LINE_AA)

if __name__ == '__main__':

    cam = cv2.VideoCapture(0)

    # 获取摄像头视频

    gender = Model()

    gender.load()

    # 加载性别模型

    while True:

        ret, img = cam.read()

        # 读取帧图像

        bounding_boxes, _ = detect_face.detect_face(img, minsize, pnet, rnet, onet, threshold, factor)

        # 读取帧图像

        for face_position in bounding_boxes:

            face_position = face_position.astype(int)

            print(face_position[0:4])

            rects = [[face_position[0], face_position[1], face_position[2], face_position[3]]]

            vis = img.copy()

            draw_rects(vis, rects, (255, 255, 255))

            cv2.imshow('Gender', vis)

        if cv2.waitKey(5) == 27:

            break

    cv2.destroyAllWindows()
完全版
import os

import random

import cv2

import numpy as np

from tensorflow.contrib.keras.api.keras.preprocessing.image import ImageDataGenerator,img_to_array

from tensorflow.contrib.keras.api.keras.models import Sequential

from tensorflow.contrib.keras.api.keras.layers import Dense, Dropout, Activation, Flatten

from tensorflow.contrib.keras.api.keras.layers import Conv2D, MaxPooling2D

from tensorflow.contrib.keras.api.keras.optimizers import SGD

IMAGE_SIZE = 182

# 训练图片大小

epochs = 150#原来是50

# 遍历次数

batch_size = 32

# 批量大小

nb_train_samples = 512*2

# 训练样本总数

nb_validation_samples = 128*2

# 测试样本总数

train_data_dir = 'D:\\code\\learn\\data_sex\\train_data\\'

validation_data_dir = 'D:\\data_sex\\test_data\\'

# 样本图片所在路径

FILE_PATH = 'Gender_new.h5'

# 模型存放路径

class Dataset(object):

    def __init__(self):

        self.train = None

        self.valid = None

    def read(self, img_rows=IMAGE_SIZE, img_cols=IMAGE_SIZE):

        train_datagen = ImageDataGenerator(

            rescale=1. / 255,

            horizontal_flip=True)

        test_datagen = ImageDataGenerator(rescale=1. / 255)

        train_generator = train_datagen.flow_from_directory(

            train_data_dir,

            target_size=(img_rows, img_cols),

            batch_size=batch_size,

            class_mode='binary')

        validation_generator = test_datagen.flow_from_directory(

            validation_data_dir,

            target_size=(img_rows, img_cols),

            batch_size=batch_size,

            class_mode='binary')

        self.train = train_generator

        self.valid = validation_generator

class Model(object):

    def __init__(self):

        self.model = Sequential()

        self.model.add(Conv2D(32, (3, 3), input_shape=(IMAGE_SIZE,IMAGE_SIZE,3)))

        self.model.add(Activation('relu'))

        self.model.add(MaxPooling2D(pool_size=(2, 2)))

        self.model.add(Conv2D(32, (3, 3)))

        self.model.add(Activation('relu'))

        self.model.add(MaxPooling2D(pool_size=(2, 2)))

        self.model.add(Conv2D(64, (3, 3)))

        self.model.add(Activation('relu'))

        self.model.add(MaxPooling2D(pool_size=(2, 2)))

        self.model.add(Flatten())

        self.model.add(Dense(64))

        self.model.add(Activation('relu'))

        self.model.add(Dropout(0.5))

        self.model.add(Dense(1))

        self.model.add(Activation('sigmoid'))

    def train(self, dataset, batch_size=batch_size, nb_epoch=epochs):

        self.model.compile(loss='binary_crossentropy',

                      optimizer='adam',

                      metrics=['accuracy'])

        self.model.fit_generator(dataset.train,

                                 steps_per_epoch=nb_train_samples // batch_size,

                                 epochs=epochs,

                                 validation_data=dataset.valid,

                                 validation_steps=nb_validation_samples//batch_size)

    def save(self, file_path=FILE_PATH):

        print('Model Saved.')

        self.model.save_weights(file_path)

    def load(self, file_path=FILE_PATH):

        print('Model Loaded.')

        self.model.load_weights(file_path)

    def predict(self, image):

        # 预测样本分类

        img = image.resize((1, IMAGE_SIZE, IMAGE_SIZE, 3))

        img = image.astype('float32')

        img /= 255

        #归一化

        result = self.model.predict(img)

        print(result)

        # 概率

        result = self.model.predict_classes(img)

        print(result)

        # 0/1

        return result[0]

    def evaluate(self, dataset):

        # 测试样本准确率

        score = self.model.evaluate_generator(dataset.valid,steps=2)

        print("样本准确率%s: %.2f%%" % (self.model.metrics_names[1], score[1] * 100))

if __name__ == '__main__':

    dataset = Dataset()

    dataset.read()

    model = Model()

    model.load()

    model.train(dataset)

    model.evaluate(dataset)

    model.save()


最新文章
- java中synchronized关键字的用法
- Arduino101学习笔记(七)—— 时间API
- oracle管理控制台不能打开,提示此网站的安全证书有问题?
- svn 批量更新 bat脚本
- C#上位机读数据库
- SQL server 如何附加、还原、分离、备份数据库文件
- struts.xml中的intercepter
- CSS通用编码规范
- sqlite3触发器的使用
- poj3984迷宫问题
- js截取文件名
- Chrome浏览器扩展开发系列之十二:Content Scripts
- 用AngularJS实现对表格的增删改查(仅限前端)
- SpringBoot+mybatis使用@Transactional无效
- Linux——用户管理简单学习笔记(四)
- sql的嵌套查询,把一次查询的结果做为表继续进一步查询;内联视图
- Python中参数多个值的表示法
- python cython 模块(2)
- 理解ros话题--6
- “全栈2019”Java异常第十九章:RuntimeException详解