6.Django与Ajax
Ajax
文件夹为Ajaxdemo
向服务器发送请求的途径:
1.浏览器地址栏,默认get请求;
2.form表单:
get请求
post请求
3.a标签,超链接(get请求)
4.Ajax请求
特点:1异步请求;2局部刷新
get
post
AJAX(Asynchronous Javascript And XML)翻译成中文就是“异步Javascript和XML”。即使用Javascript语言与服务器进行异步交互,传输的数据为XML(当然,传输的数据不只是XML,现在更多使用json数据)。
- 同步交互:客户端发出一个请求后,需要等待服务器响应结束后,才能发出第二个请求;
- 异步交互:客户端发出一个请求后,无需等待服务器响应结束,就可以发出第二个请求。
AJAX除了异步的特点外,还有一个就是:浏览器页面局部刷新;(这一特点给用户的感受是在不知不觉中完成请求和响应过程)
场景:

优点:
- AJAX使用Javascript技术向服务器发送异步请求
- AJAX无须刷新整个页面
jquery cdn百度 src="http://ajax.aspnetcdn.com/ajax/jquery/jquery-2.1.4.min.js"></script> (把服务器上的jquery引入进来)
1.基于jquery的Ajax实现
index.html
<!DOCTYPE html>

<html lang="en">

<head>

    <meta charset="UTF-8">

    <title>Title</title>

    <script src="http://ajax.aspnetcdn.com/ajax/jquery/jquery-2.1.4.min.js"></script>

</head>

<body>

    <h2>this is Index!</h2>

    <button class="Ajax">Ajax</button>

    <p class="content"></p>

    <script>

        $(".Ajax").click(function(){

            //alert(123)

           //发送ajax请求 (一定要有路径,是哪种请求方式呢?)

            $.ajax({

                url:"/test_ajax/" ,  //请求路径url,不加地址它会找默认当前脚本的ip地址和端口

                type:"get", //请求方式

                success: function (data) {  //回调函数,某个事件执行完之后再去执行的函数

                    console.log(data);

                    $(".content").html(data);

                }

            })

        })

    </script>

</body>

</html>
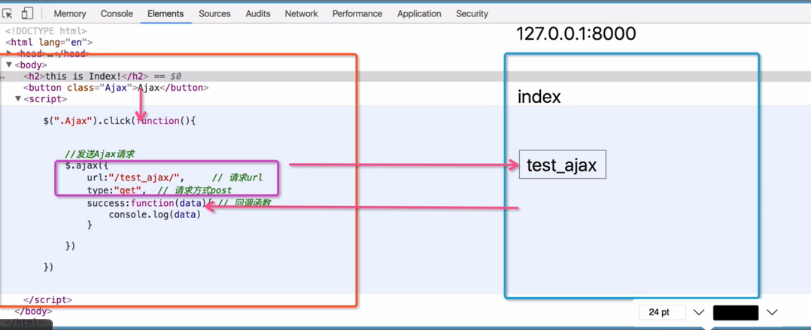
Ajax---服务器 Ajax流程图

执行过程:
一点击Ajax按钮,触发click这个函数,然后发就要发生ajax,给test_ajax发Ajax路径请求,当url匹配成功后,它把这次请求的结果交给了data,(在test_ajax里返回了一个hello kris的字符串)刚刚那个hello kris这个字符串就交给了data(data拿到结果);然后再执行那个回调函数能够打印,用js处理data. (在页面中加上节点)


2.Ajax数据传递
urls
from django.contrib import admin

from django.urls import path

from app01 import views

urlpatterns = [

    path('admin/', admin.site.urls),

    path('index/', views.index),

    path('test_ajax/', views.test_ajax),

    path('cal/', views.cal),

]
views.py
from django.shortcuts import render, HttpResponse

# Create your views here.

def index(request):

    return render(request, "index.html")

def test_ajax(request):        #这次请求在处理ajax请求,

    print(request.GET)        #拿到数据,去处理

    return HttpResponse("Hello kris") #根据数据给回调函数返回个什么参数

def cal(request):

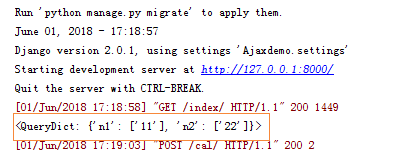
    print(request.POST)

    n1=int(request.POST.get("n1")) #取出这两个值

    n2=int(request.POST.get("n2"))

    ret = n1+n2                   #计算下

    return HttpResponse(ret)
index.html
 <!DOCTYPE html>

 <html lang="en">

 <head>

     <meta charset="UTF-8">

     <title>Title</title>

     <script src="http://ajax.aspnetcdn.com/ajax/jquery/jquery-2.1.4.min.js"></script>

 </head>

 <body>

     <h2>this is Index!</h2>

     <button class="Ajax">Ajax</button>

     <p class="content"></p>

     <hr>

     <input type="text" id="num1">+<input type="text" id="num2">=<input type="text" id="ret"><button class="cal">计算</button>

     <script>

         $(".Ajax").click(function(){

             //alert(123)

            //发送ajax请求

             $.ajax({

                 url:"/test_ajax/" ,  //请求url,不加地址它会找默认当前脚本的ip地址和端口

                 type:"get", //请求方式 a=1&b=2

                 data:{a:,b:}, //发送数据,键值

                 success: function (data) {  //回调函数,某个事件执行完之后再去执行的函数

                     console.log(data);

                     $(".content").html(data);

                 }

             })

         })

         //Ajax计算求值

         $(".cal").click(function () {

             $.ajax({

                 url:"/cal/", //交给cal的路径

                 type:"post",

                 data:{

36                     "n1":$("#num1").val(),

37                     "n2":$("#num2").val(),

38                 },

                 success: function (data) {

                     console.log(data);

                     $("#ret").val(data);

                 }

             })

         })
      ///////////////form表单一定要有input标签放有效控件,action发送路径,method是请求方式;数据由input type="text"里边的内容决定;键就是name指定的值,
              一点submit按钮就会给你自动组装这两个键值,通过method指定的方式发给action指定的路径
      <form action="" method="">
        <input type="text", name="user">
        <input type="text", name="pwd">
      </form>
       ///////////////////

     </script>

 </body>

 </html>


3.基于Ajax的登录验证
用户在表单输入用户名与密码,通过Ajax提交给服务器,服务器验证后返回响应信息,客户端通过响应信息确定是否登录成功,成功,则跳转到首页,否则,在页面上显示相应的错误信息。
models
from django.db import models

# Create your models here.

class User(models.Model):

    name = models.CharField(max_length=32)

    pwd = models.CharField(max_length=32)
views
from app01.models import User

def login(request):

    print(request.POST) #<QueryDict: {'user': ['kris'], 'pwd': ['123']}>

    user = request.POST.get("user")

    pwd = request.POST.get("pwd")

    user = User.objects.filter(name=user, pwd=pwd).first()

    res = {"user":None, "msg":None} #如果登录成功了默认是None,有值肯定是登录成功了; "msg"是避免出现错误信息,错误信息是什么

    if user:

        res["user"] = user.name

    else:

        res["msg"] = "username or password wrong!"  #失败了给msg赋个值

    import json   #想把res这个字典交给data,HttpResponse里边必须放字符串,

    return HttpResponse(json.dumps(res)) #序列化下,json字符串 。
index
<!DOCTYPE html>

<html lang="en">

<head>

    <meta charset="UTF-8">

    <title>Title</title>

    <script src="http://ajax.aspnetcdn.com/ajax/jquery/jquery-2.1.4.min.js"></script>

</head>

<body>

    <form>

        用户名<input type="text" id="user">

        密码<input type="password" id="pwd"> //下面是button只是一个按钮;改成submit就会组成键值对发过去,就是form表单请求了。

        <input type="button" value="submit" class="login_btn"><span class="error"></span>

    </form>

    <script>//登录验证

        $(".login_btn").click(function () {

            $.ajax({

                url:"/login/",

                type:"post",

                data:{

                    "user":$("#user").val(),

                    "pwd":$("#pwd").val(),

                },

                success:function(data){

                    console.log(data); //json字符串 ,js再给它反序列化拿到它支持的类似字典的object类型。

                    console.log(typeof data);

                    var data = JSON.parse(data)  //js再用它自己的json方法给它反序列化成字典 object{};js这个语言反序列化的方法是json.parse

                    console.log(data); //反序列化类似字典的object

                    console.log(typeof data);

                    if (data.user){   //有值登录成功了就让它跳转下

                        location.href="http://www.baidu.com"

                    }

                    else {  //html文本赋值(错误信息值)

                        $(".error").html(data.msg).css({"color":"red","margin-left":"10px"})

                    }

                }

            })

        })

    </script>

</body>

</html>

4.上传文件
4.1基于form表单上传文件
views
def file_put(request):

    if request.method == "POST":

        print(request.POST)  #用户上传的数据  post <QueryDict: {'user': ['kris']}>

        print(request.FILES)  #拿到这个文件   <MultiValueDict: {'avatar': [<InMemoryUploadedFile: 袁娅维.jpg (image/jpeg)>]}>

        file_obj = request.FILES.get("avatar")  #把文件下载来

        with open(file_obj.name, "wb")as f:  #上传的文件名file_obj.name 会把这个文件存到跟目录下

            for line in file_obj:

                f.write(line)

        return HttpResponse("ok")

    return render(request, "file_put.html")
file_put.html
<!DOCTYPE html>

<html lang="en">

<head>

    <meta charset="UTF-8">

    <title>Title</title>

</head>

<body>

<h3>基于form表单的文件上传</h3>

<form action="" method="post" enctype="multipart/form-data">  //上传文件一定要加上这个

    用户名<input type="text" name="user">

    头像<input type="file" name="avatar">

    <input type="submit">

</form>

</body>

</html>

4.2 请求头ContentType:urlencoed
都在这个字符串报文里边(请求首行、请求头、请求体):

请求首行

请求头(决定数据以什么格式进行编码)

....

ContentType:urlencoed(告诉服务器,这次发过来的请求体的数据是按照urlencoed这种格式进行编码的(a=&b=..))

请求体(a=&b=&c=)

服务器那边拿到这个wsgiref先检查ContentType,如果是urlencoed它就知道你是怎么编码的了,它就按照这种方式解码,拿到相应的键以及对应的值。

enctype="multipart/form-data"是另外一种编码格式,文件可以用这种方式;而普通的键值只适用这种 enctype="application/x-www-form-urlencoded" 编码格式

enctype="multipart/form-data" #上传文件一定要加上这个
enctype="application/x-www-form-urlencoded" #普通的键值对的上传加这个
file_put.html
<!DOCTYPE html>

<html lang="en">

<head>

    <meta charset="UTF-8">

    <title>Title</title>

    <script src="http://ajax.aspnetcdn.com/ajax/jquery/jquery-2.1.4.min.js"></script>

</head>

<body>

<h3>简单的form</h3>

<form action="" method="post" enctype="application/x-www-form-urlencoded"> {#普通的键值只能用这种#}

    用户名<input type="text" name="user">

    密码<input type="password" name="pwd">

    <input type="submit">

</form>

<h3>基于form表单的文件上传</h3>

<form action="" method="post" enctype="multipart/form-data">

    用户名<input type="text" name="user">

    头像<input type="file" name="avatar">

    <input type="submit">

</form>

<h3>基于Ajax文件上传</h3>

<form action="" method="post">

    用户名<input type="text" name="user">

    <input type="button" class="btn" value="Ajax">

</form>

<script>

    $.ajax({

        url:"",

        type:"post",

        data:{

            a:1,

            b:2

        },//无论是ajax还是form它们都有一个默认的请求头ContentType:urlencoed ,把我们写好的数据按照某种类型编码好之后放到请求体中,然后把整个报文部分发给服务器

        success: function (data) {

            console.log(data)

        }

    })

</script>

</body>

</html>
4.3 Ajax传递json数据
file_put
<h3>基于Ajax文件上传</h3>

<form action="" method="post">

    用户名<input type="text" name="user">

    <input type="button" class="btn" value="Ajax">

</form>

<script>
  $(".btn").click(function()){

    $.ajax({

        url:"",

        type:"post",

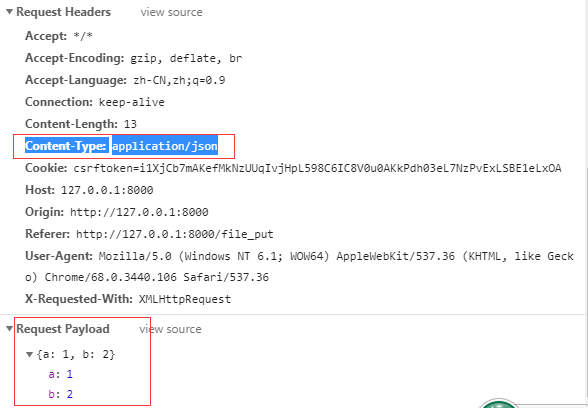
        contentType:"application/json", //不加它默认是contentType:urlencoed;加上application/json相当于是告诉服务器这次编码类型是json数据了

        data:JSON.stringify({ #对一个数据进行序列化,相当于python里边的json.dumps,把这个a:1,b:2数据放到stringify里边,它对应的值就是json字符串

            a:1,               //告诉服务器这次发的是json数据你到时候按照json解就可以了

            b:2

        }),                 //无论是ajax还是form它们都有一个默认的请求头ContentType:urlencoed ,把我们写好的数据按照某种类型编码好之后放到请求体中,然后把整个报文部分发给服务器

        success: function (data) {

            console.log(data)

        }

    });
  });

</script>
请求首行

请求头(决定数据以什么格式进行编码)

....

ContentType:json               #urlencoed(告诉服务器,这次发过来的请求体的数据是按照urlencoed这种格式进行编码的(a=&b=..))

请求体{"a":"", "b":""}   #到时候反序列化就可以了     #(a=&b=&c=)
views
def file_put(request):

    if request.method == "POST":

        print("body",request.body)  #请求报文中的请求体   body b'{"a":1,"b":2}' 取的时候进行解码,反序列化就可以了;a=1&b=2在请求体里边,所以能打印出

        print("post",request.POST)                     #用户上传的数据;post <QueryDict: {}> 只有在ContentType:urlencoed时,request.POST才有数据,数据存到body里边了

        return HttpResponse("ok")

    return render(request, "file_put.html")

'''

请求首行

请求体

'''

'''

ContentType:urlencoed   请求头 这样的编码格式 ;multipart/form-data文件上传只能用这种

请求体(a=1&b=2&c=3)

'''
############如果把这些都去掉,对比上边的

 $(".btn").click(function()){

    $.ajax({

        url:"",

        type:"post",

        ###contentType:"application/json", contentType:urlencoed;//把这些都去掉

        data:{

            a:,

            b:

        },

        success: function (data) {

            console.log(data)

        }

    });

  });

 post是按照body解成的字典,只有urlencoded这种编码格式才会给你解;json不会给你解,必须去request.body里边去取自己去拿原生的数据,自己去进行反序列化。
4.4 基于Ajax文件上传
file_put
这里data不光是写个字典了,上传文件要把 enctype="multipart/form-data"格式换成这种编码格式来上传数据;如果没有文件上传,就像之前那样子写data的键值对;
一旦涉及上传文件,创建一个formdata的对象
    //Ajax上传文件

    $(".btn").click(function () {

        var formdata=new FormData();

        formdata.append("user",$("#user").val());   {#不断的append添加键值对#}

        formdata.append("avatar",$("#avatar")[].files[]);

        $.ajax({

            url:"",

            type:"post",

            contentType:false, #加2个参数,只要有formdata就要有这两个参数。意思是不做编码了,对文件不做处理。

            processData:false,

            data:formdata,   //把整个formdata对象放到data里边

            success: function (data) {

                console.log(data)

            }

        })

    })
views.py
def file_put(request):

    if request.method == "POST":

        print("body",request.body)  #请求报文中的请求体

        print("post",request.POST)  #用户上传的数据; 只有在ContentType:urlencoed时,request.POST才有数据

        print(request.FILES)  #拿到这个文件

        file_obj = request.FILES.get("avatar")  #把文件下载来

        with open(file_obj.name, "wb")as f:  #上传的文件名file_obj.name

            for line in file_obj:

                f.write(line)

        return HttpResponse("ok")

    return render(request, "file_put.html")

用 js 怎么来找到这个文件呢?通过找到对应的input标签 dom对象,然后[0]来获取文件

最新文章
- 如何快速清除ZBrush画布中多余图像
- Nginx简易配置文件(一)(静态页面及PHP页面解析)
- VB类模块中属性的参数——VBA中Range对象的Value属性和Value2属性的一点区别
- ReactJs设置css样式
- LeetCode:Longest Substring Without Repeating Characters(最长不重复子串)
- Face The Right Way---hdu3276(开关问题)
- js处理数学经典问题:有一对兔子,从出生后第3个月起每个月都生一对兔子,小兔子长到第三个月后每个月又生一 对兔子,假如兔子都不死,问每个月的兔子总数为多少?
- MySQL Replicationation基础
- Linux笔记(十一) - 文件系统管理
- hibernate 常用主键生成策略与配置
- Servlet学习记录4
- SQL 数据库高CPU占用语句排查
- 如何在云端部署SAP HANA实战, Azure 上的 SAP HANA(大型实例)概述和体系结构
- JWT(Json Web Token—)的定义及组成
- Docker Kubernetes 查询字段说明
- python中assert详解
- JDBC几种常见的数据库连接
- python中的os
- vi相关
- subprocess.Popen模块
热门文章
- shell反弹总结
- python(七) Python中单下划线和双下划线
- Activity生命周期函数、onSaveInstanceState()和onRestoreInstanceState()的介绍
- try 、catch 、finally 、throw 测试js错误
- PHP - CentOS下开发运行环境搭建(Apache+PHP+MySQL+FTP)
- 2017-2018-2 20155303『网络对抗技术』Exp1:PC平台逆向破解
- ubuntu14.04 boost 1.58.0 安裝
- WinEdt 和 Sumatra 双向关联设置
- AutoMapper中用户自定义转换
- malloc 函数详解【转】
