一、HTTPS介绍
1.概述
为什么需要使用HTTPS,因为HTTP不安全,当我们使用http网站时,会遭到劫持和篡改,如果采用https协议,那么数据在传输过程中是加密的,所以黑客无法窃取或者篡改数据报文信息,同时也避免网站传输时信息泄露。
那么我们在实现https时,需要了解ssl协议,但我们现在使用的更多的是TLS加密协议。
那么TLS是怎么保证明文消息被加密的呢?在OSI七层模型中,应用层是http协议,那么在应用层协议之下,我们的表示层,是ssl协议所发挥作用的一层,他通过(握手、交换秘钥、告警、加密)等方式,是应用层http协议没有感知的情况下做到了数据的安全加密
2.模拟网站篡改
1.配置一个网站
[root@web01 /code]# vim /etc/nginx/conf.d/linux.jiechi.com.conf
server {
listen 80;
server_name linux.jiechi.com;
charset utf-8;
location / {
root /code/jc;
index index.html;
}
}
2.写一个网站页面
[root@web01 /code]# mkdir /code/jc
[root@web01 /code]# cat /code/jc/index.html
<!DOCTYPE html>
<html lang="en">
<head>
<meta charset="UTF-8">
<title>我是title</title>
</head>
<body>
<article>
<header>
<h1>我是qiudao</h1>
<p>创建时间:<time pubdate="pubdate">2018/8/10</time></p>
</header>
<p>
<b>Aticle</b>第一次用h5写文章,好他*的紧张...
</p>
<footer>
<p><small>版权所有!</small></p>
</footer>
</article>
</body>
</html>
3.重启nginx访问
[root@web01 /code]# systemctl restart nginx
#配置hosts
10.0.0.7 linux.jiechi.com
4.配置劫持网站的站点文件
[root@lb01 ~]# vim /etc/nginx/conf.d/linux.jiechi.com.conf
server {
listen 80;
server_name linux.jiechi.com;
charset utf-8;
location / {
#劫持
proxy_pass http://10.0.0.7;
include proxy_params;
#篡改
sub_filter '<title>我是title</title>' '<title>我不是个东西</title>';
sub_filter '<b>qiudao</b>第一次用h5写文章,好他*的紧张...' '<img src="https://blog.driverzeng.com/zenglaoshi/xingganheguan.gif">';
}
}
5.配置hosts访问
[root@lb01 /code]# systemctl restart nginx
#配置hosts
#10.0.0.7 linux.jiechi.com
10.0.0.4 linux.jiechi.com
3.HTTPS证书下发流程
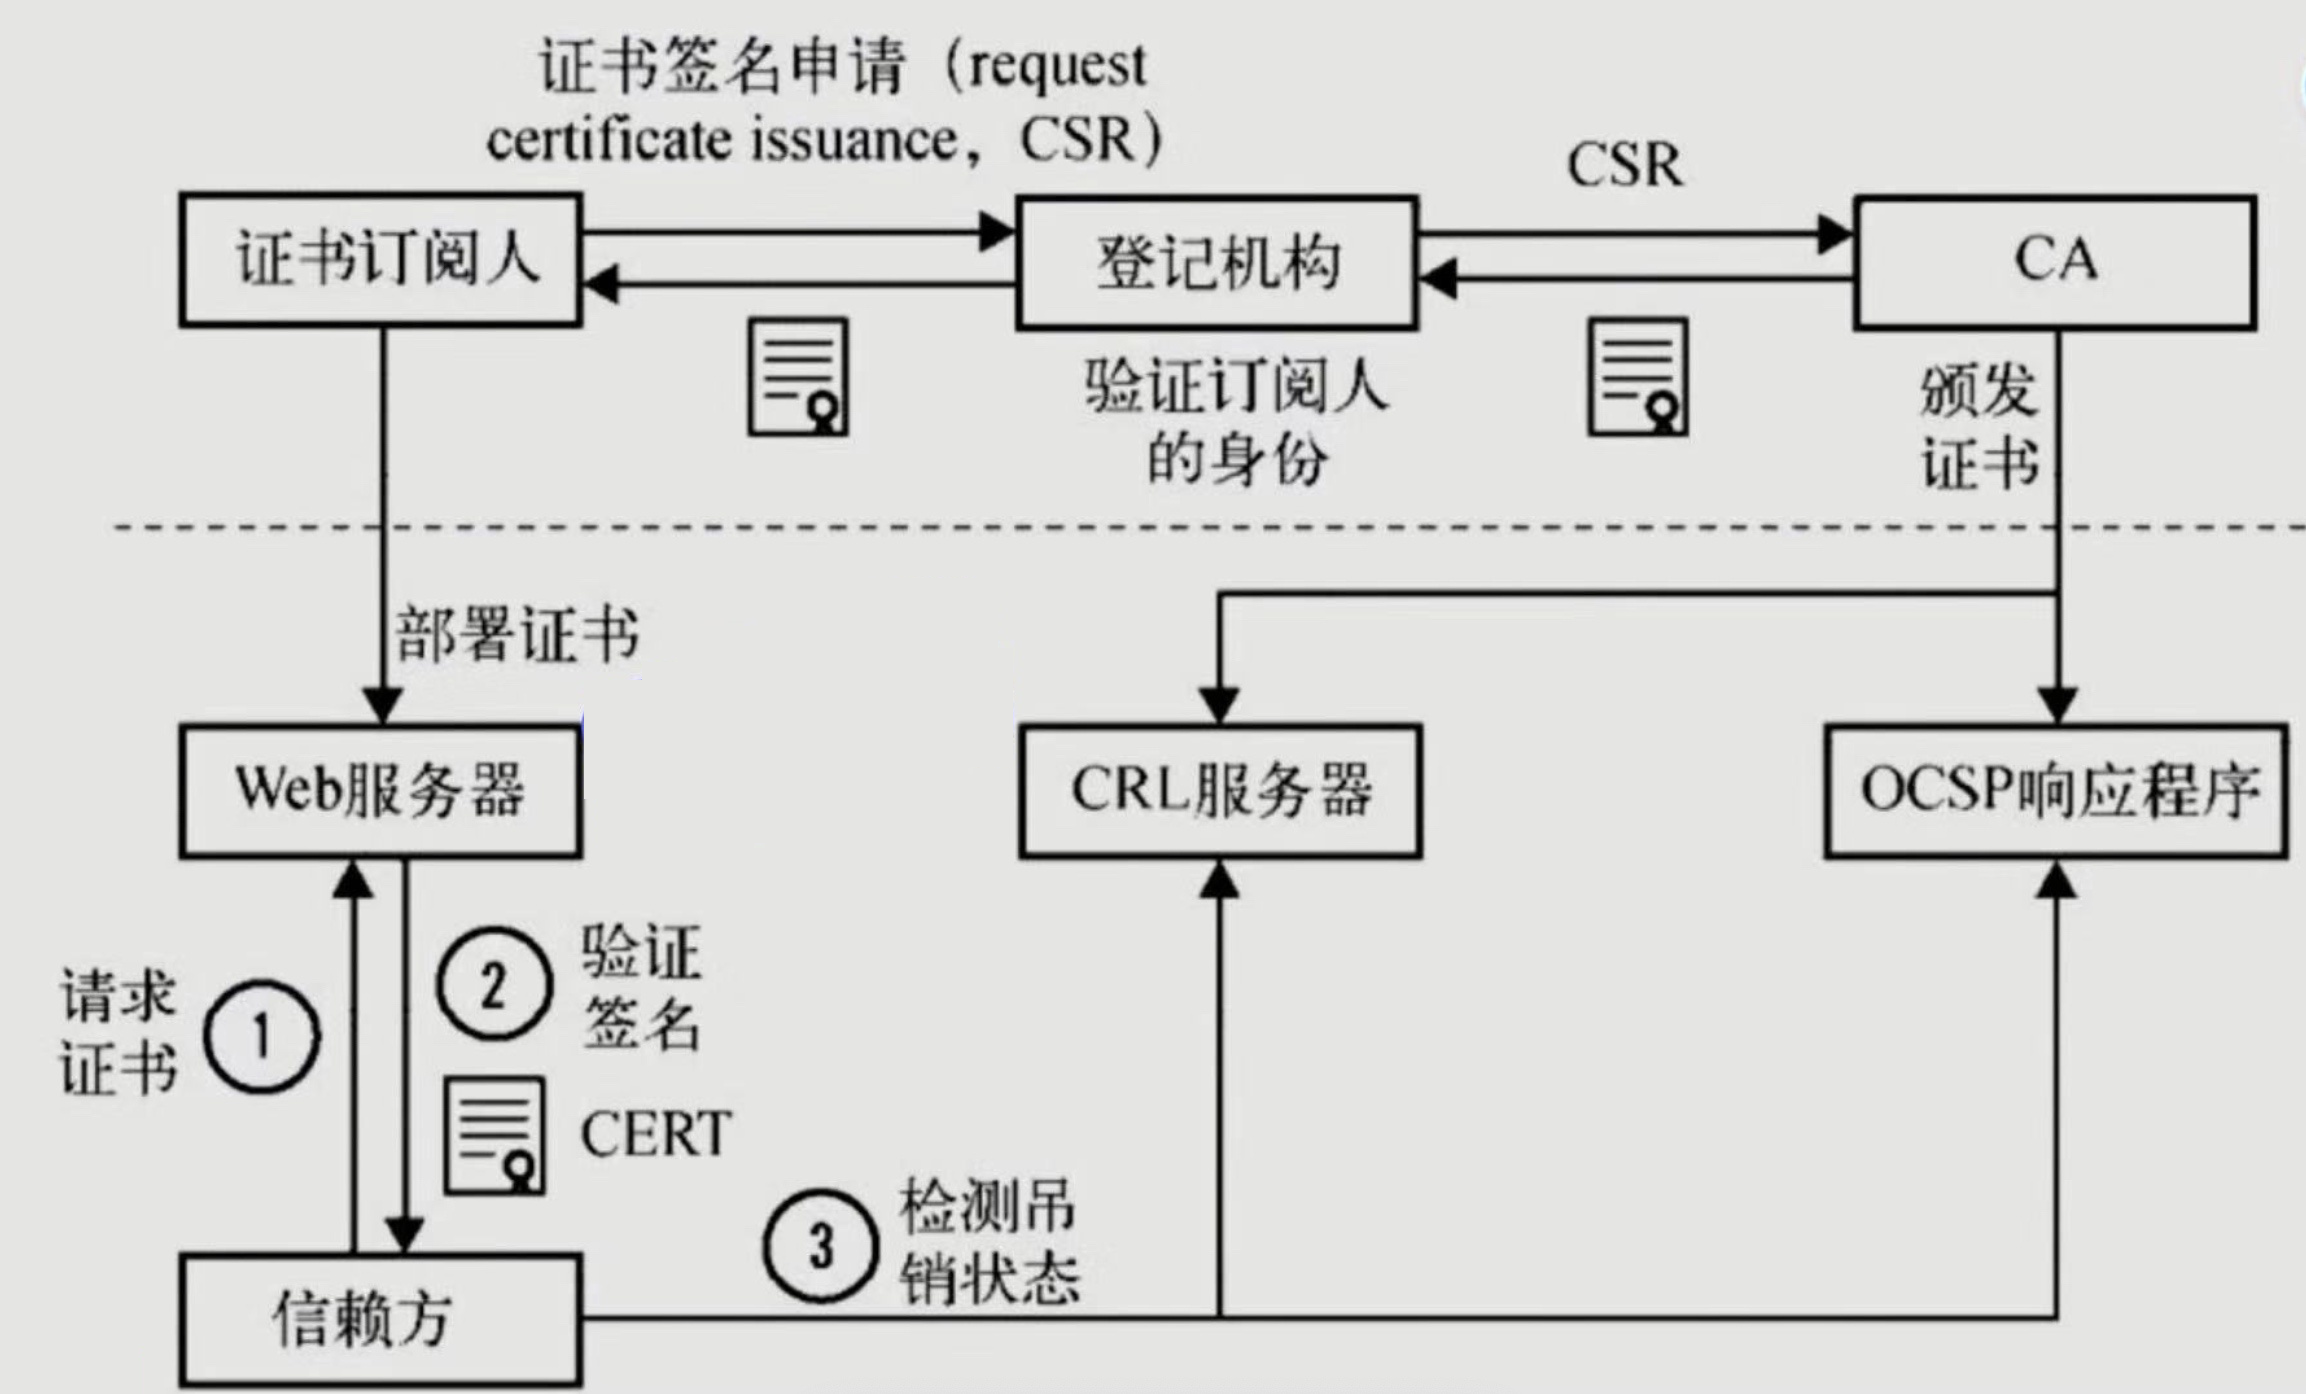
我们首先需要申请证书,先去登记机构进行身份登记,我是谁,我是干嘛的,我想做什么,然后登记机构再通过CSR发给CA,CA中心通过后会生成一堆公钥和私钥,公钥会在CA证书链中保存,公钥和私钥证书我们拿到后,会将其部署在WEB服务器上
1.当浏览器访问我们的https站点时,他会去请求我们的证书
2.Nginx这样的web服务器会将我们的公钥证书发给浏览器
3.浏览器会去验证我们的证书是否合法有效
4.CA机构会将过期的证书放置在CRL服务器,CRL服务的验证效率是非常差的,所以CA有推出了OCSP响应程序,OCSP响应程序可以查询指定的一个证书是否过去,所以浏览器可以直接查询OSCP响应程序,但OSCP响应程序性能还不是很高
5.Nginx会有一个OCSP的开关,当我们开启后,Nginx会主动上OCSP上查询,这样大量的客户端直接从Nginx获取证书是否有效
#不用记
1、浏览器发起往服务器的443端口发起请求,请求携带了浏览器支持的加密算法和哈希算法。
2、服务器收到请求,选择浏览器支持的加密算法和哈希算法。
3、服务器下将数字证书返回给浏览器,这里的数字证书可以是向某个可靠机构申请的,也可以是自制的。
4、浏览器进入数字证书认证环节,这一部分是浏览器内置的TLS完成的:
    4.1 首先浏览器会从内置的证书列表中索引,找到服务器下发证书对应的机构,如果没有找到,此时就会提示用户该证书是不是由权威机构颁发,是不可信任的。如果查到了对应的机构,则取出该机构颁发的公钥。
    4.2 用机构的证书公钥解密得到证书的内容和证书签名,内容包括网站的网址、网站的公钥、证书的有效期等。浏览器会先验证证书签名的合法性(验证过程类似上面Bob和Susan的通信)。签名通过后,浏览器验证证书记录的网址是否和当前网址是一致的,不一致会提示用户。如果网址一致会检查证书有效期,证书过期了也会提示用户。这些都通过认证时,浏览器就可以安全使用证书中的网站公钥了。
    4.3 浏览器生成一个随机数R,并使用网站公钥对R进行加密。
5、浏览器将加密的R传送给服务器。
6、服务器用自己的私钥解密得到R。
7、服务器以R为密钥使用了对称加密算法加密网页内容并传输给浏览器。
8、浏览器以R为密钥使用之前约定好的解密算法获取网页内容。
4.证书类型介绍
| 对比 |
域名型 DV |
企业型 OV |
增强型 EV |
| 绿色地址栏 |
 小锁标记+https 小锁标记+https |
 小锁标记+https 小锁标记+https |
 小锁标记+企业名称+https 小锁标记+企业名称+https |
| 一般用途 |
个人站点和应用; 简单的https加密需求 |
电子商务站点和应用; 中小型企业站点 |
大型金融平台; 大型企业和政府机构站点 |
| 审核内容 |
域名所有权验证 |
全面的企业身份验证; 域名所有权验证 |
最高等级的企业身份验证; 域名所有权验证 |
| 颁发时长 |
10分钟-24小时 |
3-5个工作日 |
5-7个工作日 |
| 单次申请年限 |
1年 |
1-2年 |
1-2年 |
| 赔付保障金 |
—— |
125-175万美金 |
150-175万美金 |
5.证书购买选择
1.单个域名       www.mumusir.com
2.保护多个域名      www.   class.   test.   cdn.   all.
3.通配符域名
6.HTTPS证书注意选项
1.https证书不支持续费,证书到期需要重新申请并进行替换
2.https不支持三级域名解析,如 test.mall.mumsir.com
3.https显示绿色,说明整个网站的url都是https的
4.https显示黄色,因为网站代码中包含http的不安全链接
5.https显示红色,那么证书是假的或者证书过期。
二、单台机器配置HTTPS
1.检查nginx
[root@web01 /code]# nginx -v
nginx version: nginx/1.18.0
[root@web01 /code]# nginx -V
--with-http_ssl_module
2.创建存放证书的目录
[root@web01 /code]# mkdir /etc/nginx/ssl_key
[root@web01 /code]# cd /etc/nginx/ssl_key/
3.生成证书
#使用openssl命令充当CA权威机构创建证书(生产不使用此方式生成证书,不被互联网认可的黑户证书)
[root@web01 /etc/nginx/ssl_key]# openssl genrsa -idea -out server.key 2048
Generating RSA private key, 2048 bit long modulus
....+++
..................................................+++
e is 65537 (0x10001)
Enter pass phrase for server.key: 123456
Verifying - Enter pass phrase for server.key: 123456
#生成自签证书,同时去掉私钥的密码
[root@web03 ssl_key]# openssl req -days 36500 -x509 -sha256 -nodes -newkey rsa:2048 -keyout server.key -out server.crt
Generating a 2048 bit RSA private key
..................................................................................................+++
...................................................................................................+++
writing new private key to 'server.key'
-----
You are about to be asked to enter information that will be incorporated
into your certificate request.
What you are about to enter is what is called a Distinguished Name or a DN.
There are quite a few fields but you can leave some blank
For some fields there will be a default value,
If you enter '.', the field will be left blank.
-----
Country Name (2 letter code) [XX]:zhongguo
string is too long, it needs to be less than 2 bytes long
Country Name (2 letter code) [XX]:CN
State or Province Name (full name) []:meiguo
Locality Name (eg, city) [Default City]:riben
Organization Name (eg, company) [Default Company Ltd]:heiyiren
Organizational Unit Name (eg, section) []:heiyiren
Common Name (eg, your name or your server's hostname) []:kenan
Email Address []:123@qq.com
# req --> 用于创建新的证书
# new --> 表示创建的是新证书
# x509 --> 表示定义证书的格式为标准格式
# key --> 表示调用的私钥文件信息
# out --> 表示输出证书文件信息
# days --> 表示证书的有效期
#证书生成后两个文件
[root@web01 /etc/nginx/ssl_key]# ll
total 8
-rw-r--r-- 1 root root 1387 Sep 4 11:30 server.crt
-rw-r--r-- 1 root root 1704 Sep 4 11:30 server.key
4.证书配置语法
#开启ssl认证
Syntax: ssl on | off;
Default: ssl off;
Context: http, server
#指定证书文件
Syntax: ssl_certificate file;
Default: —
Context: http, server
#指定私钥文件
Syntax: ssl_certificate_key file;
Default: —
Context: http, server
5.配置nginx证书
[root@web01 ~]# vim /etc/nginx/conf.d/linux.ssl.com.conf
server {
listen 443 ssl;
server_name linux.ssl.com;
ssl_certificate /etc/nginx/ssl_key/server.crt;
ssl_certificate_key /etc/nginx/ssl_key/server.key;
location / {
root /code/ssl;
index index.html;
}
}
6.重启访问
[root@web01 ~]# systemctl restart nginx
#配置hosts
10.0.0.7 linux.ssl.com
7.http自动转化为HTTPS
[root@web01 ~]# vim /etc/nginx/conf.d/linux.ssl.com.conf
server {
listen 443 ssl;
server_name linux.ssl.com;
ssl_certificate /etc/nginx/ssl_key/server.crt;
ssl_certificate_key /etc/nginx/ssl_key/server.key;
location / {
root /code/ssl;
index index.html;
}
}
server {
listen 80;
server_name linux.ssl.com;
rewrite (.*) https://linux.ssl.com$1;
#return 302 https://$server_name$request_uri;
}
三、全站HTTPS
1.环境准备
| 主机 |
外网IP |
内网IP |
身份 |
| lb01 |
10.0.0.4 |
172.16.1.4 |
负载均衡 |
| web01 |
|
172.16.1.7 |
web服务器 |
| web03 |
|
172.16.1.9 |
web服务器 |
2.配置web服务器
1.配置nginx
[root@web01 ~]# vim /etc/nginx/conf.d/linux.https.com.conf
server {
listen 80;
server_name linux.https.com;
location / {
root /code/https;
index index.html;
}
}
2.配置站点
[root@web01 ~]# mkdir /code/https
[root@web01 ~]# echo "web01111111" > /code/https/index.html
[root@web03 ~]# mkdir /code/https
[root@web03 ~]# echo "web033333333" > /code/https/index.html
3.测试访问
[root@web01 ~]# systemctl restart nginx
[root@web03 ~]# systemctl restart nginx
#配置hosts访问
3.配置负载均衡服务器
1.配置证书
[root@web01 ~]# scp -r /etc/nginx/ssl_key 172.16.1.4:/etc/nginx/
2.配置nginx
[root@lb01 ~]# vim /etc/nginx/conf.d/linux.https.com.conf
upstream https_web {
server 172.16.1.7:80;
server 172.16.1.9;
}
server {
listen 80;
server_name linux.https.com;
rewrite (.*) https://linux.https.com$1;
}
server {
listen 443 ssl;
server_name linux.https.com;
ssl_certificate /etc/nginx/ssl_key/server.crt;
ssl_certificate_key /etc/nginx/ssl_key/server.key;
location / {
proxy_pass http://https_web;
include proxy_params;
}
}
3.重启访问
[root@lb01 ~]# nginx -t
nginx: the configuration file /etc/nginx/nginx.conf syntax is ok
nginx: configuration file /etc/nginx/nginx.conf test is successful
[root@lb01 ~]# systemctl restart nginx
#配置hosts
四、实战演练
1.需求
1.恢复快照
2.搭建博客和phpmyadmin
3.数据库单独部署
4.配置7层负载均衡
5.多台WEB服务器(2台)文件共享
6.给项目配置全站HTTPS
2.环境准备
| 服务器 |
外网IP |
内网IP |
身份 |
| lb01 |
10.0.0.4 |
172.16.1.4 |
负载均衡服务器 |
| web01 |
|
172.16.1.7 |
Web服务器 |
| web02 |
|
172.16.1.8 |
Web服务器 |
| db01 |
|
172.16.1.51 |
数据库服务器 |
| nfs |
|
172.16.1.31 |
文件共享服务器 |
3.web01服务器配置
1.关闭防火墙
[root@web01 ~]# systemctl disable firewalld
2.关闭selinux
[root@web01 ~]# vim /etc/selinux/config
SELINUX=disabled
3.配置官方源
[root@web01 ~]# vim /etc/yum.repos.d/nginx.repo
[nginx-stable]
name=nginx stable repo
baseurl=http://nginx.org/packages/centos/7/$basearch/
gpgcheck=1
enabled=1
gpgkey=https://nginx.org/keys/nginx_signing.key
module_hotfixes=true
4.安装依赖
[root@web01 ~]# yum install -y gcc gcc-c++ autoconf pcre pcre-devel make automake wget httpd-tools vim tree
5.安装nginx
[root@web01 ~]# yum -y install nginx
6.配置nginx文件
[root@web01 ~]# vim /etc/nginx/nginx.conf
user www;
client_max_body_size 200m;
7.创建统一用户
[root@web01 ~]# groupadd www -g 666
[root@web01 ~]# useradd www -u 666 -g 666
8.检查服务并启动服务、设置开机自启
[root@web01 ~]# nginx -t
nginx: the configuration file /etc/nginx/nginx.conf syntax is ok
nginx: configuration file /etc/nginx/nginx.conf test is successful
[root@web01 ~]# systemctl start nginx
[root@web01 ~]# systemctl enable nginx
Created symlink from /etc/systemd/system/multi-user.target.wants/nginx.service to /usr/lib/systemd/system/nginx.service.
9.配置nginx站点文件
[root@web01 ~]# vim /etc/nginx/conf.d/linux.wordpress.com.conf
server {
listen 80;
server_name linux.wordpress.com;
charset utf-8;
location / {
root /code/wordpress;
index index.php;
}
location ~* \.php$ {
root /code/wordpress;
fastcgi_pass 127.0.0.1:9000;
fastcgi_param SCRIPT_FILENAME $document_root$fastcgi_script_name;
include fastcgi_params;
}
}
[root@web01 ~]# vim /etc/nginx/conf.d/linux.php.com.conf
server {
listen 80;
server_name linux.php.com;
charset utf-8;
root /code/php;
location / {
index index.php;
}
location ~* \.php$ {
fastcgi_pass 127.0.0.1:9000;
fastcgi_param SCRIPT_FILENAME $document_root$fastcgi_script_name;
include fastcgi_params;
}
}
10.检查服务并重启
[root@web01 ~]# nginx -t
nginx: the configuration file /etc/nginx/nginx.conf syntax is ok
nginx: configuration file /etc/nginx/nginx.conf test is successful
[root@web01 ~]# systemctl restart nginx
11.创建站点目录
[root@web01 ~]# mkdir /code
12.上传源码包并解压到指定目录
[root@web01 ~]# ll
-rw-r--r-- 1 root root 11060845 Sep 1 15:39 phpMyAdmin-4.9.0.1-all-languages.zip
-rw-r--r-- 1 root root 11098483 Aug 26 10:49 wordpress-5.0.3-zh_CN.tar.gz
[root@web01 ~]# tar xf wordpress-5.0.3-zh_CN.tar.gz -C /code/
[root@web01 ~]# unzip phpMyAdmin-4.9.0.1-all-languages.zip -d /code/
13.配置代码
[root@web01 /code]# cp php/config.sample.inc.php php/config.inc.php
[root@web01 /code]# vim php/config.inc.php
$cfg['Servers'][$i]['host'] = '172.16.1.51';
14.授权目录
[root@web01 ~]# chown -R www:www /code/
[root@web01 /code]# chown -R www.www /var/lib/php/session
4.web02服务器配置
1.关闭防火墙
[root@web02 ~]# systemctl disable firewalld
2.关闭selinux
[root@web02 ~]# vim /etc/selinux/config
SELINUX=disabled
3.配置官方源
[root@web02 ~]# vim /etc/yum.repos.d/nginx.repo
[nginx-stable]
name=nginx stable repo
baseurl=http://nginx.org/packages/centos/7/$basearch/
gpgcheck=1
enabled=1
gpgkey=https://nginx.org/keys/nginx_signing.key
module_hotfixes=true
4.安装依赖
[root@web02 ~]# yum install -y gcc gcc-c++ autoconf pcre pcre-devel make automake wget httpd-tools vim tree
5.安装nginx
[root@web02 ~]# yum -y install nginx
6.配置nginx
[root@web02 ~]# vim /etc/nginx/nginx.conf
user www;
client_max_body_size 200m;
7.创建统一用户
[root@web02 ~]# groupadd www -g 666
[root@web02 ~]# useradd www -u 666 -g 666
8.启动服务并设置开机自启
[root@web02 ~]# systemctl start nginx
[root@web02 ~]# systemctl enable nginx
Created symlink from /etc/systemd/system/multi-user.target.wants/nginx.service to /usr/lib/systemd/system/nginx.servi
9.配置nginx站点文件
[root@web01 /code]# scp /etc/nginx/conf.d/* 172.16.1.8:/etc/nginx/conf.d/
root@172.16.1.8's password:
linux.php.com.conf 100% 286 124.7KB/s 00:00
linux.wordpress.com.conf 100% 323 228.3KB/s 00:00
10.检查服务并重启
[root@web02 ~]# nginx -t
nginx: the configuration file /etc/nginx/nginx.conf syntax is ok
nginx: configuration file /etc/nginx/nginx.conf test is successful
[root@web02 ~]# systemctl restart nginx
11.创建目录
[root@web02 ~]# mkdir /code
12.上传源码包并解压
[root@web01 /code]# scp /root/wordpress-5.0.3-zh_CN.tar.gz 172.16.1.8:/code
root@172.16.1.8's password:
wordpress-5.0.3-zh_CN.tar.gz 100% 11MB 21.8MB/s 00:00
[root@web01 /code]# scp /root/phpMyAdmin-4.9.0.1-all-languages.zip 172.16.1.8:/code
root@172.16.1.8's password:
phpMyAdmin-4.9.0.1-all-languages.zip 100% 11MB 25.6MB/s 00:00
[root@web02 ~]# cd /code/
[root@web02 /code]# tar xf wordpress-5.0.3-zh_CN.tar.gz
[root@web02 /code]# unzip phpMyAdmin-4.9.0.1-all-languages.zip
13.配置代码
[root@web02 /code]# cp php/config.sample.inc.php php/config.inc.php
[root@web02 /code]# vim php/config.inc.php
$cfg['Servers'][$i]['host'] = '172.16.1.51';
14.授权目录
[root@web02 ~]# chown -R www:www /code/
[root@web02 /code]# chown -R www.www /var/lib/php/session
5.web01安装PHP
1.创建目录
[root@web01 ~]# mkdir /package
[root@web01 ~]# cd /package/
2.上传源码包并解压
[root@web01 /package]# rz
[root@web01 /package]# ll
total 19424
-rw-r--r-- 1 root root 19889622 Aug 26 09:04 php.tar.gz
[root@web01 /package]# tar xf php.tar.gz
3.安装PHP
[root@web01 /package]# yum -y localinstall *.rpm
5.配置PHP
[root@web01 /package]# vim /etc/php-fpm.d/www.conf
user = www
group = www
[root@web01 /package]# vim /etc/php.ini
post_max_size = 200M
upload_max_filesize = 200M
6.启动PHP并设置开机自启
[root@web01 /package]# systemctl restart php-fpm.service
[root@web01 /package]# systemctl enable php-fpm.service
Created symlink from /etc/systemd/system/multi-user.target.wants/php-fpm.service to /usr/lib/systemd/system/php-fpm.service.
6.web02安装PHP
1.创建目录
[root@web02 /code]# mkdir /package
[root@web02 /code]# cd /package/
2.上传源码包并解压
[root@web02 /package]# rz
[root@web02 /package]# ll
total 19424
-rw-r--r-- 1 root root 19889622 Aug 26 09:04 php.tar.gz
[root@web02 /package]# tar xf php.tar.gz
3.安装PHP
[root@web02 /package]# yum -y localinstall *.rpm
5.配置PHP
[root@web02 /package]# vim /etc/php-fpm.d/www.conf
user = www
group = www
[root@web02 /package]# vim /etc/php.ini
post_max_size = 200M
upload_max_filesize = 200M
6.启动PHP并设置开机自启
[root@web02 /package]# systemctl start php-fpm.service
[root@web02 /package]# systemctl enable php-fpm.service
Created symlink from /etc/systemd/system/multi-user.target.wants/php-fpm.service to /usr/lib/systemd/system/php-fpm.service.
7.db01安装数据库
1.安装数据库
[root@db01 ~]# yum -y install mariadb-server
2.启动服务并设置开机自启
[root@db01 ~]# systemctl start mariadb.service
[root@db01 ~]# systemctl enable mariadb.service
Created symlink from /etc/systemd/system/multi-user.target.wants/mariadb.service to /usr/lib/systemd/system/mariadb.service.
3.设置服务器密码并验证密码
[root@db01 ~]# mysqladmin -uroot password
New password:
Confirm new password:
[root@db01 ~]# mysql -u root -p
Enter password:
Welcome to the MariaDB monitor. Commands end with ; or \g.
Your MariaDB connection id is 3
Server version: 5.5.65-MariaDB MariaDB Server
Copyright (c) 2000, 2018, Oracle, MariaDB Corporation Ab and others.
Type 'help;' or '\h' for help. Type '\c' to clear the current input statement.
MariaDB [(none)]>
4.进行数据库授权
MariaDB [(none)]> create database wordpress;
Query OK, 1 row affected (0.00 sec)
MariaDB [(none)]> grant all on wordpress.* to wp@'172.16.1.%' identified by 'wp123';
Query OK, 0 rows affected (0.00 sec)
MariaDB [(none)]> grant all on *.* to admin@'172.16.1.%' identified by 'admin123';
Query OK, 0 rows affected (0.00 sec)
MariaDB [(none)]> flush privileges;
Query OK, 0 rows affected (0.00 sec)
8.nfs服务器实现文件共享
1.安装nfs
[root@nfs ~]# yum -y install rpcbind nfs-utils
2.启动服务并设置开机自启
[root@nfs ~]# systemctl start rpcbind nfs
[root@nfs ~]# systemctl enable rpcbind nfs
Created symlink from /etc/systemd/system/multi-user.target.wants/nfs-server.service to /usr/lib/systemd/system/nfs-server.service.
3.创建用户
[root@nfs ~]# groupadd www -g 666
[root@nfs ~]# useradd www -u 666 -g 666
4.创建目录并授权
[root@nfs ~]# mkdir -p /data/wp
[root@nfs ~]# chown -R www:www /data/wp/
5.配置nfs
[root@nfs ~]# vim /etc/exports
/data/wp 172.16.1.0/24(rw,sync,all_squash,anonuid=666,anongid=666)
6.重启并检查配置
[root@nfs ~]# systemctl restart rpcbind nfs
[root@nfs ~]# cat /var/lib/nfs/etab
/data/wp 172.16.1.0/24(rw,sync,wdelay,hide,nocrossmnt,secure,root_squash,all_squash,no_subtree_check,secure_locks,acl,no_pnfs,anonuid=666,anongid=666,sec=sys,rw,secure,root_squash,all_squash)
9.web01、web02实现nfs挂载
1.web01服务器配置
1.安装nfs
[root@web01 /code]# yum -y install rpcbind nfs-utils
2.启动服务并设置开机自启
[root@web01 /code]# systemctl start rpcbind nfs
[root@web01 /code]# systemctl enable rpcbind nfs
Created symlink from /etc/systemd/system/multi-user.target.wants/nfs-server.service to /usr/lib/systemd/system/nfs-server.service.
3.查看挂载点
[root@web01 /code]# showmount -e 172.16.1.31
Export list for 172.16.1.31:
/data/wp 172.16.1.0/24
4.挂载目录并查看挂载
[root@web01 /code]# mount -t nfs 172.16.1.31:/data/wp /code/wordpress/wp-content/uploads/
[root@web01 /code]# df -h
Filesystem Size Used Avail Use% Mounted on
/dev/sda3 98G 1.9G 96G 2% /
devtmpfs 980M 0 980M 0% /dev
tmpfs 991M 0 991M 0% /dev/shm
tmpfs 991M 9.6M 981M 1% /run
tmpfs 991M 0 991M 0% /sys/fs/cgroup
/dev/sda1 497M 120M 378M 25% /boot
tmpfs 199M 0 199M 0% /run/user/0
172.16.1.31:/data/wp 98G 1.7G 96G 2% /code/wordpress/wp-content/uploads
2.web02服务器配置
1.安装nfs
[root@web02 /package]# yum -y install rpcbind nfs-utils
2.启动服务并设置开机自启
[root@web02 /package]# systemctl start rpcbind nfs
[root@web02 /package]# systemctl enable rpcbind nfs
Created symlink from /etc/systemd/system/multi-user.target.wants/nfs-server.service to /usr/lib/systemd/system/nfs-server.service.
3.查看挂载点
[root@web02 /package]# showmount -e 172.16.1.31
Export list for 172.16.1.31:
/data/wp 172.16.1.0/24
4.挂载目录并查看挂载
[root@web02 /package]# mount -t nfs 172.16.1.31:/data/wp /code/wordpress/wp-content/uploads/
[root@web02 /package]# df -h
Filesystem Size Used Avail Use% Mounted on
/dev/sda3 98G 1.9G 96G 2% /
devtmpfs 980M 0 980M 0% /dev
tmpfs 991M 0 991M 0% /dev/shm
tmpfs 991M 9.6M 981M 1% /run
tmpfs 991M 0 991M 0% /sys/fs/cgroup
/dev/sda1 497M 120M 378M 25% /boot
tmpfs 199M 0 199M 0% /run/user/0
172.16.1.31:/data/wp 98G 1.7G 96G 2% /code/wordpress/wp-content/uploads
9.lb01服务器配置
1.配置官方源
[root@lb01 ~]# scp 172.16.1.7:/etc/yum.repos.d/nginx.repo /etc/yum.repos.d/
The authenticity of host '172.16.1.7 (172.16.1.7)' can't be established.
ECDSA key fingerprint is SHA256:g6buQ4QMSFl+5MMAh8dTCmLtkIfdT8sgRFYc6uCzV3c.
ECDSA key fingerprint is MD5:5f:d7:ad:07:e8:fe:d2:49:ec:79:2f:d4:91:59:c5:03.
Are you sure you want to continue connecting (yes/no)? yes
Warning: Permanently added '172.16.1.7' (ECDSA) to the list of known hosts.
root@172.16.1.7's password:
nginx.repo 100% 183 137.6KB/s 00:00
2.安装依赖
[root@lb01 ~]# yum install -y gcc gcc-c++ autoconf pcre pcre-devel make automake wget httpd-tools vim tree
3.安装nginx
[root@lb01 ~]# yum -y install nginx
3.配置nginx
[root@lb01 ~]# vim /etc/nginx/nginx.conf
user www;
4.创建用户
[root@lb01 ~]# groupadd www -g 666
[root@lb01 ~]# useradd www -u666 -g 666
5.生成https证书
[root@lb01 ~]# mkdir /etc/nginx/ssl_key
[root@lb01 ~]# cd /etc/nginx/ssl_key/
[root@lb01 /etc/nginx/ssl_key]# openssl genrsa -idea -out server.key 2048
Generating RSA private key, 2048 bit long modulus
...............................................+++
.............+++
e is 65537 (0x10001)
Enter pass phrase for server.key:
Verifying - Enter pass phrase for server.key:
[root@lb01 /etc/nginx/ssl_key]# openssl req -days 36500 -x509 -sha256 -nodes -newkey rsa:2048 -keyout server.key -out server.crt
Generating a 2048 bit RSA private key
.........................+++
.......................................................................................................+++
writing new private key to 'server.key'
-----
You are about to be asked to enter information that will be incorporated
into your certificate request.
What you are about to enter is what is called a Distinguished Name or a DN.
There are quite a few fields but you can leave some blank
For some fields there will be a default value,
If you enter '.', the field will be left blank.
-----
Country Name (2 letter code) [XX]:cn
State or Province Name (full name) []:mei
Locality Name (eg, city) [Default City]:guo
Organization Name (eg, company) [Default Company Ltd]:shan
Organizational Unit Name (eg, section) []:kou
Common Name (eg, your name or your server's hostname) []:kenan
Email Address []:kenan
6.配置站点文件
[root@lb01 /etc/nginx/ssl_key]# vim /etc/nginx/conf.d/linux.wordpress.com.conf
upstream wordpress {
server 172.16.1.7:80;
server 172.16.1.8:80;
}
server {
listen 80;
server_name linux.wordpress.com;
rewrite (.*) https://linux.wordpress.com$1;
}
server {
listen 443 ssl;
server_name linux.wordpress.com;
ssl_certificate /etc/nginx/ssl_key/server.crt;
ssl_certificate_key /etc/nginx/ssl_key/server.key;
location / {
proxy_pass http://wordpress;
include /etc/nginx/conf.d/proxy_params;
}
}
[root@lb01 /etc/nginx/conf.d]# vim linux.php.com.conf
upstream php {
server 172.16.1.7:80;
server 172.16.1.8:80;
}
server {
listen 80;
server_name linux.php.com;
rewrite (.*) https://linux.php.com$1;
}
server {
listen 443 ssl;
server_name linux.php.com;
ssl_certificate /etc/nginx/ssl_key/server.crt;
ssl_certificate_key /etc/nginx/ssl_key/server.key;
location / {
proxy_pass http://php;
include /etc/nginx/conf.d/proxy_params;
}
}
7.重启服务并设置开机自启
[root@lb01 /etc/nginx/ssl_key]# systemctl start nginx
[root@lb01 /etc/nginx/ssl_key]# systemctl enable nginx
Created symlink from /etc/systemd/system/multi-user.target.wants/nginx.service to /usr/lib/systemd/system/nginx.service.
最新文章
- closure
- 采用dlopen、dlsym、dlclose加载动态链接库【总结】(转)
- Silverlight TreeView 动态绑定Xml 文件
- android 主线程和子线程之间的消息传递
- Card Game Cheater---hdu1528(扑克建图求二分匹配)
- jmeter 使用聚合报告分析jtl文件
- Xcode打包framework脚本
- Ruby01: Beginner
- temp-黄河农商行路径
- Openning
- APP开发选择什么框架好? 请看这里!
- FFmpeg在ubuntu下安装及使用
- [爬虫]爬虫时碰到的IOError: [Errno ftp error] [Errno 10060]错误的原因以及解决方法
- Java中的基本类型转换,数据溢出原理
- Metrics.NET step by step
- c/c++ 用克鲁斯卡尔(kruskal)算法构造最小生成树
- MVC中返回json数据的两种方式
- VLAN IEEE802.1Q
- for循环实例2
- Jq_select的操作
热门文章
- [Java并发编程之美]第2章 synchroized关键字
- [ArcGIS]高程地图-把DEM栅格数据(.tif)转换为TIN矢量数据,并储存TIN数据。
- C#开发PACS医学影像处理系统(十三):绘图处理之病灶测量
- jekins的搭建和踩过的坑
- Redis安装即python使用
- Window10 上MindSpore(CPU)用LeNet网络训练MNIST
- 【Netty之旅四】你一定看得懂的Netty客户端启动源码分析!
- Linux系统编程—信号量
- OSI和TCP/IP参考模型
- C# 中的 is 真的是越来越强大,越来越语义化