vue-vite浅析
大家好,我是小雨小雨,致力于分享有趣的、实用的文章。
内容分为原创和翻译,如果有问题,欢迎随时评论或私信,很乐意和大家一起探讨,一起进步。
分享不易,希望能够得到大家的支持和关注。
vite出了好久了,也出了好多相关文章,我也想出,然后我就写了。
该文档对应的vite版本:2.0.0-beta.4
vite文档
整体流程
笔者认为,vite是站在巨人肩膀上的一个创新型dev构建工具,分别继承于:
其中洋葱模型如果将next()放到函数最底部的话,和rollup的插件驱动是类似的。
也就是说可插拔架构是vite的整体思想,不仅可以编写内部插件,将内部插件原子化,还可以借助npm上各种已有的插件。非常灵活。
为什么采用es module呢?
vite采用的es module进行模块导入,这是现代浏览器原生支持的,当import一个模块时,会发出一个请求,正因如此,只能在服务中使用es module。而且import的模块路径发生变化的时候,会重新发送请求,路径变化包括query。
下面我们进入整体
vite采用monorepo架构,我们要关心的代码主要两部分:
先从vite cli说起。
这里是vite的入口:
const { createServer } = await import('./server')

try {

  const server = await createServer(

    {

      root,

      mode: options.mode,

      logLevel: options.logLevel,

      server: cleanOptions(options) as ServerOptions

    },

    options.config

  )

  await server.listen()
简单粗暴,通过createServer创建一个服务,然后开始监听,我们直接一个瞎子摸葫芦,打开createServer看看。
export async function createServer(

  inlineConfig: UserConfig & { mode?: string } = {},

  configPath?: string | false

): Promise<ViteDevServer> {

  // 代码太多不放了,放点方便看的,有兴趣的话可以打开代码一边看这里的注释一边看代码

  // 配置相关,比如记载本地配置文件、集成插件,环境变量等等

  // 利用connect初始化服务,connect是一个使用中间件为node提供可扩展服务的http框架,有兴趣可以去看看

  // 创建webSocket服务

  // 利用chokidar进行文件监听

  // vite继承rollup实现了一个迷你版的构解析构建工具

  // 创建一个图来维护模块之间的关系

  // 当文件发生变化的时候进行hmr相关操作,后续会介绍

  // 接入各种各样的中间件,比如接口代理的、静态服务的、解析请求资源的、重定向、处理html的等,其中最重要的就是解析请求资源的了,下面具体来扣一下这块

  // 调用插件中的configureServer,这一步可以将vite中所有内容暴露给用户,比如node服务app,配置,文件监听器,socket等等,很大胆,很坏,但是我好喜欢

  // 返回node服务,供listen

}
运行完这一堆后,我们就启动了一个服务,我们发现,vite到目前为止,并没有任何关于打包的代码,那他快在哪里呢?
其实没有打包就是vite快的原因之一,而他的打包做到了真正的按需。
启动服务后,我们访问页面会发送一个个的请求,这些请求会经过中间件处理,而中间件,就会进行打包,注入等相关操作。
核心内容其实就是上面注释中写的解析请求资源这个中间件,vite中叫做transformMiddleware
export function transformMiddleware(

  server: ViteDevServer

): Connect.NextHandleFunction {

  const {

    config: { root, logger },

    moduleGraph

  } = server

  return async (req, res, next) => {

      // 其他代码

      // Only apply the transform pipeline to:

      // - requests that initiate from ESM imports (any extension)

      // - CSS (even not from ESM)

      // - Source maps (only for resolving)

      if (

        isJSRequest(url) || // 指定的(j|t)sx?|mjs|vue这类文件,或者没有后缀

        isImportRequest(url) || // import来的

        isCSSRequest(url) || // css

        isHTMLProxy(url) || // html-proxy

        server.config.transformInclude(withoutQuery) // 命中需要解析的

      ) {

        // 移除import的query,例: (\?|$)import=xxxx

        url = removeImportQuery(url)

        // 删调idprefix,importAnalysis生成的不合法的浏览器说明符被预先解析id

        if (url.startsWith(VALID_ID_PREFIX)) {

          url = url.slice(VALID_ID_PREFIX.length)

        }

        // for CSS, we need to differentiate between normal CSS requests and

        // imports

        // 处理css链接

        if (isCSSRequest(url) && req.headers.accept?.includes('text/css')) {

          url = injectQuery(url, 'direct')

        }

        // check if we can return 304 early

        const ifNoneMatch = req.headers['if-none-match']

        // 命中浏览器缓存,利用浏览器的特性

        if (

          ifNoneMatch &&

          (await moduleGraph.getModuleByUrl(url))?.transformResult?.etag ===

            ifNoneMatch

        ) {

          res.statusCode = 304

          return res.end()

        }

        // 解析vue js css 等文件的关键

        const result = await transformRequest(url, server)

        if (result) {

          const type = isDirectCSSRequest(url) ? 'css' : 'js'

          const isDep =

            DEP_VERSION_RE.test(url) ||

            url.includes(`node_modules/${DEP_CACHE_DIR}`)

          return send(

            req,

            res,

            result.code,

            type,

            result.etag,

            // allow browser to cache npm deps!

            isDep ? 'max-age=31536000,immutable' : 'no-cache',

            result.map

          )

        }

      }

    } catch (e) {

      return next(e)

    }

    next()

  }

}
其中最重要的是transformRequest,该方法进行了缓存,请求资源解析,加载,转换操作。
export async function transformRequest(

  url: string,

  { config: { root }, pluginContainer, moduleGraph, watcher }: ViteDevServer

): Promise<TransformResult | null> {

  url = removeTimestampQuery(url)

  const prettyUrl = isDebug ? prettifyUrl(url, root) : ''

  // 检查上一次的transformResult,这个东西会在hmr中被主动移除掉

  const cached = (await moduleGraph.getModuleByUrl(url))?.transformResult

  if (cached) {

    isDebug && debugCache(`[memory] ${prettyUrl}`)

    return cached

  }

  // resolve

  const id = (await pluginContainer.resolveId(url))?.id || url

  const file = cleanUrl(id)

  let code = null

  let map: SourceDescription['map'] = null

  // load

  const loadStart = Date.now()

  const loadResult = await pluginContainer.load(id)

  // 加载失败,直接读文件

  if (loadResult == null) {

    // try fallback loading it from fs as string

    // if the file is a binary, there should be a plugin that already loaded it

    // as string

    try {

      code = await fs.readFile(file, 'utf-8')

      isDebug && debugLoad(`${timeFrom(loadStart)} [fs] ${prettyUrl}`)

    } catch (e) {

      if (e.code !== 'ENOENT') {

        throw e

      }

    }

    if (code) {

      map = (

        convertSourceMap.fromSource(code) ||

        convertSourceMap.fromMapFileSource(code, path.dirname(file))

      )?.toObject()

    }

  } else {

    isDebug && debugLoad(`${timeFrom(loadStart)} [plugin] ${prettyUrl}`)

    if (typeof loadResult === 'object') {

      code = loadResult.code

      map = loadResult.map

    } else {

      code = loadResult

    }

  }

  if (code == null) {

    throw new Error(`Failed to load url ${url}. Does the file exist?`)

  }

  // 将当前处理请求地址添加到维护的图中

  const mod = await moduleGraph.ensureEntryFromUrl(url)

  // 监听

  if (mod.file && !mod.file.startsWith(root + '/')) {

    watcher.add(mod.file)

  }

  // transform

  const transformStart = Date.now()

  // 所有的插件都被闭包保存了,然后调用pluginContainer上的某个钩子函数,该函数会loop插件进行具体操作

  const transformResult = await pluginContainer.transform(code, id, map)

  if (

    transformResult == null ||

    (typeof transformResult === 'object' && transformResult.code == null)

  ) {

    // no transform applied, keep code as-is

    isDebug &&

      debugTransform(

        timeFrom(transformStart) + chalk.dim(` [skipped] ${prettyUrl}`)

      )

  } else {

    isDebug && debugTransform(`${timeFrom(transformStart)} ${prettyUrl}`)

    if (typeof transformResult === 'object') {

      code = transformResult.code!

      map = transformResult.map

    } else {

      code = transformResult

    }

  }

  // 返回并缓存当前转换结果

  return (mod.transformResult = {

    code,

    map,

    etag: getEtag(code, { weak: true })

  } as TransformResult)

}
主要涉及插件提供的三个钩子函数:
- pluginContainer.resolveId
- pluginContainer.load
- pluginContainer.transform
resolveId和load将请求的url解析成对应文件中的内容供transform使用
transform会调用插件提供的transform方法对不同文件代码进行转换操作,比如vite提供的plugin-vue,就对vue进行了转换,提供的plugin-vue-jsx,就对jsx写法进行了支持。如果要支持其他框架语言,也可以自行添加。
到这里,vite的大致流程就结束了。
可能光看代码不是很直观,这边提供一个简单的例子:
<!DOCTYPE html>

<html lang="en">

<head>

    <title>Vite App</title>

</head>

<body>

    <div id="app"></div>

    <script type="module" src="/src/main.js"></script>

</body>

</html>
// main.js

import { createApp } from 'vue'

import App from './App.vue'

createApp(App).mount('#app')
// app.vue

<template>

    <div>hello world</div>

</template>
浏览器中看到的app.vue中的内容是这样的:
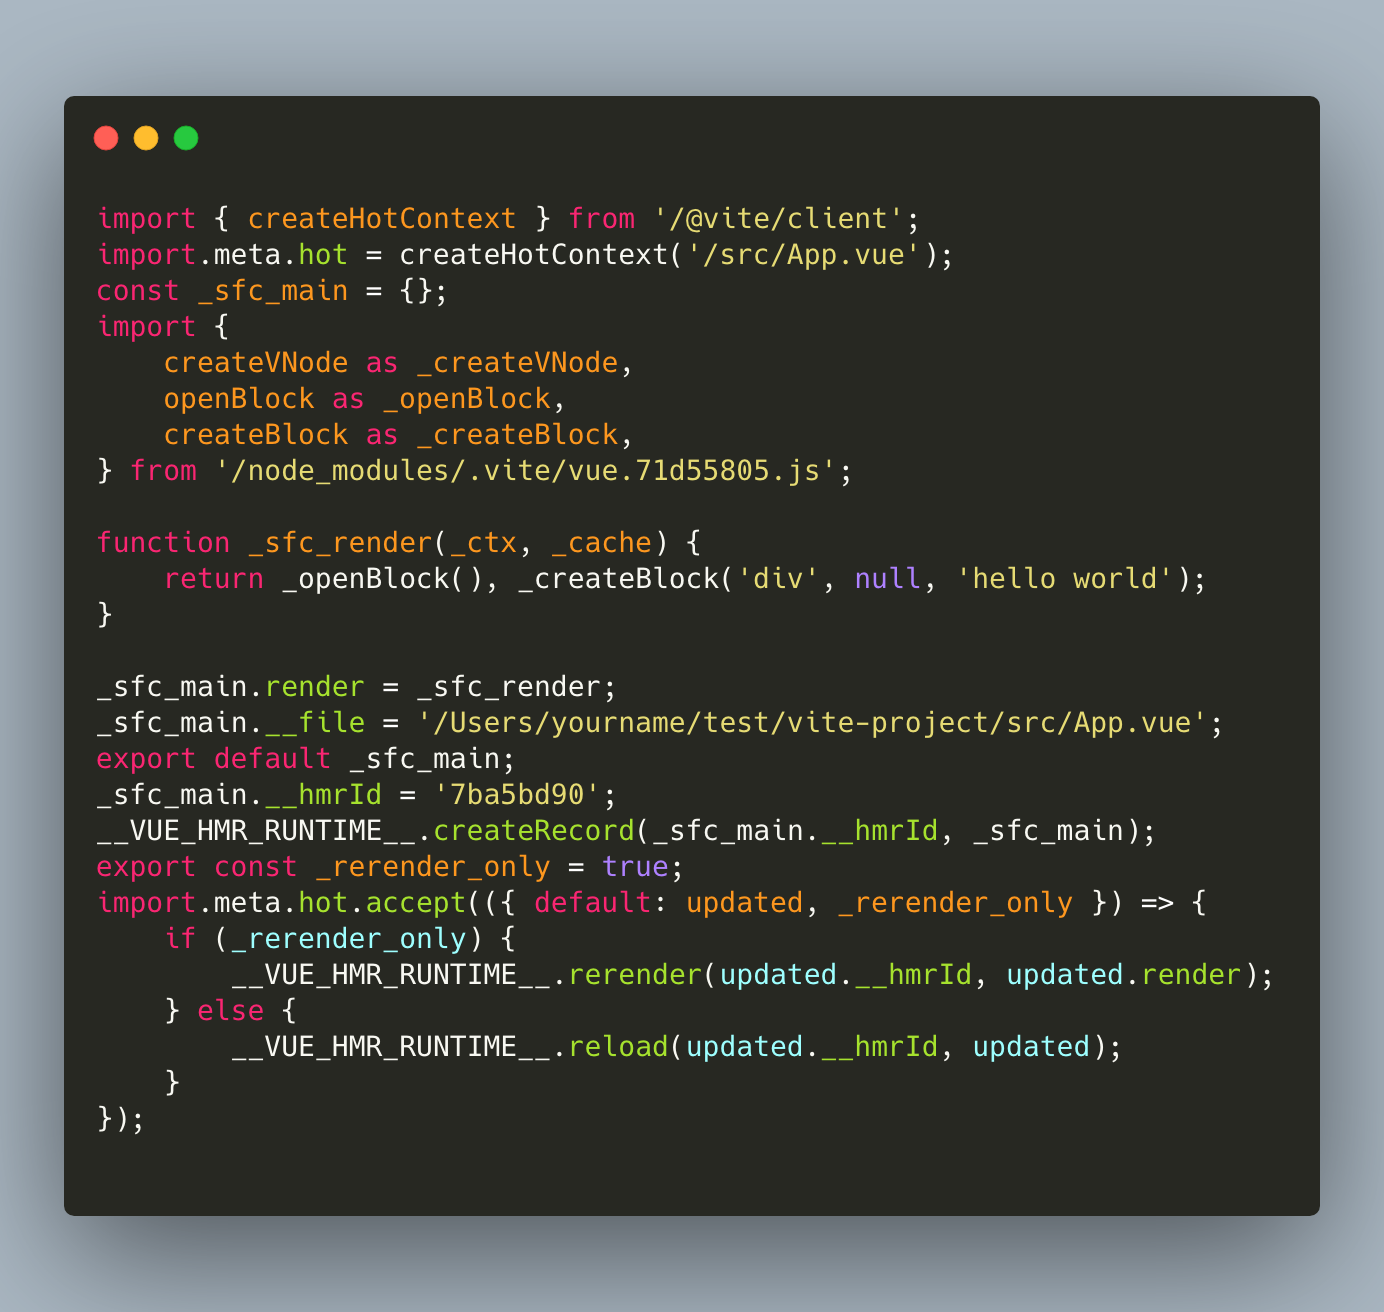
除了render相关函数,还有createHotContext、import.meta.hot.accept这类内容,这是和hmr相关的,下面会讲到。
hmr
hmr在我们的开发工程中也提到举足轻重的作用,那vite是怎么做的呢?
涉及部分:
client提供hmr上下文环境,其中包含当前文件对应的更新方法,ws通知时会调用
importsAnalysisimport模块的时候对模块进行图依赖更新、拼接等操作,比如针对hmr模块注入client中提供的hmr api
plugin-vue注入vue上下文环境,并且将client中的方法拼接到当前模块中
当我们import一个模块时,会发送一个请求,当前请求在transformMiddleware中间件处理的时候,当前请求url会被添加到图中,然后被各种插件的transform处理,其中就包括importsAnalysis插件,importsAnalysis会通过es-module-lexer解析import的export,将当前模块插入到模块图中,并且将当前importe和被引入的importedModules建立依赖关系。
// importsAnalysis.ts

if (!isCSSRequest(importer)) {

    const prunedImports = await moduleGraph.updateModuleInfo(

      importerModule, // 当前解析的主体

      importedUrls, // 被引入的文件

      normalizedAcceptedUrls,

      isSelfAccepting

    )

    if (hasHMR && prunedImports) {

      handlePrunedModules(prunedImports, server)

    }

}
并且会为当前请求的文件中加入hmr api。
// importsAnalysis.ts

if (hasHMR) {

    // inject hot context

    str().prepend(

      `import { createHotContext } from "${CLIENT_PUBLIC_PATH}";` +

        `import.meta.hot = createHotContext(${JSON.stringify(

          importerModule.url

        )});`

    )

  }
除了importsAnalysis插件外,还有plugin-vue插件的transform,插入的是re-render方法。
// /plugin-vue/src/main.ts

if (devServer && !isProduction) {

    output.push(`_sfc_main.__hmrId = ${JSON.stringify(descriptor.id)}`)

    output.push(

      `__VUE_HMR_RUNTIME__.createRecord(_sfc_main.__hmrId, _sfc_main)`

    )

    // check if the template is the only thing that changed

    if (prevDescriptor && isOnlyTemplateChanged(prevDescriptor, descriptor)) {

      output.push(`export const _rerender_only = true`)

    }

    output.push(

      `import.meta.hot.accept(({ default: updated, _rerender_only }) => {`,

      `  if (_rerender_only) {`,

      `    __VUE_HMR_RUNTIME__.rerender(updated.__hmrId, updated.render)`,

      `  } else {`,

      `    __VUE_HMR_RUNTIME__.reload(updated.__hmrId, updated)`,

      `  }`,

      `})`

    )

}
其中__VUE_HMR_RUNTIME__为vue runtime暴露的,已经在main.js中引入过了,下面的import.meta.hot.accept则是client暴露的方法,import.meta为es module当前模块的元数据。
而client就是浏览器端hmr相关的逻辑了,也是上面插件注入的方法的依赖。
// client.ts

function acceptDeps(deps: string[], callback: HotCallback['fn'] = () => {}) {

    // hotModulesMap被闭包保存了

    // ownerPath是当importsAnalysis实例化hmr上下文的时候传入的当前模块的id地址

    const mod: HotModule = hotModulesMap.get(ownerPath) || {

      id: ownerPath,

      callbacks: []

    }

    mod.callbacks.push({

      deps,

      fn: callback

    })

    hotModulesMap.set(ownerPath, mod)

  }

  // 通过importsAnalysis添加在文件中

  // plugin-vue插件会使用该方法添加模块(mod),并且会添加一些vue相关的内容,比如:

  // 添加vue render方法,以供hmr调用

const hot = {

    // 调用的时候给callback增加刷新方法

    accept(deps: any, callback?: any) {

      if (typeof deps === 'function' || !deps) {

        // self-accept: hot.accept(() => {})

        acceptDeps([ownerPath], ([mod]) => deps && deps(mod))

      } else if (typeof deps === 'string') {

        // explicit deps

        acceptDeps([deps], ([mod]) => callback && callback(mod))

      } else if (Array.isArray(deps)) {

        acceptDeps(deps, callback)

      } else {

        throw new Error(`invalid hot.accept() usage.`)

      }

    },

    // ...

}
我们调用import.meta.hot.accept的时候,比如传入方法,那么会以importer模块为key将更新方法添加到一个hotModulesMap中。记录当前待更新模块。
接下来,ws会在在文件变化后发送message到浏览器端。这一步会涉及判断是否为自更新、(主要是根据accept方法主体内容判断,具体逻辑可自行查看)是否有importer等逻辑决定hmr类型。
我们以hmr类型为js-update为例子继续往下说。
主要是两个方法,一个是fetchUpdate,用来获取即将更新的模块,import模块,返回一个调用re-render的方法,一个是queueUpdate,用于执行fetchUpdate返回的方法。
进入fetchUpdate后,会判断是否更新的是当前模块,是的话添加当前模块到modulesToUpdate,不是的话将依赖的子模块添加到待更新的记录中modulesToUpdate,之后过滤出之前收集的待更新的模块,循环进行import操作,但是会在import模块的路径上加上当前时间戳,以强制触发http请求,用引入的新模块替换之前的旧模块,最后返回plugin-vue提供的re-render方法。
async function fetchUpdate({ path, acceptedPath, timestamp }: Update) {

  // 当前更新的模块

  const mod = hotModulesMap.get(path)

  if (!mod) {

    return

  }

  const moduleMap = new Map()

  // 自更新

  const isSelfUpdate = path === acceptedPath

  // make sure we only import each dep once

  const modulesToUpdate = new Set<string>()

  if (isSelfUpdate) {

    // self update - only update self

    modulesToUpdate.add(path)

  } else {

    // dep update

    for (const { deps } of mod.callbacks) {

      deps.forEach((dep) => {

        if (acceptedPath === dep) {

          modulesToUpdate.add(dep)

        }

      })

    }

  }

  // determine the qualified callbacks before we re-import the modules

  // 符合标准的更新函数才会留下来

  const qualifiedCallbacks = mod.callbacks.filter(({ deps }) => {

    return deps.some((dep) => modulesToUpdate.has(dep))

  })

  // 将modulesToUpdate变成对应模块的更新函数

  await Promise.all(

    Array.from(modulesToUpdate).map(async (dep) => {

      const disposer = disposeMap.get(dep)

      if (disposer) await disposer(dataMap.get(dep))

      const [path, query] = dep.split(`?`)

      try {

        // 这里又会发一个请求,然后新的模块就下来了,但是dom树还没变化,下载下来的文件会有id,对应当前即将被更新的模块

        const newMod = await import(

          /* @vite-ignore */

          path + `?t=${timestamp}${query ? `&${query}` : ''}`

        )

        moduleMap.set(dep, newMod)

      } catch (e) {

        warnFailedFetch(e, dep)

      }

    })

  )

  // 返回函数,函数内容是plugin-vue中的accept注入的,比如vue文件就是vue的render更新方法

  // 这里会调用新文件中的render方法,进而在浏览器端进行模块更新操作

  return () => {

    for (const { deps, fn } of qualifiedCallbacks) {

      fn(deps.map((dep) => moduleMap.get(dep)))

    }

    const loggedPath = isSelfUpdate ? path : `${acceptedPath} via ${path}`

    console.log(`[vite] hot updated: ${loggedPath}`)

  }

}
fetchUpdate的结果会流向queueUpdate,queueUpdate将更新任务放到微任务中,自动收集一定时间内的渲染。
async function queueUpdate(p: Promise<(() => void) | undefined>) {

  queued.push(p)

  if (!pending) {

    pending = true

    await Promise.resolve()

    pending = false

    const loading = [...queued]

    queued = []

    ;(await Promise.all(loading)).forEach((fn) => fn && fn())

  }

}
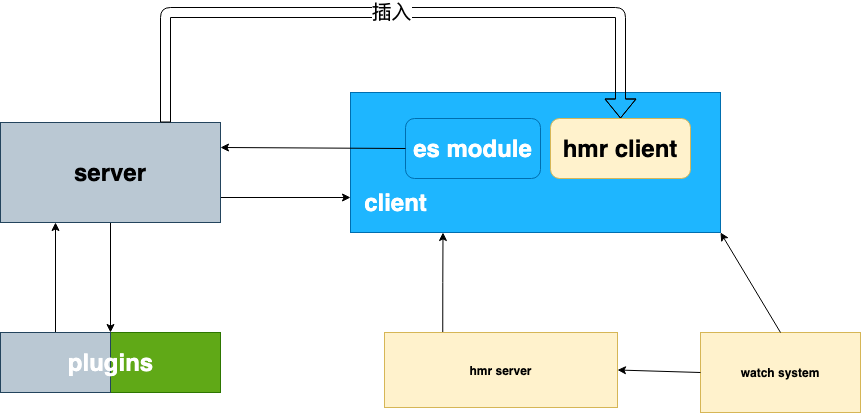
vite简版流程图
总结
vite对es module的使用让人惊艳,一下子解决了大项目build所有内容的痛点,而且与rollup完美集结合,任何rollup插件都可以在vite中使用。
当然,vite的这种思想不是首例,很早之前snowpack利用es module也是名噪一时。
vite目前主要解决的是dev环境的问题,生产环境还是需要build才能使用,vite使用esbuild进行生产环境打包,esbuild使用go开发,原生到原生,感兴趣的朋友可以去看一看,这里就不班门弄斧了。
最后感谢大家的内心阅读,如果觉得不错,可以通过关注,点赞,转发多多支持~
祝大家工作顺利,节节高升
最新文章
- Leetcode Permutations
- js 截取字符串,取指定位置的字符(完善中)
- 关于git(分布式版本控制系统)的一些操作和命令
- App主界面Tab实现方法
- hibernate base
- BFGS方法
- HDU 5029 Relief grain(离线+线段树+启发式合并)(2014 ACM/ICPC Asia Regional Guangzhou Online)
- [Asp.net MVC]Asp.net MVC5系列——Razor语法
- readonly和const区别
- Java 的swing.GroupLayout布局管理器的使用方法和实例(转)
- 管道通信(使用popen和pclose功能简单的控制管道)
- Nexus搭建私服 学习
- 201521123003《Java程序设计》第14周学习总结
- Git分支(2/5) -- Fast Forward 合并
- eclipse 设置maven来自动下载源码与doc
- 安卓开发笔记(二十六):Splash实现首页快速开屏功能
- Zookeeper运维小结--CancelledKeyException
- 2019年 十款Mac上必备的实用软件列表
- SharePoint JavaScript 更新用户和组字段
- 深入理解Java虚拟机6-chap8-9-斗者3星