Spring Cloud入门看这一篇就够了
SpringCloud微服务
架构演进
- 单体架构
- 垂直拆分
- 分布式SOA面向服务架构
- 微服务架构
服务调用方式:
- RPC,早期的webservice,现在热门的dubbo,都是RPC的典型代表
- HTTP,HttpClient,OKHttp,URLConnection,RestTemplate
Euraka服务注册中心
注册中心
- 添加依赖
<dependency>

	<groupId>org.springframework.cloud</groupId>

	<artifactId>spring-cloud-starter-netflix-eureka-client</artifactId>

</dependency>

<dependency>

    <groupId>org.springframework.cloud</groupId>

    <artifactId>spring-cloud-starter-netflix-eureka-server</artifactId>

</dependency>
- 使用@EnableEurekaServer注解开启注册服务
@SpringBootApplication

@EnableEurekaServer

public class EurekaServerApplication {

    public static void main(String[] args) {

        SpringApplication.run(EurekaServerApplication.class, args);

    }

}
- 编写配置文件application.yml
server:

  port: 8761

eureka:

  instance:

    hostname: localhost

  client:

    registerWithEureka: false

    fetchRegistry: false

    serviceUrl:

      defaultZone: http://${eureka.instance.hostname}:${server.port}/eureka/

    #是否将自己注册到Eureka服务中,默认为true(由于当前就是eureka服务,固设置为false)

    registerWithEureka: false

    #设置是否从eureka服务上获取注册信息,默认为true(由于当前就是eureka服务,固设置为false)

    fetchRegistry: false

  server:

      # 是否开启自我保护模式(自我保护模式,当eureka在一定时间内没有接受到某个微服务实例的心跳包,默认90S会注销该实例),

      # 一旦进入自我保护模式,若短时间内丢失大量客户端,eureka也会保护注册表的信息,不再注销

      enable-self-preservation: false

      # 清理间隔。默认为60000ms

      eviction-interval-timer-in-ms: 5000
服务提供者(服务注册)
- 添加依赖
<!-- Eureka客户端 -->

<dependency>

    <groupId>org.springframework.cloud</groupId>

    <artifactId>spring-cloud-starter-netflix-eureka-client</artifactId>

</dependency
2.添加 @EnableDiscoveryClient 来开启Eureka客户端功能
@SpringBootApplication

@EnableDiscoveryClient

public class SpringDemoApplication {

    public static void main(String[] args) {

        SpringApplication.run(SpringDemoApplication.class, args);

    }

}
3.编写配置文件
eureka:

  instance:

    #在调用服务的时候就已经变成ip地址;需要注意的是:不是在eureka中的控制台服务实例状态显示。

    ip-address: 127.0.0.1

  	prefer-ip-address: true #使用ip注册

  client:

    # 是否开启健康检查

    healthcheck:

      enabled: true

    # 集群url

    service-url:

      defaultZone: http://127.0.0.1:8761/eureka
服务消费者(服务发现)
消费应用从注册中心获取服务列表,从而得知每个服务方的信息,知道去哪里调用服务方
服务续约
在注册服务完成以后,服务提供者会维持一个心跳(定时向EurekaServer发起Rest请求),有两个重要参数可以修改服务续约的行为
eureka:

	instance:

	    #服务失效时间,默认值90秒

		lease-expiration-duration-in-seconds: 90

		#服务续约(renew)的间隔,默认为30秒

		lease-renewal-interval-in-seconds: 30
也就是说,默认情况下每隔30秒服务会向注册中心发送一次心跳,证明自己还活着。如果超过90秒没有发送心跳,EurekaServer就会认为该服务宕机,会定时(eureka.server.eviction-interval-timer-in-ms设定的时间)从服务列表中剔除
失效剔除和自我保护
服务注册中心在启动时会创建一个定时任务,默认每隔一段时间(默认为60秒)将当前清单中超时(默认为90秒)没有续约的服务剔除。
Eureka Server在运行期间,会统计心跳失败的比例在15分钟之内是否低于85%,如果出现低于的情况,Eureka Server会将当前的实例注册信息保护起来,不再删除服务注册表中的数据(也就是不会注销任何微服务)
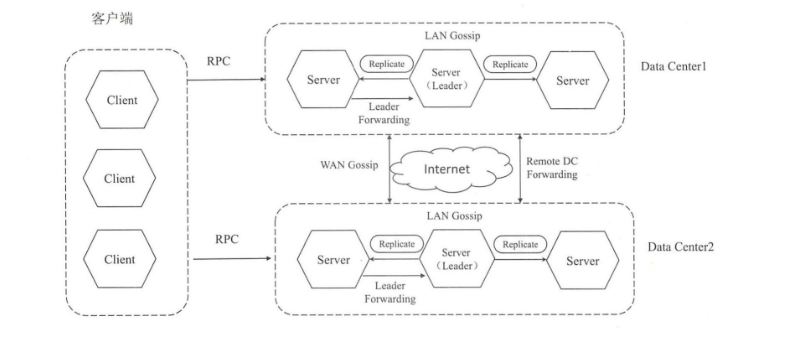
Consul
特性
- 高效的Raft一致性算法
- 支持多数据中心
- 支持健康检查
- HTTP和DNS支持
Consul和Eureka的区别:
Consul强一致性(CP),Eureka保证高可用和最终一致性(AP)
Consul使用Go语言,Eureka使用Java语言
Consul 不同于 Eureka 需要单独安装,官网:https://www.consul.io/downloads
Consul架构图
Consul基本使用
服务提供者
- pom.xml添加依赖
<!--SpringCloud提供的基于Consul的服务发现-->

<dependency>

	<groupId>org.springframework.cloud</groupId>

	<artifactId>spring-cloud-starter-consul-discovery</artifactId>

</dependency>

 <!--actuator用于心跳检查-->

<dependency>

	<groupId>org.springframework.boot</groupId>

	<artifactId>spring-boot-starter-actuator</artifactId>

</dependency>
- 通过@EnableDiscoveryClient注解开启对服务发现的支持
- 编写配置文件application.yml
spring:

  application:

    name: consul-provider

  ####consul注册中心地址

  cloud:

    consul:

      host: localhost

      port: 8500

      discovery:

        service-name: ${spring.application.name} #注册中心名字与spring的应用名称一致

        #-----------------------------相关配置----------------------------|

        #是否注册

        register: true

        #实例ID

        instance-id: ${spring.application.name}-1

        #服务实例名称

        service-name: ${spring.application.name}

        #服务实例端口

        port: ${server.port}

        #健康检查路径

        healthCheckPath: /actuator/health

        #健康检查时间间隔

        healthCheckInterval: 15s

        #开启ip地址注册

        prefer-ip-address: true

        #实例的请求ip

        ip-address: ${spring.cloud.client.ip-address}
服务消费者
- pom.xml添加依赖
<dependency>

	<groupId>org.springframework.cloud</groupId>

	<artifactId>spring-cloud-starter-consul-discovery</artifactId>

</dependency>
- 编写配置文件application.yml
spring:

  application:

    name: consul-provider

  ####consul注册中心地址

  cloud:

    consul:

      host: localhost

      port: 8500

      discovery:

        #设置不需要注册到Consul中

        register: false
负载均衡Ribbon
Ribbon是 Netflix 发布的一个负载均衡器,有助于控制 HTTP 和 TCP客户端行为。Ribbon自动的从注册中心中获取服务提供者的
列表信息,并基于内置的负载均衡算法,请求服务。
搭建过程
- 启动两个服务实例
先编写请求的接口
@Value("${spring.cloud.client.ip-address}")

private String ip;

@Value("${server.port}")

private String port;

@ResponseBody

@RequestMapping(value = "backInfo", method = RequestMethod.GET)

public String backInfo() {

	return "调用的是" + ip + "端口是:" + port;

}
我们假设搭建两台服务提供者,端口分别为:8090和8091,将已有服务的配置更改为
server:

	#的${}表示在jvm启动时候若能找到对应port则使用,若无则使用后面的默认值

	port: ${port:8090}
另外一台在启动的时候可以指定端口port,在如下界面中的 VM options 中设置 -Dport=10087

- 启动负载均衡
因为Eureka中已经集成了Ribbon,所以我们无需引入新的依赖。直接修改消费者的启动类
@Bean

@LoadBalanced

public RestTemplate restTemplate() {

	return new RestTemplate();

}
- 调取服务提供者接口,页面进行测试,可以分别请求到8090和8091两个端口
@Autowired

private RestTemplate restTemplate;

@ResponseBody

@RequestMapping(value = "getIpAndPort", method = RequestMethod.GET)

public String printInfo() {

	String url = "http://springbootdemo/backInfo";

	return restTemplate.getForObject(url, String.class);

}
负载均衡策略
Ribbon默认的负载均衡策略是轮询,Ribbon内置了多种负载均衡策略
修改负载均衡规则的配置:
springbootdemo:

  ribbon:

    NFLoadBalancerRuleClassName: com.netflix.loadbalancer.RandomRule

    #格式是: {服务名称}.ribbon.NFLoadBalancerRuleClassName
- com.netflix.loadbalancer.RoundRobinRule :以轮询的方式进行负载均衡。
- com.netflix.loadbalancer.RandomRule :随机策略
- com.netflix.loadbalancer.RetryRule :重试策略
- com.netflix.loadbalancer.WeightedResponseTimeRule :权重策略
- com.netflix.loadbalancer.BestAvailableRule :最佳策略
- com.netflix.loadbalancer.AvailabilityFilteringRule :可用过滤策略
策略选择:
如果每个机器配置一样,则建议不修改策略 (推荐)
如果部分机器配置强,则可以改为 WeightedResponseTimeRule
源码跟踪
RibbonAutoConfifiguration->LoadBalancerAutoConfiguration->LoadBalancerInterceptor
服务调用Feign
Feign是一种声明式、模板化的HTTP客户端。
基于Feign的服务调用
1.在消费者引入依赖
<dependency>

 <groupId>org.springframework.cloud</groupId>

 <artifactId>spring-cloud-starter-openfeign</artifactId>

</dependency>
2.启动类开启feign支持
@SpringBootApplication

@EnableDiscoveryClient

@ComponentScan(basePackages = "com.jyd0124.consume_server.*")

@EnableFeignClients

public class ConsumeServerApplication {

    public static void main(String[] args) {

        SpringApplication.run(ConsumeServerApplication.class, args);

    }

    @Bean

    @LoadBalanced

    public RestTemplate returnBean() {

        return new RestTemplate();

    }

}
3.创建接口和定义需要远程调用的方法
@FeignClient("springbootdemo")

public interface SpringBootFeign {

    @RequestMapping(value = "/person", method = RequestMethod.GET)

    public Map<String, Object> getPerson(@RequestParam(value = "id") int id);

}
4.调用服务。
@Autowired

private SpringBootFeign springBootFeign;

@ResponseBody

@RequestMapping(value = "/person/{id}", method = RequestMethod.GET)

public Map<String,Object> printInfo(@PathVariable("id") int id) {

	return springBootFeign.getPerson(id);

}
5.访问,测试结果

负载均衡
Feign中本身已经集成了Ribbon依赖和自动配置,因此我们不需要额外引入依赖,也不需要再注册RestTemplate 对象,可以通过 ribbon.xx 来进行全局配置。也可以通过 服务名.ribbon.xx 来对指定服务配置。
Feign的配置
feign:

  client:

    config:

      feignName: ##定义FeginClient的名称

        connectTimeout: 5000 # 建立链接的超时时长

        readTimeout: 5000 # 读取超时时长

        # 配置Feign的日志级别,相当于代码配置方式中的Logger

        loggerLevel: full

        # Feign的错误解码器,相当于代码配置方式中的ErrorDecoder

        errorDecoder: com.example.SimpleErrorDecoder

        # 配置重试,相当于代码配置方式中的Retryer

        retryer: com.example.SimpleRetryer

        # 配置拦截器,相当于代码配置方式中的

        RequestInterceptor requestInterceptors:

          - com.example.FooRequestInterceptor

          - com.example.BarRequestInterceptor

        #配置熔断不处理404异常

        decode404: false
请求压缩: 支持对请求和响应进行GZIP压缩,以减少通信过程中的性能损耗
#请求压缩

feign:

  compression:

    request:

      enabled: true # 开启请求压缩

    response:

      enabled: true # 开启响应压缩
Hystrix支持
Feign默认也有对Hystrix的集成
feign:

	hystrix:

		enabled: true # 开启Feign的熔断功能
日志级别
默认情况下Feign的日志是没有开启的。
feign:

  client:

    config:

      feignName:

        loggerLevel: full

        #NONE【性能最佳,适用于生产】:不记录任何日志(默认值)

        #BASIC【适用于生产环境追踪问题】:仅记录请求方法、URL、响应状态代码以及执行时间

        #HEADERS:记录BASIC级别的基础上,记录请求和响应的header。

        #FULL【比较适用于开发及测试环境定位问题】:记录请求和响应的header、body和元数据
熔断器Hystrix
雪崩效应
在微服务架构中,根据业务来拆分成一个个的服务,服务与服务之间可以相互调用(RPC),在Spring Cloud可以用RestTemplate+Ribbon和Feign来调用。为了保证其高可用,单个服务通常会集群部署。由于网络原因或者自身的原因,服务并不能保证100%可用,如果单个服务出现问题,调用这个服务就会出现线程阻塞,此时若有大量的请求涌入,Servlet容器的线程资源会被消耗完毕,导致服务瘫痪。服务与服务之间的依赖性,故障会传播,会对整个微服务系统造成灾难性的严重后果,这就是服务故障的“雪崩”效应。
Hystrix的特性
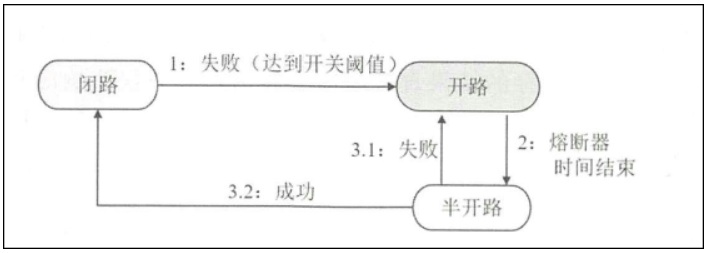
- 服务熔断
Hystrix的熔断状态机模型:
hystrix:

  command:

    default:

      execution.isolation.thread.timeoutInMilliseconds: 2000

      circuitBreaker:

        errorThresholdPercentage: 50 # 触发熔断错误比例阈值,默认值50%

        sleepWindowInMilliseconds: 10000 # 熔断后休眠时长,默认值5秒

        requestVolumeThreshold: 10 # 触发熔断的最小请求次数,默认20

        #配置项可以参考 HystrixCommandProperties 类
服务降级
通过HystrixdeCommand的fallback实现服务降级。
服务隔离
-线程池隔离策略
- 信号量隔离策略
Ribbon中使用断路器
- 在pom.xml中添加依赖
<dependency>

    <groupId>org.springframework.cloud</groupId>

    <artifactId>spring-cloud-starter-hystrix</artifactId>

</dependency>
- 在启动类上添加注解开启Hystrix
@SpringBootApplication

@EnableDiscoveryClient

@EnableHystrix

public class ConsumeServerApplication {

    public static void main(String[] args) {

        SpringApplication.run(ConsumeServerApplication.class, args);

    }

    @Bean

    @LoadBalanced

    public RestTemplate returnBean() {

        return new RestTemplate();

    }

}
- 编写熔断降级逻辑。在方法上加上@HystrixCommand注解,并指定了fallbackMethod熔断方法
@ResponseBody

@RequestMapping(value = "/info", method = RequestMethod.GET)

@HystrixCommand(fallbackMethod = "backErrorInfo")

public String printInfo() {

    String url = "http://springbootdemo/backInfo";

    return restTemplate.getForObject(url, String.class);

}

public String backErrorInfo(){

    return "sorry,error";

}
- 测试,如果springbootdemo服务关闭,会发现页面返回了降级处理信息

Feign中使用断路器
SpringCloud Fegin默认已为Feign整合了hystrix
- 添加配置
feign:

	hystrix:

		enabled: true # 开启Feign的熔断功能
- 配置FeignClient接口的实现类,并通过@Component注入到Ioc容器中
@Component

public class HystrixMethod implements SpringBootFeign {

    @Override

    public Map<String, Object> getPerson(int id) {

        Map<String, Object> map = new HashMap<>();

        map.put("code", 500);

        map.put("msg", "sorry,error");

        return map;

    }

}
- 在@FeignClient注解中添加降级方法
@FeignClient(name = "springbootdemo", fallback = HystrixMethod.class)

public interface SpringBootFeign {

    @RequestMapping(value = "/person", method = RequestMethod.GET)

    public Map<String, Object> getPerson(@RequestParam(value = "id") int id);

}
- 关闭 springbootdemo 服务,访问测试

Hystrix Dashboard
- 添加依赖
<dependency>

	<groupId>org.springframework.boot</groupId>

	<artifactId>spring-boot-starter-actuator</artifactId>

</dependency>

<dependency>

	<groupId>org.springframework.cloud</groupId>

	<artifactId>spring-cloud-starter-hystrix-dashboard</artifactId>

</dependency>
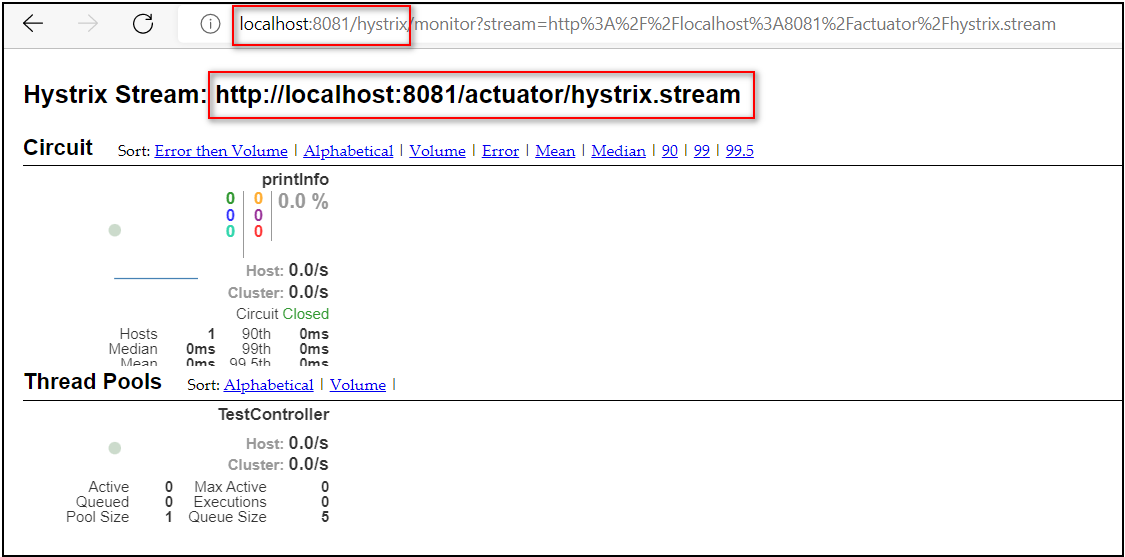
- 在启动类使用@EnableHystrixDashboard注解激活仪表盘
@SpringBootApplication

@EnableDiscoveryClient

@EnableHystrix

@EnableHystrixDashboard

public class ConsumeServerApplication {

    public static void main(String[] args) {

        SpringApplication.run(ConsumeServerApplication.class, args);

    }

    @Bean

    @LoadBalanced

    public RestTemplate returnBean() {

        return new RestTemplate();

    }

}
- 访问页面
遇到问题:https://blog.csdn.net/ghyghost/article/details/108053206
断路器聚合监控Turbine,Turbine是一个聚合Hystrix 监控数据的工具。
网关Gateway
介绍
Spring Cloud Gateway 是 Spring 官方基于 Spring 5.0,Spring Boot 2.0 和 Project Reactor 等技术开发的网关,旨在为微服务架构提供一种简单而有效的统一的 API 路由管理方式。Spring Cloud Gateway 作为 Spring Cloud 生态系中的网关,目标是替代 Netflflix ZUUL,其不仅提供统一的路由方式,并且基于 Filter 链的方式提供了网关基本的功能,例如:安全,监控/埋点,和限流等。
快速入门
- 创建gateway-server模块,引入依赖
<dependency>

	<groupId>org.springframework.cloud</groupId>

	<artifactId>spring-cloud-starter-gateway</artifactId>

</dependency>

<dependency>

	<groupId>org.springframework.cloud</groupId>

	<artifactId>spring-cloud-starter-netflix-eureka-client</artifactId>

</dependency>
- 编写启动类
@SpringBootApplication

@EnableDiscoveryClient

public class GatewayServerApplication {

    public static void main(String[] args) {

        SpringApplication.run(GatewayServerApplication.class, args);

    }

}
- 编写路由规则
server:

  port: 8765

spring:

  application:

    # 注册到eureka上的应用名称

    name: gateway_server

  cloud:

    gateway:

      #由一个ID、一个目的URL、一组断言工厂、一组Filter组成

      routes:

          # 路由id,可以随意写

        - id: consume-server-route

          # 代理的服务地址

          uri: http://127.0.0.1:8081

          # 路由断言,可以配置映射路径

          predicates:

            - Path=/person/**

eureka:

  client:

    # 集群url

    service-url:

      defaultZone: http://127.0.0.1:8761/eureka

  instance:

    prefer-ip-address: true #使用ip注册

    ip-address: 127.0.0.1

    instance-id: ${spring.cloud.client.ip-address}:${server.port}
- 启动测试

路由
- 添加前缀PrefixPath
spring:

  application:

    # 注册到eureka上的应用名称

    name: gateway_server

  cloud:

    gateway:

      #由一个ID、一个目的URL、一组断言工厂、一组Filter组成

      routes:

          # 路由id,可以随意写

        - id: consume-server-route

          # 代理的服务地址

          uri: http://127.0.0.1:8081

          # 路由断言,可以配置映射路径

          predicates:

            - Path=/**

          filters:

          	# 添加请求路径的前缀

          	- PrefixPath=/person
相当于PrefixPath=/personhttp://localhost:8765/180868 --》http://localhost:8765/person/180868 --》http://localhost:8081/person/180868
- 去除前缀StripPrefifix
spring:

  application:

    # 注册到eureka上的应用名称

    name: gateway_server

  cloud:

    gateway:

      #由一个ID、一个目的URL、一组断言工厂、一组Filter组成

      routes:

          # 路由id,可以随意写

        - id: consume-server-route

          # 代理的服务地址

          uri: http://127.0.0.1:8081

          # 路由断言,可以配置映射路径

          predicates:

            - Path=/api/person/**

          filters:

          	# 表示过滤1个路径,2表示两个路径,以此类推

          	- StripPrefix=1
StripPrefix=1 http://localhost:8765/api/person/180868--》http://localhost:8765/person/180868--》http://localhost:8081/person/180868
- 动态路由
uri以 lb: //开头(lb代表从注册中心获取服务),后面接的就是你需要转发到的服务名称
spring:

  application:

    # 注册到eureka上的应用名称

    name: gateway_server

  cloud:

    gateway:

      routes:

          # 路由id,可以随意写

        - id: consume-server-route

          # 代理的服务地址

          uri: lb://springbootdemo

          # 路由断言,可以配置映射路径

          predicates:

            - Path=/person/**
- 重写转发路径
路由转发是直接将匹配的路由path直接拼接到映射路径(URI)之后,那么往往没有那么便利。修改application.yaml
spring:

  application:

    # 注册到eureka上的应用名称

    name: gateway_server

  cloud:

    gateway:

      routes:

          # 路由id,可以随意写

        - id: consume-server-route

          # 代理的服务地址

          uri: lb://springbootdemo

          # 路由断言,可以配置映射路径

          predicates:

            - Path=/springbootdemo/**

          filters:

          	- RewritePath=/springbootdemo/(?<segment>.*), /$\{segment}
请求http://localhost:8765/springbootdemo/person/180868 --》http://localhost:8765/person/180868--》http://localhost:8081/person/180868( 值得注意的是在yml文档中 $ 要写成 $\ )
- 基于服务发现的路由规则
spring:

  application:

    # 注册到eureka上的应用名称

    name: gateway_server

  cloud:

    gateway:

      discovery:

        locator:

          #设置路由访问方式:http://Gateway_HOST:Gateway_PORT/大写的serviceId/**,其中微服务应用名默认大写访问。

          enabled: true

          # 该设置可以将服务名改成小写(默认为大写)

          lower-case-service-id: true
这样,就可以通过http://localhost:8765/springbootdemo/person?id=180868访问
过滤器
- 生命周期
- pre:: 这种过滤器在请求被路由之前调用。
- post : 这种过滤器在路由到微服务以后执行。
- 过滤器类型
- 局部过滤器(GatewayFilter),应用到单个路由或者一个分组的路由上,通过 spring.cloud.gateway.routes.filters 配置在具体路由下,只作用在当前路由上;
- 全部过滤器(GlobalFilter),应用到所有的路由上,实现 GlobalFilter 接口即可
- 常见过滤器
| 过滤器名称 | 说明 |
|---|---|
| AddRequestHeader | 对匹配上的请求加上Header |
| AddRequestParameters | 对匹配上的请求路由添加参数 |
| AddResponseHeader | 对从网关返回的响应添加Header |
| StripPrefifix | 对匹配上的请求路径去除前缀 |
配置全局默认过滤器
spring:

  cloud:

    gateway:

      default-filters:

      	- AddResponseHeader=X-Response-Default-MyName, jyd0124
其他过滤器具体可参考GatewayFilterFactory类
自定义过滤器
需求:模拟一个登录的校验。基本逻辑:如果请求中有token参数,则认为请求有效,放行。
@Component

public class TokenFilter implements GlobalFilter, Ordered {

    private final Logger logger = LoggerFactory.getLogger(TokenFilter.class);

    @Override

    public Mono<Void> filter(ServerWebExchange exchange, GatewayFilterChain chain) {

        //request,response都可以通过 ServerWebExchange 获取

        String token = exchange.getRequest().getQueryParams().getFirst("token");

        if (StringUtils.isBlank(token)) {

            logger.info("token is empty ...");

            exchange.getResponse().setStatusCode(HttpStatus.UNAUTHORIZED);

            return exchange.getResponse().setComplete();

        }

        //chain.filter 继续向下游执行

        return chain.filter(exchange);

    }

    @Override

    public int getOrder() {

        //过滤器的优先级,返回值越大级别越低

        return 0;

    }

}
跨域问题
@Configuration

public class GwCorsFilter {

    /**

     *  以下CorsWebFilter跨域处理也可以通过配置文件进行处理

     * spring:

     *   cloud:

     *     gateway:

     *       globalcors:

     *         cors-configurations:

     */

    @Bean

    public CorsWebFilter corsFilter() {

        CorsConfiguration config = new CorsConfiguration();

        config.setAllowCredentials(true); // 允许cookies跨域

        config.addAllowedOrigin("*");// #允许向该服务器提交请求的URI,*表示全部允许,在SpringMVC中,如果设成*,会自动转成当前请求头中的Origin

        config.addAllowedHeader("*");// #允许访问的头信息,*表示全部

        config.setMaxAge(18000L);// 预检请求的缓存时间(秒),即在这个时间段里,对于相同的跨域请求不会再预检了

        config.addAllowedMethod("OPTIONS");// 允许提交请求的方法类型,*表示全部允许

        config.addAllowedMethod("HEAD");

        config.addAllowedMethod("GET");

        config.addAllowedMethod("PUT");

        config.addAllowedMethod("POST");

        config.addAllowedMethod("DELETE");

        config.addAllowedMethod("PATCH");

        UrlBasedCorsConfigurationSource source =

                new  UrlBasedCorsConfigurationSource(new PathPatternParser());

        source.registerCorsConfiguration("/**", config);

        return new CorsWebFilter(source);

    }

    /**

     *

     *如果使用了注册中心(如:Eureka),进行控制则需要增加如下配置

     */

    @Bean

    public RouteDefinitionLocator discoveryClientRouteDefinitionLocator(DiscoveryClient discoveryClient) {

        return new DiscoveryClientRouteDefinitionLocator(discoveryClient,new DiscoveryLocatorProperties());

    }

    /**

     * 以下是springboot2.0.5出现only one connection 的解决办法

     * @return

     */

    @Bean

    public HiddenHttpMethodFilter hiddenHttpMethodFilter() {

        return new HiddenHttpMethodFilter() {

            @Override

            public Mono<Void> filter(ServerWebExchange exchange, WebFilterChain chain) {

                return chain.filter(exchange);

            }

        };

    }

}
负载均衡和熔断
Gateway中默认已经集成了Ribbon负载均衡和Hystrix熔断机制。但是所有的策略都是走的默认值,建议根据Ribbon和Hystrix手动进行配置。
网关限流
- 计数器限流算法
- 漏桶算法
- 令牌桶算法
- 基于Filter的限流
- 基于Sentinel的限流
SpringCloud Config配置中心
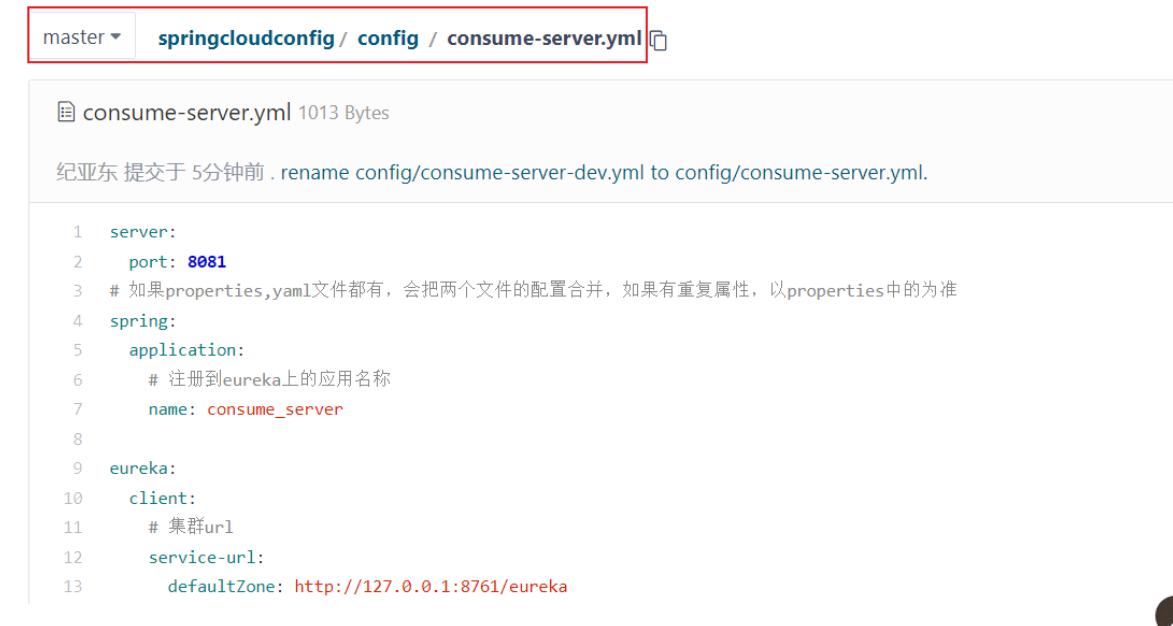
在gitee上创建远程配置文件
构建config配置中心服务
- 构建Config-server服务,添加依赖
<dependency>

	<groupId>org.springframework.cloud</groupId>

	<artifactId>spring-cloud-config-server</artifactId>

</dependency>

<dependency>

	<groupId>org.springframework.cloud</groupId>

	<artifactId>spring-cloud-starter-netflix-eureka-client</artifactId>

</dependency>
- 在config-server的启动类添加@EnableConfigServer
@SpringBootApplication

@EnableDiscoveryClient

@EnableConfigServer

public class ConfigServerApplication {

    public static void main(String[] args) {

        SpringApplication.run(ConfigServerApplication.class, args);

    }

}
- 编写config-server配置文件
server:

  port: 8888

spring:

  application:

    name: config_server

  cloud:

    config:

      server:

        git:

          #配置文件所在的git仓库

          uri: https://gitee.com/jyd0124/springcloudconfig.git

          #配置文件分支

          default-label: master

          #配置文件所在根目录

          search-paths: config

          #如果Git仓库为公开仓库,可以不填写用户名和密码,如果是私有仓库需要填写

          username: xxx

          password: xxx

eureka:

  client:

    service-url:

      defaultZone: http://127.0.0.1:8761/eureka #服务注册地址
- 可通过http://localhost:8888/consume-server.yml测试是否成功
获取配置中心配置
- 改造其他随便一个服务,比如我使用我自己的consume_server,添加依赖
<dependency>

	<groupId>org.springframework.cloud</groupId>

	<artifactId>spring-cloud-starter-config</artifactId>

</dependency>

<dependency>

	<groupId>org.springframework.cloud</groupId>

	<artifactId>spring-cloud-starter-netflix-eureka-client</artifactId>

</dependency>
- 修改配置
删除consume_server的application.yml 文件(因为该文件从配置中心获取)
创建consume_server 的bootstrap.yml 配置文件,其内容如下
spring:

  cloud:

    config:

      name: consume-server

      # 远程仓库中的版本保持一致

      label: master

      #profile: dev

      #通过ip直接访问配置中心

      #uri: http://localhost:8888/

      #通过eurka访问配置中心

      discovery:

        #配置中心服务

        service-id: config-server

        enabled: true

eureka:

  client:

    service-url:

      defaultZone: http://127.0.0.1:8761/eureka #服务注册地址
3.启动consume_server项目发现获取到配置文件将服务暴露在8081端口,测试接口可成功返回数据
补充:bootstrap.yml文件也是Spring Boot的默认配置文件,而且其加载的时间相比于application.yml更早。bootstrap.yml文件相当于项目启动时的引导文件,内容相对固定。application.yml文件是微服务的一些常规配置参数,变化比较频繁。
Spring Cloud Bus服务总线
问题:
前面已经完成了将微服务中的配置文件集中存储在远程Git仓库,如果我们更新Git仓库中的配置文件,那用户微服务是否可以及时接收到新的配置信息并更新呢?经过测试,对于Git仓库中配置文件的修改并没有及时更新到用户微服务,只有重启用户微服务才能生效。如果想在不重启微服务的情况下更新配置该如何实现呢? 可以使用Spring Cloud Bus来实现配置的自动更新。
介绍
Spring Cloud Bus是用轻量的消息代理将分布式的节点连接起来,可以用于广播配置文件的更改或者服务的监控管理。也就是消息总线可以为微服务做监控,也可以实现应用程序之间相互通信。 Spring Cloud Bus可选的消息代理有两种:RabbitMQ和Kafka。
具体实现可参考:https://www.fangzhipeng.com/springcloud/2018/08/08/sc-f8-bus.html
https://www.cnblogs.com/babycomeon/p/11141160.html
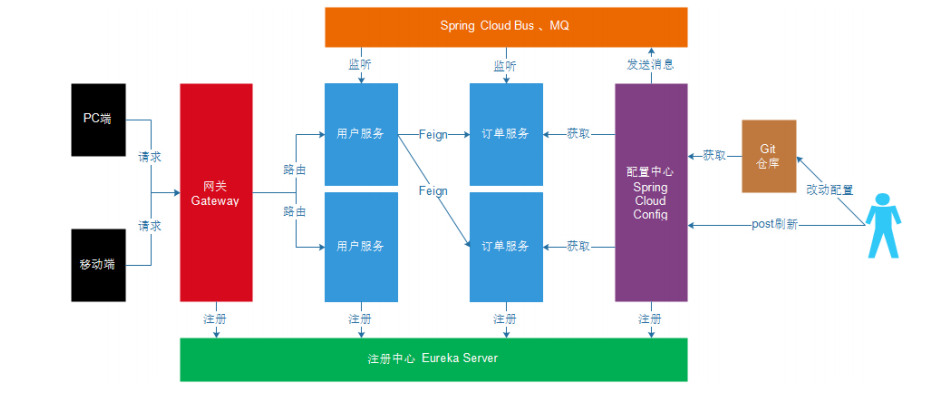
Spring Cloud 体系技术综合应用概览
最新文章
- IDDD 实现领域驱动设计-理解限界上下文
- nmap的script参数列表
- poj2649 数论
- C#实现的ReplaceFirst和ReplaceLast
- cloudera-scm-server ip改了怎么办了
- 摆方块(贪心)P1087
- C++中vector和list排序
- Android中的Socket
- OpenGL中glUniform1i使用
- CentOS 7 安装配置KVM 通过KVM安装CentOS系统
- docker命令
- python免费发送短信
- PAT A1141 PAT Ranking of Institutions (25 分)——排序,结构体初始化
- JDBC的简单封装
- js关于移入移出延迟提示框效果处理
- css字体更小 css比12px更小的方法
- Linux内核分析作业四
- Mysql(四)正则表达式
- libcurl上传文件
- Python3基础 __len__,__getitem__ 记录列表中元素访问的次数 定制不可变序列,下标字典