vue2.0用法以及环境配置
一、配置环境搭建
1.安装node.js (可以去官网看)
2.安装git (推荐看廖雪峰文章,点击查看)
3.安装vue:
cmd:npm install vue //最新稳定版本
npm install -g vue-cli //最新稳定版本
vue init webpack my-project //创建一个基于 "webpack" 模板的新项目,首先进入项目的文件夹,在创建; 例如:进入D盘:(D:);
cd my-project //安装创建的文件夹,
npm install -g cnpm --registry=https://registry.npm.taobao.org //安装(cnpm)依赖,安装的cnpm,之后使用npm是换成cnpm
cnpm run dev //起环境;
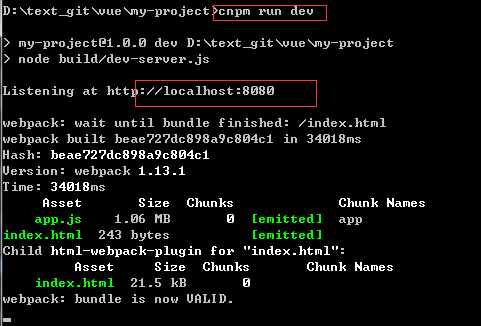
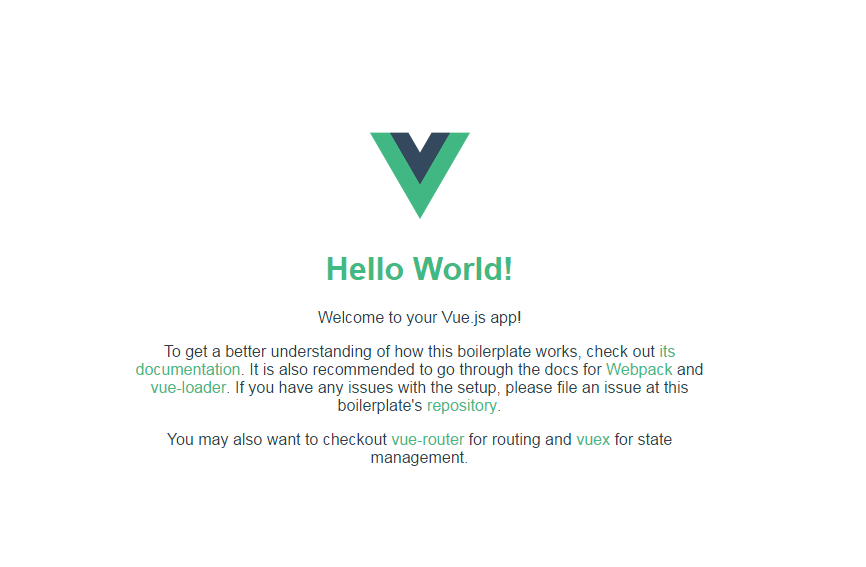
在浏览器里面输入 http://localhost:8080/;成功
二、启动原理
打开我们的src目录,能看到这样的结构:

很简单有木有,assets存放资源。components存放组件,也就是说我们的.vue文件就存放在这里,App.vue是我们挂载的组件,main.js是入口文件。
.vue 文件是什么?
不得不说,.vue文件真的很像一个小盒子,它把一个组件的html,css,js都存放到了一起,就像一副扑克,非常的完整,拆开就能打斗地主,多拿两幅扑克可以玩升级,虽然我不玩。App.vue
<template>

  <div id="app">

    <img src="./assets/logo.png">

    <hello></hello>

  </div>

</template>

<script>

/*js是些什么鬼,看都看不懂*/

import Hello from './components/Hello'

export default {

  name: 'app',

  components: {

    Hello

  }

}

</script>

<style>

#app {

  font-family: 'Avenir', Helvetica, Arial, sans-serif;

  -webkit-font-smoothing: antialiased;

  -moz-osx-font-smoothing: grayscale;

  text-align: center;

  color: #2c3e50;

  margin-top: 60px;

}

</style>
除了js部分比较陌生,其他的都是old friend了。
先从入口文件说起....
太简单了把,整个入口文件,引入了vue(这里是node_modules中的vue模块,也就是vue框架),还有App(也就是App.vue)。new 了一个 Vue并传入了一个对象。
// The Vue build version to load with the `import` command

// (runtime-only or standalone) has been set in webpack.base.conf with an alias.

import Vue from 'vue'  // 没有加路径,会默认去node_modules找

import App from './App' // 没有加后缀会根据对应的名称匹配

/* eslint-disable no-new */

new Vue({

  el: '#app', // 挂载到id=app的element上 提供一个在页面上已存在的 DOM 元素作为 Vue 实例的挂载目标。可以是 CSS 选择器,也可以是一个 HTMLElement 实例

  template: '<App/>', // 一个字符串模板作为 Vue 实例的标识使用。模板将会 替换 挂载的元素。挂载元素的内容都将被忽略,除非模板的内容有分发 slot。

  components: { App } // 包含 Vue 实例可用组件的哈希表,这里只有一个App组件,也就是指App.vue

})
上面的注释其实都是从vue官网扒下来的...http://cn.vuejs.org/
关于更详细的vue教程,请以官网为准。
根据上面的内容,我们很容易就能得出这样的启动原理:根据引入的vue模块和APP.vue,创建一个挂载到id为app的元素上面的对象,并配置了tempate和components属性。然后根据配置对document进行渲染。
原理看似很简单,但是vue做了大量的工作。
三、组件的使用
还是看我们的App.vue
<template>

  <div id="app">

    <img src="./assets/logo.png">

    <hello></hello> // 类似angular中的自定义指令

  </div>

</template>

<script>

import Hello from './components/Hello' // 引入了Hello.vue

export default {

  name: 'app', // 给组件指定名字

  components: { // 包含 Vue 实例可用组件的哈希表 和main.js中的用法一样

    Hello // 将导入的hello组件赋给对象,这样在渲染dom的时候遇到<hello>就将Hello.vue中的tamplate替换

  }

}

</script>

<style>

#app {

  font-family: 'Avenir', Helvetica, Arial, sans-serif;

  -webkit-font-smoothing: antialiased;

  -moz-osx-font-smoothing: grayscale;

  text-align: center;

  color: #2c3e50;

  margin-top: 60px;

}

</style>
export default ?

这是ES6的语法,使用关键字default,可将对象标注为default对象导出。default关键字在每一个模块中只能使用一次。它既可以用于内联导出,也可以用于一组对象导出声明中。也就是将default后面跟着的对象当作default对象导出。
default导出的对象(可以看作是组件对象)属性有很多,官网上都有非常详细的解释。http://cn.vuejs.org/v2/api/#c...
根据main.js和App.js可以得到这样的一个层级关系:
Vue.comenonts ==> { App } ===> App.conenonts ==> { Hello }
看上去貌似就是定义了组件的包含关系呢。这样的话不是很简单?写一个组件测试下:
Test.vue
<template>

 <!--最外层只能有一个标签 -->

  <div class="test">

   <p>我是全英雄联盟最骚的骚猪</p>

   <p></p>

  </div>

  <!-- <div>加了我会报错</div> -->

</template>

<script>

export default {

  name: 'test'

}

</script>

<!-- Add "scoped" attribute to limit CSS to this component only -->

<style scoped>

p {

  color: red;

}

</style>
然后在App.vue中引用
<template>

  <div id="app">

    <img src="./assets/logo.png">

    <hello></hello>

<!-- 这里加上对应的标签  注意名字不能和html原有的标签重复 -->

    <test></test>

  </div>

</template>

<script>

import Hello from './components/Hello'

import Test from './components/Test'  // 这里引入Test组件

export default {

  name: 'app',

  components: {

    Hello,

    Test // 在components中添加Test

  }

}

</script>

<style>

#app {

  font-family: 'Avenir', Helvetica, Arial, sans-serif;

  -webkit-font-smoothing: antialiased;

  -moz-osx-font-smoothing: grayscale;

  text-align: center;

  color: #2c3e50;

  margin-top: 60px;

}

</style>
然后在浏览器打开:

红色的字就是我们的Test.vue组件的内容了。
四、增加路由
需要在页面显示一个组件,像上面那样添加上去就好了,那想切换组件的显示呢?当然是用路由了。vue提供了一个vue-router的插件,用来实现路由之间的转换。关于这个插件的文档在这里:http://router.vuejs.org/zh-cn/
首先,先增加我们的路由插件。在根目录下安装:
npm install vue-router --save
--save代表将在你的package.json中添加对应的依赖。安装成功会看到如下信息:
C:\Users\59227\Desktop\x-chat>npm install vue-router --save

x-chat@1.0.0 C:\Users\59227\Desktop\x-chat

`-- vue-router@2.1.1

npm WARN optional Skipping failed optional dependency /chokidar/fsevents:

npm WARN notsup Not compatible with your operating system or architecture: fsevents@1.0.15
然后在入口文件main.js中引用:
官网上的例子:
// 0. 如果使用模块化机制编程,導入Vue和VueRouter,要调用 Vue.use(VueRouter)

// 1. 定义(路由)组件。

// 可以从其他文件 import 进来

const Foo = { template: '<div>foo</div>' }

const Bar = { template: '<div>bar</div>' }

// 2. 定义路由

// 每个路由应该映射一个组件。 其中"component" 可以是

// 通过 Vue.extend() 创建的组件构造器,

// 或者,只是一个组件配置对象。

// 我们晚点再讨论嵌套路由。

const routes = [

  { path: '/foo', component: Foo },

  { path: '/bar', component: Bar }

]

// 3. 创建 router 实例,然后传 `routes` 配置

// 你还可以传别的配置参数, 不过先这么简单着吧。

const router = new VueRouter({

  routes // (缩写)相当于 routes: routes

})

// 4. 创建和挂载根实例。

// 记得要通过 router 配置参数注入路由,

// 从而让整个应用都有路由功能

const app = new Vue({

  router

}).$mount('#app')
// 现在,应用已经启动了!main.js
import Vue from 'vue'

import App from './App'

import Apart from  './components/Apart' // 新创建的组件

import Bpart from  './components/Bpart' // 新创建的组件

import VueRouter from 'vue-router' // 引入vue-router模块

Vue.use(VueRouter) // 安装 Vue.js 插件

/* 创建一个组件 并指定组件的template属性,类似穿件一个 const为ES6语法,标识声明一个不可改变的变量 */

const Error = {template: '<p style="color: red">is Error!!</p>'}

const routes = [  //创建一个路由数组

    {

        path: '/',

        component: Apart //将组件Apart作为路由‘/’下显示的组件

    },

    {

        path: '/bb',

        component: Bpart

    },

    {

        path: '*', // ‘*’代表在上面的路由中查找不到就默认显示‘*’路由的内容,必须放在最后,不然在‘*’之后的路由都不起作用

        component: Error

    }

]

const router = new VueRouter({ routes }) //创建一个router对象

/* eslint-disable no-new */

new Vue({

  el: '#app',

  router, // 将router对象传给vue,这样就可以通过this.$router获取到router对象了

  template: '<App/>',

  components: { App }

})
新建的组件:
Apart.vue
<template>

    <div>

        <p>我是Apart</p>

        <!-- 类似anguar的ng-click,用于绑定事件监听 -->

        <a v-on:click="goPage">点我切换</a>

    </div>

</template>

<script>

export default {

  name: 'test',

  methods: { // methods参数用来声明组件下的方法

      goPage: function () {

/*push方法会向 history 栈添加一个新的记录,所以,当用户点击浏览器后退按钮时,则回到之前的 URL。*/

          this.$router.push('/bb')

      }

  }

}

</script>

<!-- Add "scoped" attribute to limit CSS to this component only -->

<style scoped>

p {

  color: red;

}

div {

    width: 100%;

    height: 100px;

    background-color: green;

}

</style>
Bpart.vue:
<template>

    <div>

        <p>我是Bpart</p>

        <a v-on:click="goPage">点我切换</a>

    </div>

</template>

<script>

export default {

  name: 'test',

  methods: {

      goPage: function () {

          this.$router.push('/')

      }

  }

}

</script>

<!-- Add "scoped" attribute to limit CSS to this component only -->

<style scoped>

p {

  color: red;

}

div {

    width: 100%;

    height: 100px;

    background-color: yellow;

}

</style>
然后修改我们的App.vue:
<template>

  <div id="app">

    <img src="./assets/logo.png">

    <test></test>

    <!-- 路由出口 -->

  <!-- 路由匹配到的组件将渲染在这里 -->

    <router-view></router-view>

  </div>

</template>

<script>

import Test from './components/Test'  // 这里引入Test组件

export default {

  name: 'app',

  components: {

    Test // 在components中添加Test

  }

}

</script>

<style>

#app {

  font-family: 'Avenir', Helvetica, Arial, sans-serif;

  -webkit-font-smoothing: antialiased;

  -moz-osx-font-smoothing: grayscale;

  text-align: center;

  color: #2c3e50;

  margin-top: 60px;

}

</style>
完成以上步骤之后,在cmd输入:
npm run dev
打开浏览器就可以看到如下效果了:

很完美,路由功能撸好了。还有嵌套路由又该怎么做呢?官网上有很详细的例子,对着官网撸,绝对能搞得很完美。
五扩展:路由嵌套使用方法:
<script>

        //组件

        const Home = {

            template:'<h3>我是主页</h3>'

        };

        const Users = {

            template:`

            <div>

                <h3>我是用户信息</h3>

                <ul>

                    <li><router-link to="/users/teemo">teemo</router-link>

                    </li>

                </ul>

                <div>

                    <router-view></router-view>

                </div>

            </div>

            `

        }

        const About = {

            template:'<h3>我是关于</h3>'

        }

        const Teemo={

            template:'<div>提莫</div>'

        }

        //配置路由

        const routes = [

            {path:'/home', component :Home},

            {

                path:'/users',

                component:Users,

                children:[{path:'teemo',component:Teemo}]

            },

            {path:'/about',component:About},

            //404重定向

            {path:'*',redirect:'/home'}

        ]

        //生成路由实例

        const router = new VueRouter({

            routes

        })

        //挂载到vue上

        new Vue({

            router,

            el:'#box'

        })

    </script>
最新文章
- 美国在研新药_读取单个PDF
- Oracle 把秒转成时分秒格式(hh24:mm:ss);检测字符串是否是数字;字符串转换为数字
- tp框架之查询
- maven依赖本地非repository中的jar包
- js实现对json数据的序列化(兼容ie6以上浏览器)
- BZOJ3172——[Tjoi2013]单词
- 读<jQuery 权威指南>[5]-插件
- [转]PhoneGap使用PushPlugin插件实现消息推送
- URL编码数据转换为JSON数据
- 台电幻彩u盘拆解
- BZOJ 1816 扑克牌
- POJ 2763 Housewife Wind (树链剖分 有修改单边权)
- js 函数(function)
- VS2010下调试.NET源码
- android studio创建一个最简单的跳转activity
- Kruscal(最小生成树)算法模版
- Oracle数据库中OVER()函数的了解
- javascript 点击触发复制功能
- C语言复习---矩形法求定积分函数
- leetcode75