C#互操作
一、引言
“为什么我们需要掌握互操作技术的呢?” 对于这个问题的解释就是——掌握了.NET平台下的互操作性技术可以帮助我们在.NET中调用非托管的dll和COM组件。
。.NET 平台下提供了3种互操作性的技术:
- Platform Invoke(P/Invoke),即平台调用,主要用于调用C库函数和Windows API
- C++ Introp, 主要用于Managed C++(托管C++)中调用C++类库
- COM Interop, 主要用于在.NET中调用COM组件和在COM中使用.NET程序集。
二、平台调用
使用平台调用的技术可以在托管代码中调用动态链接库(Dll)中实现的非托管函数,如Win32 Dll和C/C++ 创建的dll。
2.1 在托管代码中通过平台调用来调用非托管代码的步骤
(1). 获得非托管函数的信息,即dll的名称,需要调用的非托管函数名等信息
(2). 在托管代码中对非托管函数进行声明,并且附加平台调用所需要属性
(3). 在托管代码中直接调用第二步中声明的托管函数
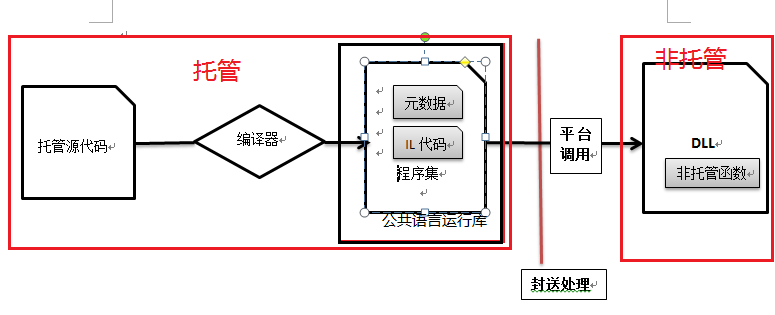
平台调用的过程可以通过下图更好地理解:
2.2、如何使用平台调用Win32 函数——从实例开始
第一步就需要知道非托管函数声明,为了找到需要需要调用的非托管函数,可以借助两个工具——Visual Studio自带的dumpbin.exe和depends.exe.
- dumpbin.exe 是一个命令行工具,可以用于查看从非托管DLL中导出的函数等信息,可以通过打开Visual Studio 2010 Command Prompt(中文版为Visual Studio 命令提示(2010)),然后切换到DLL所在的目录,输入 dummbin.exe/exports dllName, 如 dummbin.exe/exports User32.dll 来查看User32.dll中的函数声明,关于更多命令的参数可以参看MSDN;
- 然而 depends.exe是一个可视化界面工具,大家可以从 “VS安装目录\Program Files (x86)\Microsoft Visual Studio 10.0\Common7\Tools\Bin\” 这个路径找到,然后双击 depends.exe 就可以出来一个可视化界面(如果某些人安装的VS没有附带这个工具,也可以从官方网站下载:http://www.dependencywalker.com/),如下图:
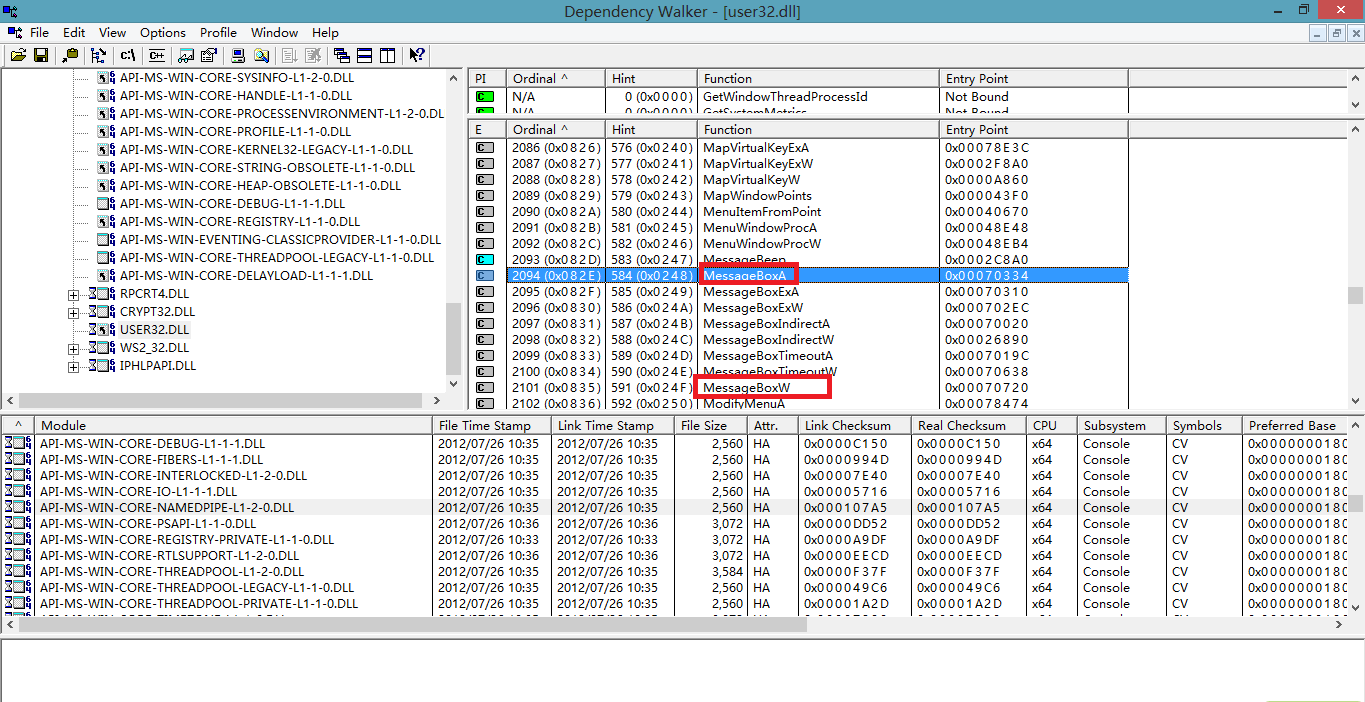
上图中 用红色标示出 MessageBox 有两个版本,而MessageBoxA 代表的就是ANSI版本,而MessageBoxW 代笔的就是Unicode版本,这也是上面所说的依据。下面就看看 MessageBox的C++声明的(更多的函数的定义大家可以从MSDN中找到,这里提供MessageBox的定义在MSDN中的链接:http://msdn.microsoft.com/en-us/library/windows/desktop/ms645505(v=vs.85).aspx ):
int WINAPI MessageBox(

  _In_opt_  HWND hWnd,

  _In_opt_  LPCTSTR lpText,

  _In_opt_  LPCTSTR lpCaption,

  _In_      UINT uType

);
现在已经知道了需要调用的Win32 API 函数的定义声明,下面就依据平台调用的步骤,在.NET 中实现对该非托管函数的调用,下面就看看.NET中的代码的:
using System;

// 使用平台调用技术进行互操作性之前,首先需要添加这个命名空间

using System.Runtime.InteropServices;

namespace 平台调用Demo

{

    class Program

    {

        // 在托管代码中对非托管函数进行声明,并且附加平台调用所需要属性 在默认情况下,CharSet为CharSet.Ansi

        // 指定调用哪个版本的方法有两种——通过DllImport属性的CharSet字段和通过EntryPoint字段指定 在托管函数中声明注意一定要加上 static 和extern 这两个关键字

        //第一种指定方式,通过CharSet字段指定,在默认情况下CharSet为CharSet.Ansi

        [DllImport("user32.dll")]

        public static extern int MessageBox(IntPtr hWnd, String text, String caption, uint type);

        [DllImport("user32.dll")]

        public static extern int MessageBoxA(IntPtr hWnd, String text, String caption, uint type);

        // [DllImport("user32.dll", CharSet = CharSet.Unicode)] public static extern int

        // MessageBox(IntPtr hWnd, String text, String caption, uint type);

        [DllImport("user32.dll", CharSet = CharSet.Unicode)]

        public static extern int MessageBoxW(IntPtr hWnd, String text, String caption, uint type);

        // 通过EntryPoint字段指定

        [DllImport("user32.dll", EntryPoint = "MessageBoxA")]

        public static extern int MessageBox3(IntPtr hWnd, String text, String caption, uint type);

        [DllImport("user32.dll", EntryPoint = "MessageBoxW", CharSet = CharSet.Unicode)]

        public static extern int MessageBox4(IntPtr hWnd, String text, String caption, uint type);

        static void Main(string[] args)

        {

            // 在托管代码中直接调用声明的托管函数 使用CharSet字段指定的方式,要求在托管代码中声明的函数名必须与非托管函数名一样 否则就会出现找不到入口点的运行时错误

            // 下面的调用都可以运行正确

            MessageBox(new IntPtr(), "Learning Hard", "欢迎", );

            MessageBoxA(new IntPtr(), "Learning Hard", "欢迎", );

            MessageBoxW(new IntPtr(), "Learning Hard", "欢迎", );

            //使用指定函数入口点的方式调用,OK

            MessageBox3(new IntPtr(), "Learning Hard", "欢迎", );

            MessageBox4(new IntPtr(), "Learning Hard", "欢迎", );

        }

    }

}
2.3使用平台调用技术中,还需要注意下面4点
(1). DllImport属性的ExactSpelling字段如果设置为true时,则在托管代码中声明的函数名必须与要调用的非托管函数名完全一致,因为从ExactSpelling字面意思可以看出为 "准确拼写"的意思,当ExactSpelling设置为true时,此时会改变平台调用的行为,此时平台调用只会根据根函数名进行搜索,而找不到的时候不会添加 A或者W来进行再搜索,.
[DllImport("user32.dll", ExactSpelling=true)]

       public static extern int MessageBox(IntPtr hWnd, String text, String caption, uint type);

(2). 如果采用设置CharSet的值来控制调用函数的版本时,则需要在托管代码中声明的函数名必须与根函数名一致,否则也会调用出错
[DllImport("user32.dll")]

        public static extern int MessageBox1(IntPtr hWnd, String text, String caption, uint type);

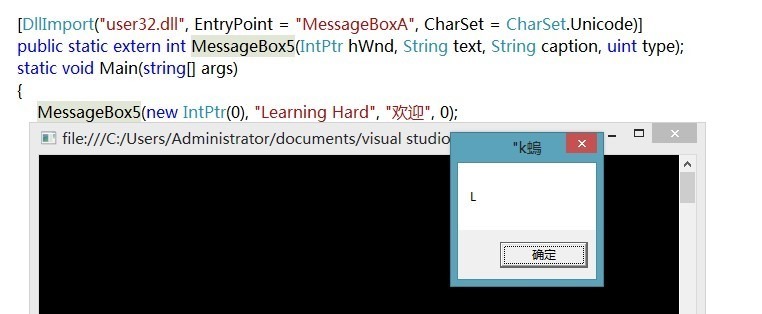
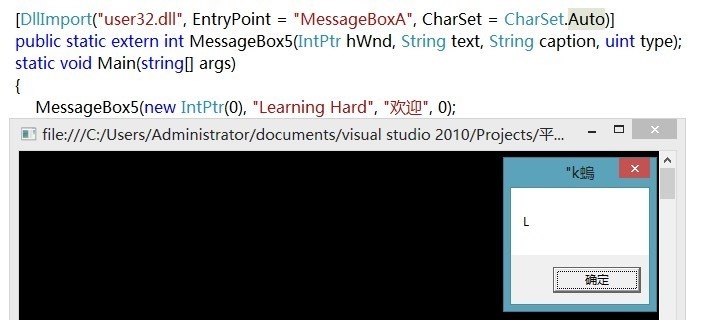
(3). 如果通过指定DllImport属性的EntryPoint字段的方式来调用函数版本时,此时必须相应地指定与之匹配的CharSet设置,意思就是——如果指定EntryPoint为 MessageBoxW,那么必须将CharSet指定为CharSet.Unicode,如果指定EntryPoint为 MessageBoxA,那么必须将CharSet指定为CharSet.Ansi或者不指定,因为 CharSet默认值就是Ansi。
(4). CharSet还有一个可选字段为——CharSet.Auto, 如果把CharSet字段设置为CharSet.Auto,则平台调用会针对目标操作系统适当地自动封送字符串。在 Windows NT、Windows 2000、Windows XP 和 Windows Server 2003 系列上,默认值为 Unicode;在 Windows 98 和 Windows Me 上,默认值为 Ansi。
2.3、获得Win32函数的错误信息
捕捉由托管定义导致的异常演示代码:
try

            {

                MessageBox1(new IntPtr(), "Learning Hard", "欢迎", );

            }

            catch (DllNotFoundException dllNotFoundExc)

            {

                Console.WriteLine("DllNotFoundException 异常发生,异常信息为: " + dllNotFoundExc.Message);

            }

            catch (EntryPointNotFoundException entryPointExc)

            {

                Console.WriteLine("EntryPointNotFoundException 异常发生,异常信息为: " + entryPointExc.Message);

            }
捕获由Win32函数本身返回异常的演示代码如下:要想获得在调用Win32函数过程中出现的错误信息,首先必须将DllImport属性的SetLastError字段设置为true,只有这样,平台调用才会将最后一次调用Win32产生的错误码保存起来,然后会在托管代码调用Win32失败后,通过Marshal类的静态方法GetLastWin32Error获得由平台调用保存的错误码,从而对错误进行相应的分析和处理。
class Program

    {

        // Win32 API

        //  DWORD WINAPI GetFileAttributes(

        //  _In_  LPCTSTR lpFileName

        //);

        // 在托管代码中对非托管函数进行声明

        [DllImport("Kernel32.dll",SetLastError=true,CharSet=CharSet.Unicode)]

        public static extern uint GetFileAttributes(string filename);

        static void Main(string[] args)

        {

            // 试图获得一个不存在文件的属性

            // 此时调用Win32函数会发生错误

            GetFileAttributes("FileNotexist.txt");

            // 在应用程序的Bin目录下存在一个test.txt文件,此时调用会成功

            //GetFileAttributes("test.txt");

            // 获得最后一次获得的错误

            int lastErrorCode = Marshal.GetLastWin32Error();

            // 将Win32的错误码转换为托管异常

            //Win32Exception win32exception = new Win32Exception();

            Win32Exception win32exception = new Win32Exception(lastErrorCode);

            if (lastErrorCode != )

            {

                Console.WriteLine("调用Win32函数发生错误,错误信息为 : {0}", win32exception.Message);

            }

            else

            {

                Console.WriteLine("调用Win32函数成功,返回的信息为: {0}", win32exception.Message);

            }

            Console.Read();

        }

    }
2.4 数据封送
数据封送是——在托管代码中对非托管函数进行互操作时,需要通过方法的参数和返回值在托管内存和非托管内存之间传递数据的过程,数据封送处理的过程是由CLR(公共语言运行时)的封送处理服务(即封送拆送器)完成的。
封送时需要处理的数据类型分为两种——可直接复制到本机结构中的类型(blittable)和非直接复制到本机结构中的类型(non-bittable)。
2.4.1 可直接复制到本机结构中的类型
把在托管内存和非托管内存中有相同表现形式的数据类型称为——可直接复制到本机结构中的类型,这些数据类型不需要封送拆送器进行任何特殊的处理就可以在托管和非托管代码之间传递,
下面列出一些课直接复制到本机结构中的简单数据类型:
|
Windows 数据类型 |
非托管数据类型 |
托管数据类型 |
托管数据类型解释 |
|
BYTE/Uchar/UInt8 |
unsigned char |
System.Byte |
无符号8位整型 |
|
Sbyte/Char/Int8 |
char |
System.SByte |
有符号8位整型 |
|
Short/Int16 |
short |
System.Int16 |
有符号16位整型 |
|
USHORT/WORD/UInt16/WCHAR |
unsigned short |
System.UInt16 |
无符号16位整型 |
|
Bool/HResult/Int/Long |
long/int |
System.Int32 |
有符号32位整型 |
|
DWORD/ULONG/UINT |
unsigned long/unsigned int |
System.UInt32 |
无符号32位整型 |
|
INT64/LONGLONG |
_int64 |
System.Int64 |
有符号64位整型 |
|
UINT64/DWORDLONG/ULONGLONG |
_uint64 |
System.UInt64 |
无符号64位整型 |
|
INT_PTR/hANDLE/wPARAM |
void*/int或_int64 |
System.IntPtr |
有符号指针类型 |
|
HANDLE |
void* |
System.UIntPtr |
无符号指针类型 |
|
FLOAT |
float |
System.Single |
单精度浮点数 |
|
DOUBLE |
double |
System.Double |
双精度浮点数 |
除了上表列出来的简单类型之外,还有一些复制类型也属于可直接复制到本机结构中的数据类型:
(1) 数据元素都是可直接复制到本机结构中的一元数组,如整数数组,浮点数组等
(2)只包含可直接复制到本机结构中的格式化值类型
(3)成员变量全部都是可复制到本机结构中的类型且作为格式化类型封送的类
上面提到的格式化指的是——在类型定义时,成员的内存布局在声明时就明确指定的类型。在代码中用StructLayout属性修饰被指定的类型,并将StructLayout的LayoutKind属性设置为Sequential或Explicit,例如:
using System.Runtime.InteropServices;

// 下面的结构体也属于可直接复制到本机结构中的类型

[StructLayout(LayoutKind.Sequential)]

public struct Point {

   public int x;

   public int y;

}
2.4.2 非直接复制到本机结构中的类型
对于这种类型,封送器需要对它们进行相应的类型转换之后再复制到被调用的函数中,下面列出一些非直接复制到本机结构中的数据类型:
|
Windows 数据类型 |
非托管数据类型 |
托管数据类型 |
托管数据类型解释 |
|
Bool |
bool |
System.Boolean |
布尔类型 |
|
WCHAR/TCHAR |
char/ wchar_t |
System.Char |
ANSI字符/Unicode字符 |
|
LPCSTR/LPCWSTR/LPCTSTR/LPSTR/LPWSTR/LPTSTR |
const char*/const wchar_t*/char*/wchar_t* |
System.String |
ANSI字符串/Unicode字符串,如果非托管代码不需要更新此字符串时,此时用String类型在托管代码中声明字符串类型 |
|
LPSTR/LPWSTR/LPTSTR |
Char*/wchar_t* |
System.StringBuilder |
ANSI字符串/Unicode字符串,如果非托管代码需要更新此字符串,然后把更新的字符串传回托管代码中,此时用StringBuilder类型在托管代码中声明字符串 |
除了上表中列出的类型之外,还有很多其他类型属于非直接复制到本机结构中的类型,例如其他指针类型和句柄类型等。
2.4.3、封送字符串的处理
封送作为返回值的字符串,下面是一段演示代码,代码中主要是调用Win32 GetTempPath函数来获得返回临时路径,此时拆送器就需要把返回的字符串封送回托管代码中。使用System.StringBuilder托管数据类型。
// 托管函数中的返回值封送回托管函数的例子

    class Program

    {

        // Win32 GetTempPath函数的定义如下:

//DWORD WINAPI GetTempPath(

//  _In_   DWORD nBufferLength,

//  _Out_  LPTSTR lpBuffer

//);

  // 主要是注意如何在托管代码中定义该函数原型

        [DllImport("Kernel32.dll", CharSet = CharSet.Unicode, SetLastError=true)]

        public static extern uint GetTempPath(int bufferLength, StringBuilder buffer);

        static void Main(string[] args)

        {

            StringBuilder buffer = new StringBuilder();

            uint tempPath=GetTempPath(, buffer);

            string path = buffer.ToString();

            if (tempPath == )

            {

                int errorcode =Marshal.GetLastWin32Error();

                Win32Exception win32expection = new Win32Exception(errorcode);

                Console.WriteLine("调用非托管函数发生异常,异常信息为:" +win32expection.Message);

            }

            Console.WriteLine("调用非托管函数成功。");

            Console.WriteLine("Temp 路径为:" + buffer);

            Console.Read();

        }

    }
2.4.4、封送结构体的处理
在我们实际调用Win32 API函数时,经常需要封送结构体和类等复制类型,下面就以Win32 函数GetVersionEx为例子来演示如何对作为参数的结构体进行封送处理。
下面是GetVersionEx非托管定义(更多关于该函数的信息可以参看MSDN链接:http://msdn.microsoft.com/en-us/library/ms885648.aspx ):
BOOL GetVersionEx(

  LPOSVERSIONINFO lpVersionInformation

);
参数lpVersionInformation是一个指向 OSVERSIONINFO结构体的指针类型,所以我们在托管代码中为函数GetVersionEx函数之前,必须知道 OSVERSIONINFO结构体的非托管定义,然后再在托管代码中定义一个等价的结构体类型作为参数。以下是OSVERSIONINFO结构体的非托管定义:
typedef struct  _OSVERSIONINFO{

    DWORD dwOSVersionInfoSize;       //在使用GetVersionEx之前要将此初始化为结构的大小

    DWORD dwMajorVersion;               //系统主版本号

    DWORD dwMinorVersion;               //系统次版本号

    DWORD dwBuildNumber;               //系统构建号

    DWORD dwPlatformId;                  //系统支持的平台

    TCHAR szCSDVersion[];          //系统补丁包的名称

    WORD wServicePackMajor;            //系统补丁包的主版本

    WORD wServicePackMinor;            //系统补丁包的次版本

    WORD wSuiteMask;                      //标识系统上的程序组

    BYTE wProductType;                    //标识系统类型

    BYTE wReserved;                         //保留,未使用

} OSVERSIONINFO;
知道了OSVERSIONINFO结构体在非托管代码中的定义之后, 现在我们就需要在托管代码中定义一个等价的结构,并且要保证两个结构体在内存中的布局相同。托管代码中的结构体定义如下:
// 因为Win32 GetVersionEx函数参数lpVersionInformation是一个指向 OSVERSIONINFO的数据结构

        // 所以托管代码中定义个结构体,把结构体对象作为非托管函数参数

        [StructLayout(LayoutKind.Sequential,CharSet=CharSet.Unicode)]

        public struct OSVersionInfo

        {

            public UInt32 OSVersionInfoSize; // 结构的大小,在调用方法前要初始化该字段

            public UInt32 MajorVersion; // 系统主版本号

            public UInt32 MinorVersion; // 系统此版本号

            public UInt32 BuildNumber;  // 系统构建号

            public UInt32 PlatformId;  // 系统支持的平台

            // 此属性用于表示将其封送成内联数组

            [MarshalAs(UnmanagedType.ByValTStr,SizeConst=)]

            public string CSDVersion; // 系统补丁包的名称

            public UInt16 ServicePackMajor; // 系统补丁包的主版本

            public UInt16 ServicePackMinor;  // 系统补丁包的次版本

            public UInt16 SuiteMask;   //标识系统上的程序组

            public Byte ProductType;    //标识系统类型

            public Byte Reserved;  //保留,未使用

        }
从上面的定义可以看出, 托管代码中定义的结构体有以下三个方面与非托管代码中的结构体是相同的:
- 字段声明的顺序
- 字段的类型
- 字段在内存中的大小
并且在上面结构体的定义中,我们使用到了 StructLayout 属性,该属性属于System.Runtime.InteropServices命名空间(所以在使用平台调用技术必须添加这个额外的命名空间)。这个类的作用就是允许开发人员显式指定结构体或类中数据字段的内存布局,为了保证结构体中的数据字段在内存中的顺序与定义时一致,所以指定为 LayoutKind.Sequential(该枚举也是默认值)。
下面就具体看看在托管代码中调用的代码:
using System;

using System.ComponentModel;

using System.Runtime.InteropServices;

namespace 封送结构体的处理

{

    class Program

    {

        // 对GetVersionEx进行托管定义

        // 为了传递指向结构体的指针并将初始化的信息传递给非托管代码,需要用ref关键字修饰参数

        // 这里不能使用out关键字,如果使用了out关键字,CLR就不会对参数进行初始化操作,这样就会导致调用失败

        [DllImport("Kernel32",CharSet=CharSet.Unicode,EntryPoint="GetVersionEx")]

        private static extern Boolean GetVersionEx_Struct(ref  OSVersionInfo osVersionInfo);

        // 因为Win32 GetVersionEx函数参数lpVersionInformation是一个指向 OSVERSIONINFO的数据结构

        // 所以托管代码中定义个结构体,把结构体对象作为非托管函数参数

        [StructLayout(LayoutKind.Sequential,CharSet=CharSet.Unicode)]

        public struct OSVersionInfo

        {

            public UInt32 OSVersionInfoSize; // 结构的大小,在调用方法前要初始化该字段

            public UInt32 MajorVersion; // 系统主版本号

            public UInt32 MinorVersion; // 系统此版本号

            public UInt32 BuildNumber;  // 系统构建号

            public UInt32 PlatformId;  // 系统支持的平台

            // 此属性用于表示将其封送成内联数组

            [MarshalAs(UnmanagedType.ByValTStr,SizeConst=)]

            public string CSDVersion; // 系统补丁包的名称

            public UInt16 ServicePackMajor; // 系统补丁包的主版本

            public UInt16 ServicePackMinor;  // 系统补丁包的次版本

            public UInt16 SuiteMask;   //标识系统上的程序组

            public Byte ProductType;    //标识系统类型

            public Byte Reserved;  //保留,未使用

        }

        // 获得操作系统信息

        private static string GetOSVersion()

        {

            // 定义一个字符串存储版本信息

            string versionName = string.Empty;

            // 初始化一个结构体对象

            OSVersionInfo osVersionInformation = new OSVersionInfo();

            // 调用GetVersionEx 方法前,必须用SizeOf方法设置结构体中OSVersionInfoSize 成员

            osVersionInformation.OSVersionInfoSize = (UInt32)Marshal.SizeOf(typeof(OSVersionInfo));

            // 调用Win32函数

            Boolean result = GetVersionEx_Struct(ref osVersionInformation);

            if (!result)

            {

                // 如果调用失败,获得最后的错误码

                int errorcode = Marshal.GetLastWin32Error();

                Win32Exception win32Exc = new Win32Exception(errorcode);

                Console.WriteLine("调用失败的错误信息为: " + win32Exc.Message);

                // 调用失败时返回为空字符串

                return string.Empty;

            }

            else

            {

                Console.WriteLine("调用成功");

                switch (osVersionInformation.MajorVersion)

                {

                    // 这里仅仅讨论 主版本号为6的情况,其他情况是一样讨论的

                    case :

                        switch (osVersionInformation.MinorVersion)

                        {

                            case :

                                if (osVersionInformation.ProductType == (Byte))

                                {

                                    versionName = " Microsoft Windows Vista";

                                }

                                else

                                {

                                    versionName = "Microsoft Windows Server 2008"; // 服务器版本

                                }

                                break;

                            case :

                                if (osVersionInformation.ProductType == (Byte))

                                {

                                    versionName = " Microsoft Windows 7";

                                }

                                else

                                {

                                    versionName = "Microsoft Windows Server 2008 R2";

                                }

                                break;

                            case :

                                versionName = "Microsoft Windows 8";

                                break;

                        }

                        break;

                    default:

                        versionName = "未知的操作系统";

                        break;

                }

                return versionName;

            }

        }

        static void Main(string[] args)

        {

            string OS=GetOSVersion();

            Console.WriteLine("当前电脑安装的操作系统为:{0}", OS);

            Console.Read();

        }

    }

}
2.4.5、封送类的处理
下面直接通过GetVersionEx函数进行封送类的处理的例子,具体代码如下:
using System;

using System.ComponentModel;

using System.Runtime.InteropServices;

namespace 封送类的处理

{

    class Program

    {

        // 对GetVersionEx进行托管定义

        // 由于类的定义中CSDVersion为String类型,String是非直接复制到本机结构类型,

        // 所以封送拆送器需要进行复制操作。

        // 为了是非托管代码能够获得在托管代码中对象设置的初始值(指的是OSVersionInfoSize字段,调用函数前首先初始化该值),

        // 所以必须加上[In]属性;函数返回时,为了将结果复制到托管对象中,必须同时加上 [Out]属性

        // 这里不能是用ref关键字,因为 OsVersionInfo是类类型,本来就是引用类型,如果加ref 关键字就是传入的为指针的指针了,这样就会导致调用失败

        [DllImport("Kernel32", CharSet = CharSet.Unicode, EntryPoint = "GetVersionEx")]

        private static extern Boolean GetVersionEx_Struct([In, Out]  OSVersionInfo osVersionInfo);

        // 获得操作系统信息

        private static string GetOSVersion()

        {

            // 定义一个字符串存储操作系统信息

            string versionName = string.Empty;

            // 初始化一个类对象

            OSVersionInfo osVersionInformation = new OSVersionInfo();

            // 调用Win32函数

            Boolean result = GetVersionEx_Struct(osVersionInformation);

            if (!result)

            {

                // 如果调用失败,获得最后的错误码

                int errorcode = Marshal.GetLastWin32Error();

                Win32Exception win32Exc = new Win32Exception(errorcode);

                Console.WriteLine("调用失败的错误信息为: " + win32Exc.Message);

                // 调用失败时返回为空字符串

                return string.Empty;

            }

            else

            {

                Console.WriteLine("调用成功");

                switch (osVersionInformation.MajorVersion)

                {

                    // 这里仅仅讨论 主版本号为6的情况,其他情况是一样讨论的

                    case :

                        switch (osVersionInformation.MinorVersion)

                        {

                            case :

                                if (osVersionInformation.ProductType == (Byte))

                                {

                                    versionName = " Microsoft Windows Vista";

                                }

                                else

                                {

                                    versionName = "Microsoft Windows Server 2008"; // 服务器版本

                                }

                                break;

                            case :

                                if (osVersionInformation.ProductType == (Byte))

                                {

                                    versionName = " Microsoft Windows 7";

                                }

                                else

                                {

                                    versionName = "Microsoft Windows Server 2008 R2";

                                }

                                break;

                            case :

                                versionName = "Microsoft Windows 8";

                                break;

                        }

                        break;

                    default:

                        versionName = "未知的操作系统";

                        break;

                }

                return versionName;

            }

        }

        static void Main(string[] args)

        {

            string OS = GetOSVersion();

            Console.WriteLine("当前电脑安装的操作系统为:{0}", OS);

            Console.Read();

        }

    }

    [StructLayout(LayoutKind.Sequential, CharSet = CharSet.Unicode)]

    public class OSVersionInfo

    {

        public UInt32 OSVersionInfoSize = (UInt32)Marshal.SizeOf(typeof(OSVersionInfo));

        public UInt32 MajorVersion = ;

        public UInt32 MinorVersion = ;

        public UInt32 BuildNumber = ;

        public UInt32 PlatformId = ;

        // 此属性用于表示将其封送成内联数组

        [MarshalAs(UnmanagedType.ByValTStr, SizeConst = )]

        public string CSDVersion = null;

        public UInt16 ServicePackMajor = ;

        public UInt16 ServicePackMinor = ;

        public UInt16 SuiteMask = ;

        public Byte ProductType = ;

        public Byte Reserved;

    }

}
三、COM Interop
为了解决在.NET中的托管代码能够调用COM组件的问题,.NET 平台下提供了COM Interop,即COM互操作技术。
在.NET中使用COM对象,主要方法:使用TlbImp工具为COM组件创建一个互操作程序集来绑定早期的COM对象,这样就可以在程序中添加互操作程序集来调用COM对象。
在.NET 中使用COM对象的步骤:
- 找到要使用的COM 组件并注册它。使用 regsvr32.exe 注册或注销 COM DLL。
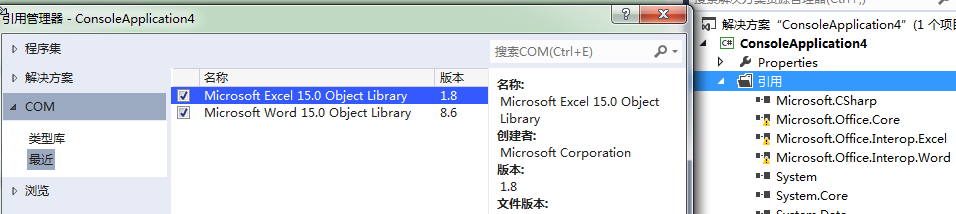
- 在项目中添加对 COM 组件或类型库的引用。
添加引用时,Visual Studio 会用到Tlbimp.exe(类型库导入程序),Tlbimp.exe程序将生成一个 .NET Framework 互操作程序集。该程序集又称为运行时可调用包装 (RCW),其中包含了包装COM组件中的类和接口。Visual Studio 将生成组件的引用添加至项目。
- 创建RCW中类的实例,这样就可以使用托管对象一样来使用COM对象。
在.NET中使用COM组件的过程:

如何在C#中调用COM组件——访问Office 互操作对象
在新建的控制台程序里添加”Microsoft.Office.Interop.Word 14.0.0.0 “ 这个引用
Microsoft.Office.Interop.Word.dll 确实是一个.NET程序集,并且它也叫做COM组件的互操作程序集,这个程序集中包含了COM组件中定义的类型的元数据, 托管代码通过调用互操作程序集中公开的接口或对象来间接地调用COM对象和接口的。
关于通过Tlblmp.exe工具来生成互操作程序集步骤,这里我就不多详细诉说了,大家可以参考MSDN中这个工具详细使用说明 :http://msdn.microsoft.com/zh-cn/library/tt0cf3sx(v=VS.80).aspx 。
然而我们也可以使用Visual Studio中内置的支持来完成为COM类型库创建互操作程序集的工作,我们只需要在VS中为.NET 项目添加对应的COM组件的引用,此时VS就会自动将COM类型库中的COM类型库转化为程序集中的元数据,并在项目的Bin目录下生成对于的互操作程序集,所以在VS中添加COM引用,其实最后程序中引用的是互操作程序集,然后通过RCW来对COM组件进行调用。 然而对于Office中的Microsoft.Office.Interop.Wordd.dll,这个程序集也是互操作程序集,但是它又是主互操作程序集,即PIA(Primary Interop Assemblies)。主互操作程序集是一个由供应商提供的唯一的程序集,为了生成主互操作程序集,可以在使用TlbImp命令是打开 /primary 选项。
using System;

using System.Collections.Generic;

using System.Linq;

using Excel = Microsoft.Office.Interop.Excel;

using Word = Microsoft.Office.Interop.Word;

namespace OfficeProgramminWalkthruComplete

{

    class Walkthrough

    {

        static void Main(string[] args)

        {

            // Create a list of accounts.

            var bankAccounts = new List<Account>

            {

                new Account {

                              ID = ,

                              Balance = 541.27

                            },

                new Account {

                              ID = ,

                              Balance = -127.44

                            }

            };

            // Display the list in an Excel spreadsheet.

            DisplayInExcel(bankAccounts);

            // Create a Word document that contains an icon that links to

            // the spreadsheet.

            CreateIconInWordDoc();

        }

        static void DisplayInExcel(IEnumerable<Account> accounts)

        {

            var excelApp = new Excel.Application();

            // Make the object visible.

            excelApp.Visible = true;

            // Create a new, empty workbook and add it to the collection returned

            // by property Workbooks. The new workbook becomes the active workbook.

            // Add has an optional parameter for specifying a praticular template.

            // Because no argument is sent in this example, Add creates a new workbook.

            excelApp.Workbooks.Add();

            // This example uses a single workSheet.

            Excel._Worksheet workSheet = excelApp.ActiveSheet;

            // Earlier versions of C# require explicit casting.

            //Excel._Worksheet workSheet = (Excel.Worksheet)excelApp.ActiveSheet;

            // Establish column headings in cells A1 and B1.

            workSheet.Cells[, "A"] = "ID Number";

            workSheet.Cells[, "B"] = "Current Balance";

            var row = ;

            foreach (var acct in accounts)

            {

                row++;

                workSheet.Cells[row, "A"] = acct.ID;

                workSheet.Cells[row, "B"] = acct.Balance;

            }

            workSheet.Columns[].AutoFit();

            workSheet.Columns[].AutoFit();

            // Call to AutoFormat in Visual C#. This statement replaces the

            // two calls to AutoFit.

            workSheet.Range["A1", "B3"].AutoFormat(

                Excel.XlRangeAutoFormat.xlRangeAutoFormatClassic2);

            // Put the spreadsheet contents on the clipboard. The Copy method has one

            // optional parameter for specifying a destination. Because no argument

            // is sent, the destination is the Clipboard.

            workSheet.Range["A1:B3"].Copy();

        }

        static void CreateIconInWordDoc()

        {

            var wordApp = new Word.Application();

            wordApp.Visible = true;

            // The Add method has four reference parameters, all of which are

            // optional. Visual C# allows you to omit arguments for them if

            // the default values are what you want.

            wordApp.Documents.Add();

            // PasteSpecial has seven reference parameters, all of which are

            // optional. This example uses named arguments to specify values

            // for two of the parameters. Although these are reference

            // parameters, you do not need to use the ref keyword, or to create

            // variables to send in as arguments. You can send the values directly.

            wordApp.Selection.PasteSpecial(Link: true, DisplayAsIcon: true);

        }

    }

    public class Account

    {

        public int ID { get; set; }

        public double Balance { get; set; }

    }

}
错误处理
try

            {

                // 如果文档不存在时,就会出现调用COM对象失败的情况

                // 打开Word文档

                wordDoc = wordApp.Documents.Open(wordPath);

                // 向Word中插入文本

                Range wordRange = wordDoc.Range(, );

                wordRange.Text = "这是插入的文本";

                // 保存文档

                wordDoc.Save();

            }

            catch(Exception ex)

            {

                // 获得异常相对应的HRESULT值

                // 因为COM中根据方法返回的HRESULT来判断调用是否成功的

                int HResult = Marshal.GetHRForException(ex);

                // 设置控制台的前景色,即输出文本的颜色

                Console.ForegroundColor = ConsoleColor.Red;

                // 下面把HRESULT值以16进制输出

                Console.WriteLine("调用抛出异常,异常类型为:{0}, HRESULT= 0x{1:x}", ex.GetType().Name, HResult);

                Console.WriteLine("异常信息为:" + ex.Message.Replace('\r', ' '));

            }

            finally

            {

                // 关闭文档并

                if (wordDoc != null)

                {

                    wordDoc.Close();

                }

                // 退出Word程序

                wordApp.Quit();

            }
从上面的结果我们看到了一个 HRESULT值,这个值真是COM代码中返回返回的。在COM中,COM方法通过返回 HRESULT 来报告错误;.NET 方法则通过引发异常来报告错误,为了方便地在托管代码中获得COM代码中出现的错误和异常信息,CLR提供了两者之间的转换,每一个代表错误发生的HRESULT都会被映射到.NET Framework中的一个异常类,对于具体的映射关系可以参考MSDN中 的文章: http://msdn.microsoft.com/zh-cn/library/9ztbc5s1(VS.80).aspx ,
最新文章
- java中trim()函数是什么
- PyCharm5.0.2最新版破解注册激活码(图文版)
- 运行编译后的程序报错 error while loading shared libraries: lib*.so: cannot open shared object file: No such file or directory
- Android简易数据存储之SharedPreferences
- Delphi Socket 阻塞线程下为什么不触发OnRead和OnWrite事件
- 编写jquery插件的分享
- hdoj 1384 Intervals
- js获取智能机浏览器版本信息
- 编写可维护的Javascript读书笔记
- 使用sed替换一行内多个括号内的值
- BBS的登陆——发帖——回帖
- ALINX公众号
- Exp3
- CSS渐变之CSS3 gradient在Firefox3.6下的使用
- Linux——系统开关机指令简单学习笔记
- OpenERP实施记录(11):入库处理
- 常用的go语言IDE对比
- 省队集训 Day6 序列
- 算法笔记_068:Dijkstra算法简单介绍(Java)
- Python学习实践 | speech智能语音模块