使用VB.Net Express版本创建服务
Services Part 1:> Creating Services
Visual Basic Express is a great, free tool from Microsoft. You don’t get all that Visual Studio 2005 offers though. One of the things VB Express does not have is templates to create a Windows Service.
We can still make Services with VB 2005 Express. All it takes is a little manual work. I will walk you thru a example on how to make a service in Visual Basic Express.
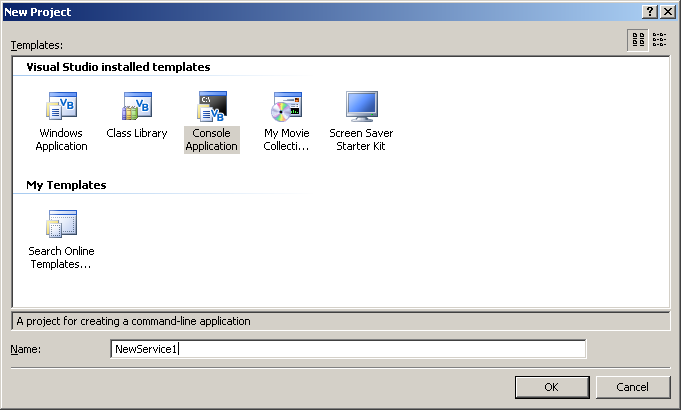
Choose Console Application, and give it the name of NewService1.
It will open in the designer with a module. Rename the module to NewService1.
Now we have to get some references for our Service. In the solution Explorer, double click on My Project and choose the References tab.
We need to Add the following references:
System.Configuration.Install
System.ServiceProcess
Now back to the NewService1 Module. We will be replacing all the text in the module, thus turning it into a class. Replace all the text with the text below:
Imports System.ServiceProcess

Imports System.Configuration.Install

Public Class NewService1

    Inherits System.ServiceProcess.ServiceBase

    Friend WithEvents Timer1 As System.Timers.Timer

    Public Sub New()

        MyBase.New()

        InitializeComponents()

        ' TODO: Add any further initialization code

    End Sub

    Private Sub InitializeComponents()

        Me.ServiceName = "NewService1″"

        Me.AutoLog = True

        Me.CanStop = True

        Me.Timer1 = New System.Timers.Timer()

        Me.Timer1.Interval = 6000

        Me.Timer1.Enabled = True

    End Sub

    ' This method starts the service.

    <MTAThread()> Shared Sub Main()

        ' To run more than one service you have to add them to the array

        System.ServiceProcess.ServiceBase.Run(New System.ServiceProcess.ServiceBase() {New NewService1})

    End Sub

    ' Clean up any resources being used.

    Protected Overloads Overrides Sub Dispose(ByVal disposing As Boolean)

        MyBase.Dispose(disposing)

        ' TODO: Add cleanup code here (if required)

    End Sub

    Protected Overrides Sub OnStart(ByVal args() As String)

        ' TODO: Add start code here (if required)

        ' to start your service.

        Me.Timer1.Enabled = True

    End Sub

    Protected Overrides Sub OnStop()

        ' TODO: Add tear-down code here (if required)

        ' to stop your service.

        Me.Timer1.Enabled = False

    End Sub

    Private Sub InitializeComponent()

        Me.Timer1 = New System.Timers.Timer

        CType(Me.Timer1, System.ComponentModel.ISupportInitialize).BeginInit()

        '

        'Timer1

        '

        Me.Timer1.Enabled = True

        CType(Me.Timer1, System.ComponentModel.ISupportInitialize).EndInit()

    End Sub

 Private Sub Timer1_Elapsed(ByVal sender As System.Object, ByVal e As System.Timers.ElapsedEventArgs) Handles Timer1.Elapsed

        Dim MyLog As New EventLog() ' create a new event log

        ' Check if the the Event Log Exists

        If Not MyLog.SourceExists(“NewService1″) Then

            MyLog.CreateEventSource(“NewService1″, “NewService1 Log”) ‘ Create Log

        End If

        MyLog.Source = "NewService1″"

        MyLog.WriteEntry("NewService1 Log", "It is running", EventLogEntryType.Information)

        'disable the timer so you dont fill up the log

        Timer1.Enabled = False

    End Sub

End Class
This will create the NewService class and insert a Timer into your designer.
If you Double-Click on the NewService1 in the SolutionExplorer, you will see the designer and the Timer1 object.
This code will run after 6 seconds has passed, and will insert a log entry for our service saying “ It is running”.
We need to set the Service Name in the Designer:
Double click on NewService1 to get the gray page. Then click somewhere in the grey to get the properties for this class.
Under ServiceName put NewService1.

Services Part 2:> Creating the needed Installers
This is not the Actual “Installer”. This is code needed for the Service to operate correctly.
We will get to Installing Later…
Add the Installer Code:
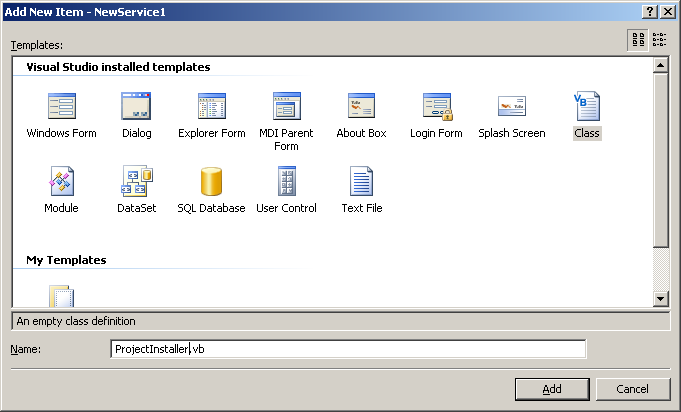
Create a new class file in your project and call it ProjectInstaller.
We wil replace the text in the ProjectInstaller class with the following code:
Imports System.ComponentModel

Imports System.Configuration.Install

<RunInstaller(True)> Public Class ProjectInstaller

    Inherits System.Configuration.Install.Installer

    'Installer overrides dispose to clean up the component list.

    <System.Diagnostics.DebuggerNonUserCode()> _

    Protected Overrides Sub Dispose(ByVal disposing As Boolean)

        Try

            If disposing AndAlso components IsNot Nothing Then

                components.Dispose()

            End If

        Finally

            MyBase.Dispose(disposing)

        End Try

    End Sub

    'Required by the Component Designer

    Private components As System.ComponentModel.IContainer

    'NOTE: The following procedure is required by the Component Designer

    'It can be modified using the Component Designer.

    'Do not modify it using the code editor.

    <System.Diagnostics.DebuggerStepThrough()> _

    Private Sub InitializeComponent()

        Me.ServiceProcessInstaller1 = New System.ServiceProcess.ServiceProcessInstaller

        Me.ServiceInstaller1 = New System.ServiceProcess.ServiceInstaller

        '

        'ServiceProcessInstaller1

        '

        Me.ServiceProcessInstaller1.Account = System.ServiceProcess.ServiceAccount.LocalSystem

        Me.ServiceProcessInstaller1.Password = Nothing

        Me.ServiceProcessInstaller1.Username = Nothing

        '

        'ServiceInstaller1

        '

        Me.ServiceInstaller1.ServiceName = "NewService1″"

        Me.ServiceInstaller1.StartType = System.ServiceProcess.ServiceStartMode.Automatic

        '

        'ProjectInstaller

        '

        Me.Installers.AddRange(New System.Configuration.Install.Installer() {Me.ServiceProcessInstaller1, Me.ServiceInstaller1})

    End Sub

    Friend WithEvents ServiceProcessInstaller1 As System.ServiceProcess.ServiceProcessInstaller

    Friend WithEvents ServiceInstaller1 As System.ServiceProcess.ServiceInstaller

    Public Sub New()

        MyBase.New()

        'This call is required by the Component Designer.

        InitializeComponent()

        'Add initialization code after the call to InitializeComponent

    End Sub

End Class
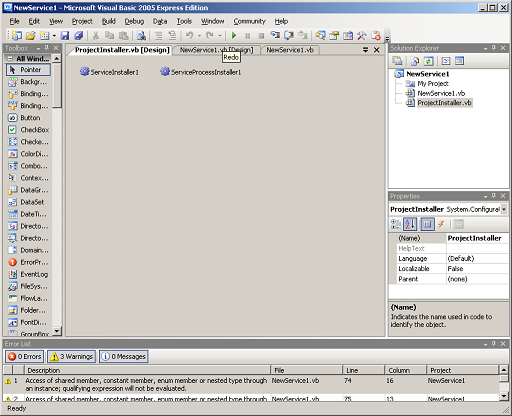
This will create the ProjectInstaller class and insert 2 Objects in the designer:
ServiceInstaller1 – Settings: The Service Name, Display Name, description, StartType
ServiceProcessInstaller – Settings: The Account the service will run under
In this example, the settings are set as follows:
ServiceName: NewService1
DisplayName: {blank}
Description: {blank}
StartType: Automatic – (will auto start on reboot)
Account: LocalSystem – (do not need user/password. This will run under System account)
Now we have to build the project.
Services Part 3:> Build and Install your Service
Build and Install service on your pc:
Go to build menu and choose Build NewService1 – This will create an EXE file in our project’s \bin\Release folder.
Next we will need to use the InstallUtil.exe to install the service into the PC.
InstallUtil.exe is part of the Dot Net distribution package.
It is found in the c:\windows\Microsoft.net\Firmware\v2.0.50727\ folder.
Its command line usage is:
Install Service:
Installutil.exe PATH_TO_EXE.exe
Uninstall Service:
InstallUtil.exe PATH_TO_EXE.exe /u
For this example, I changed directory into the c:\windows\Microsoft.net\Firmware\v2.0.50727\ folder.
Then I ran:
InstallUtil.exe “c:\vb2005\projects\NewService1\bin\Release\NewService1.exe”
The installer should give you lots of text, It should end by saying:
The Commit phase completed successfully.
The transacted install has completed.
If there are any error messages in the install of the service, it will list them.
After successful installation, you should see the Service listed as NewService1 in the Service Manager.
To get the service manager, Right click on My Computer on the desktop, and choose Manage.
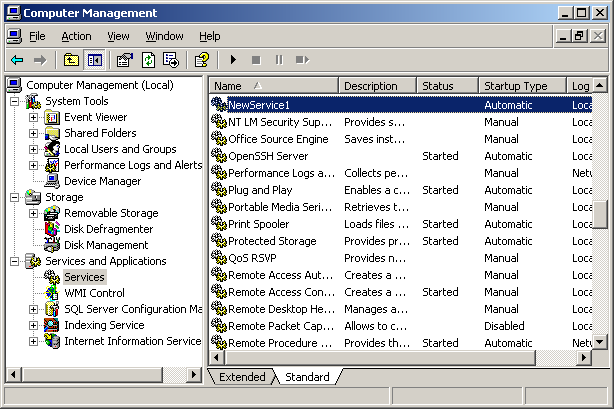
Then choose Services and Applications > Services. Right-Click on the NewService1 and choose Start.
Then go to System Tools > Event Viewer > Application, and you should see your log entries.
The service will make one entry saying “It is running” then disable the Timer so your log doesn’t fill up.
To install this service on another computer:
Prerequisites: You need to have .net distributable 2.0 on the target PC.
You need to copy over the files in the Release folder to the target computer. Then inside the c:\windows\Microsoft.net\Firmware\v2.0.50727\ folder run the InstallUtil.exe program as described previously.
That’s It.
最新文章
- 一、Stream,sink,source,transform
- 使用excel快速制表 拒绝粗心
- tomcat部署新的项目的时候出现报错信息: Invalid byte tag in constant pool: 15
- http://182.92.241.20/mypro/login 偶的点金项目细化分包管理平台即将上线!!
- API 版本控制
- AndroidStudio KeyMap
- <%@include和<jsp:include
- vim备注
- [Design Pattern] Singleton Pattern 简单案例
- NSIS脚本调用C语言写的插件
- php 利用socket上传文件
- Language Modeling with Gated Convolutional Networks
- 一个都不能少: DevOps的3大核心基础架构
- Azure Storage用法:使用Blob Storage
- WPF 杂记
- 关于在IE浏览器中使用控件问题
- 关于Apache的配置方法和步骤
- text/css什麼意思
- Fibonacci Number LT509
- npm bower gulp