unity5 静态和动态cubmap
一,静态cubemap:
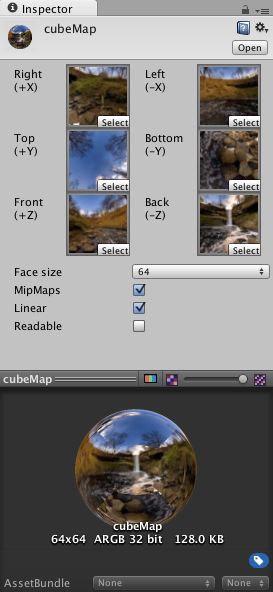
asserts窗口 右键->Create->Legacy->Cubemap,新建一个cubemap,命名为cubeMap,然后为其各面指定贴图,如图:
需要注意的是,unity是左手坐标系,与opengl右手坐标系相反,所以如果我们的六张贴图是适用于opengl坐标系的,则用到unity中+Z和-Z两张贴图要互换。例如下面六个图是适用于opengl坐标系的(n表示negative,p表示positive):

则用到unity中,应:nx添加到-X,ny添加到-Y,nz添加到+Z,px添加到+X,py添加到+Y,pz添加到-Z。
新建shader,命名为cubeMapShader:
Shader "Custom/cubeMapShader" {

	Properties {

		_MainTex("Base (RGB)",2D) = "white" {}

		_Cubemap("CubeMap",CUBE) = ""{}

		_ReflAmount("Reflection Amount", Range(0.01, 1)) = 1

		_Glossiness ("Smoothness", Range(0,1)) = 0.5

		_Metallic ("Metallic", Range(0,1)) = 0.0

		_Color ("Color", Color) = (0,0,0,1)

	}

	SubShader {

		Tags { "RenderType"="Opaque" }

		LOD 200

		CGPROGRAM

		// Physically based Standard lighting model, and enable shadows on all light types

		#pragma surface surf Standard fullforwardshadows

		// Use shader model 3.0 target, to get nicer looking lighting

		#pragma target 3.0

		sampler2D _MainTex;

		samplerCUBE _Cubemap;

		float _ReflAmount;

		half _Glossiness;

		half _Metallic;

		fixed4 _Color;

		struct Input {

			float2 uv_MainTex;

			float3 worldRefl;

		};

		void surf (Input IN, inout SurfaceOutputStandard o) {

			// Albedo comes from a texture tinted by color

			fixed4 c = tex2D (_MainTex, IN.uv_MainTex)*_Color;

			o.Albedo = c.rgb;

			// Metallic and smoothness come from slider variables

			o.Metallic = _Metallic;

			o.Smoothness = _Glossiness;

			o.Alpha = c.a;

			o.Emission=texCUBE(_Cubemap, IN.worldRefl).rgb*_ReflAmount;

		}

		ENDCG

	}

	FallBack "Diffuse"

}
新建一个material,命名为cubeMapMat。其shader选Custom/cubeMapShader。shader->Cubemap选前面创建的cubeMap。其余默认。
新建一个球体,命名为sphere1,将其Mesh Renderer->Materials->Element 0 选为cubeMapMat。
则得到一个静态cubemap球体,如图:

二,动态cubemap:
创建camera,命名为Camera_cubeMapRealTime,删除其Audio Listener组件。
新建cubemap,命名为cubeMapRealTime,勾选Readable。
新建material,命名为cubeMapRealTimeMat,其shader选Custom/cubeMapShader。shader->Cubemap选cubeMapRealTime。
创建球体,命名为sphere2。
为sphere2添加脚本cubeMapRealTime.cs:
using UnityEngine;

using System.Collections;

[ExecuteInEditMode]

public class cubeMapRealTime : MonoBehaviour {

	public Camera camera_cubeMapRealTime;

	public Cubemap cubeMap;

	void Start () {

		UpdateCubemap();

	}

	void LateUpdate () {

		UpdateCubemap ();

	}

	void UpdateCubemap () {

		camera_cubeMapRealTime.transform.position = gameObject.transform.position;

		camera_cubeMapRealTime.RenderToCubemap(cubeMap);

	}

}
Camera_cubeMapRealTime拖给脚本的camera_cubeMapRealTime变量,
cubeMapRealTime拖给脚本的cubeMap变量。
sphere2的Mesh Renderer->Materials->Element 0 选cubeMapRealTimeMat。
此时cubeMapRealTime中产生实时图像:

运行效果如下:

最新文章
- Microservices Reference Architecture - with Spring Boot, Spring Cloud and Netflix OSS--转
- WCF初探-2:手动实现WCF程序
- ora-28002 the password will expire解决办法
- iOS代码规范文档
- 设置Eclipse启动JDK
- 为SharePoint 2010中的FBA创建自定义登录页面
- Unity编程标准导引-2.2Unity中的基本概念
- Java:实现对象的比较 comparable接口和comparator接口
- Node与apidoc的邂逅——NodeJS Restful 的API文档生成
- 第1章 Linux文件类基础命令
- 如何破解MyEclipse 10.x
- JavaScript学习 - 基础(五) - string/array/function/windows对象
- 【索引失效】什么情况下会引起MySQL索引失效
- vue-2-计算属性和观察者
- linux命令学习之:vim
- 微网站|手机端html弹窗、弹层、提示框、加载条
- Windows / Windows Phone 8.1 预留应用名称及应用上传
- SpringBoot配置文件注入值数据校验
- Spring.Net框架一:Spring.Net简介
- 算法笔记_061:蓝桥杯练习 字串统计(Java)
热门文章
- M2Mqtt is a MQTT client available for all .Net platform
- [Javascript] Hositing
- [Node.js]29. Level 6: Socket.io: Setting up Socket.io server-side & Client socket.io setup
- Shader Object及Program操作API
- wepy - 使用vsCode编辑器安装插件
- Oracle 11g 分区拆分与合并
- python之函数用法id(),了解即可
- Python 实现的、带GUI界面的词云生成器
- (一)Linux实操之——权限、任务调度、磁盘分区
- redis通过json方案存取对象com.alibaba.fastjson.JSONException: syntax error, expect