Windows安装MySQL免安装版
安装环境:
win7 64位
IP地址:192.168.2.37
防火墙已经关闭
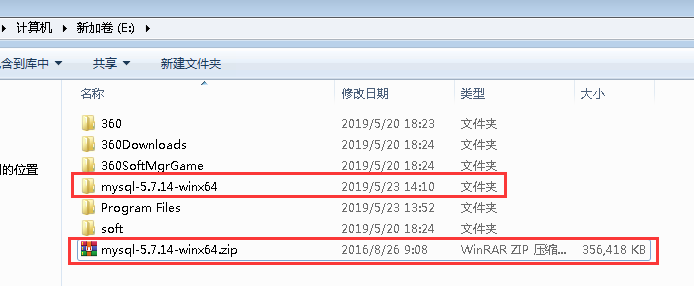
一、安装MySQL5.7.14免安装版
1、解压文件
2、新建my.ini文件
data文件夹自动生成
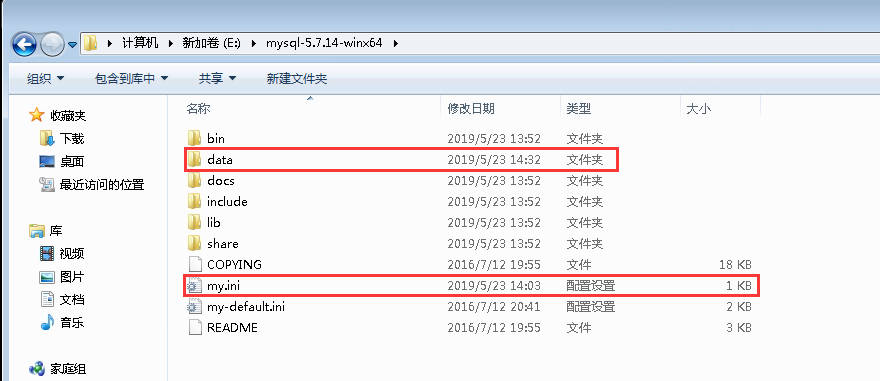
my.ini里面内容为:
[mysql]

# 设置mysql客户端默认字符集

default-character-set=utf8

[mysqld]

#设置3306端口

port =

# 设置mysql的安装目录

basedir=E:\mysql-..-winx64

# 设置mysql数据库的数据的存放目录

datadir=E:\mysql-..-winx64\data

# 允许最大连接数

max_connections=

# 服务端使用的字符集默认为8比特编码的latin1字符集

character-set-server=utf8

# 创建新表时将使用的默认存储引擎

default-storage-engine=INNODB
3、配置环境变量,避免每次都要到安装目录下的bin里面执行。
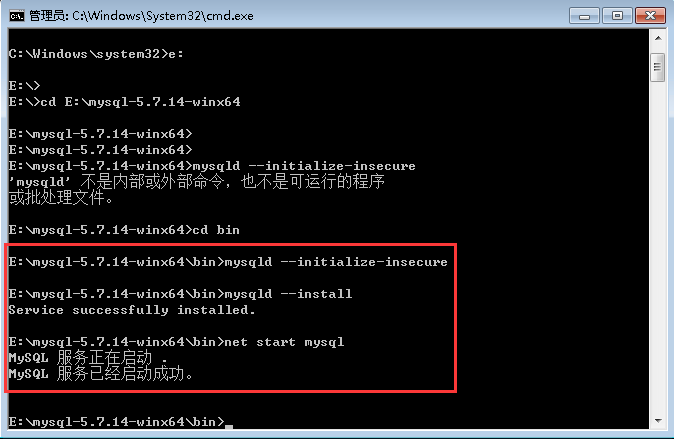
4、初始化数据、安装服务、启动MySQL
以管理员的身份运行cmd,将目录切换到你mysql安装目录的bin目录
mysqld --initialize-insecure
执行 mysqld --initialize-insecure 指令进行配置,安装路径会默认生成一个data文件夹
mysqld --install mysql
也可以指定配置文件进行安装服务
mysqld --install --defaults-file="E:\mysql-5.7.14-winx64\my.ini"
net start mysql
E:\mysql-5.7.-winx64\bin>mysqld --initialize-insecure

E:\mysql-5.7.-winx64\bin>mysqld --install

Service successfully installed.

E:\mysql-5.7.-winx64\bin>net start mysql

MySQL 服务正在启动 .

MySQL 服务已经启动成功。
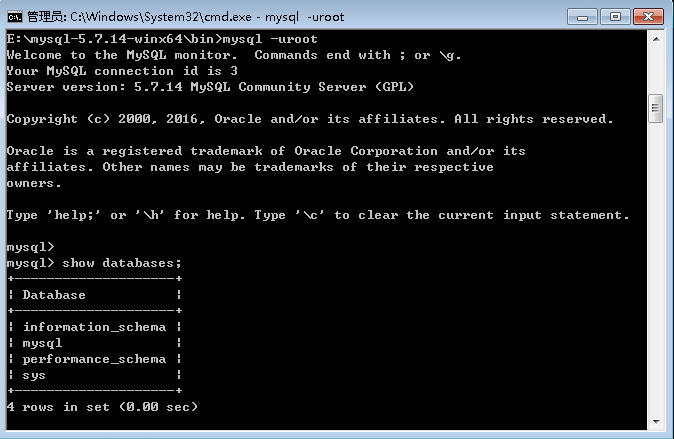
5、用户设置
cmd到bin目录下执行mysql -uroot (无需密码) , 即可进入,因为上边是用insecure 创建的
创建一个root用户,并设置密码
MariaDB [aa]> grant all on *.* to root@'%' identified by '123456';
mysql> select user,host from mysql.user;

+-----------+-----------+

| user      | host      |

+-----------+-----------+

| mysql.sys | localhost |

| root      | localhost |

+-----------+-----------+

 rows in set (0.00 sec)

mysql> grant all on *.* to root@'%' identified by '';

Query OK,  rows affected,  warning (0.00 sec)

mysql> select user,host from mysql.user;

+-----------+-----------+

| user      | host      |

+-----------+-----------+

| root      | %         |

| mysql.sys | localhost |

| root      | localhost |

+-----------+-----------+

 rows in set (0.00 sec)
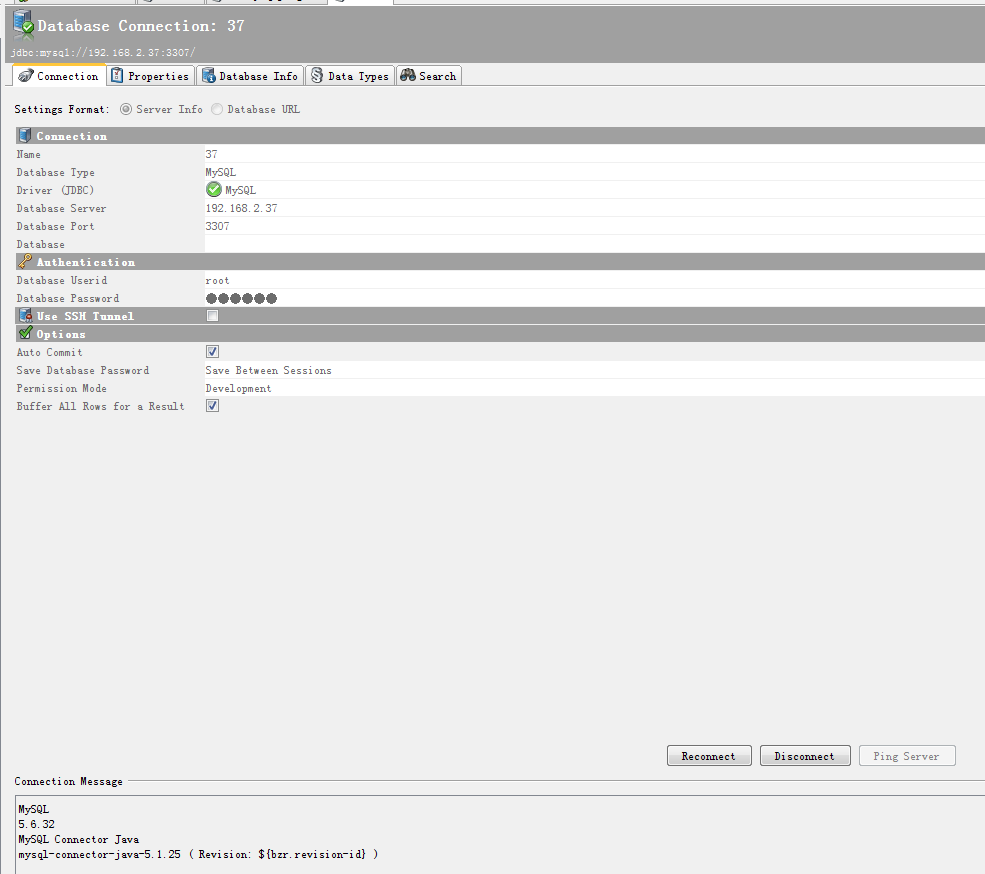
客户端连接成功
二、安装MySQL5.6.32免安装版
1、解压文件

2、新建my.ini文件
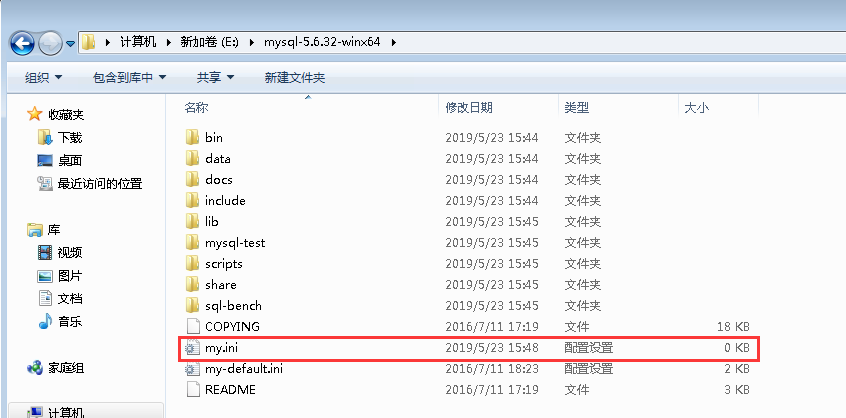
my.ini里面内容如下:
[mysql]

# 设置mysql客户端默认字符集

default-character-set=utf8

[mysqld]

#设置3307端口

port =

# 设置mysql的安装目录

basedir=E:\mysql-5.6.-winx64

# 设置mysql数据库的数据的存放目录

datadir=E:\mysql-5.6.-winx64\data

# 允许最大连接数

max_connections=

# 服务端使用的字符集默认为8比特编码的latin1字符集

character-set-server=utf8

# 创建新表时将使用的默认存储引擎

default-storage-engine=INNODB
3、初始化数据、安装服务、启动MySQL
mysqld --initialize-insecure
mysqld --install mysql5.6
也可以指定配置文件进行安装服务
mysqld --install mysql5.6 --defaults-file="E:\mysql-5.6.32-winx64\my.ini"
net start mysql5.6
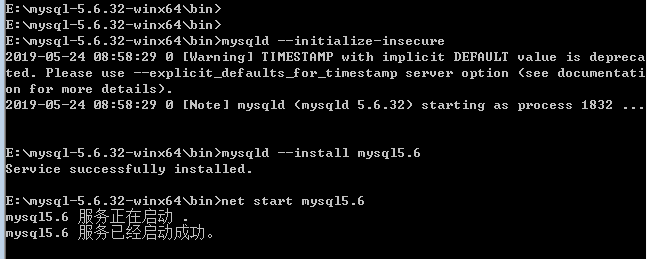
E:\mysql-5.6.-winx64\bin>mysqld --initialize-insecure

-- ::  [Warning] TIMESTAMP with implicit DEFAULT value is depreca

ted. Please use --explicit_defaults_for_timestamp server option (see documentati

on for more details).

-- ::  [Note] mysqld (mysqld 5.6.) starting as process  ...

E:\mysql-5.6.-winx64\bin>mysqld --install mysql5.

Service successfully installed.

E:\mysql-5.6.-winx64\bin>net start mysql5.

mysql5. 服务正在启动 .

mysql5. 服务已经启动成功。
登陆MySQL5.6服务
E:\mysql-5.6.32-winx64\bin>mysql -u root -P 3307
第一次登录没有密码
-u root指定root用户登陆
-P 指定MySQL端口号3307
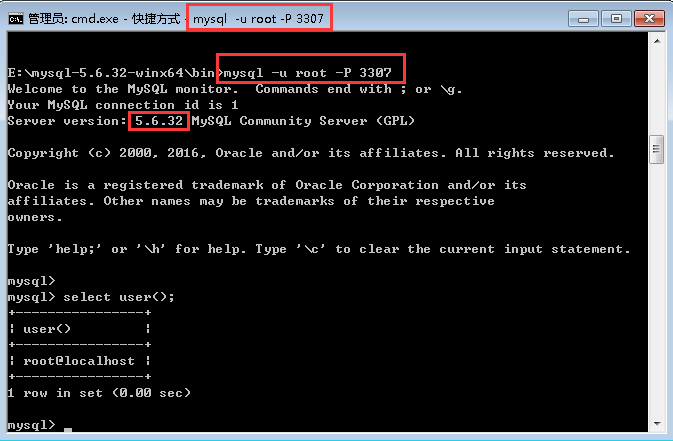
E:\mysql-5.6.-winx64\bin>mysql -u root -P

Welcome to the MySQL monitor.  Commands end with ; or \g.

Your MySQL connection id is

Server version: 5.6. MySQL Community Server (GPL)

Copyright (c) , , Oracle and/or its affiliates. All rights reserved.

Oracle is a registered trademark of Oracle Corporation and/or its

affiliates. Other names may be trademarks of their respective

owners.

Type 'help;' or '\h' for help. Type '\c' to clear the current input statement.

mysql>

mysql> select user();

+----------------+

| user()         |

+----------------+

| root@localhost |

+----------------+

 row in set (0.00 sec)

mysql>
4、设置root密码
语法:
mysql> update user set password=password(“新密码”) where user=”用户名” and host='localhost';
实例:
mysql> update mysql.user set password=password('000000') where user='root' and host='localhost';
刷新内存生效
mysql> flush privileges;
mysql> update mysql.user set password=password('') where user='root' and h

ost='localhost';

Query OK,  row affected (0.00 sec)

Rows matched:   Changed:   Warnings:

mysql> flush privileges;

Query OK,  rows affected (0.00 sec)
执行如果报错:ERROR 1054 (42S22): Unknown column 'password' in 'field list'
请把password字段改成了authentication_string
mysql> update mysql.user set authentication_string=password('123456') where user='root' and host='localhost';
刷新内存生效
mysql> flush privileges;
mysql> update mysql.user set authentication_string=password('') where user

='root' and host='localhost';

Query OK,  row affected,  warning (0.00 sec)

Rows matched:   Changed:   Warnings:

mysql> flush privileges;

Query OK,  rows affected (0.01 sec)
查看所有用户信息
mysql> select user,host,password from mysql.user;
mysql> select user,host,password from mysql.user;

+------+-----------+-------------------------------------------+

| user | host      | password                                  |

+------+-----------+-------------------------------------------+

| root | localhost | *032197AE5731D4664921A6CCAC7CFCE6A0698693 |

| root | 127.0.0.1 |                                           |

| root | ::       |                                           |

|      | localhost |                                           |

+------+-----------+-------------------------------------------+

 rows in set (0.00 sec)
执行授权命令
mysql> grant all privileges on *.* to root@'%' identified by '000000';
mysql> grant all privileges on *.* to root@'%' identified by '';

Query OK,  rows affected (0.00 sec)

mysql> flush privileges;

Query OK,  rows affected (0.00 sec)

mysql> select user,host,password from mysql.user;

+------+-----------+-------------------------------------------+

| user | host      | password                                  |

+------+-----------+-------------------------------------------+

| root | %         | *032197AE5731D4664921A6CCAC7CFCE6A0698693 |

| root | 127.0.0.1 |                                           |

| root | ::       |                                           |

|      | localhost |                                           |

+------+-----------+-------------------------------------------+

 rows in set (0.00 sec)
5、客户端连接
参考文章:
https://www.jb51.net/article/139463.htm
https://www.cnblogs.com/jiyongjia/p/9527499.html
Windows安装两个mysql数据库步骤
https://blog.csdn.net/alex_my/article/details/38981047
windows电脑如何同时安装多个mysql服务
https://jingyan.baidu.com/article/72ee561a13bf95e16038df10.html
最新文章
- MSYS2环境下编译X265
- OpenCV2+入门系列(三):遍历图像的几种方法
- VIM使用(三)
- JDK 伪异步编程(线程池)
- chrome 插件 vimium 像操作vim一样的操作浏览器
- 轉發和重定向-JSP
- PHP里10个鲜为人知但却非常有用的函数
- Percona Xtrabackup备份mysql(转)
- C# Windows - ListView
- BNU10792:沙漠旅行者
- Android学习总结——SharedPreferences
- github Permission denied (publickey)解决办法
- < high performance web sites > 阅读小记
- ADS的go to命令
- 第四章 MySQL高级查询(二)
- python3.X中try/except
- git 实战
- c# 虚拟路径转换为绝对路径
- ubuntu上第一个hello程序
- C#存储过程中传入传出参数