基于 Annotation 的装配(注解)
2024-09-03 13:44:35
- 注解:就是一个类,使用@注解名称
- 开发中:使用注解 取代 xml配置文件。
1. @Component取代<bean class="">
@Component("id") 取代 <bean id="" class="">
2.web开发,提供3个@Component注解衍生注解(功能一样)取代<bean class="">
@Repository :dao层
@Service:service层
@Controller:web层
3.依赖注入 ,给私有字段设置,也可以给setter方法设置
普通值:@Value("")
引用值:
方式1:按照【类型】注入
@Autowired
方式2:按照【名称】注入1
@Autowired
@Qualifier("名称")
方式3:按照【名称】注入2
@Resource("名称")
4.生命周期
初始化:@PostConstruct
销毁:@PreDestroy
5.作用域
@Scope("prototype") 多例
在 Spring 中,尽管使用XML配置文件可以实现 Bean 的装配工作,但如果应用中有很多的 Bean 时,会导致XML配置文件过于臃肿,给后续的维护和升级带来一定的困难. 为此, Spring 。提供了对Annotation(注解)技术的全面支持。
Spring 中定义一系列的注解,常用的注解如下所示。
- @Component:可以使用此注解描述 Spring 中的 Bean ,但它是一个泛化的概念,仅仅表示一个组件(Bean ),并且可以作用在任何层次使用时只需要注解标注在相应类上即可。Spring 中的 Bean ,但它是一个泛化的概念,仅仅表示一个组件( Bean ),并且可以作用在任何层次使用时只需要注解标注在相应类上即可。
- @Repository:用于将数据访问层(DAO层)的类标识为 Spring 中的 Bean ,其功能与@Component相同。Spring 中的 Bean ,其功能与@Component相同。
- @Service:通常作用在业务层(Service 层),用于将业务层的类标识为 Spring 中的 Bean ,其功能与@Component相同。Spring 中的 Bean ,其功能与@Component相同。
- @Controller:通常作用在控制层(如Spring MVC的Controller),用于将控制层的类标识为Spring中的Bean,其功能与@Component相同。
- @Autowired:用于对贝纳的属性变量,属性的 setter 方法以及构造方法进行标注,配合对应的注解处理器完成的 Bean 的自动配置工作默认按照 Bean 的类型进行装配。Bean 的自动配置工作默认按照 Bean 的类型进行装配。
- @Resource:其作用与 @Autowired 一样.。其区别在于 @Autowired 默认按照 Bean 的类型装配,而 @Resource 默认按照 Bean 的实例名称进行装配 @Resource 中有两个重要属性:name 和 type 。 Spring将名称属性解析为 Bean 实例名称,type 属性解析为 Bean 实例类型。 如果指定 name 属性,则按实例名称进行装配; 如果指定 type 属性,则按 Bean 类型进行装配,如果都不指定,则先按 Bean 实例名称装配,如果不能匹配,再按照 Bean 类型进行装配;如果都无法匹配,则抛出异常NoSuchBeanDefinitionException。
- @Qualifier:与@Autowired注解配合使用,会将默认的按钮类型装配修改为按 Bean 的实例名称装配, Bean 的实例名称由@Qualifier注解的参数指定。Bean 的实例名称装配, Bean 的实例名称由@Qualifier注解的参数指定。 在上面几个注解中,虽然@ Repository,@ Service与@Controller功能与@Component注解的功能相同,但为了是标注类本身用途更加清晰,建议在实际开发中使用@ Repository,@ Service与@Controller分别对实现类进行标注。
下面,通过一个案例来演示如何通过这些注解来装配 Bean 。
- 创建一个项目,在SRC目录下,创建一个com.itheima.annotation包,在该包中创建接口userDao,并在接口中定义一个save()方法,如图所示。

- 在com.itheima.annotation包中,创建的UserDAO的接口的实现类在UserDAOImpl中,该类需要实现接口中的 save(方法 ),如图所示。
 首先使用@Repository注解将在一个UserDaoImpl类标识为 Spring 中的Bean,其写法相当于配置文件中<bean id =“userDao” class =“com.itheima.annotation.UserDaoImpl”/>的编写。然后在save()方法中输出打印一句话,用于验证是否成功调用了该方法。
 - 在com.itheima.annotation包中,创建接口UserService,在接口中同样定义一个save(方法) ,如图所示。

- 在com.itheima.annotation包中,创建UserService接口的实现类UserServiceImpl,该接口需要实现接口中的save()方法,如图所示。
 在图片中,首先使用@Service注解将UserServiceImpl类标识为Spring中的Bean,这相当于配置文件中<bean id =“userService” class =“com.itheima.annotation.UserServiceImpl”/>的编写;然后使用@Resource注解标注在属性userDao上,这相当于配置文件中< property name =“userDao”ref =“userDao”/>的写法 ,这相当于配置文件中< property name =“userDao”ref =“userDao”/>的写法(ref:引用数据,一般是另一个bean id值);最后在该类的save()方法中调用userDao中的save()方法,并输出一句话。
 - 在com.itheima.annotation包中,创建控制器类UserController,编辑后如图片
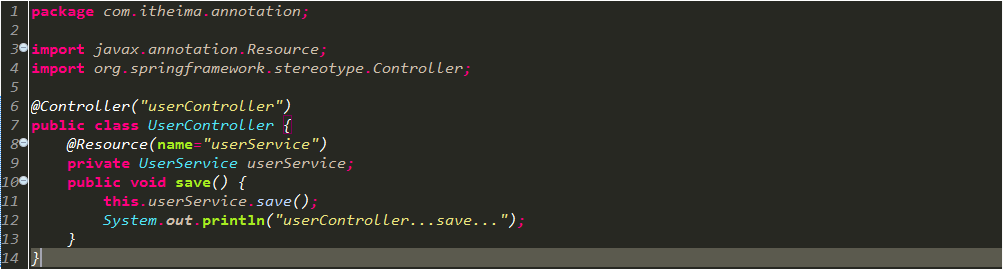 在图片中,首先使用@Controller注解标注了UserController类,这相当于在配置文件中编写<bean id =“userController” class = “” com.itheima.annotation.UserController“/>; 然后使用了@Resource注解标注在userService属性中,这相当于在配置文件中编写<property name =“userService”ref =“userService”/>;(ref:引用数据,一般是另一个bean id值)最后在其save()方法中调用了userService中的save()方法,并输出了一句话。
 - 在com.itheima.annotation包中,创建配置文件beans6.xml,在配置文件中编写基于Annotation装配的代码,如图 配置<context:annotation-config />报错:
- 配置 <context:annotation-config />
- 报错1. cvc-complex-type.2.4.c: The matching wildcard is strict, but no declaration can be found for element 'context:annotation-config'.
- 需添加: xmlns:context="http://www.springframework.org/schema/context"
- 报错2. cvc-complex-type.2.4.c: The matching wildcard is strict, but no declaration can be found for element 'context:annotation-config'.
- 需添加: http://www.springframework.org/schema/context
- http://www.springframework.org/schema/context/spring-context.xsd
<p><img alt="" class="has" height="345" src="https://img-blog.csdnimg.cn/20181130133447104.png" width="832"> 从上述代码可以看出,与之前的配置文件有很大的不同首先,在<Bean >元素中,增加了第4行,第7行和第8行中包含有上下文的约束信息;然后通过配置<context:annotation-config />来开启注解处理器;最后分别定义了3个Bean对应所编写的3个实例。与XML装备方式有所不同的是,这里不再需要配置子元素<property> 。上诉 Spring 配置文件中高端注解方式虽然较大程度简化了XML文件中的Bean的配置,但仍需要在 Spring 配置文件中一一配置相应的 Bean ,为此 Spring 注释提供了另外一种高效的注解配置方式(对包路径下的所有 Bean 文件进行扫描),其配置方式如下。Bean >元素中,增加了第4行,第7行和第8行中包含有上下文的约束信息;然后通过配置<context:annotation-config />来开启注解处理器;最后分别定义了3个Bean对应所编写的3个实例。与XML装备方式有所不同的是,这里不再需要配置子元素<property>。上诉 Spring 配置文件中高端注解方式虽然较大程度简化了XML文件中的 Bean 的配置,但仍需要在 Spring 配置文件中一一配置相应的 Bean ,为此 Spring 注释提供了另外一种高效的注解配置方式(对包路径下的所有 Bean 文件进行扫描),其配置方式如下。</p> <pre class="has" name="code"><code class="hljs java"><context:component-scan base-<span class="hljs-keyword">package</span>=<span class="hljs-string">"Bean 所在的包路径"</span> /></code><div class="hljs-button {2}" data-title="复制" onclick="hljs.copyCode(event)"></div></pre> <p> 所以可以将上诉文件中第12 -17行代码进行如下替换(推荐)。 </p> <pre class="has" name="code"><code class="hljs java"><context:component-scan base-<span class="hljs-keyword">package</span>=<span class="hljs-string">"com.itheima.annotation"</span> /></code><div class="hljs-button {2}" data-title="复制" onclick="hljs.copyCode(event)"></div></pre> <blockquote>
<p><span style="color:#f33b45;">注意:</span> <span style="color:#f33b45;">Spring 4.0以上版本使用上面的代码对指定包中的注解进行扫描前,需要先向项目中导入Spring AOP的JAR包spring-aop-4.3.6.RELEASE.jar,否则程序在运行时会包出“java.lang.NoClassDefFound错误:java.lang.NoClassDefFoundError: org/springframework/aop/TargetSource”错误</span></p>
</blockquote>
</li>
<li>
<p style="text-indent:0;"> 在com.itheima.annotation包中, 创建测试类 AnnotationAssemebleTest, 在类中编写测试方法并定义配置文件的路径, 然后通过 Spring 容器加载配置文件并获取 UserController 实例, 最后调用实例中 save() 方法, 如下<img alt="" class="has" height="325" src="https://img-blog.csdnimg.cn/20181130161651164.png" width="955"> 执行程序后, 控制台的输出结果如果所示。 <img alt="" class="has" height="86" src="https://img-blog.csdnimg.cn/20181130161810179.png" width="881"> 从图可以看出, Spring 容器已成功获取了 UserController 的实例, 并通过调用实例中的方法执行了各层中的输出语句, 这说明已成功实现了基于 Annotation 装配 Bean。 </p>
</li>
提示: 使用 @Autowired 注解 替换 @Resource注解, 也可以达到同样的效果
最新文章
- 【WCF】错误协定声明
- 原版ubuntu 系统下,emacs24无法输入中文问题解决方案
- 新浪微博客户端(50)-解决输入Emotion表情逐渐变小的问题
- Keypress – 超强大!捕获键盘输入的 JavaScript 库
- Tomcat7.x 与 Tomcat6.x
- Extension 代表的是私有成员变量
- Qt OpenCV Support Image Type 支持读写的图像格式
- Ubuntu 14.04 & ant: Unable to locate tools.jar. Expected to find it in /usr/lib/jvm/java-7-openjdk-i386/lib/tools.jar
- jquery悬停tab
- css中的滤镜
- 痞子衡嵌入式:串口调试工具Jays-PyCOM诞生记 - 索引
- 【洛谷P3275】糖果
- Win10系统安装过程小记
- Lua搜索特殊字符
- Category Theory: 01 One Structured Family of Structures
- Linux安装ElasticSearch-2.2.0-分词器插件(Mmseg)
- vue-scroll 底部无数据时,底部出现大片的空白
- 如何在一台 web 服务器上注册CA证书
- Oracle like '%...%' 优化
- 解决ajax请求(SpringMVC后台)响应415/400/405错误