Git详解及github的使用
1.Devops介绍
1.Devops是什么
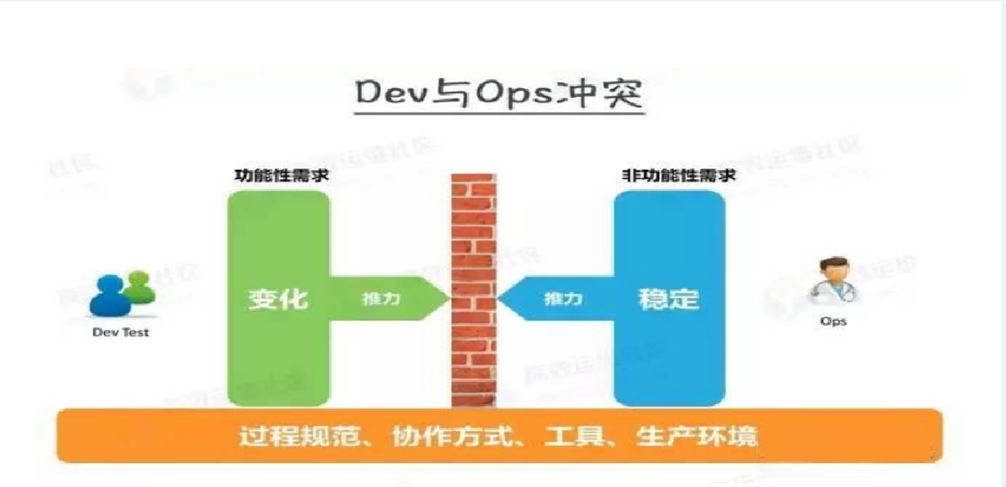
开发 development
运维 operations
2.Devops能干嘛
提高产品质量

1 自动化测试

2 持续集成

3 代码质量管理工具

4 程序员鼓励师
3.Devops如何实现
设计架构规划‐代码的存储‐构建‐测试、预生产、部署、监控
2.Git版本控制系统
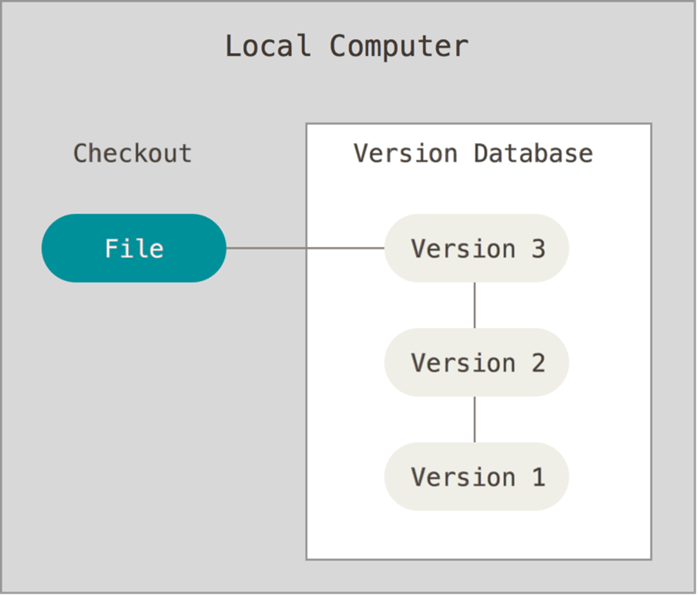
1.版本控制系统简介
vcs   `version control system`

版本控制系统是一种记录一个或若干个文件内容变化,以便将来查阅特定版本内容情况的系统

记录文件的所有历史变化

随时可恢复到任何一个历史状态

多人协作开发
2.为什么需要版本控制系统
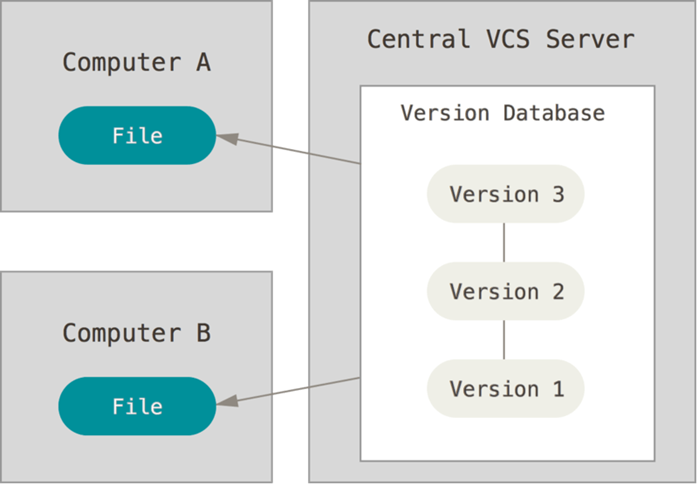
3.常见版本管理工具
SVN
集中式的版本控制系统,只有一个中央数据仓库,如果中央数据仓库挂了或者不可访问,所有的使用者无法使用SVN,无
法进行提交或备份文件。
Git
3 .Git安装
1. 系统环境准备
root@git‐git~]# cat /etc/redhat-release #查看系统版本

CentOS Linux release 7.1.1503 (Core)

[root@git‐git ~]# uname -r #查看内核版本

3.10.0‐229.el7.x86_64

[root@git‐git ~]# getenforce #确认Selinux关闭状态

Disabled

[root@git‐git ~]# systemctl stop firewalld #关闭防火墙
2. Git安装
[root@git‐git ~]# yum install git
3.Git部署配置
[root@git ~]# git config

‐‐global              使用全局配置文件

‐‐system              使用系统级配置文件

‐‐local               使用版本库级配置文件
配置git使用用户
[root@git‐git ~]# git config --global user.name "zeq"
配置git使用邮箱
[root@git‐git ~]# git config --global user.email "chn@eqnice.com"
语法高亮
[root@git‐git ~]# git config --global color.ui true
查看配置
[root@git‐git ~]# git config –‐list

user.name=zeq

user.email=chn@eqnice.com

color.ui=true

[root@git ~]# cat .gitconfig

[user]

    name = zeq

    email = chn@eqnice.com

[color]

    ui = true
4.git初始化
- 初始化工作目录、对已存在的目录或者对已存在的目录都可进行初始化
mkdir git_data

cd git_data/
- 初始化
git init
- 查看工作区状态
git status
- 隐藏文件介绍:
branches # 分支目录

config   # 定义项目特有的配置选项

description  # 仅供git web程序使用

HEAD # 指示当前的分支

hooks # 包含git钩子文件

info # 包含一个全局排除文件(exclude文件)

objects # 存放所有数据内容,有info和pack两个子文件夹

refs # 存放指向数据(分支)的提交对象的指针

index # 保存暂存区信息,在执行git init的时候,这个文件还没有
4 .Git常规使用
1. 创建数据-提交数据
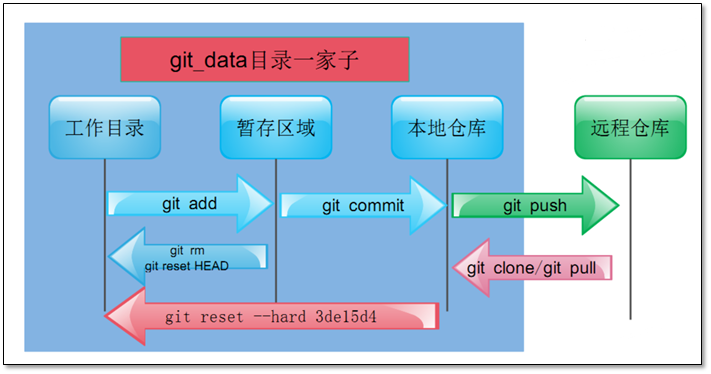
2. git四种状态

3. git基础命令
[root@git git_data]# git status

# 位于分支 master

# 初始提交

- 无文件要提交(创建/拷贝文件并使用 "git add" 建立跟踪)

[root@git git_data]# touch a b c

[root@git git_data]# git status

# 位于分支 master

#

# 初始提交

#

# 未跟踪的文件:

#   (使用 "git add <file>..." 以包含要提交的内容)

#

#       a

#       b

#       c

提交为空,但是存在尚未跟踪的文件(使用 "git add" 建立跟踪)

[root@git git_data]# git add a

[root@git git_data]# git status

# 位于分支 master

#

# 初始提交

#

# 要提交的变更:

#   (使用 "git rm ‐‐cached <file>..." 撤出暂存区)

#

#       新文件:    a

#

# 未跟踪的文件:

#   (使用 "git add <file>..." 以包含要提交的内容)

#

#       b

#       c

[root@git git_data]# ll .git/

总用量 20

drwxr‐xr‐x 2 root root    6 8月  23 05:44 branches

‐rw‐r‐‐r‐‐ 1 root root   92 8月  23 05:44 config

‐rw‐r‐‐r‐‐ 1 root root   73 8月  23 05:44 description

‐rw‐r‐‐r‐‐ 1 root root   23 8月  23 05:44 HEAD

drwxr‐xr‐x 2 root root 4096 8月  23 05:44 hooks

‐rw‐r‐‐r‐‐ 1 root root   96 8月  23 07:06 index         # git add a 把文件提交到了暂存区

drwxr‐xr‐x 2 root root   20 8月  23 05:44 info

drwxr‐xr‐x 5 root root   37 8月  23 07:06 objects

drwxr‐xr‐x 4 root root   29 8月  23 05:44 refs

[root@git git_data]# git add .         # 使用git add . 或者* 添加目录中所有改动过的文件

[root@git git_data]# git status

# 位于分支 master

#

# 初始提交

#

# 要提交的变更:

#   (使用 "git rm ‐‐cached <file>..." 撤出暂存区)

#

#       新文件:    a

#       新文件:    b

#       新文件:    c

[root@git git_data]# git rm ‐‐cached c

rm 'c'

[root@git git_data]# ll

总用量 0

‐rw‐r‐‐r‐‐ 1 root root 0 8月  23 07:05 a

‐rw‐r‐‐r‐‐ 1 root root 0 8月  23 07:05 b

‐rw‐r‐‐r‐‐ 1 root root 0 8月  23 07:05 c

[root@git git_data]# git status

# 位于分支 master

#

# 初始提交

#

# 要提交的变更:

#   (使用 "git rm ‐‐cached <file>..." 撤出暂存区)

#

#       新文件:    a

#       新文件:    b

#

# 未跟踪的文件:

#   (使用 "git add <file>..." 以包含要提交的内容)

#

#       c

删除文件

1.先从暂存区撤回到工作区、然后直接删除文件

git rm ‐‐cached c

rm ‐f c

2.直接从暂存区域同工作区域一同删除文件命令

git rm ‐f b

[root@git git_data]# git commit ‐m "commit a"    # 提交到本地仓库

[master(根提交) b4017a8] commit a

1 file changed, 0 insertions(+), 0 deletions(‐)

create mode 100644 a

[root@git git_data]# git status

# 位于分支 master

无文件要提交,干净的工作区
- 修改文件名称两种方法
[root@git git_data]# mv a a.txt

[root@git git_data]# git status

# 位于分支 master

# 尚未暂存以备提交的变更:

#   (使用 "git add/rm <file>..." 更新要提交的内容)

#   (使用 "git checkout ‐‐ <file>..." 丢弃工作区的改动)

#

#       删除:      a

#

# 未跟踪的文件:

#   (使用 "git add <file>..." 以包含要提交的内容)

#

#       a.txt

修改尚未加入提交(使用 "git add" 和/或 "git commit ‐a")

[root@git git_data]# git rm ‐‐cached a         # 从暂存区删除a文件

rm 'a'

[root@git git_data]# git status

# 位于分支 master

# 要提交的变更:

#   (使用 "git reset HEAD <file>..." 撤出暂存区)

#

#       删除:      a

#

# 未跟踪的文件:

#   (使用 "git add <file>..." 以包含要提交的内容)

#

#       a.txt

[root@git git_data]# git add a.txt

[root@git git_data]# git status

# 位于分支 master

# 要提交的变更:

#   (使用 "git reset HEAD <file>..." 撤出暂存区)

#

#       重命名:    a ‐> a.txt          # 识别到a和a.txt相同为重命名

[root@git git_data]# git commit ‐m "commit a.txt"

2.直接用git命令重命名

[root@git git_data]# git mv a.txt a    把工作区域和暂存区域的文件同时修改文件名称

[root@git git_data]# git status

# 位于分支 master

# 要提交的变更:

#   (使用 "git reset HEAD <file>..." 撤出暂存区)

#

#       重命名:    a.txt ‐> a

git commit ‐m "rename a.txt a"
git status 只能查看区域状态的不同,不能查看文件内容的变化。

git diff 查看内容的不同

[root@git git_data]# echo aaa > a

[root@git git_data]# git diff a         # 比对本地工作目录和暂存区文件的不同

diff ‐‐git a/a b/a

index e69de29..72943a1 100644#

‐‐‐ a/a

+++ b/a

@@ ‐0,0 +1 @@

+aaa

[root@git git_data]# git add a      # 提交a文件到暂存区域、在用git diff是相同的

[root@git git_data]# git diff ‐‐cached a   # 比对的是暂存区和本地仓库文件的不同处

diff ‐‐git a/a b/a

index e69de29..72943a1 100644

‐‐‐ a/a

+++ b/a

@@ ‐0,0 +1 @@

+aaa

[root@git git_data]# git commit ‐m "modified a"  # 提交后在比对则暂存区和本地仓库内容相同

[master 4c57a60] modified a

1 file changed, 1 insertion(+)

[root@git git_data]# git diff ‐‐cached a

[root@git git_data]#

git commit  # 相当于虚拟机的镜像、任何操作都被做了一次快照,可恢复到任意一个位置

[root@git git_data]# git log   查看历史的git commit快照操作

commit 4c57a605997f511149bfec53d9018b503e77f961     # 哈希唯一标识的字符串

Author: lizhenya <lizhenya@qq.com>                  # 作者个人信息

Date:   Thu Aug 23 07:54:23 2018 +0800              # 时间

    modified a                                      # ‐m 个人写的提交描述信息

commit 56925321114eb9adf09b42a733a6f9f3edd9ad65

Author: lizhenya <lizhenya@qq.com>

Date:   Thu Aug 23 07:39:41 2018 +0800

    rename a.txt a

commit 7adfca06559ef7739dffdc11ecb7fb8800a9931a

Author: lizhenya <lizhenya@qq.com>

Date:   Thu Aug 23 07:36:47 2018 +0800

    commit a.txt

commit b4017a876cfed78425fe58e7ecbcd49199ed5a11

Author: lizhenya <lizhenya@qq.com>

Date:   Thu Aug 23 07:22:29 2018 +0800

[root@git git_data]# git log ‐‐oneline         # 一行简单的显示commit信息

4c57a60 modified a

5692532 rename a.txt a

7adfca0 commit a.txt

b4017a8 commit a

 [root@git git_data]# git log ‐‐oneline ‐‐decorate  # 显示当前的指针指向哪里

4c57a60 (HEAD, master) modified a

5692532 rename a.txt a

7adfca0 commit a.txt

b4017a8 commit a

[root@git git_data]# git log ‐p  # 显示具体内容的变化

[root@git git_data]# git log ‐1  # 只显示1条内容

恢复历史数据

1.只更改了当前目录

[root@git git_data]# echo "333" >> a

[root@git git_data]# git status

# 位于分支 master

# 尚未暂存以备提交的变更:

#   (使用 "git add <file>..." 更新要提交的内容)

#   (使用 "git checkout ‐‐ <file>..." 丢弃工作区的改动)   # 看提示使用此命令覆盖工作区的改动

#

#       修改:      a

#

修改尚未加入提交(使用 "git add" 和/或 "git commit ‐a")

[root@git git_data]# git checkout ‐‐ a    # 从暂存区覆盖本地工作目录

[root@git git_data]# git status

# 位于分支 master

无文件要提交,干净的工作区

[root@git git_data]# cat a

aaa

2.修改了本地目录且同时提交到了暂存区

[root@git git_data]# echo ccc >> a   # 添加新内容

[root@git git_data]# git add .       # 提交到暂存区

[root@git git_data]# git diff ‐‐cached #比对暂存区和本地仓库的内容

diff ‐‐git a/a b/a

index 72943a1..959479a 100644

‐‐‐ a/a

+++ b/a

@@ ‐1 +1,2 @@

 aaa

+ccc

[root@git git_data]# git status

# 位于分支 master

# 要提交的变更:

#   (使用 "git reset HEAD <file>..." 撤出暂存区)

#

#       修改:      a

[root@git git_data]# git reset HEAD a       # 本地仓库覆盖暂存区域

重置后撤出暂存区的变更:

M       a

[root@git git_data]# git diff a

diff ‐‐git a/a b/a

index 72943a1..959479a 100644

‐‐‐ a/a

+++ b/a

@@ ‐1 +1,2 @@

 aaa

+ccc

[root@git git_data]# git diff ‐‐cached a

[root@git git_data]#

3.修改了工作目录后提交到了暂存区和本地仓库后进行数据恢复

echo bbb >>a    # 提交新的bbb文件到a

git commit ‐m "add bbb"

echo ccc >> a

git commit ‐am "add ccc"     # 这时候发现改错代码了,想还原某一次提交的文件快照

[root@git git_data]# git log ‐‐oneline

59ba2a9 add ccc

dbead4c add bbb

4c57a60 modified a

5692532 rename a.txt a

7adfca0 commit a.txt

b4017a8 commit a

`Git服务程序中有一个叫做HEAD的版本指针,当用户申请还原数据时,其实就是将HEAD指针指向到某个特定的提交

版本,但是因为Git是分布式 版本控制系统,为了避免历史记录冲突,故使用了SHA‐1计算出十六进制的哈希字串

来区分每个提交版本,另外默认的HEAD版本指针会指向到最近的一次提交版本记录`

[root@git git_data]# git reset ‐‐hard 4c57a60

HEAD 现在位于 4c57a60 modified a

`刚刚的操作实际上就是改变了一下HEAD版本指针的位置,就是你将HEAD指针放在那里,那么你的当前工作版本就

会定位在那里,要想把内容再还原到最新提交的版本,先看查看下提交版本号`

[root@git git_data]# cat a    # 打开发现回退错了,应该回退到bbb版本

aaa

[root@git git_data]# git log ‐‐oneline      # 这时候查看log没有commit bbb的历史了

4c57a60 modified a

5692532 rename a.txt a

7adfca0 commit a.txt

b4017a8 commit a

`怎么搞得?竟然没有了add bbb这个提交版本记录?

原因很简单,因为我们当前的工作版本是历史的一个提交点,这个历史提交点还没有发生过add bbb 更新记录,所

以当然就看不到了,要是想”还原到未来”的历史更新点,可以用git reflog命令来查看所有的历史记录:`

[root@git git_data]# git reflog     # 使用git reflog 可查看总历史内容

4c57a60 HEAD@{0}: reset: moving to 4c57a60

59ba2a9 HEAD@{1}: commit: add ccc

dbead4c HEAD@{2}: commit: add bbb

4c57a60 HEAD@{3}: commit: modified a

5692532 HEAD@{4}: commit: rename a.txt a

7adfca0 HEAD@{5}: commit: commit a.txt

b4017a8 HEAD@{6}: commit (initial): commit a

[root@git git_data]# git reset ‐‐hard dbead4c   # 然后使用reset回到bbb的版本内容下

HEAD 现在位于 dbead4c add bbb

[root@git git_data]# cat a

aaa

bbb
5. git分支
分支即是平行空间,假设你在为某个手机系统研发拍照功能,代码已经完成了80%,但如果将这不完整的代码直接
提交到git仓库中,又有可能影响到其他人的工作,此时我们便可以在该软件的项目之上创建一个名叫”拍照功
能”的分支,这种分支只会属于你自己,而其他人看不到,等代码编写完成后再与原来的项目主分支合并下即可,这
样即能保证代码不丢失,又不影响其他人的工作。
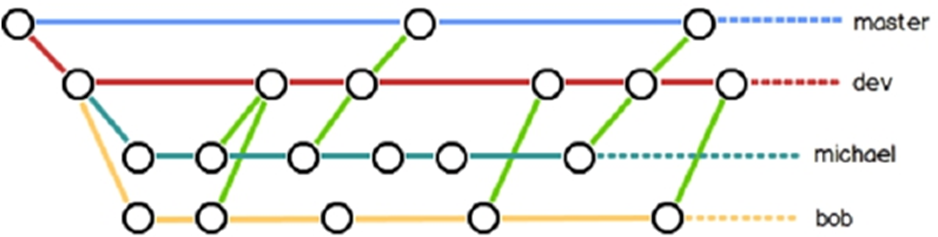
一般在实际的项目开发中,我们要尽量保证master分支是非常稳定的,仅用于发布新版本,平时不要随便直接修
改里面的数据文件,而工作的时候则可以新建不同的工作分支,等到工作完成后在合并到master分支上面,所以团
队的合作分支看起来会像上面图那样。
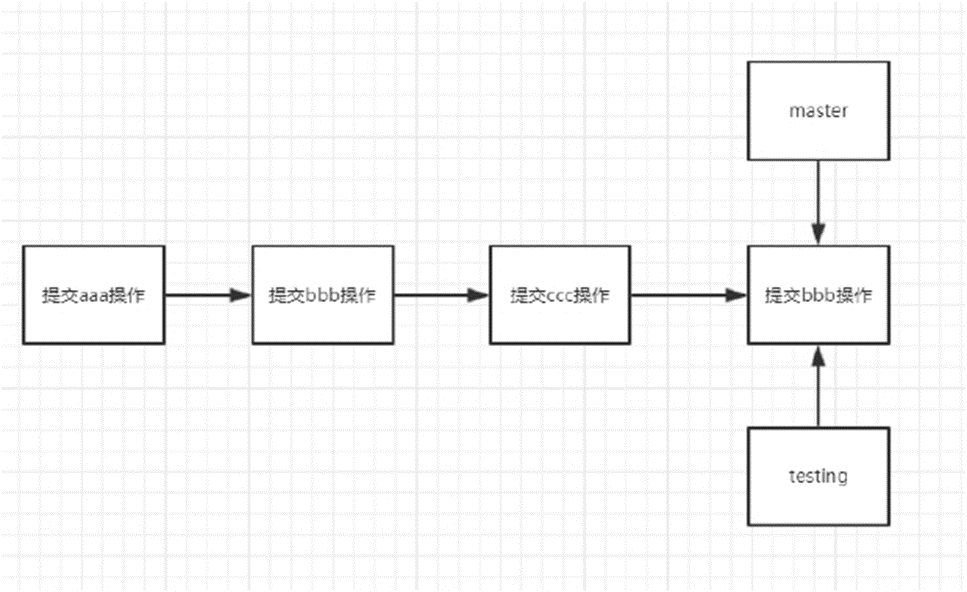
[root@git git_data]# git log ‐‐oneline ‐‐decorate
dbead4c (HEAD, master) add bbb # 默认分支指向你最后一次的提交 HEAD头、指针
4c57a60 modified a
5692532 rename a.txt a
7adfca0 commit a.txt
b4017a8 commit a
HEAD 指针指向哪个分支、说明你当前在哪个分支下工作`
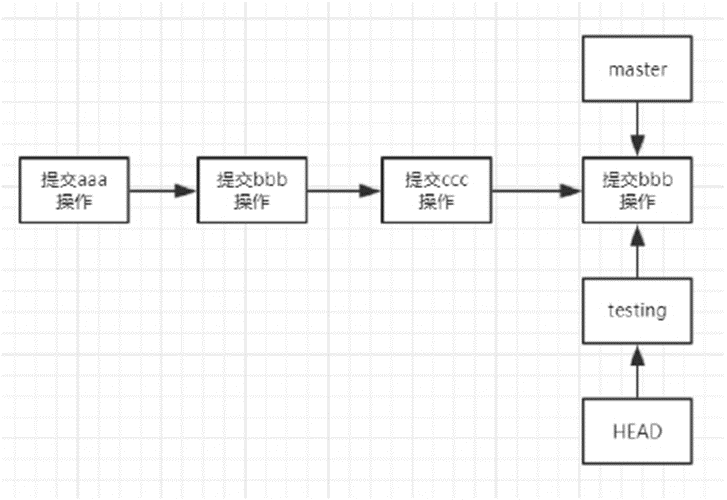
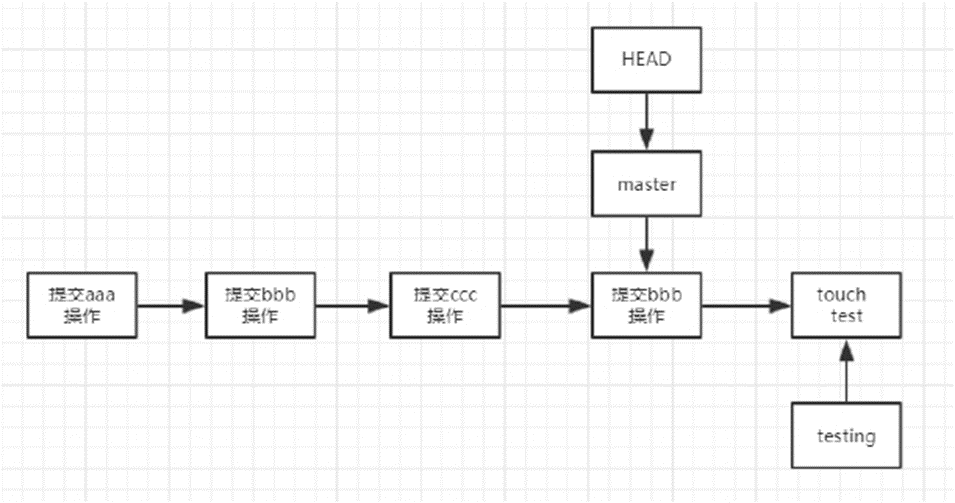
[root@git git_data]# git branch testing # 新建testing分支
[root@git git_data]# git branch
* master # *号在哪里就说明当前在哪个分支上入下图所示
testing
[root@git git_data]# git log ‐‐oneline ‐‐decorate # 通过命令查看分支指向
dbead4c (HEAD, testing, master) add bbb
4c57a60 modified a
5692532 rename a.txt a
7adfca0 commit a.txt
b4017a8 commit a
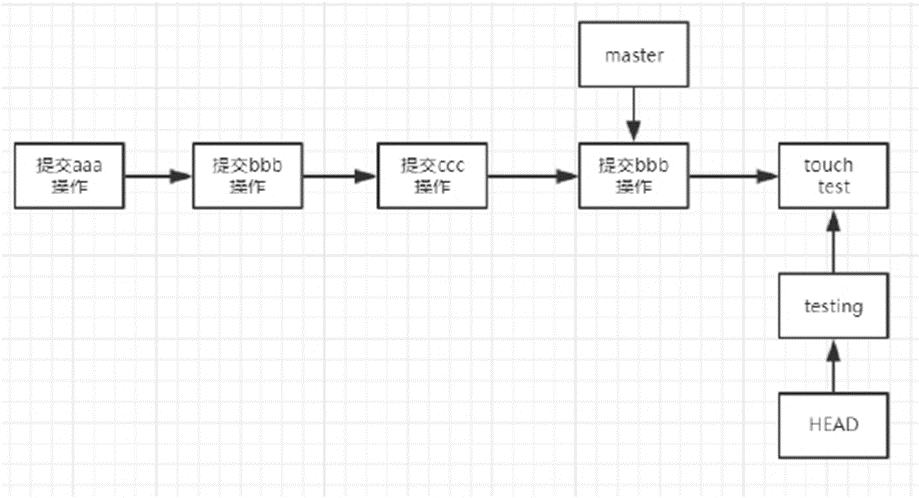
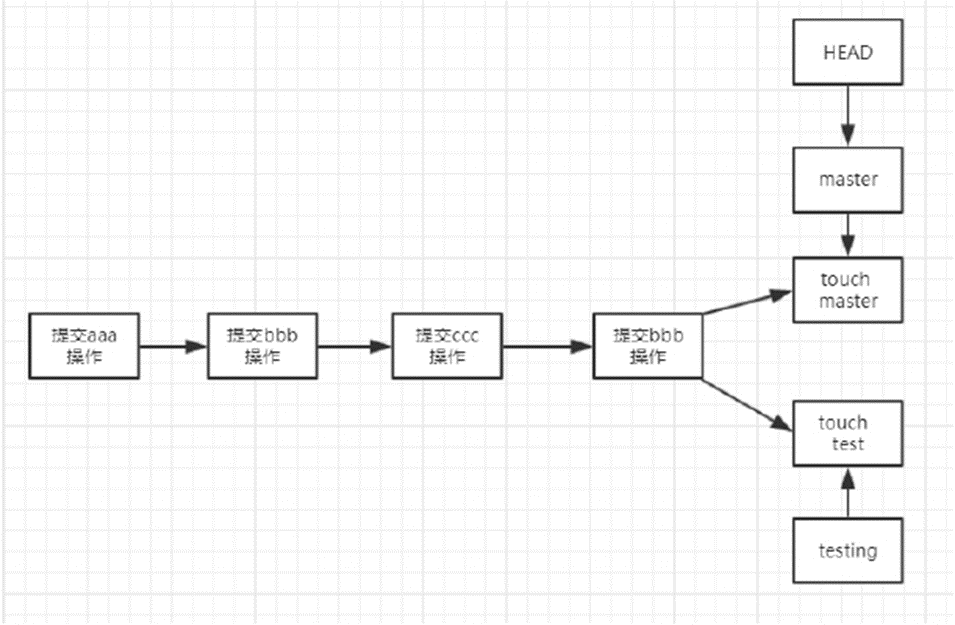
[root@git git_data]# git checkout testing # 切换到testing分支、对应的HEAD指针也指向了testing
切换到分支 'testing'
[root@git git_data]# git branch
master
* testing
[root@git git_data]# touch test

[root@git git_data]# git add .

[root@git git_data]# git commit ‐m "commit test"
[root@git git_data]# git checkout master    # 切换到master分支后指针指向到了master

切换到分支 'master'

[root@git git_data]# git branch

* master

  testing

[root@git git_data]# ll         # 正常情况下是没有test文件的、保证master分支是线上环境的

总用量 4

‐rw‐r‐‐r‐‐ 1 root root 8 8月  23 08:42 a
[root@git git_data]# touch master

[root@git git_data]# git add .

[root@git git_data]# git commit ‐m "commit master"
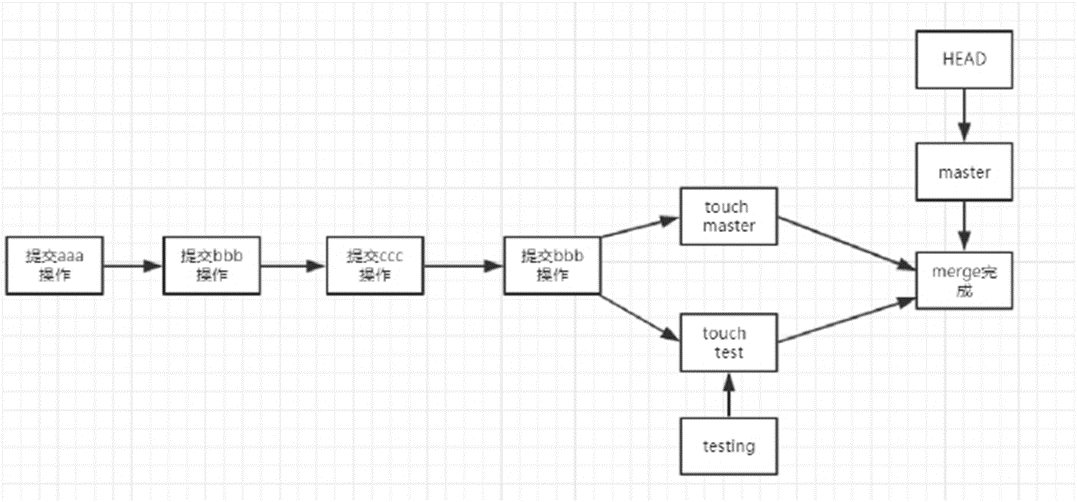
合并分支
[root@git git_data]# git merge testing          # 提示输入描述信息 相当于git的‐m参数

[root@git git_data]# git log ‐‐oneline ‐‐decorate

3258705 (HEAD, master) Merge branch 'testing'

f5ae1d8 commit master

ad4f25a (testing) commit test

dbead4c add bbb

4c57a60 modified a

5692532 rename a.txt a

7adfca0 commit a.txt

b4017a8 commit a
冲突合并

[root@git git_data]# echo "master" >> a

[root@git git_data]# git commit ‐am "modified a master"

[root@git git_data]# git checkout testing

切换到分支 'testing'

[root@git git_data]# git branch

  master

* testing

[root@git git_data]# cat a

aaa

bbb

[root@git git_data]# echo "testing" >>a

[root@git git_data]# git commit ‐am "modified a on testing branch"

[root@git git_data]# git checkout master

[root@git git_data]# git merge testing

自动合并 a

冲突(内容):合并冲突于 a

自动合并失败,修正冲突然后提交修正的结果。

[root@git git_data]# cat a              # 冲突的文件自动标识到文件里,手动更改冲突要保留的代码

[root@git git_data]# git commit ‐am "merge testing to master"       # 进行提交即可

[root@git git_data]# git log ‐‐oneline ‐‐decorate

bba413d (HEAD, master) merge testing to master

34d7a55 (testing) modified a on testing branch

ec1a424 modified a master

3258705 Merge branch 'testing'

f5ae1d8 commit master

ad4f25a commit test

删除分支‐d参数

[root@git git_data]# git branch ‐d testing

已删除分支 testing(曾为 34d7a55)。

[root@git git_data]# git branch

* master
6.git标签使用
标签也是指向了一次commit提交,是一个里程碑式的标签,回滚打标签直接加标签号,不需要加唯一字符串不好记
[root@git git_data]# git tag ‐a v1.0 ‐m "aaa bbb master tesing version v1.0"  # ‐a指定标签名字 ‐m 指定说明文字

[root@git git_data]# git tag

v1.0

[root@git git_data]# git tag ‐a v2.0 dbead4c ‐m "add bbb version v2.0"    # 指定某一次的提交为标签

[root@git git_data]# git show v1.0   # 查看v1.0的信息  git show 加标签查看

[root@git git_data]# git reset ‐‐hard v2.0  # 直接还原数据到v2.0

HEAD 现在位于 dbead4c add bbb

[root@git git_data]# ll

总用量 4

‐rw‐r‐‐r‐‐ 1 root root 8 8月  23 11:26 a

‐rw‐r‐‐r‐‐ 1 root root 0 8月  23 11:25 b

[root@git git_data]# git tag ‐d v2.0  # 删除标签 ‐d参数
5. github使用
1.什么是github
Github顾名思义是一个Git版本库的托管服务,是目前全球最大的软件仓库,拥有上百万的开发者用户,也是软件
开发和寻找资源的最佳途径,Github不仅可以托管各种Git版本仓库,还拥有了更美观的Web界面,您的代码文件可
以被任何人克隆,使得开发者为开源项贡献代码变得更加容易,当然也可以付费购买私有库,这样高性价比的私有
库真的是帮助到了很多团队和企业
2.github操作
1、注册用户

2、配置ssh‐key

3、创建项目

4、克隆项目到本地

5、推送新代码到github
1.注册用户
访问github网站
https://github.com/
点击注册

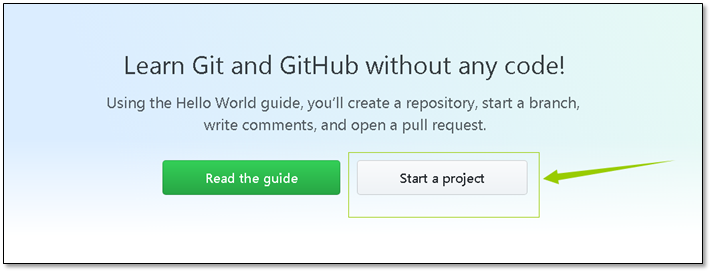
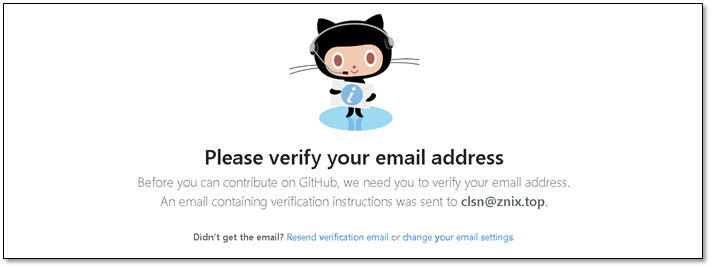
注册完成后添加新的项目
添加新项目之前要验证邮箱
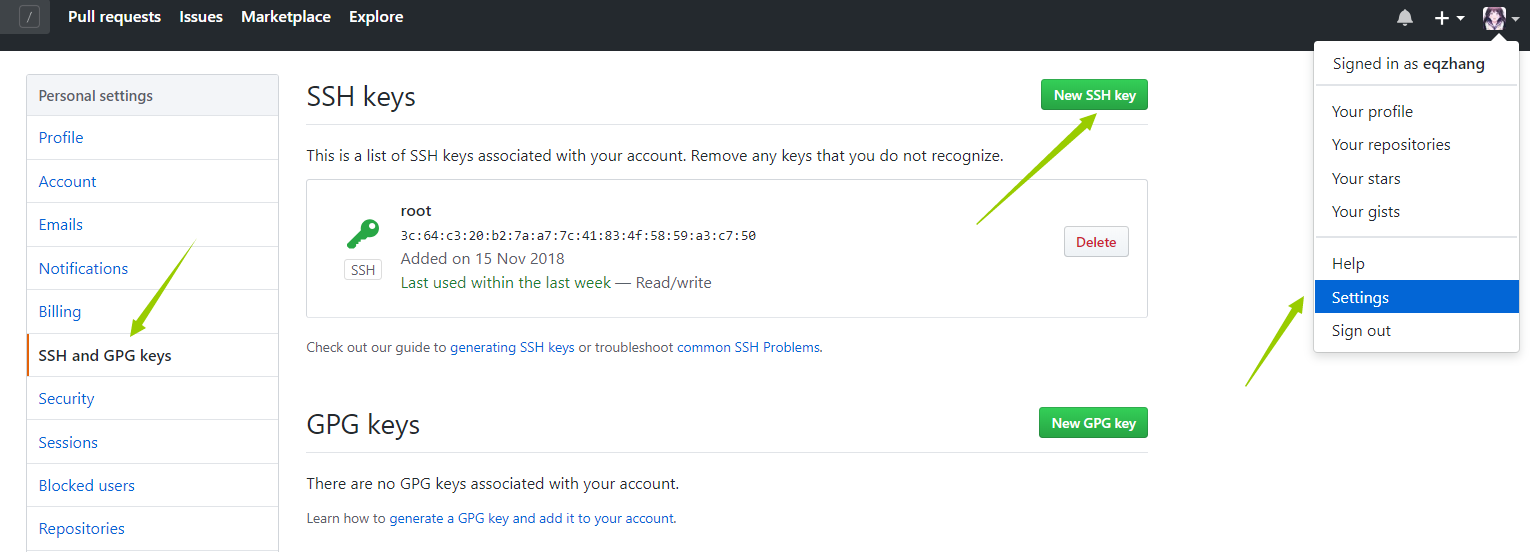
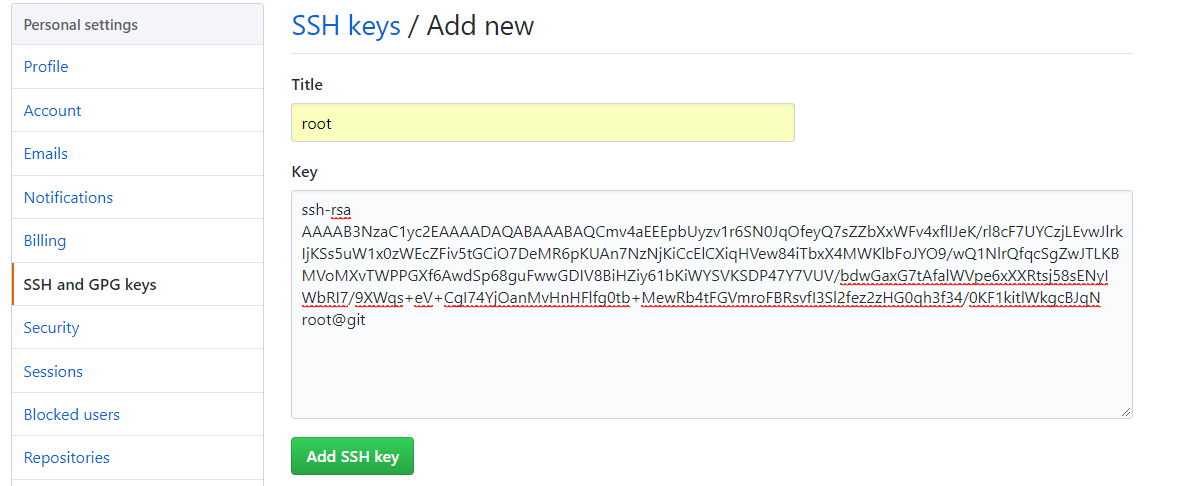
2.配置ssh‐key
添加一个密钥
git服务器创建秘钥
[root@git ~]# ssh-keygen

Generating public/private rsa key pair.

Enter file in which to save the key (/root/.ssh/id_rsa):

Created directory '/root/.ssh'.

Enter passphrase (empty for no passphrase):

Enter same passphrase again:

Your identification has been saved in /root/.ssh/id_rsa.

Your public key has been saved in /root/.ssh/id_rsa.pub.

The key fingerprint is:

SHA256:n/V2kCiwwm2UfBsnQLm17eXUCBiBByyPbefmz5oQvfU root@gitlab

The key's randomart image is:

+---[RSA 2048]----+

|       o++o+     |

|      ..+o+ .    |

|       ==++o.. o |

|     ..o==o=..+..|

|      o.So+.++o  |

|       o oo*.o.. |

|        .o+   E .|

|         ..o . . |

|          ooo    |

+----[SHA256]-----+

[root@git ~]# cat .ssh/id_rsa.pub

ssh-rsa AAAAB3NzaC1yc2EAAAADAQABAAABAQCmv4aEEEpbUyzv1r6SN0JqOfeyQ7sZZbXxWFv4xflIJeK/rl8cF7UYCzjLEvwJlrkIjKSs5uW1x0zWEcZFiv5tGCiO7DeMR6pKUAn7NzNjKiCcElCXiqHVew84iTbxX4MWKlbFoJYO9/wQ1NlrQfqcSgZwJTLKBMVoMXvTWPPGXf6AwdSp68guFwwGDIV8BiHZiy61bKiWYSVKSDP47Y7VUV/bdwGaxG7tAfalWVpe6xXXRtsj58sENyIWbRI7/9XWqs+eV+CgI74YjOanMvHnHFlfg0tb+MewRb4tFGVmroFBRsvfI3Sl2fez2zHG0qh3f34/0KF1kitlWkgcBJqN root@git
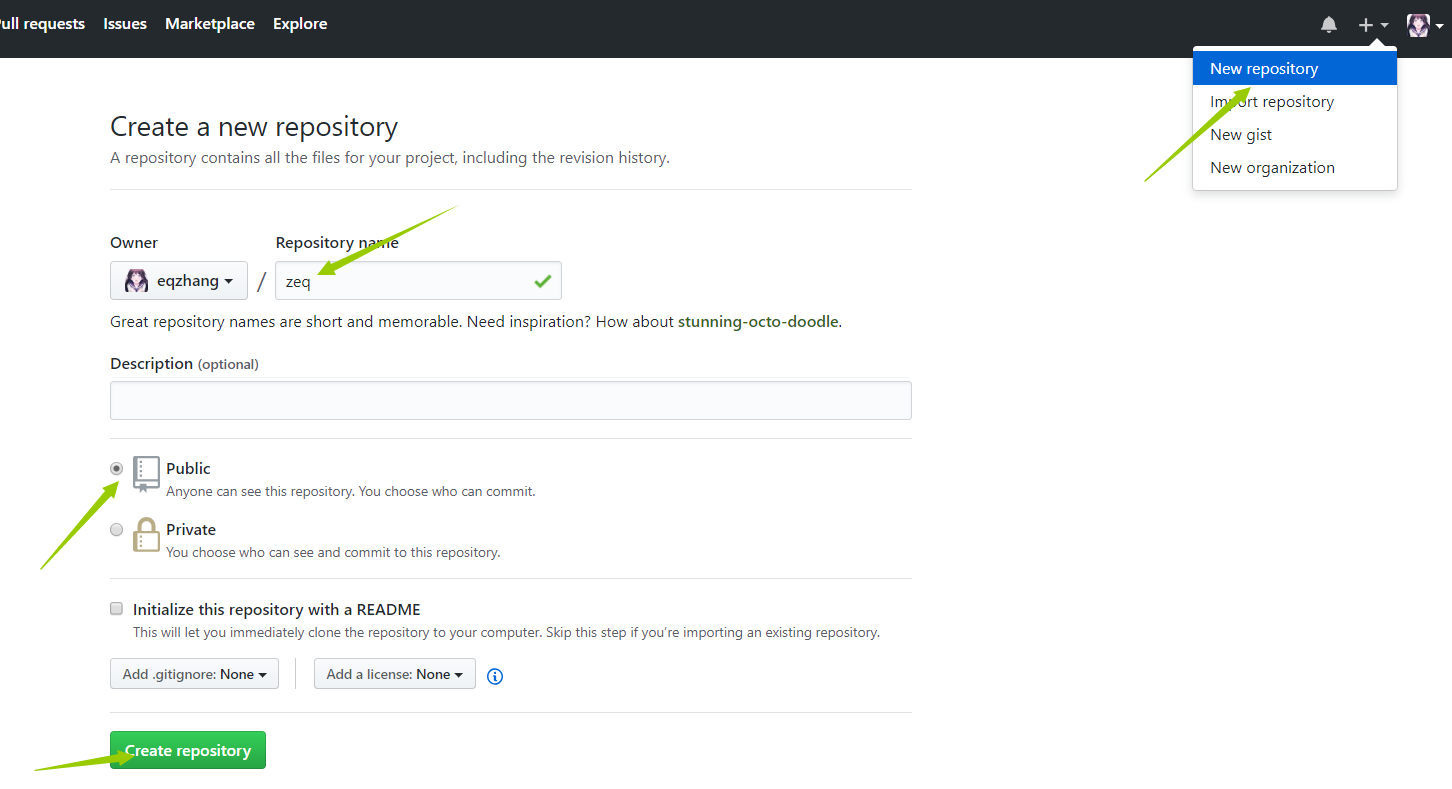
3.创建项目
4.克隆项目到本地
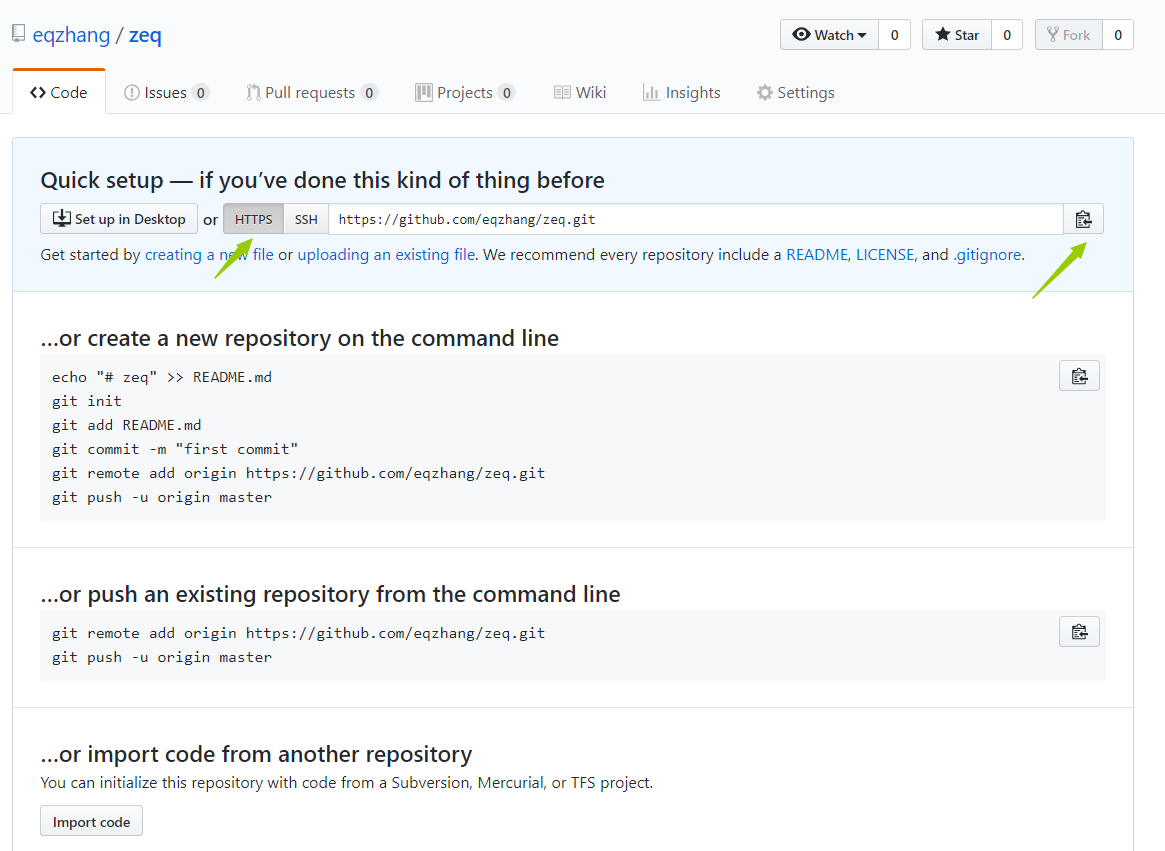
http方式克隆

[root@git ~]# git clone https://github.com/eqzhang/zeq.git

正克隆到 'zeq'...

warning: 您似乎克隆了一个空版本库。

[root@git ~]# ll

总用量 4

-rw-------. 1 root root 1271 9月   3 17:37 anaconda-ks.cfg

drwxr-xr-x  3 root root   18 11月 20 19:47 zeq
ssh方式克隆

[root@git ~]# git clone git@github.com:eqzhang/zeq.git

正克隆到 'zeq'...

warning: 您似乎克隆了一个空版本库。

[root@git ~]# ll

总用量 4

-rw-------. 1 root root 1271 9月   3 17:37 anaconda-ks.cfg

drwxr-xr-x  3 root root   18 11月 20 19:51 zeq
如果用其中一种方式克隆成功以后,在用另一种方式克隆的话会报错(版本库已经存在),这时候可以删除存在的仓库在执行克隆
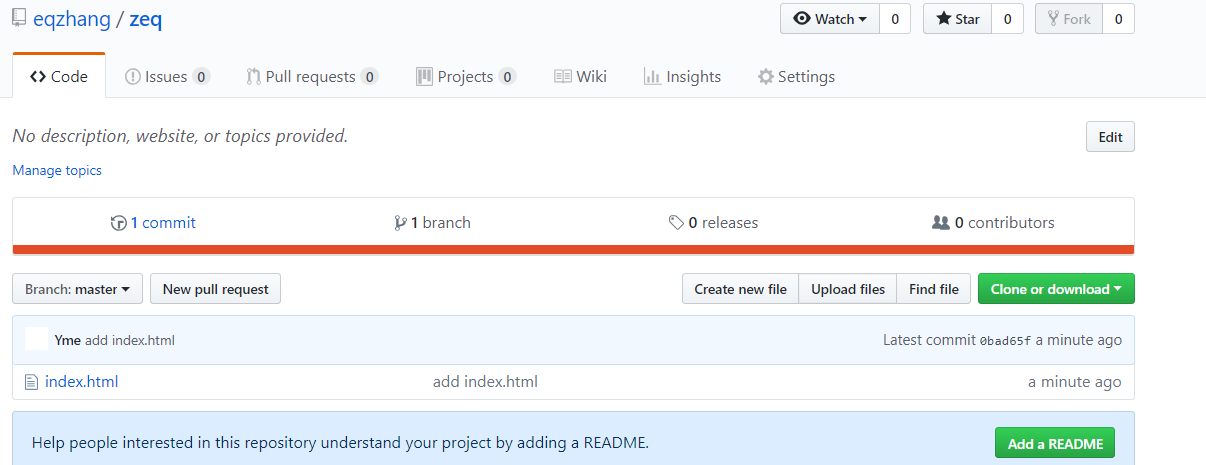
5.推送新代码到github
创建一个index.html的文件推送到github
[root@git ~]# cd zeq/

[root@git zeq]# echo 123 > index.html

[root@git zeq]# ll

总用量 4

-rw-r--r-- 1 root root 4 11月 20 19:54 index.html

[root@git zeq]# git add .

[root@git zeq]# git push -u origin master     #git push 推送本地仓库代码到远程仓库

Counting objects: 3, done.

Writing objects: 100% (3/3), 211 bytes | 0 bytes/s, done.

Total 3 (delta 0), reused 0 (delta 0)

remote:

remote: Create a pull request for 'master' on GitHub by visiting:

remote:      https://github.com/eqzhang/zeq/pull/new/master

remote:

To git@github.com:eqzhang/zeq.git

 * [new branch]      master -> master

分支 master 设置为跟踪来自 origin 的远程分支 master。
进入github网页查看
[root@git zeq]# git pull origin # 拉取远程仓库最新代码、然后进行上传
- 上面操作是本地没有仓库,克隆的远程仓库
- 如果我本地有本地仓库,我想把本地仓库的代码上传到我的远程仓库则需要进行关联远程仓库
[root@git zeq]# git remote add origin git@github.com:eqzhang/zeq.git

[root@git zeq]# git remote

origin

[root@git zeq]# git push -u origin master
- 如果已存在origin则用rm删除
[root@git zeq]# git remote add origin git@github.com:eqzhang/zeq.git

fatal: 远程 origin 已经存在。

[root@git zeq]# git remote rm origin

[root@git zeq]# git remote

[root@git zeq]#
最新文章
- CodeForces - 274B Zero Tree
- RN组件之ScrollView
- POJ 2195
- 【转载】JAVA IO 流的总结
- eclipse[日文版] 的SVN 上传步骤
- Error 56: …… VPN Service has not been started
- linux下实现自动部署tomcat的脚本
- 一起来学jquery!
- [填坑]树上差分 例题:[JLOI2014]松鼠的新家(LCA)
- Python高级用法总结
- 单元测试——Qunit
- js中三种全局变量声明方法
- 初学python之路-day06
- 用反射的形式将一个对象属性值赋值给另一个对象,省略点get/set方法的冗余代码
- Centos 7下网卡bonding配置之mode4
- ASP.NET MVC - 模型与元数据(进阶)
- WebStorm 11的安装与激活
- 带你入门Python爬虫,8个常用爬虫技巧盘点
- python SMTP other
- Spring Boot的@SpringBootApplication无法引入的问题