WPF 触摸到事件
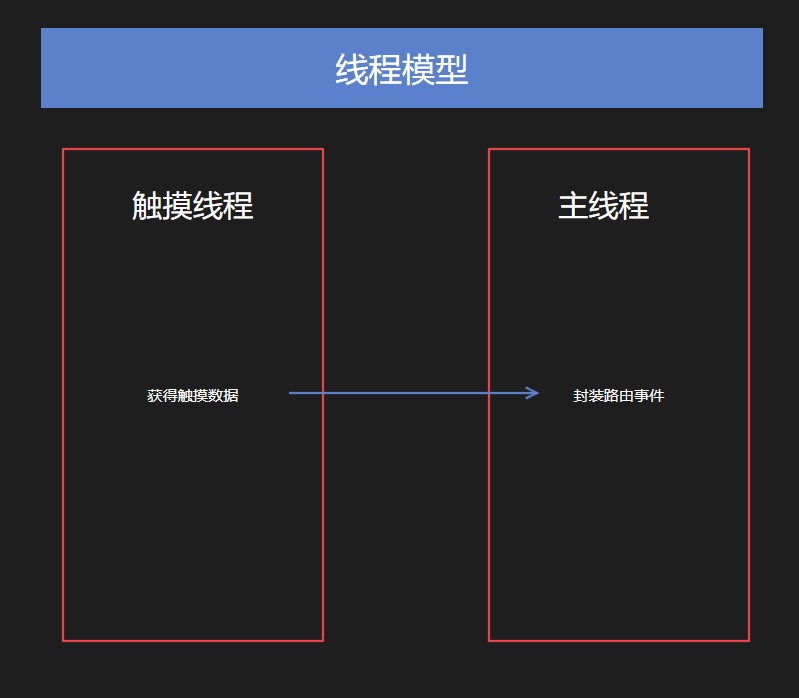
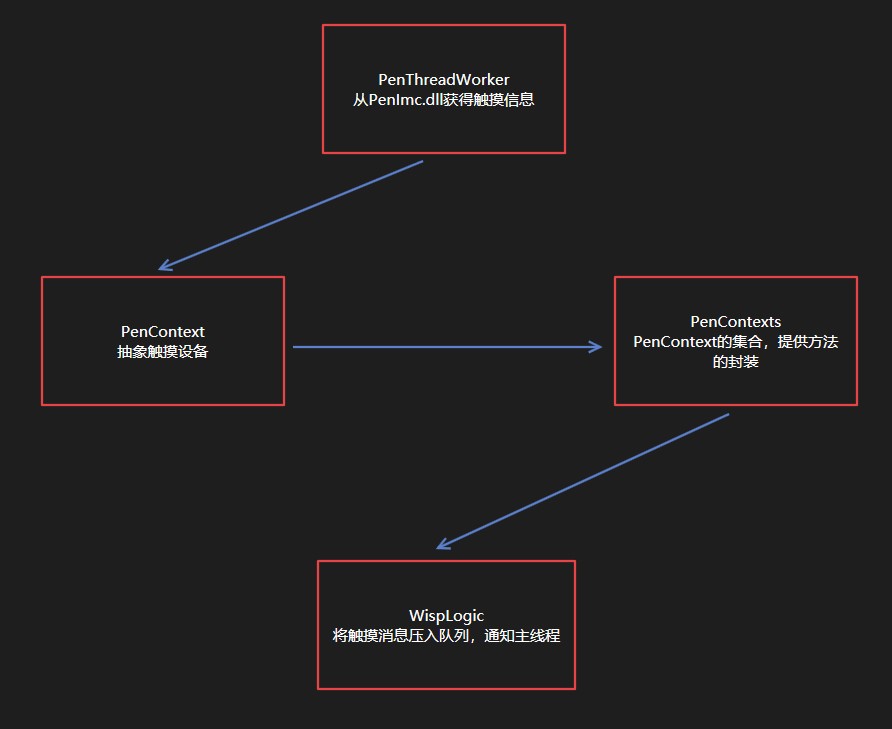
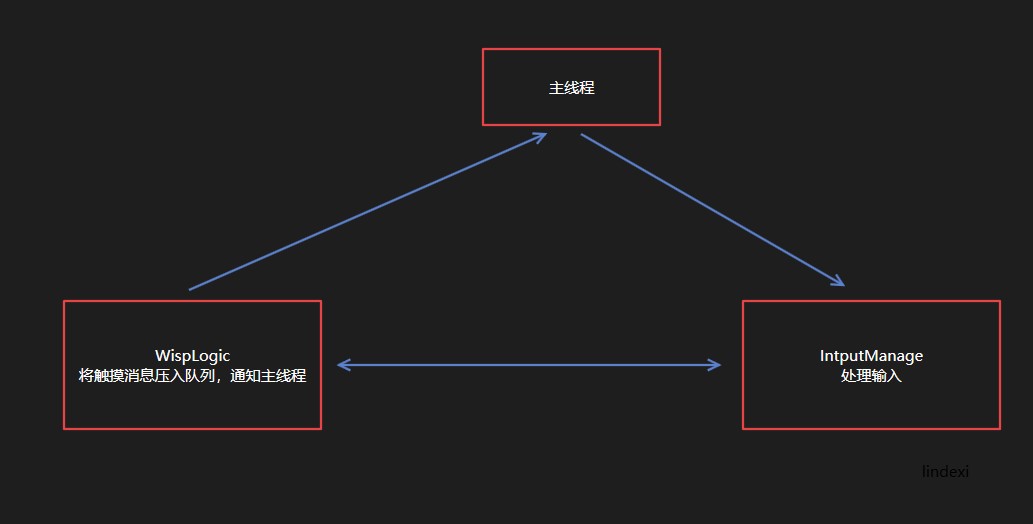
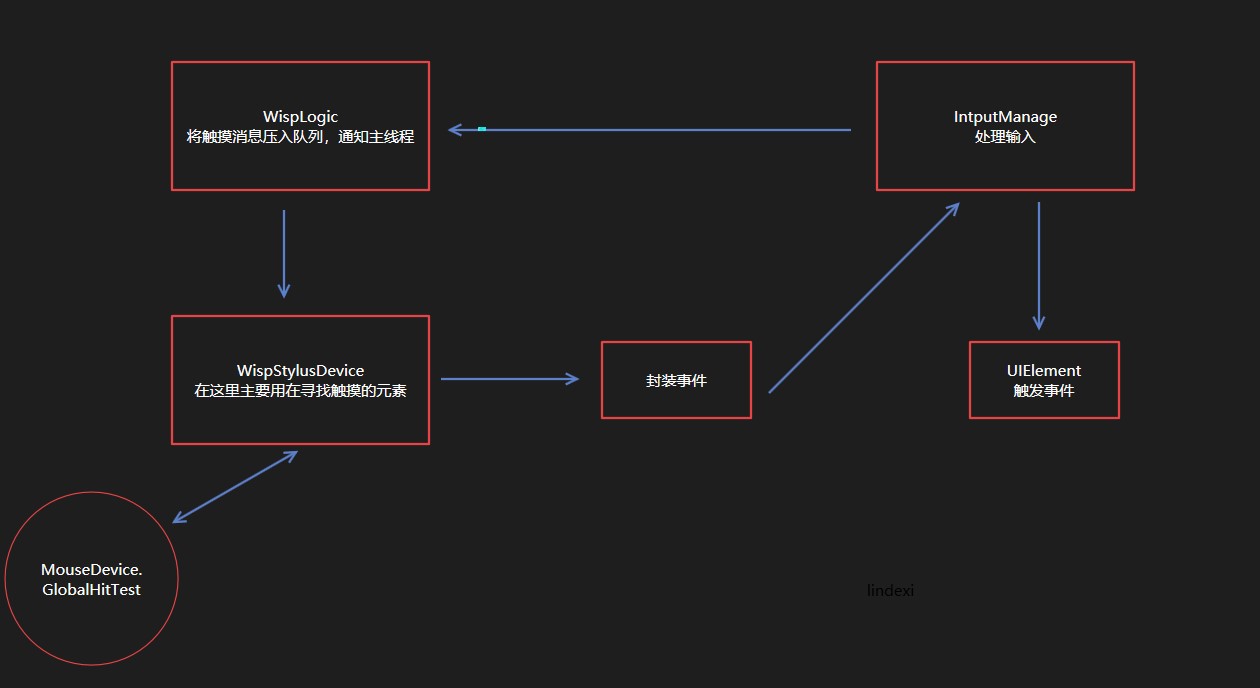
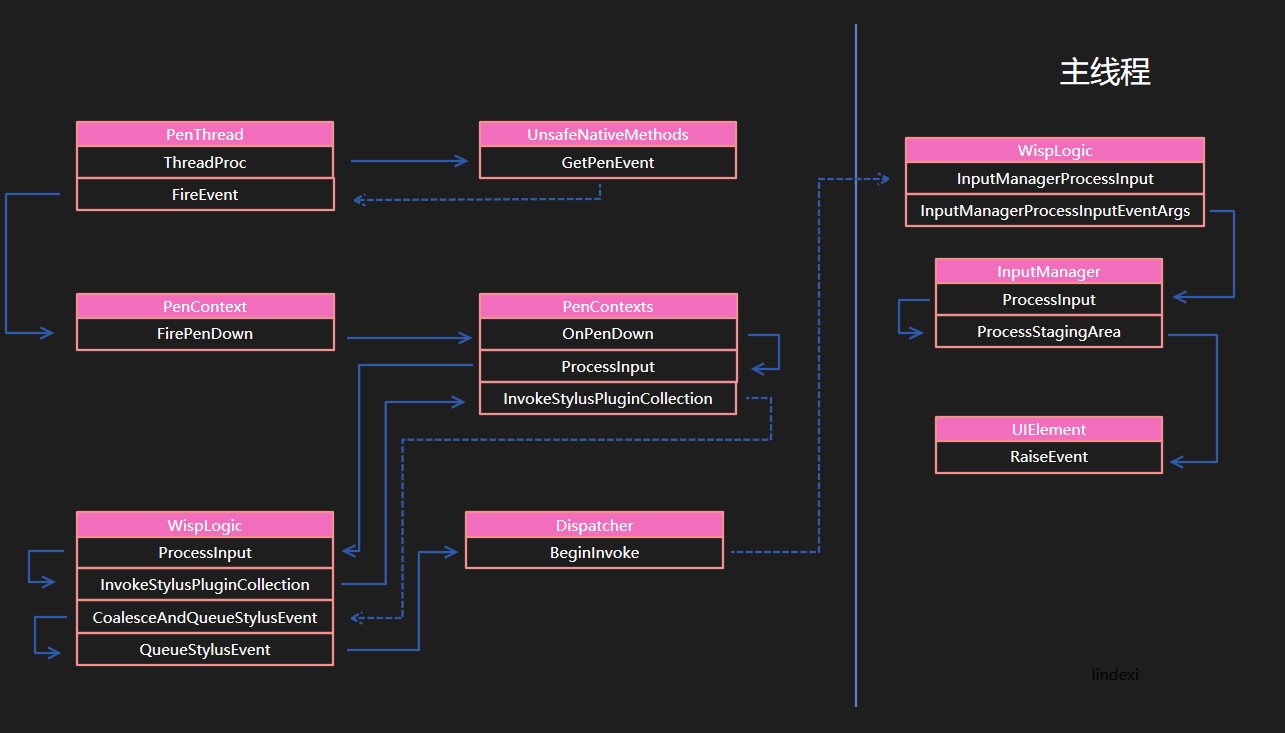
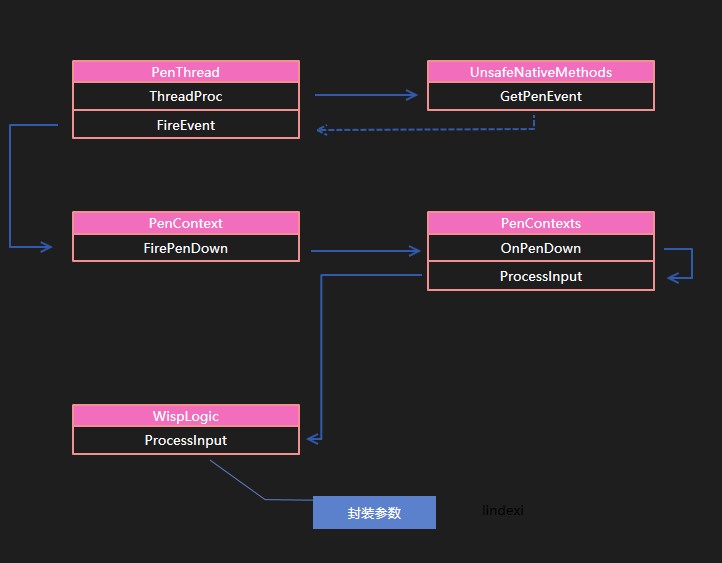
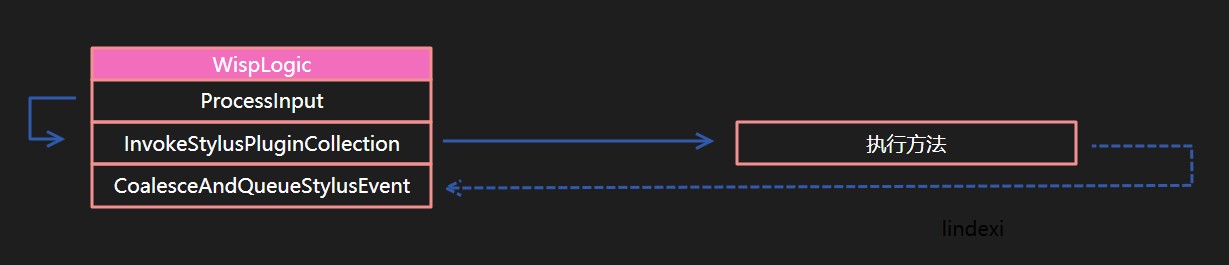
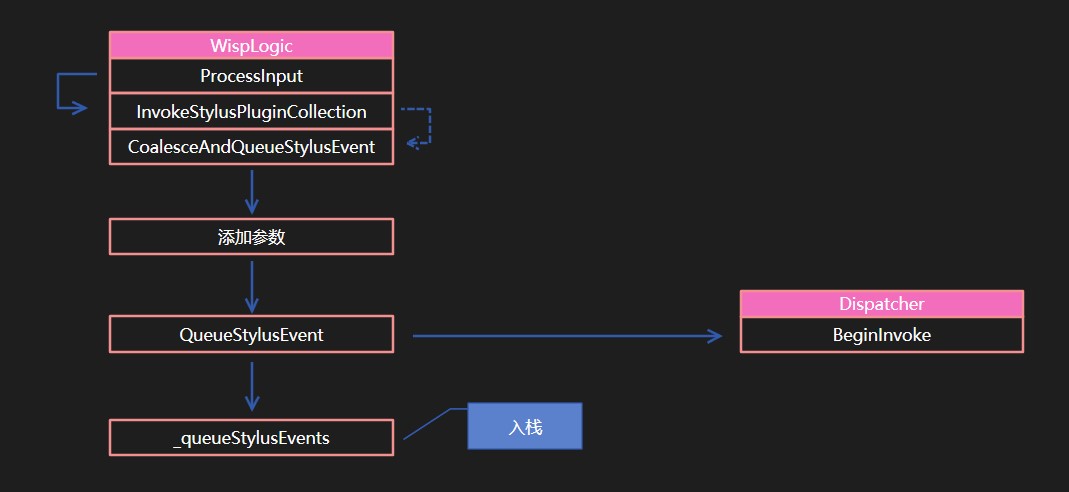
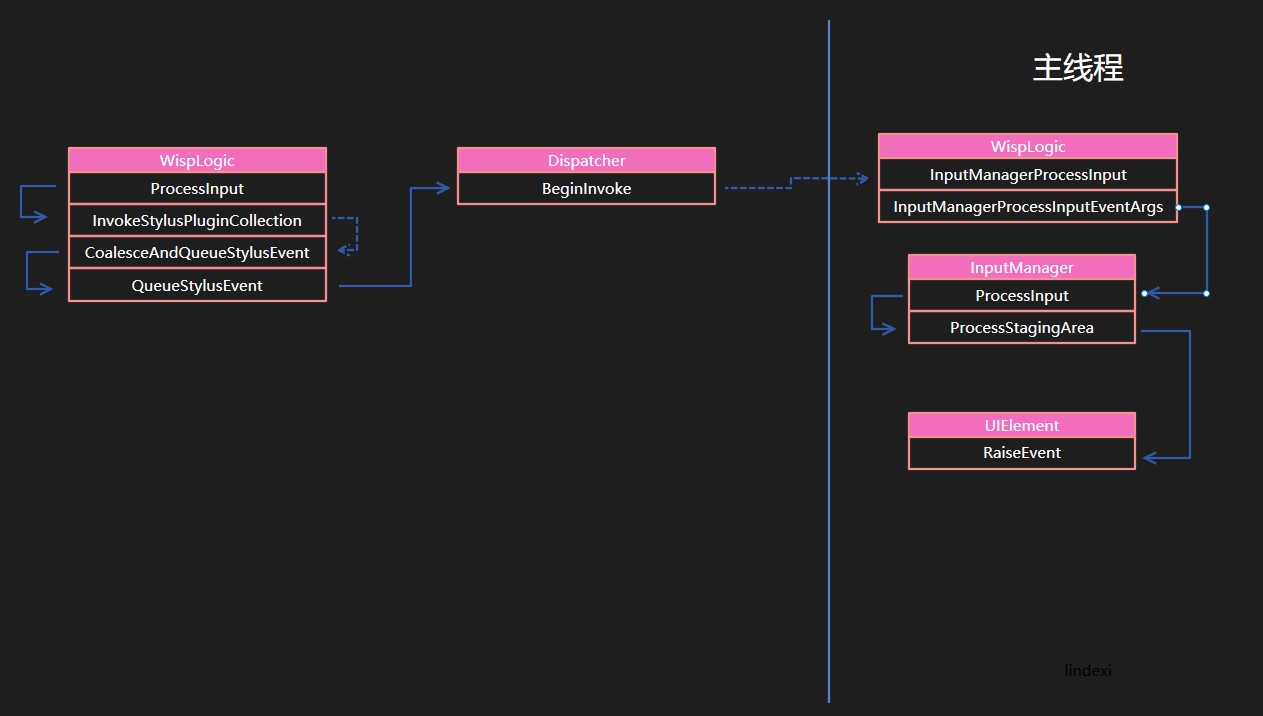
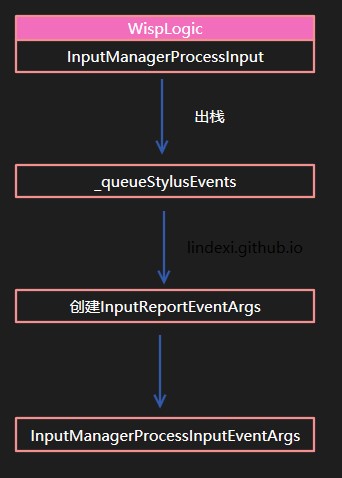
原文:WPF 触摸到事件 本文从代码底层告诉大家,在触摸屏幕之后是如何拿到触摸点并且转换为事件 在 WPF 界面框架核心就是交互和渲染,触摸是交互的一部分。在 WPF 是需要使用多个线程来做触摸和渲染,触摸是单独一个线程,这个线程就是只获得触摸,而将触摸转路由是在主线程。 在触摸线程各个模块的关系请看下面 从触摸线程转换到主线程,然后从主线程封装为路由事件的模块请看下面 路由事件需要封装触摸消息并且找到命中的元素 实际上看到这里,整个触摸就告诉了大家过程,从大的方面已经可以知道过程,触摸是如何转路由。具体代码是如何做的请看下面 在 WPF 需要使用一个线程去获取触摸的信息,这个线程是在 通过这个方法就可以创建线程运行 这个函数的底层实际上是包括了另一个循环来从 如果插入的设备有一个,就会运行 通过这个方法可以知道触摸的设备的 id 和触摸的数据,触摸的事件 在拿到触摸信息之后,会调用 如收到的是 709 事件,就会进入 在 FirePenDown 函数会先判断这个触摸是否初始化,每个触摸都有 StylusPointDescription 这个值是使用 在 上面代码传入的 stylusPointerId 、data 都是从刚才的底层拿到的值,这里的 tabletDeviceId 是从 PenContext 拿到,一个触摸的设备都有设备的 id 也就是 tabletDeviceId 的值。触摸的时候会给这个触摸一个 id 就是 stylusPointerId 通过这个在进行移动的时候就知道是哪个触摸点在移动。这个技术是用来解决多点触摸,如果用户有多个点触摸,就需要使用 stylusPointerId 来拿到这个点之前的做法 先告诉大家调用的顺序,不然大家看到下面忘记了点就不知道我在说的是什么了,本文图片画的实线表示方法在方法内调用了下一个方法,使用虚线表示在外面调用完成这个方法之后再调用下一个方法。 现在就将事件传入到 ProcessInput 并且告诉 WispLogic 的 Wisp 是 Windows Inking Service Platform 用来在系统和输入设备之间通信 在 这里的第一个参数 然后调用 在 在处理完参数会调用 这里需要告诉大家,从读微软的源代码一个很重要的就是学习微软的写法。在这里这样写是可以做到写出尽量短的代码,将一个功能拆到一个函数。如上面的代码,在 看到这里也许会认为 PenContexts 和 PenContext 相同的,实际上是两个不同的类。 如果想知道 在 PenContexts 的 在 WispLogic 和 PenContexts 都有相同的 实际上调用了的过程是回到原来的 PenContexts 如果看了下面的图会比较容易知道这个调用的过程,因为刚刚讲了 在 PenContexts 的 InvokeStylusPluginCollection 函数有一个重要的过程就是找到 在 PenContexts 有一个数组 如我在一个 Grid 添加了 从上面的代码可以知道,找到命中测试的方法是拿到所有的 这个是非常重要的,也就是即使在 WPF 命中测试到元素,而在这个元素下面的元素就不会被命中,但是在 为什么触摸一定要在另一个线程,我可以告诉大家是因为笔迹,在用户的笔迹很重要的就是笔迹的从触摸到显示,主线程经常在做很多的事情无法将整个主线程来计算用户的笔画,所以这里就使用了 在 TargetPlugInCollection 函数也就是 InvokeStylusPluginCollection 的核心调用完成之后,如果判断存在值就调用对应的 stylusPlugInCollection 的 FireRawStylusInput 函数,请看 FireRawStylusInput 的实现 这里的 stylusPlugInCollection 也就是经过 TargetPlugInCollection 判断命中测试找到的所有 StylusPlugIn 放在一起,通过调用 具体 StylusPlugIn 的调用本文就不多讲,在调用完成 InvokeStylusPluginCollection 也就是先告诉了很多类触摸了,现在就到了告诉路由事件的时候了。在 WispLogic 的 ProcessInputReport 函数调用 InvokeStylusPluginCollection 完成就会调用 CoalesceAndQueueStylusEvent 这个方法就是从触摸消息转路由的第一个方法,从上面代码可以说明 StylusPlugIn 的执行是比路由事件快,所以要做到比较快的触摸就需要使用这个方法。更多关于 StylusPlugIn 请看 WPF 高速书写 StylusPlugIn 原理 函数 CoalesceAndQueueStylusEvent 主要是添加一些参数,然后调用 QueueStylusEvent 函数将触摸的参数放在 主线程从 在 InputManagerProcessInput 主要就是创建 InputReportEventArgs 然后传入 InputManagerProcessInputEventArgs 通过这个函数调用 这里的 这里有一些细节,如在触摸传入的数据是如何拿出来,如何从触摸的点找到对应的元素进行路由。 在 WispLogic 的 InputManagerProcessInput 就是主线程从 在 InputManagerProcessInputEventArgs 主要就是调用 InputManager 的 ProcessInput 实际是没有代码 在 ProcessInput 主要是调用了 ProcessStagingArea 找到元素,然后使用 UIElement.RaiseEvent 从触摸到路由 在 ProcessStagingArea 函数相对还是比较复杂的,因为 InputManager 负责协调整个 WPF 的输入,包括键盘、鼠标、触摸输入。 因为 InputManager 在 WPF 是非常重要的类,需要重新来讲一下 InputManager 所做的内容。在 WPF 中通过消息循环将不同的消息发送到不同的处理,而 InputManager 就是处理输入相关,这个类会除了从底层的消息和参数转换为路由事件,并且告诉 WPF 触发的是哪个元素的事件。因为 InputManager 是属于整个输入的处理而不是仅触摸,所以本文只告诉大家会在 InputManager 的 ProcessStagingArea 调用 UIElement.RaiseEvent 触发了路由事件。 关于路由事件是如何到触摸对应的元素,就需要大家去看下InputManager 是如何做的,在底层还是调用 MouseDevice 的 GlobalHitTest 方法 下面来告诉大家触摸的初始化 初始化触摸需要从 Window 的创建开始说,在 Window 类的 Visibility 修改时触发 需要吐槽垃圾微软的函数命名,这里的 在 ShowHelper 可以忽略很多代码,因为这里没有明显初始化触摸,初始化的代码是调用 中间调用的代码大家可以自己看,这里就直接告诉大家函数调用 在 HwndSource.Initialize 的初始化是进行判断,如果设置了 然后判断 原来的 WPF 是存在很多的触摸的问题,在 win10 的 UWP 解决了很多的触摸问题的原因是使用了 Pointer 消息。原来的 WPF 是无法收到触摸的消息,需要使用 在 WispLogic.RegisterHwndForInput 就是初始化的函数在开始初始化之前需要 在 本文不告诉大家 PointerLogic 相关的方法,如何开启 Pointer 消息请看win10 支持默认把触摸提升鼠标事件 打开 Pointer 消息,这里假如是创建 在 HwndStylusInputProvider.HwndStylusInputProvider 除了创建 StylusLogic 还调用 RegisterHwndForInput 这里传入的是 InputManager HwndSource 通过这两个创建 WispTabletDevices 、 PenContexts 并且通过 IPimcManager2 拿到值 在这个函数调用 在触摸的时候很重要的就是 PenContext 在 WPF 插拔触摸设备触摸失效 有告诉了大家,如果拿到 创建 PenContext 的核心代码是 WispTabletDevice 类的 CreateContext 创建需要 penContextInfo 而这个值是从 在 WispTabletDeviceCollection 是通过 UpdateTablets 更新 在窗口打开的过程就通过 HwndStylusInputProvider.HwndStylusInputProvider 调用 调用 调用 在 Stylus Input 线程会在 这样就创建了 penContext 但是这时还需要将 penContext 加入到 PenThreadWorker 加入的方法是调用 在 在 在创建 PenContext 时需要知道创建 PenContext 数量,通过 创建 PenContext 的过程是比较复杂,所以本渣就画了图 图片的实线就是表示直接在方法内调用,而虚线表示是在这个方法执行完的下一步,也就是不是方法直接调用。 创建 PenContext 需要 penContextInfo 是从 WorkerOperationCreateContext 拿到,底层是调用 IPimcTablet2 拿到需要的值 这里很重要的两个值是 触摸的代码很重要就是拿到 课件 本文会经常更新,请阅读原文:
PenThreadWorker 创建,在 PenThreadWorker 的构造函数有下面代码 new Thread(new ThreadStart(this.ThreadProc))
{
IsBackground = true
}.Start();
ThreadProc 这个函数是一个无限循环,请看代码while (!this.__disposed)
{
// 忽略代码
}
penimc2_v0400.dll 拿到触摸信息penimc2_v0400.dll 里 GetPenEvent 拿到触摸的信息。如果有多个就会调用 GetPenEventMultiple 方法。这里先不用理会底层的实现,只需要知道底层实现的代码大概就是下面代码 internal void ThreadProc()
{
Thread.CurrentThread.Name = "Stylus Input";
while (!this.__disposed)
{
// 初始化的代码
for (;;)
{
// 有一个触摸设备,就进入 GetPenEvent 拿到触摸
if (this._handles.Length == 1)
{
UnsafeNativeMethods.GetPenEvent(一些参数)
num2 = 0;
}
else
{
// 有多个触摸设备,就会进入 GetPenEventMultiple 在用户触摸
UnsafeNativeMethods.GetPenEventMultiple(参数)
}
PenContext penContext = xx; // 在触摸对应的 PenContext 是通过判断用户触摸
this.FireEvent(penContext, 参数);
}
}
}
FireEvent 转换事件,在拿到的信息包括了表示是什么事件,因为触摸的事件是传入一个数值,需要通过这个数值转换为对应的事件FireEvent 在下面代码使用 penContext.FirePenDown 告诉现在是触摸按下IPimcContext2 获取 GetPacketPropertyInfo 拿到,是触摸屏的设备描述信息里告诉程序这个触摸的精度和触摸宽度penContext 传入事件给 PenContexts.OnPenDown 这个是在 PenContexts 的三个主要事件的一个,可以从代码知道都是调用 ProcessInput 只是第一个参数不相同 internal void OnPenDown(PenContext penContext, int tabletDeviceId, int stylusPointerId, int[] data, int timestamp)
{
// 下面两个函数和这个函数的不同在于 RawStylusActions.Down 其他都是相同
this.ProcessInput(RawStylusActions.Down, penContext, tabletDeviceId, stylusPointerId, data, timestamp);
}
internal void OnPenUp(PenContext penContext, int tabletDeviceId, int stylusPointerId, int[] data, int timestamp)
{
this.ProcessInput(RawStylusActions.Up, penContext, tabletDeviceId, stylusPointerId, data, timestamp);
}
internal void OnPackets(PenContext penContext, int tabletDeviceId, int stylusPointerId, int[] data, int timestamp)
{
this.ProcessInput(RawStylusActions.Move, penContext, tabletDeviceId, stylusPointerId, data, timestamp);
}
	void A()

	{

		B(); // A和B连接用实线表示

	}

	void C()

	{

		A();

		B(); // A和B连接需要虚线表示

	}
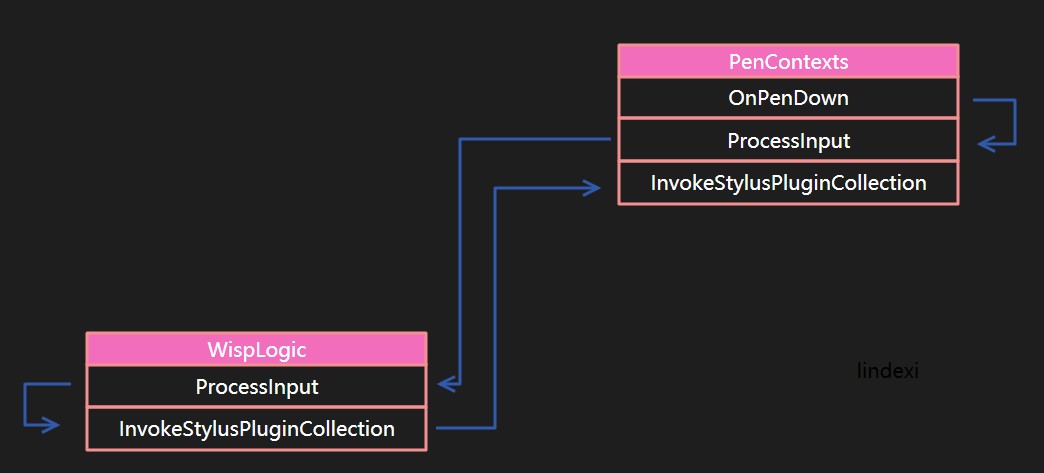
RawStylusActions 这个函数会调用 WispLogic 的 ProcessInput 在这里使用函数的原因是为了传入的时候加上 _inputSource 这里的 WispLogic 可能是 StylusLogic 现在的代码就到了比较熟悉的 StylusLogic 函数WispLogic 的 ProcessInput 会包装输入的参数为 RawStylusInputReport 现在这个参数还不需要知道是按下还是移动 internal void ProcessInput(RawStylusActions actions, PenContext penContext, int tabletDeviceId, int stylusDeviceId, int[] data, int timestamp, PresentationSource inputSource)
{
RawStylusInputReport inputReport = new RawStylusInputReport(InputMode.Foreground, timestamp, inputSource, penContext, actions, tabletDeviceId, stylusDeviceId, data);
this.ProcessInputReport(inputReport);
}
InputMode 表示的是当前的应用是不是处于前台WispLogic 的 ProcessInput 传入参数,从这里可以看到,如果一个函数的参数太多,建议创建一个类来传参数。微软在这里做的还是不错ProcessInput 需要继续处理参数,使用 StylusDeviceId 找到 WispStylusDevice 这个 WispStylusDevice 是在 WispLogic 的 RegisterStylusDeviceCore 注册InvokeStylusPluginCollection 这个函数会回到 PenContexts 请看代码 internal void InvokeStylusPluginCollection(RawStylusInputReport inputReport)
{
if (inputReport.StylusDevice != null)
{
inputReport.PenContext.Contexts.InvokeStylusPluginCollection(inputReport);
}
}
WispLogic 的 ProcessInput 将多个参数转换为一个类,然后再调用重载的 ProcessInput 方法。在重载的 WispLogic 的 ProcessInput 只是用来添加参数,添加完成就调用本地的 InvokeStylusPluginCollection 方法,同时 InvokeStylusPluginCollection 也只做调用 PenContexts 的函数internal sealed class PenContext
{
internal PenContext( PenContexts contexts /*忽略参数*/)
{
this._contexts = contexts;
// 忽略代码
}
internal PenContexts Contexts
{
[SecurityCritical]
get
{
return this._contexts;
}
}
private PenContexts _contexts;
}
internal sealed class PenContexts

{

	    // 包含了很多个 PenContext 对一个输入设备创建一个 PenContext 注意这里说的是报给系统的数量,一个物理设备可以报给系统1000000000000个输入

		private PenContext[] _contexts;

		// 这个函数调用了会添加 _contexts 的值

		internal void AddContext(uint index)

		{

			// 拿到局部的字段,作为一个变量,可以减少字段的引用

			// 推荐在一个复杂的类,如果函数用到了字段或属性,就使用局部的变量引用这个字段

			// 这个写法在框架里面很多使用

			PenContext[] array = _contexts;

			PenContext penContext = this._stylusLogic.TabletDevices[(int)index].As<WispTabletDevice>().CreateContext(this._inputSource.Value.CriticalHandle, this);

			array[(int)index] = penContext;

		}

}
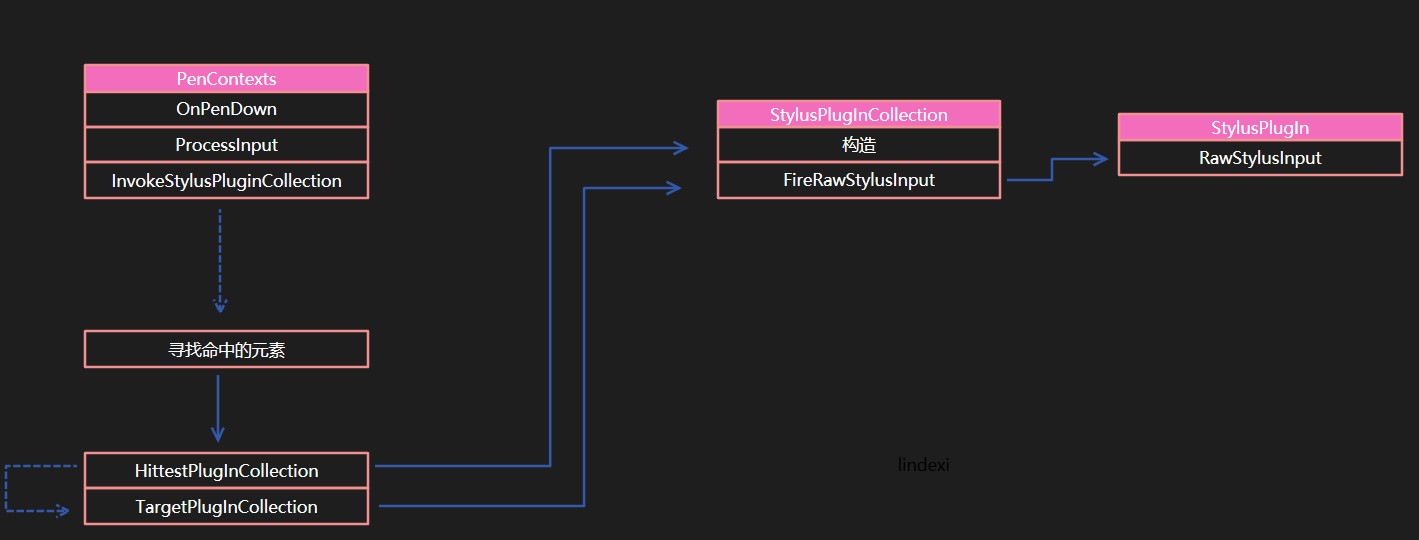
PenContext 是如何被创建的,请到下一节,因为这里的代码很多InvokeStylusPluginCollection 就是调用 StylusPlugIn 的核心代码。在触摸的过程会调用 StylusPlugIn 是 WPF 提供的快速拿到触摸的方法,如果是从路由事件,需要等待主线程和其他的代码,这样无法做到比较快拿到触摸。InvokeStylusPluginCollection 函数,但是 WispLogic 没有实际代码,请看 WispLogic 的代码 internal void InvokeStylusPluginCollection(RawStylusInputReport inputReport)
{
// 忽略代码
inputReport.PenContext.Contexts.InvokeStylusPluginCollection(inputReport);
}
PenContext 担心已经不记得说到 InvokeStylusPluginCollection 的调用。StylusPlugIn 调用List<StylusPlugInCollection> _plugInCollectionList 只要在界面添加了 StylusPlugIn 就会添加到这个列表,于是通过下面的方法判断是否存在命中测试,如果存在命中测试就调用对应的类StylusPlugIn 如果点击了 Grid 所在的范围,那么就会调用对应的类 private StylusPlugInCollection HittestPlugInCollection(Point pt)
{
foreach (StylusPlugInCollection stylusPlugInCollection in this._plugInCollectionList)
{
if (stylusPlugInCollection.IsHit(pt))
{
return stylusPlugInCollection;
}
}
return null;
}
StylusPlugIn 判断命中测试,所以如果一个被其他元素挡住的元素命中测试返回 true 就可以成功被调用。StylusPlugIn 依旧会被命中。这里这样做是为了提高性能,因为不能等 WPF 的布局,如果使用元素的布局因为触摸是在另一个线程,所以需要到主线程才可以做到。StylusPlugIn 不在主线程,可以用来处理触摸internal void FireRawStylusInput(RawStylusInput args)
{
for (int i = 0; i < this.Count; i++)
{
StylusPlugIn stylusPlugIn = this[i];
args.CurrentNotifyPlugIn = stylusPlugIn;
stylusPlugIn.RawStylusInput(args);
}
}
RawStylusInput 的方法调用了 StylusPlugIn 的方法,通过这个方法来调用继承 StylusPlugIn 的类的方法_queueStylusEvents 也就是一个队列。在触摸线程使用入栈的方式,然后通过 Dispatcher 告诉主线程。 private void QueueStylusEvent(RawStylusInputReport report)
{
object stylusEventQueueLock = _stylusEventQueueLock;
lock(stylusEventQueueLock)
{
_queueStylusEvents.Enqueue(report);
}
Dispatcher.BeginInvoke(DispatcherPriority.Input, this._dlgInputManagerProcessInput, null);
}
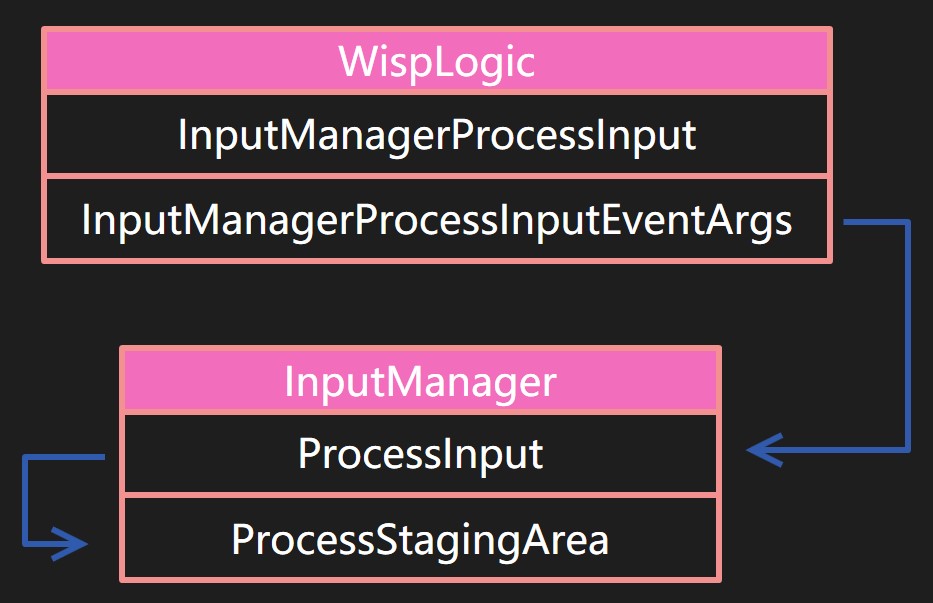
_dlgInputManagerProcessInput 就是调用 InputManagerProcessInput 方法,是使用出队的方式拿到触摸线程的触摸。上面的图片写了入栈实际上是入队。InputManager 的 ProcessInput 从上面图片可以看到是如何调用InputManager 的 ProcessInput 会通过 ProcessStagingArea 转路由事件。QueueStylusEvent放在_queueStylusEvents的参数拿出来的函数。下面就是去掉了细节代码 internal object InputManagerProcessInput(object oInput)
{
RawStylusInputReport rawStylusInputReport = null;
WispTabletDevice wispTabletDevice = null;
object stylusEventQueueLock = this._stylusEventQueueLock;
lock (stylusEventQueueLock)
{
rawStylusInputReport = this._queueStylusEvents.Dequeue();
wispTabletDevice = rawStylusInputReport.StylusDevice.TabletDevice..As<WispTabletDevice>();
InputReportEventArgs inputReportEventArgs = new InputReportEventArgs(null, rawStylusInputReport);
inputReportEventArgs.RoutedEvent = InputManager.PreviewInputReportEvent;
InputManagerProcessInputEventArgs(inputReportEventArgs);
}
}
		internal void InputManagerProcessInputEventArgs(InputEventArgs input)

		{

			this._inputManager.Value.ProcessInput(input);

		}
初始化触摸
_OnVisibilityChanged 在这个函数就使用 Dispatcher 调用 ShowHelper 而这个函数就是开始初始化_OnVisibilityChanged 命名一点都不好,建议方法的命名第一个字符大写,不要使用 _ 开始。SafeCreateWindowDuringShow 调用这个函数可以知道这个函数还不是靠近初始化触摸的代码Switch.System.Windows.Input.Stylus.DisableStylusAndTouchSupport 就可以根据用户设置打开或不打开,如果是为了学习,建议是打开。这个值默认是 false 也就是打开StylusLogic.IsPointerStackEnabled 现在在 dotnet framework 4.7 在 win10 可以使用 Pointer 消息,所以创建的是 HwndPointerInputProvider 本文使用的是 HwndStylusInputProvider 因为在 Pointer 消息就不用使用本文的逻辑penimc2_v0400.dll 使用一个新的线程去拿到触摸的消息,也就是本文在告诉大家的流程。这个方法存在一些问题,参见WPF 插拔触摸设备触摸失效所以建议是使用 Pointer 消息可以解决很多触摸的问题HwndStylusInputProvider.HwndStylusInputProvider 初始化 StylusLogic 这个类有一个静态属性 internal abstract class StylusLogic
{
internal static StylusLogic CurrentStylusLogic
{
get
{
if (_currentStylusLogic == null)
{
StylusLogic.Initialize();
}
// 忽略代码
return _currentStylusLogic;
}
}
}
StylusLogic.Initialize 函数会判断当前是不是使用 Pointer 初始化不同的类 if (StylusLogic.IsPointerStackEnabled)
{
// 在 dotnet framework 4.7 之后可以尝试使用 Pointer 消息,这时可以就会进入这个逻辑
// 本文不会详细告诉告诉大家 PointerLogic 里面的代码
StylusLogic._currentStylusLogic = new PointerLogic(InputManager.UnsecureCurrent);
}
else
{
StylusLogic._currentStylusLogic = new WispLogic(InputManager.UnsecureCurrent);
}
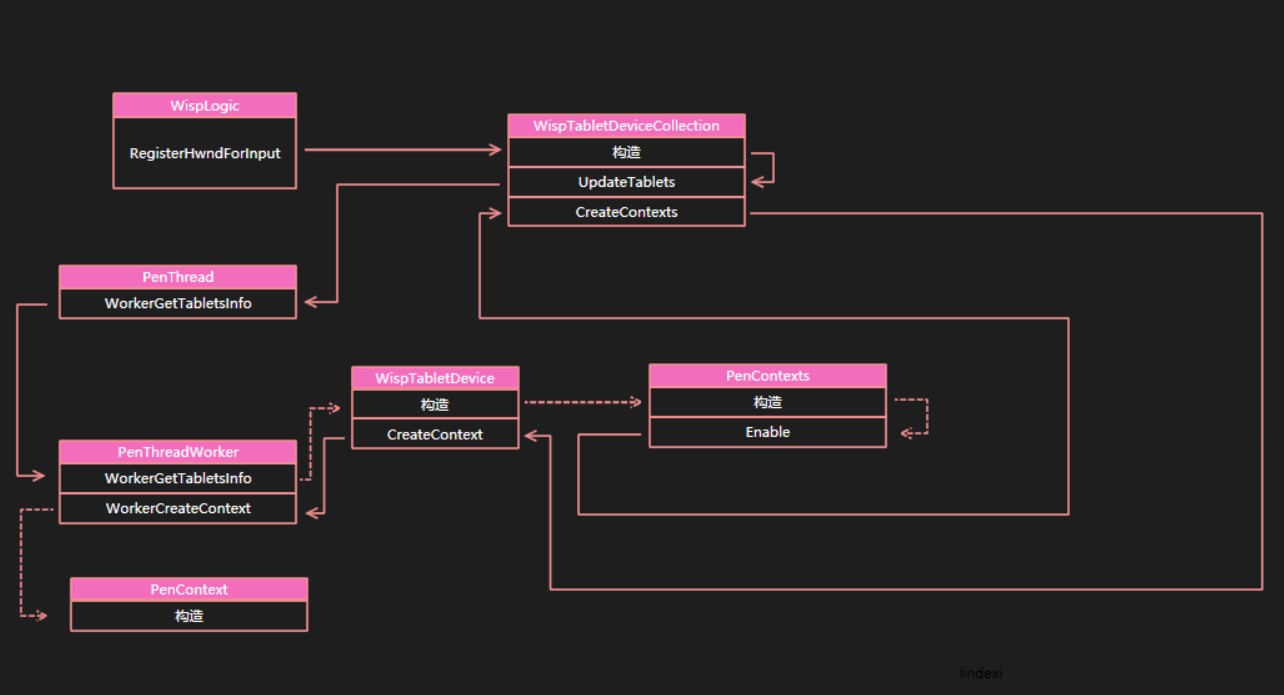
WispLogic 就会进入构造,这里只是简单的初始化属性penContexts.Enable() 就可以创建 PenContext 并且使用,如何创建 PenContext 的过程请看下面创建 PenContext 方法
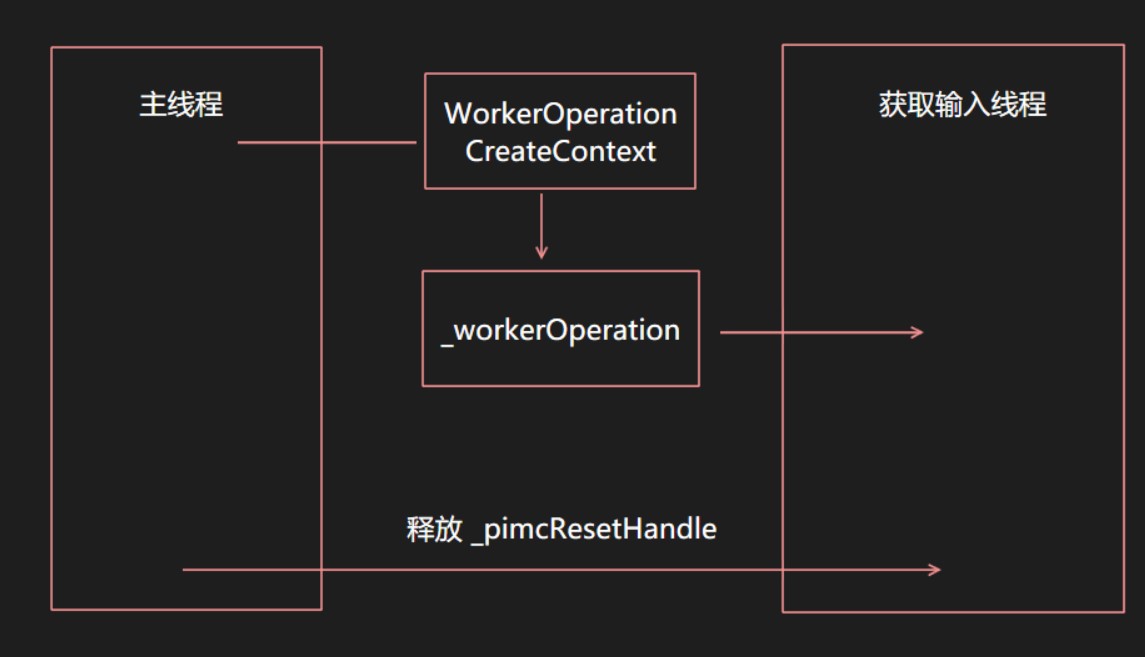
TabletDeviceInfo 为空就无法创建 PenContext 那么 这两个有什么联系_penThread.WorkerCreateContext 拿到,在 WispTabletDevice 这个类可以拿到 PenThread 和 tabletInfo 这两个值都是构造传入_tablets 这个函数在 HwndStylusInputProvider.HwndStylusInputProvider 就已经调用penContexts.Enable() 创建 PenContext 而 PenContext 的创建需要 PenContextInfo 参数,这个参数需要通过 _penThread.WorkerCreateContext 创建_penThread.WorkerCreateContext 不是直接在主线程运行而是在 PenThreadWorker 的 Stylus Input 线程运行。_penThread.WorkerCreateContext 时,先在 _workerOperation 创建 WorkerOperationCreateContext 然后释放 _pimcResetHandle 等待 Stylus Input 线程运行。GetPenEventMultiple 或 GetPenEventMultiple 等待 _pimcResetHandle 只有在用户触摸或释放 _pimcResetHandle 线程才会继续PenContext.Enable 通过下面的流程调用 PenThreadWorker.WorkerAddPenContext 添加 System.Windows.Input.PenThreadWorker.WorkerAddPenContext
System.Windows.Input.PenThread.AddPenContext
System.Windows.Input.PenThreadPool.GetPenThreadForPenContextHelper
System.Windows.Input.PenThreadPool.GetPenThreadForPenContext
PenThreadWorker.WorkerAddPenContext 实际上是添加 _workerOperation 的一个值 WorkerOperationAddContext 进行添加,也是通过释放 _pimcResetHandle 让获得输入的线程运行WorkerOperationAddContext 会调用 PenThreadWorker.AddPenContext 作为实际添加,通过 PenThreadWorker.AddPenContext 会从 PenContext 创建 _handles 在触摸线程就是通过判断 _handles 数量调用不同的函数WispTabletDeviceCollection.CreateContexts 遍历从 UpdateTablets 更新的 _tablets 进行创建。 internal interface IPimcTablet2
{
// 其他代码
void CreateContext(IntPtr handle, [MarshalAs(UnmanagedType.Bool)] bool fEnable, uint timeout, out IPimcContext2 IPimcContext, out int key, out long commHandle);
}
					// 下面 _pimcTablet 是 IPimcTablet2

					this._pimcTablet.CreateContext(this._hwnd, true, 250u, out var pimcContext, out var contextId, out var num);

					PenContextInfo result;// 这是结构体

					result.ContextId = contextId;

					result.PimcContext = new SecurityCriticalDataClass<IPimcContext2>(pimcContext);

					result.CommHandle = new SecurityCriticalDataClass<IntPtr>(new IntPtr(num));

					result.WispContextKey = UnsafeNativeMethods.QueryWispContextKey(pimcContext);

					this._result = result;
IPimcContext 和 commHandle 在创建 PenContext 主要就需要这两个值,在 PenContext 的字段是 _pimcContext _commHandle 在上面的获得触摸的过程就需要这两个值_handle 的值,这个值在 PenThreadWorker.AddPenContext 创建,实际就是拿 PenContext 的值,请看代码 internal bool AddPenContext(PenContext penContext)
{
var list = _penContexts;
list.Add(penContext);
UnsafeNativeMethods.CheckedLockWispObjectFromGit(penContext.WispContextKey);
_pimcContexts = new IPimcContext2[list.Count];
_penContexts = new WeakReference[list.Count];
_handles = new IntPtr[list.Count];
_wispContextKeys = new uint[list.Count];
foreach(var temp in list)
{
_handles[i] = temp.CommHandle;
_pimcContexts[i] = temp._pimcContext.Value;
_penContexts[i] = new WeakReference(temp);
_wispContextKeys[i] = temp.WispContextKey;
}
}
https://lindexi.gitee.io/lindexi/post/WPF-%E8%A7%A6%E6%91%B8%E5%88%B0%E4%BA%8B%E4%BB%B6.html
,以避免陈旧错误知识的误导,同时有更好的阅读体验。
本作品采用
知识共享署名-非商业性使用-相同方式共享 4.0 国际许可协议
进行许可。欢迎转载、使用、重新发布,但务必保留文章署名林德熙(包含链接:
https://lindexi.gitee.io
),不得用于商业目的,基于本文修改后的作品务必以相同的许可发布。如有任何疑问,请
与我联系
。

最新文章
- js模块开发(一)
- LINUX测试环境部署manggo(六)
- IIS发布问题汇总
- C# 泛型约束
- 攻城狮在路上(叁)Linux(十三)--- 文件与目录的管理
- linux下开启SSH,并且允许root用户远程登录,允许无密码登录
- 如何让div出现滚动条
- Java实现定时任务的三种方法(转)
- iOS AFN向接口端传递JSON数据
- Spring框架入门之Spring简介
- 搜索引擎solr和elasticsearch
- web优化(二)
- docker(4)docker的网络,自定义网桥
- 守护模式,互斥锁,IPC通讯,生产者消费者模型
- C#订阅与发布标准实现
- [Ting's笔记Day9]活用套件Carrierwave gem:(4)使用Imagemagick修改图片大小
- c#Socket Tcp服务端编程
- ubuntu下安裝sogou拼音
- WebService上传下载图片
- postfix 邮件服务的安装及详解