SSM-learning
2024-09-04 22:01:44
架构流程图:
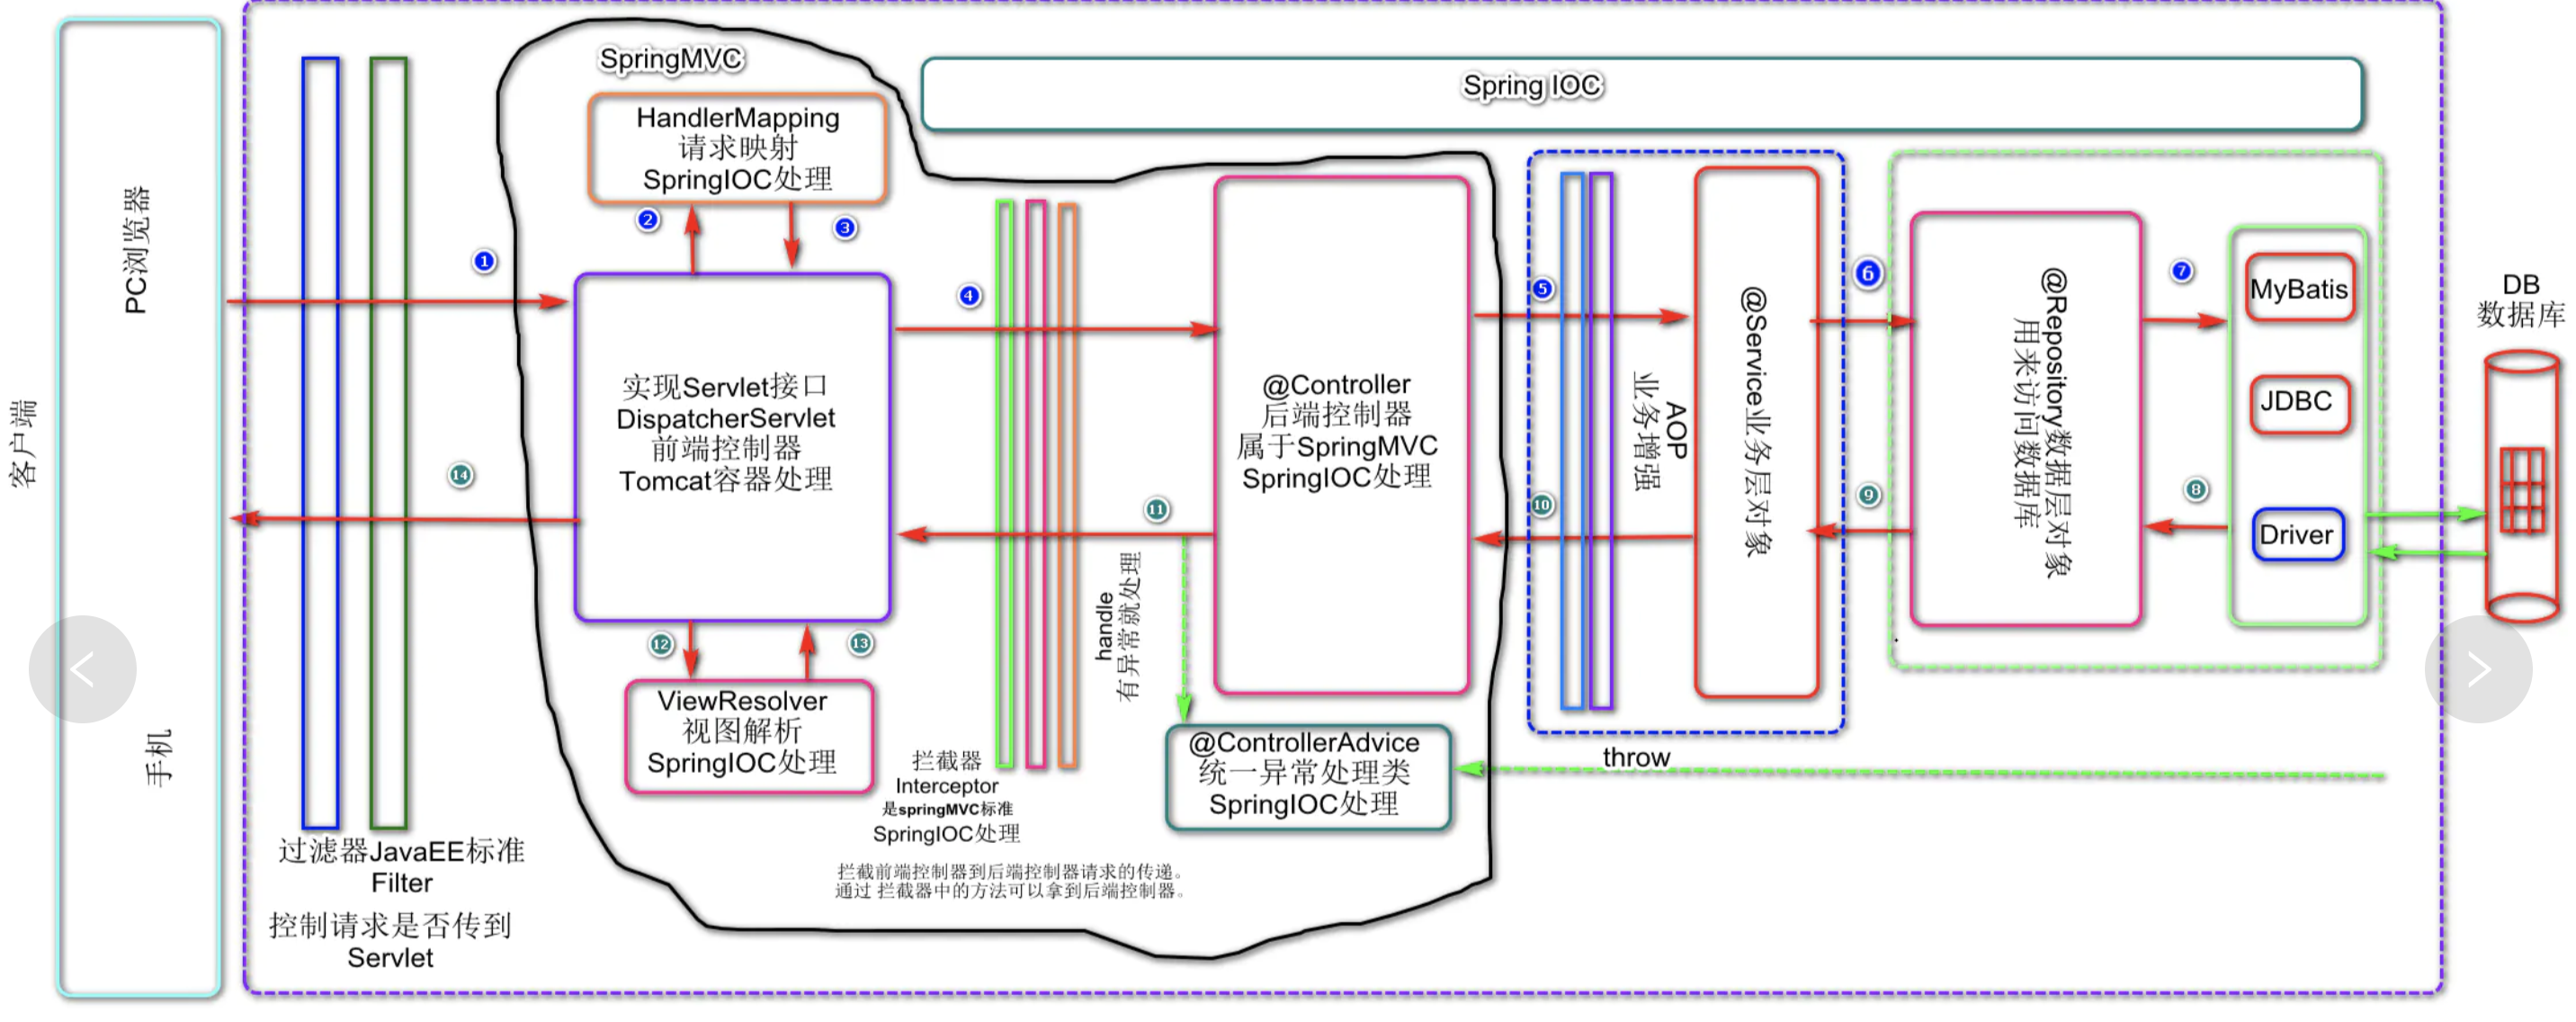
第一步:建立spring框架;
包括:建立所需要的dao层,sevice层和controller层和实体类,建立spring配置文件,配置自动扫描bean
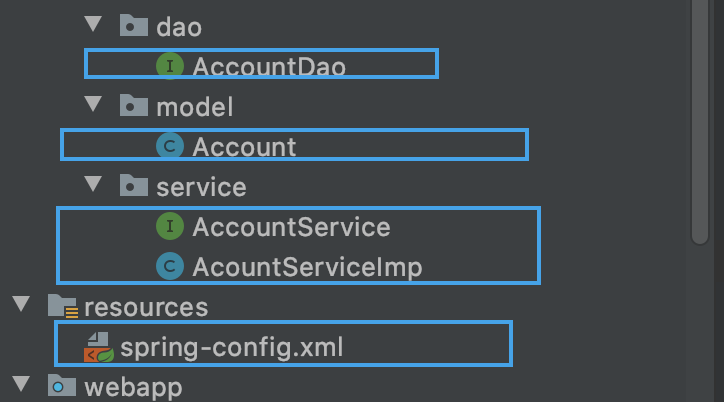
AccountDao:
@Repository

public interface AccountDao {

   @Select("select * from account where id = 1")

   Account findAll() ;

}
Account:
package com.quan.model;

import javax.annotation.Resource;

@Resource

public class Account {

    private Integer id;

    private Integer uid;

    private Double money;

    public Integer getId() {

        return id;

    }

    public void setId(Integer id) {

        this.id = id;

    }

    public Integer getUid() {

        return uid;

    }

    public void setUid(Integer uid) {

        this.uid = uid;

    }

    public Double getMoney() {

        return money;

    }

    public void setMoney(Double money) {

        this.money = money;

    }

    @Override

    public String toString() {

        return "Account{" +

                "id=" + id +

                ", uid=" + uid +

                ", money=" + money +

                '}';

    }

}
AcountService
public interface AccountService {

   Account findAll();

}
AcountServiceImp
@Service

public class AcountServiceImp  implements AccountService{

    @Autowired

    private AccountDao accountDao;

    @Override

    public Account findAll() {

       Account account =accountDao.findAll();

       System.out.println(account);

        System.out.println("springMVC-done.....");

        return account;

    }

}
spring-config.xml
<?xml version="1.0" encoding="UTF-8"?>

<beans xmlns="http://www.springframework.org/schema/beans"

       xmlns:tx="http://www.springframework.org/schema/tx"

       xmlns:context="http://www.springframework.org/schema/context"

       xmlns:mvc="http://www.springframework.org/schema/mvc"

       xmlns:aop="http://www.springframework.org/schema/aop"

       xmlns:xsi="http://www.w3.org/2001/XMLSchema-instance"

       xsi:schemaLocation="http://www.springframework.org/schema/beans

        http://www.springframework.org/schema/beans/spring-beans.xsd

        http://www.springframework.org/schema/tx

        http://www.springframework.org/schema/tx/spring-tx.xsd

        http://www.springframework.org/schema/context

        http://www.springframework.org/schema/context/spring-context.xsd

        http://www.springframework.org/schema/mvc

        http://www.springframework.org/schema/mvc/spring-mvc.xsd

            http://www.springframework.org/schema/aop

        http://www.springframework.org/schema/mvc/spring-aop.xsd

">

    <context:component-scan base-package="com.quan">

<!--        配置需要忽略的注解,controller 让spingmvc配置文件去配置-->

        <context:exclude-filter type="annotation" expression="org.springframework.stereotype.Controller"/>

    </context:component-scan>
spring的配置文件主要是,除了springMVC需要配置的扫描controller的注解,其他都需要在这里配置
建议没实现一个框架的配置,都进行简单的验证
第二部,实现springMVC配置:
配置web.xml文件,实现过滤器,核心处理器,中文乱码过滤
<!--  spring-MVC的配置,-->

  <servlet>

    <servlet-name>springmvc</servlet-name>

    <servlet-class>

      org.springframework.web.servlet.DispatcherServlet

    </servlet-class>

<!--    服务器启动的时候,让DispatcherServlet对象创建-->

    <load-on-startup>1</load-on-startup>

  </servlet>

  <!--  如果没有定义配置文件名字,spring直接会找web-inf下的servlet-name-servler.xml文件-->

  <servlet-mapping>

    <servlet-name>springmvc</servlet-name>

    <url-pattern>/</url-pattern>

  </servlet-mapping>

  <filter>

    <filter-name>characterEncodingFilter</filter-name>

    <filter-class>org.springframework.web.filter.CharacterEncodingFilter</filter-class>

    <init-param>

      <param-name>encoding</param-name>

      <param-value>UTF-8</param-value>

    </init-param>

  </filter>

  <filter-mapping>

    <filter-name>characterEncodingFilter</filter-name>

    <url-pattern>/*</url-pattern>

  </filter-mapping>
在WEB-INF/建立springmvc的配置文件:
springmvc-servlet.xml
<?xml version="1.0" encoding="UTF-8"?>

<beans xmlns="http://www.springframework.org/schema/beans"

       xmlns:tx="http://www.springframework.org/schema/tx"

       xmlns:context="http://www.springframework.org/schema/context"

       xmlns:mvc="http://www.springframework.org/schema/mvc"

       xmlns:aop="http://www.springframework.org/schema/aop"

       xmlns:xsi="http://www.w3.org/2001/XMLSchema-instance"

       xsi:schemaLocation="http://www.springframework.org/schema/beans

        http://www.springframework.org/schema/beans/spring-beans.xsd

        http://www.springframework.org/schema/tx

        http://www.springframework.org/schema/tx/spring-tx.xsd

        http://www.springframework.org/schema/context

        http://www.springframework.org/schema/context/spring-context.xsd

        http://www.springframework.org/schema/mvc

        http://www.springframework.org/schema/mvc/spring-mvc.xsd

            http://www.springframework.org/schema/aop

        http://www.springframework.org/schema/mvc/spring-aop.xsd

">

<!--    配置注解扫描-->

    <context:component-scan base-package="com.quan">

        <context:include-filter type="annotation" expression="org.springframework.stereotype.Controller"/>

    </context:component-scan>

<!--    配置试图解析器-->

    <bean id="viewResolver" class="org.springframework.web.servlet.view.InternalResourceViewResolver">

        <property name="prefix" value="/WEB-INF/pages/"/>

        <property name="suffix" value=".jsp"/>

    </bean>

<!--    设置静态资源不过滤-->

    <mvc:resources mapping="/css/**" location="WEB-INF/css"/>

    <mvc:resources mapping="/images/**" location="WEB-INF/images"/>

    <mvc:resources mapping="/js/**" location="WEB-INF/js"/>

<!--    开启springMVC注解支持-->

    <mvc:annotation-driven/>

</beans>
编写controller:
@Controller

@RequestMapping("/account")

public class AccountController {

    @Autowired

    private AccountService accountService;

    @RequestMapping("/findAll")

    public ModelAndView accFindAll(){

        ModelAndView mv = new ModelAndView();

        System.out.println("springmvcdone1");

        Account account = accountService.findAll();

        mv.addObject("at",account);

        mv.addObject("atmoney",account.getMoney());

        mv.setViewName("list");

        System.out.println("springmvcdone2");

        return mv;

    }

}
list.jsp:
<%@ page contentType="text/html;charset=UTF-8" language="java" isELIgnored="false"%>

<html>

<head>

    <title>findAll</title>

</head>

<body>

${requestScope.atmoney}

${requestScope.at.toString()}

</body>

</html>
这里可以不用编写页面,直接命令行输入消息验证生效就行
由于Tomcat服务器会自动通过web.xml配置文件进行springmvc配置文件的加载,
并没有applicationContext.xml的加载(也就是spring并没有被加载),所以可以通过监听ServeltContext域对象,在创建时加载spring的配置文件
在web.xml文件加入监听器:
<!--  配置spring的监听器-->

  <listener>

    <listener-class>org.springframework.web.context.ContextLoaderListener</listener-class>

  </listener>

<!--  配置加载的类路径-->

  <context-param>

    <param-name>contextConfigLocation</param-name>

    <param-value>classpath:spring-config.xml</param-value>

  </context-param>
这样子我们就可以使用依赖注入
配置Mybaties:
可以在spring配置文件里面直接在上mybatis的配置
<!--配置链接对象-->

    <bean id="dataSource" class="org.springframework.jdbc.datasource.DriverManagerDataSource">

        <property name="url" value="jdbc:mysql://129.204.3.133/mybatis" />

        <property name="driverClassName" value="com.mysql.jdbc.Driver"/>

        <property name="username" value="root"/>

        <property name="password" value="2004"/>

    </bean>

<!--    配置SQLsession工厂-->

 <bean id="factoryBean" class="org.mybatis.spring.SqlSessionFactoryBean">

     <property name="dataSource" ref="dataSource"/>

<!--     <property name="mapperLocations" value="com.quan.dao/*.xml"/>-->

 </bean>

<!--    配置邵渺的dao-->

    <bean id="mapperScannerConfigurer" class="org.mybatis.spring.mapper.MapperScannerConfigurer">

        <property name="basePackage" value="com.quan.dao"/>

    </bean>
编写AccountDao的maping文件:
<?xml version="1.0" encoding="utf-8" ?>

<!DOCTYPE mapper

        PUBLIC "-//mybatis.org//DTD Mapper 3.0//EN"

        "http://mybatis.org/dtd/mybatis-3-mapper.dtd">

<mapper namespace="com.quan.dao.AccountDao">

    <select id="findAll" resultType="com.quan.model.Account">

        select * from account where id = 1;

    </select>

</mapper>
测试结果:
最新文章
- redhat6.4安装MySQL-server-5.5.28-1.linux2.6.x86_64.rpm
- consul 安装
- setInterval js
- Adroid学习系列-入门(1)
- solr4.7中文分词器(ik-analyzer)配置
- 深入理解OpenGL拾取模式(OpenGL Picking)
- Flash Builder 4.6 基本设置
- Universal-Image-Loader 示例 工具
- Matlab入门学习(程序设计)
- Udacity并行计算课程笔记-The GPU Programming Model
- MongoDB 基本操作学习笔记
- [Lucas定理]【学习笔记】
- android EventBus详解(一)
- 爸爸又给Spring MVC生了个弟弟叫Spring WebFlux
- Pycharm 项目无法导入自己写的模块(问题记录贴)
- java 获取下一个字母(传大写返回大写,传小写返回小写)
- mac 中登陆mysql忘记密码解决办法
- SpringMVC框架01——使用IDEA搭建SpringMVC环境
- Day03(黑客成长日记)
- Linux磁盘和文件系统简介
热门文章
- 华为模拟器在三层交换机上实现dhcp的配置
- Oracle之关系型数据库
- XStart远程连接Linux图形化界面
- ssh静态代理模式讲解与使用
- ElementUI Tree树形控件renderContent return时报错
- FaE:基于符号知识的适应性和可解释的神经记忆
- MyBatis 使用(XML版本)
- Chapter03 Java变量
- 扩展auth_user字段、BBS需求分析、创建BBS数据库、注册页面搭建与用户头像展示及Ajax提交数据
- yum 安装时报错 Existing lock /var/run/yum.pid: another copy is running as pid 3192.