【Docker】-NO.131.Docker.1 -【Docker】
Style:Mac
Series:Java
Since:2018-09-10
End:2018-09-10
Total Hours:1
Degree Of Diffculty:5
Degree Of Mastery:5
Practical Level:5
Desired Goal:5
Archieve Goal:3
Gerneral Evaluation:3
Writer:kingdelee
Related Links:
http://www.cnblogs.com/kingdelee/
1.

centos6.8安装:
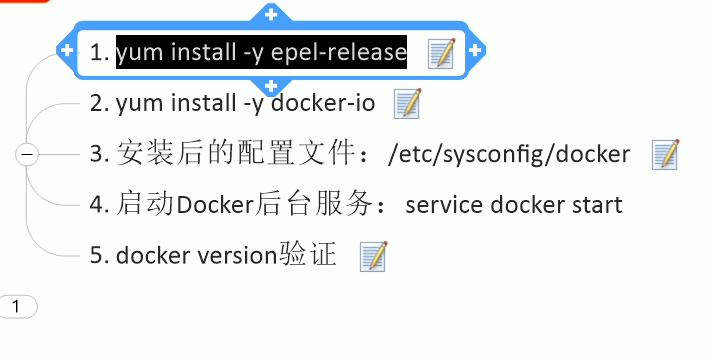
yum install -y epel-release
安装出现问题:
Error: docker-ce conflicts with 2:docker-1.13.1-75.git8633870.el7.centos.x86_64

yum remove -y docker-ce.x86_64 docker-ce-cli.x86_64 containerd.io.x86_64
根据文档描述的去做
https://yq.aliyun.com/articles/110806?spm=5176.8351553.0.0.2e381991PnZGy9
1. 安装/升级Docker客户端
推荐安装1.10.0以上版本的Docker客户端,参考文档 docker-ce
2. 配置镜像加速器
其他io版本的,是有/etc/sysconfig/docker,需要在里边修改镜像,最新版的,只需要按照下面的方式修改就行了,不需要管那个docker以及其他多余的修改
针对Docker客户端版本大于 1.10.0 的用户
您可以通过修改daemon配置文件/etc/docker/daemon.json来使用加速器
sudo mkdir -p /etc/docker

sudo tee /etc/docker/daemon.json <<-'EOF'

{

  "registry-mirrors": ["https://mm9zx6r4.mirror.aliyuncs.com"]

}

EOF

sudo systemctl daemon-reload

sudo systemctl restart docker
https://docs.docker.com/install/linux/docker-ce/centos/#install-docker-ce
yum install -y yum-utils device-mapper-persistent-data lvm2
yum-config-manager --enable docker-ce-edge
启动docker
sudo systemctl start docker
通过服务启动docker
sudo systemctl restart docker
安装后,出现启动问题,可以重新删除后,再次安装
rm: cannot remove ‘/var/lib/docker/containers’: Device or resource busy
rm -rf /var/lib/docker
提示:
rm: cannot remove ‘/var/lib/docker/aufs’: Device or resource busy
原因:
在建立容器的时候做了相应目录的挂载,没有卸载,所以Device or resource busy
解决方法:
查找挂载的目录cat /proc/mounts | grep "docker"
卸载umount /var/lib/docker/aufs
rm -rf /var/lib/docke
如果无法删除,就重启再删

https://www.cnblogs.com/anliven/p/6218741.html
https://success.docker.com/article/using-systemd-to-control-the-docker-daemon
vim /etc/systemd/system/docker.service
ExecStart=/usr/bin/dockerd --config-file=/etc/docker/daemon.json -H unix://
重载配置
sudo systemctl daemon-reload
重启镜像
sudo systemctl restart docker
查看
ps -ef | grep docker


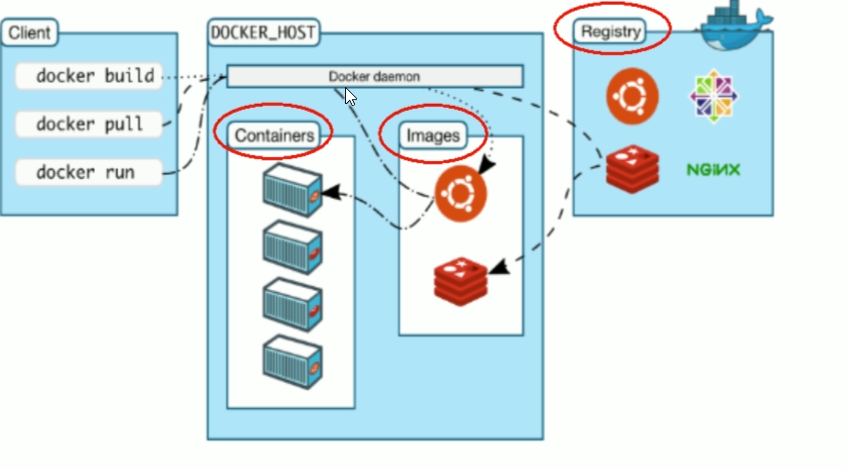
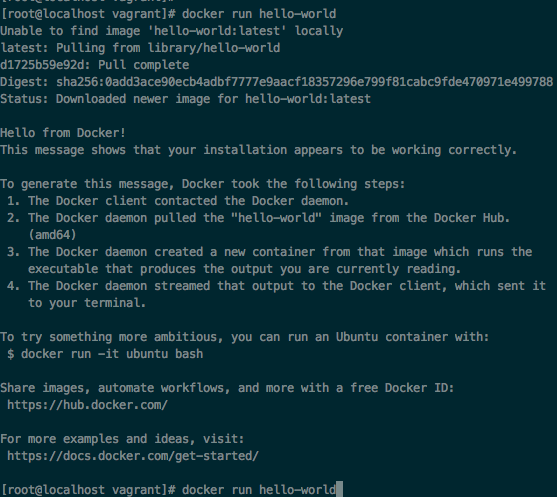
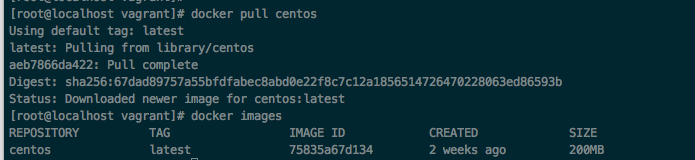
拉镜像:
docker run hello-world
docker命令
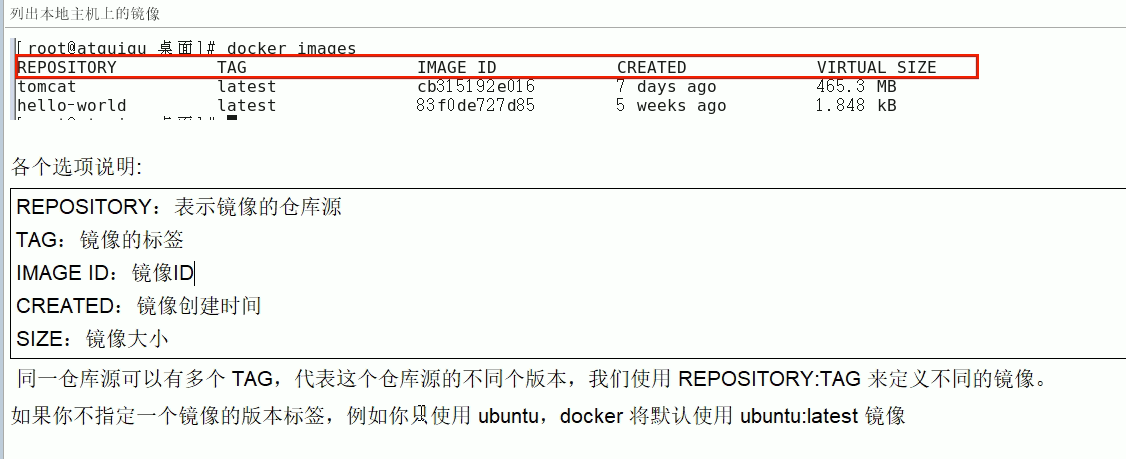
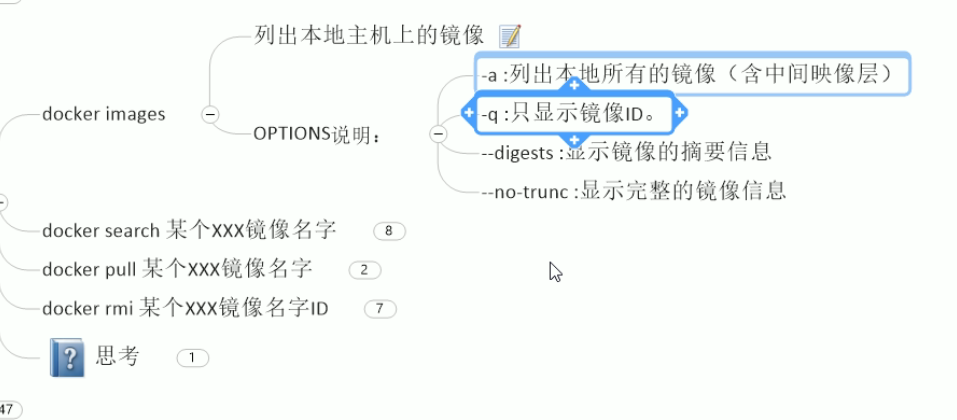
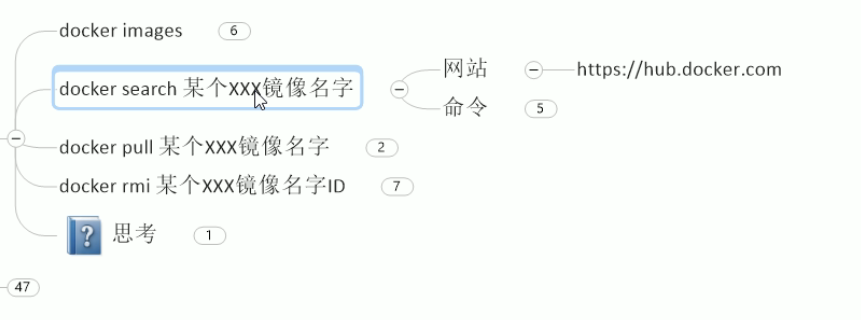
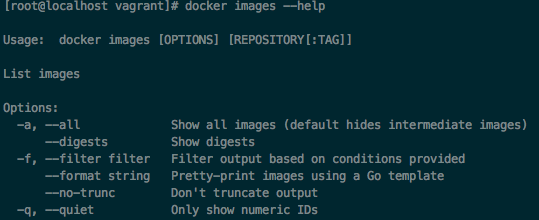
docker images 列出本地主机上的景象
各个选项说明:
|
REPOSITORY:表示镜像的仓库源 TAG:镜像的标签 IMAGE ID:镜像ID CREATED:镜像创建时间 SIZE:镜像大小 |
同一仓库源可以有多个 TAG,代表这个仓库源的不同个版本,我们使用 REPOSITORY:TAG 来定义不同的镜像。
如果你不指定一个镜像的版本标签,例如你只使用 ubuntu,docker 将默认使用 ubuntu:latest 镜像


docker search 搜索某个镜像

docker pull mysql 下载mysql镜像
docker rmi mysql 删除某个镜像
docker rmi -f hello-world
docker rmi -f $(docker images -qa) 级联删除所有镜像

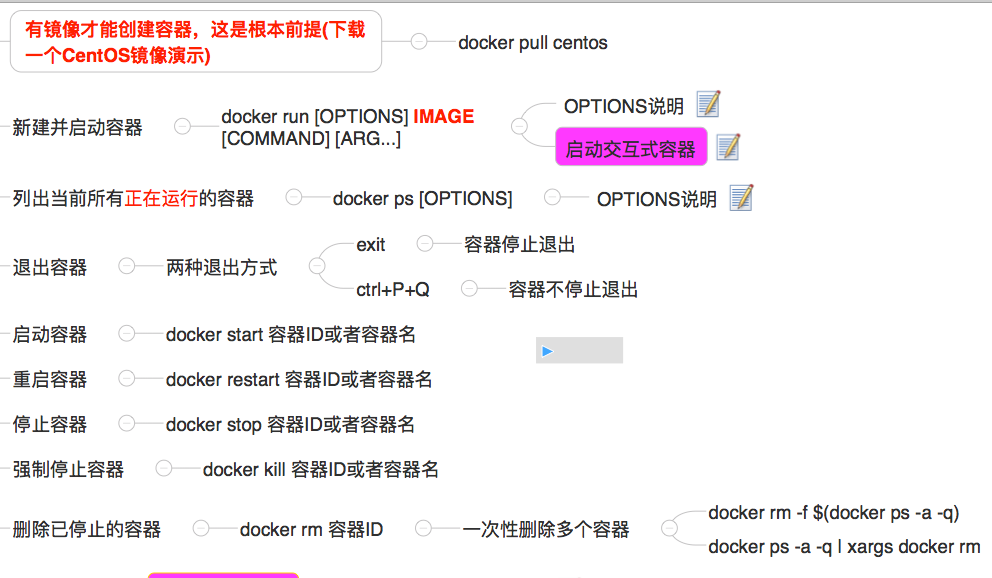
- docker run -it 镜像id,运行镜像

OPTIONS说明(常用):有些是一个减号,有些是两个减号
--name="容器新名字": 为容器指定一个名称;
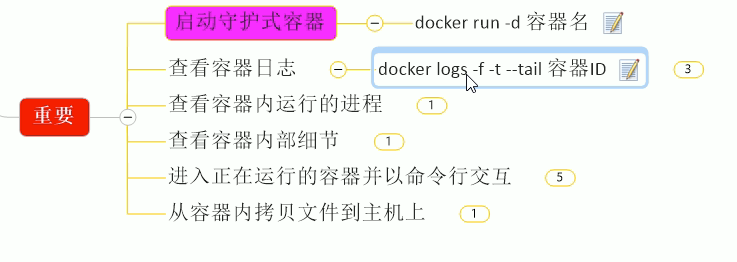
-d: 后台运行容器,并返回容器ID,也即启动守护式容器;
-i:以交互模式运行容器,通常与 -t 同时使用;
-t:为容器重新分配一个伪输入终端,通常与 -i 同时使用;
-P: 随机端口映射;
-p: 指定端口映射,有以下四种格式
ip:hostPort:containerPort
ip::containerPort
hostPort:containerPort
containerPort
指定容器名字
docker run --name centos -it 75835a67d134


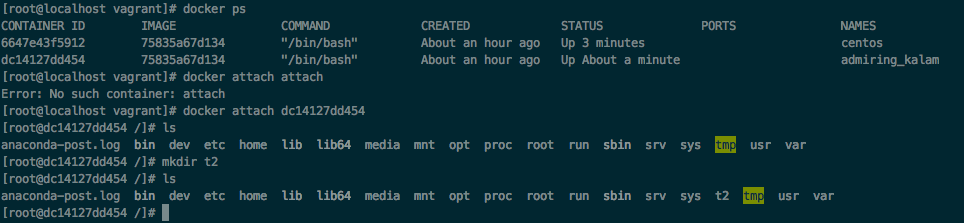
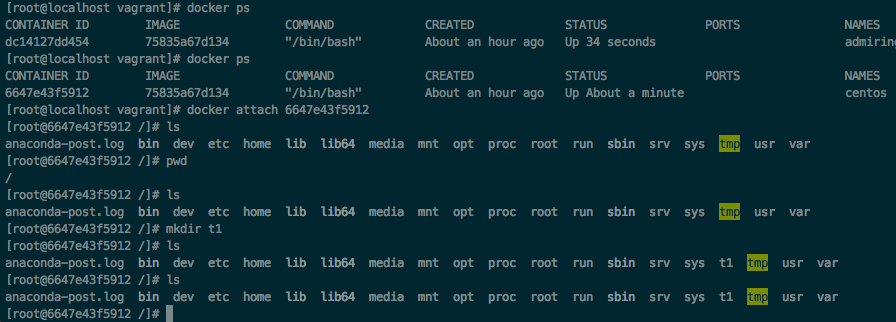
- docker ps,列出正在运行的容器

- docker ps -a 列出正在运行+历史上运行过的容器

在容器内
exit,退出并停止容器
ctrl+p+g,退出但不终止容器,如果是iterm下,可以直接关闭标签即可
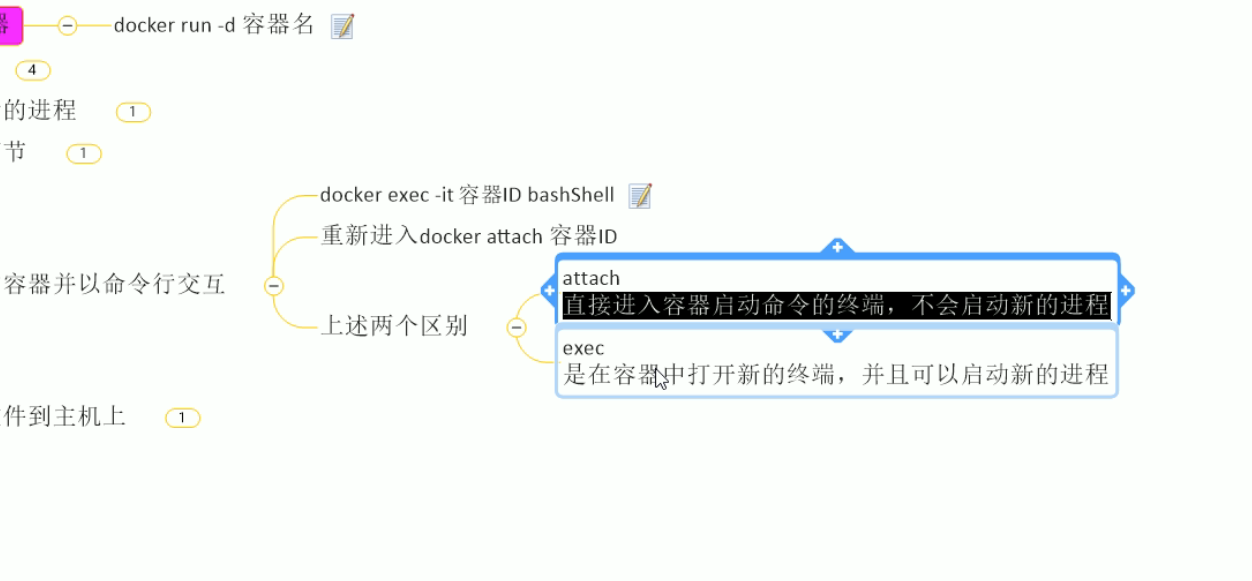
- docker attach 进入已经启动的容器

通过 docker ps -n 10,找到前10个创建的容器
尽管是用的同一个镜像,但是每个容器都是独立的,这些独立的容器,是通过刚刚docker run -it 创建的:
centos,admiring_kalam
可以通过docker的启动命令将其启动

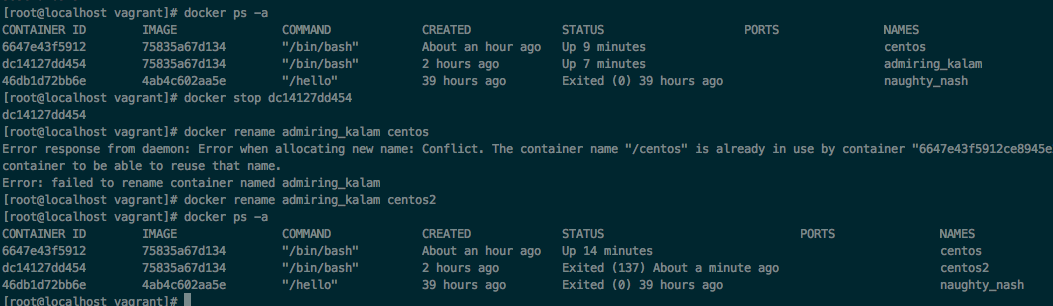
修改容器名字,容器不能重名
docker 容器(服务)重命名只要一个命令就可以:
docker rename 原容器名 新容器名
docker top 容器id,查看容器内正在运行的进程

docker inspect 6647e43f5912,查看容器内部细节
[

    {

        "Id": "6647e43f5912ce8945e29143f4059afaf3c50f1853a67ca6833bdc2a8da10202",

        "Created": "2018-10-27T04:07:38.596144727Z",

        "Path": "/bin/bash",

        "Args": [],

        "State": {

            "Status": "running",

            "Running": true,

            "Paused": false,

            "Restarting": false,

            "OOMKilled": false,

            "Dead": false,

            "Pid": 9554,

            "ExitCode": 0,

            "Error": "",

            "StartedAt": "2018-10-27T05:22:04.957537315Z",

            "FinishedAt": "2018-10-27T05:19:02.144550316Z"

        },

        "Image": "sha256:75835a67d1341bdc7f4cc4ed9fa1631a7d7b6998e9327272afea342d90c4ab6d",

        "ResolvConfPath": "/var/lib/docker/containers/6647e43f5912ce8945e29143f4059afaf3c50f1853a67ca6833bdc2a8da10202/resolv.conf",

        "HostnamePath": "/var/lib/docker/containers/6647e43f5912ce8945e29143f4059afaf3c50f1853a67ca6833bdc2a8da10202/hostname",

        "HostsPath": "/var/lib/docker/containers/6647e43f5912ce8945e29143f4059afaf3c50f1853a67ca6833bdc2a8da10202/hosts",

        "LogPath": "/var/lib/docker/containers/6647e43f5912ce8945e29143f4059afaf3c50f1853a67ca6833bdc2a8da10202/6647e43f5912ce8945e29143f4059afaf3c50f1853a67ca6833bdc2a8da10202-json.log",

        "Name": "/centos",

        "RestartCount": 0,

        "Driver": "devicemapper",

        "Platform": "linux",

        "MountLabel": "",

        "ProcessLabel": "",

        "AppArmorProfile": "",

        "ExecIDs": null,

        "HostConfig": {

            "Binds": null,

            "ContainerIDFile": "",

            "LogConfig": {

                "Type": "json-file",

                "Config": {}

            },

            "NetworkMode": "default",

            "PortBindings": {},

            "RestartPolicy": {

                "Name": "no",

                "MaximumRetryCount": 0

            },

            "AutoRemove": false,

            "VolumeDriver": "",

            "VolumesFrom": null,

            "CapAdd": null,

            "CapDrop": null,

            "Dns": [],

            "DnsOptions": [],

            "DnsSearch": [],

            "ExtraHosts": null,

            "GroupAdd": null,

            "IpcMode": "shareable",

            "Cgroup": "",

            "Links": null,

            "OomScoreAdj": 0,

            "PidMode": "",

            "Privileged": false,

            "PublishAllPorts": false,

            "ReadonlyRootfs": false,

            "SecurityOpt": null,

            "UTSMode": "",

            "UsernsMode": "",

            "ShmSize": 67108864,

            "Runtime": "runc",

            "ConsoleSize": [

                0,

                0

            ],

            "Isolation": "",

            "CpuShares": 0,

            "Memory": 0,

            "NanoCpus": 0,

            "CgroupParent": "",

            "BlkioWeight": 0,

            "BlkioWeightDevice": [],

            "BlkioDeviceReadBps": null,

            "BlkioDeviceWriteBps": null,

            "BlkioDeviceReadIOps": null,

            "BlkioDeviceWriteIOps": null,

            "CpuPeriod": 0,

            "CpuQuota": 0,

            "CpuRealtimePeriod": 0,

            "CpuRealtimeRuntime": 0,

            "CpusetCpus": "",

            "CpusetMems": "",

            "Devices": [],

            "DeviceCgroupRules": null,

            "DiskQuota": 0,

            "KernelMemory": 0,

            "MemoryReservation": 0,

            "MemorySwap": 0,

            "MemorySwappiness": null,

            "OomKillDisable": false,

            "PidsLimit": 0,

            "Ulimits": null,

            "CpuCount": 0,

            "CpuPercent": 0,

            "IOMaximumIOps": 0,

            "IOMaximumBandwidth": 0,

            "MaskedPaths": [

                "/proc/acpi",

                "/proc/kcore",

                "/proc/keys",

                "/proc/latency_stats",

                "/proc/timer_list",

                "/proc/timer_stats",

                "/proc/sched_debug",

                "/proc/scsi",

                "/sys/firmware"

            ],

            "ReadonlyPaths": [

                "/proc/asound",

                "/proc/bus",

                "/proc/fs",

                "/proc/irq",

                "/proc/sys",

                "/proc/sysrq-trigger"

            ]

        },

        "GraphDriver": {

            "Data": {

                "DeviceId": "25",

                "DeviceName": "docker-253:0-34571929-ac887ffa3045a9e8c0146009778996bb55a34e2e730e2baa6ad71dd1cc1f666f",

                "DeviceSize": "10737418240"

            },

            "Name": "devicemapper"

        },

        "Mounts": [],

        "Config": {

            "Hostname": "6647e43f5912",

            "Domainname": "",

            "User": "",

            "AttachStdin": true,

            "AttachStdout": true,

            "AttachStderr": true,

            "Tty": true,

            "OpenStdin": true,

            "StdinOnce": true,

            "Env": [

                "PATH=/usr/local/sbin:/usr/local/bin:/usr/sbin:/usr/bin:/sbin:/bin"

            ],

            "Cmd": [

                "/bin/bash"

            ],

            "ArgsEscaped": true,

            "Image": "75835a67d134",

            "Volumes": null,

            "WorkingDir": "",

            "Entrypoint": null,

            "OnBuild": null,

            "Labels": {

                "org.label-schema.build-date": "20181006",

                "org.label-schema.license": "GPLv2",

                "org.label-schema.name": "CentOS Base Image",

                "org.label-schema.schema-version": "1.0",

                "org.label-schema.vendor": "CentOS"

            }

        },

        "NetworkSettings": {

            "Bridge": "",

            "SandboxID": "d23327c79fd6c87969d0aa190f2e465f5be2fd6a0179a70d7e7c70ef0f13b71d",

            "HairpinMode": false,

            "LinkLocalIPv6Address": "",

            "LinkLocalIPv6PrefixLen": 0,

            "Ports": {},

            "SandboxKey": "/var/run/docker/netns/d23327c79fd6",

            "SecondaryIPAddresses": null,

            "SecondaryIPv6Addresses": null,

            "EndpointID": "03e81113086826176c03190b95513cf19860b3dee30f4b340831630a24ca6baf",

            "Gateway": "172.17.0.1",

            "GlobalIPv6Address": "",

            "GlobalIPv6PrefixLen": 0,

            "IPAddress": "172.17.0.2",

            "IPPrefixLen": 16,

            "IPv6Gateway": "",

            "MacAddress": "02:42:ac:11:00:02",

            "Networks": {

                "bridge": {

                    "IPAMConfig": null,

                    "Links": null,

                    "Aliases": null,

                    "NetworkID": "ca2d34924a01911c8bde199f3850427b3973b6fce3c00fc0ee47f79285c35c80",

                    "EndpointID": "03e81113086826176c03190b95513cf19860b3dee30f4b340831630a24ca6baf",

                    "Gateway": "172.17.0.1",

                    "IPAddress": "172.17.0.2",

                    "IPPrefixLen": 16,

                    "IPv6Gateway": "",

                    "GlobalIPv6Address": "",

                    "GlobalIPv6PrefixLen": 0,

                    "MacAddress": "02:42:ac:11:00:02",

                    "DriverOpts": null

                }

            }

        }

    }

]
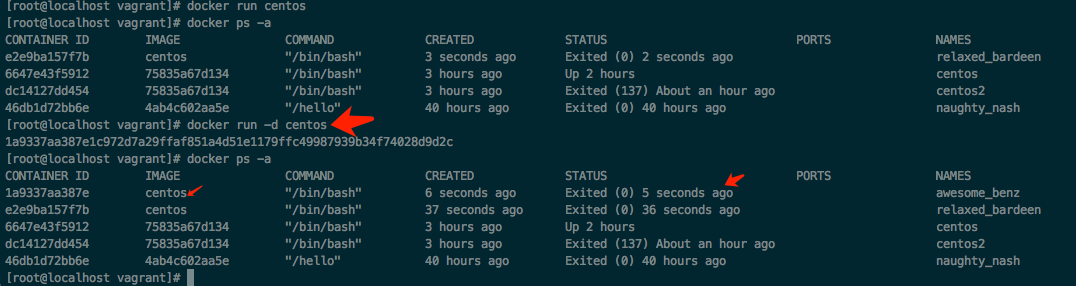
- docker run -d 镜像名,创建镜像,并在后台运行
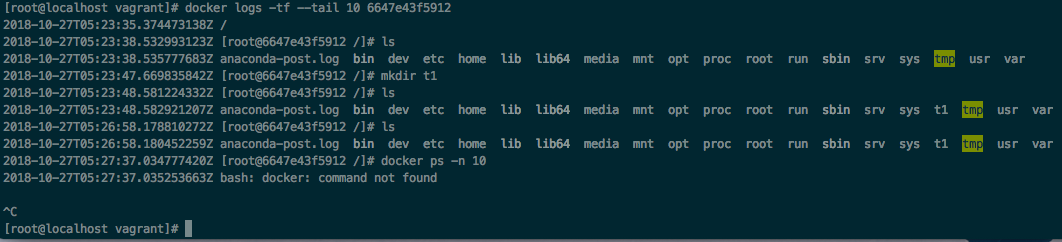
- docker logs -tf --tail 10 6647e43f5912,查看logs日志,即history
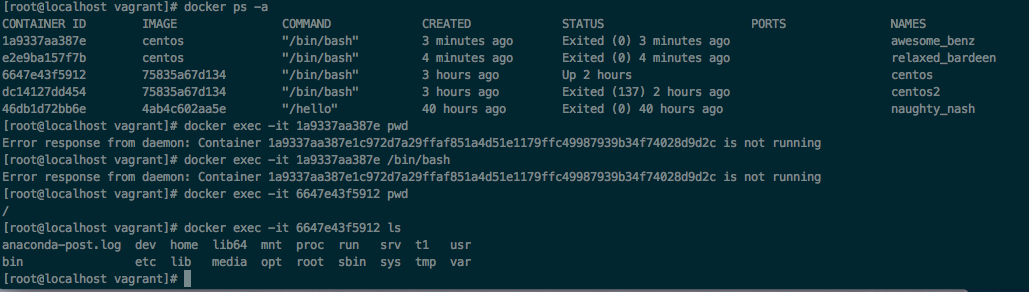
- docker exec -it 容器id ls,不进入容器,直接交互
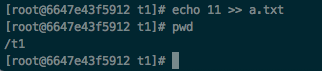
docker cp 6647e43f5912:t1/a.txt . ,docker cp 容器ID:容器内路径 目的主机路径, 将容器的文件拷贝到主机上


attach Attach to a running container # 当前 shell 下 attach 连接指定运行镜像
build Build an image from a Dockerfile # 通过 Dockerfile 定制镜像
commit Create a new image from a container changes # 提交当前容器为新的镜像
cp Copy files/folders from the containers filesystem to the host path #从容器中拷贝指定文件或者目录到宿主机中
create Create a new container # 创建一个新的容器,同 run,但不启动容器
diff Inspect changes on a container's filesystem # 查看 docker 容器变化
events Get real time events from the server # 从 docker 服务获取容器实时事件
exec Run a command in an existing container # 在已存在的容器上运行命令
export Stream the contents of a container as a tar archive # 导出容器的内容流作为一个 tar 归档文件[对应 import ]
history Show the history of an image # 展示一个镜像形成历史
images List images # 列出系统当前镜像
import Create a new filesystem image from the contents of a tarball # 从tar包中的内容创建一个新的文件系统映像[对应export]
info Display system-wide information # 显示系统相关信息
inspect Return low-level information on a container # 查看容器详细信息
kill Kill a running container # kill 指定 docker 容器
load Load an image from a tar archive # 从一个 tar 包中加载一个镜像[对应 save]
login Register or Login to the docker registry server # 注册或者登陆一个 docker 源服务器
logout Log out from a Docker registry server # 从当前 Docker registry 退出
logs Fetch the logs of a container # 输出当前容器日志信息
port Lookup the public-facing port which is NAT-ed to PRIVATE_PORT # 查看映射端口对应的容器内部源端口
pause Pause all processes within a container # 暂停容器
ps List containers # 列出容器列表
pull Pull an image or a repository from the docker registry server # 从docker镜像源服务器拉取指定镜像或者库镜像
push Push an image or a repository to the docker registry server # 推送指定镜像或者库镜像至docker源服务器
restart Restart a running container # 重启运行的容器
rm Remove one or more containers # 移除一个或者多个容器
rmi Remove one or more images # 移除一个或多个镜像[无容器使用该镜像才可删除,否则需删除相关容器才可继续或 -f 强制删除]
run Run a command in a new container # 创建一个新的容器并运行一个命令
save Save an image to a tar archive # 保存一个镜像为一个 tar 包[对应 load]
search Search for an image on the Docker Hub # 在 docker hub 中搜索镜像
start Start a stopped containers # 启动容器
stop Stop a running containers # 停止容器
tag Tag an image into a repository # 给源中镜像打标签
top Lookup the running processes of a container # 查看容器中运行的进程信息
unpause Unpause a paused container # 取消暂停容器
version Show the docker version information # 查看 docker 版本号
wait Block until a container stops, then print its exit code # 截取容器停止时的退出状态值
-------------------------------------------
attach Attach to a running container # 当前 shell 下 attach 连接指定运行镜像
build Build an image from a Dockerfile # 通过 Dockerfile 定制镜像
commit Create a new image from a container changes # 提交当前容器为新的镜像
cp Copy files/folders from the containers filesystem to the host path #从容器中拷贝指定文件或者目录到宿主机中
create Create a new container # 创建一个新的容器,同 run,但不启动容器
diff Inspect changes on a container's filesystem # 查看 docker 容器变化
events Get real time events from the server # 从 docker 服务获取容器实时事件
exec Run a command in an existing container # 在已存在的容器上运行命令
export Stream the contents of a container as a tar archive # 导出容器的内容流作为一个 tar 归档文件[对应 import ]
history Show the history of an image # 展示一个镜像形成历史
images List images # 列出系统当前镜像
import Create a new filesystem image from the contents of a tarball # 从tar包中的内容创建一个新的文件系统映像[对应export]
info Display system-wide information # 显示系统相关信息
inspect Return low-level information on a container # 查看容器详细信息
kill Kill a running container # kill 指定 docker 容器
load Load an image from a tar archive # 从一个 tar 包中加载一个镜像[对应 save]
login Register or Login to the docker registry server # 注册或者登陆一个 docker 源服务器
logout Log out from a Docker registry server # 从当前 Docker registry 退出
logs Fetch the logs of a container # 输出当前容器日志信息
port Lookup the public-facing port which is NAT-ed to PRIVATE_PORT # 查看映射端口对应的容器内部源端口
pause Pause all processes within a container # 暂停容器
ps List containers # 列出容器列表
pull Pull an image or a repository from the docker registry server # 从docker镜像源服务器拉取指定镜像或者库镜像
push Push an image or a repository to the docker registry server # 推送指定镜像或者库镜像至docker源服务器
restart Restart a running container # 重启运行的容器
rm Remove one or more containers # 移除一个或者多个容器
rmi Remove one or more images # 移除一个或多个镜像[无容器使用该镜像才可删除,否则需删除相关容器才可继续或 -f 强制删除]
run Run a command in a new container # 创建一个新的容器并运行一个命令
save Save an image to a tar archive # 保存一个镜像为一个 tar 包[对应 load]
search Search for an image on the Docker Hub # 在 docker hub 中搜索镜像
start Start a stopped containers # 启动容器
stop Stop a running containers # 停止容器
tag Tag an image into a repository # 给源中镜像打标签
top Lookup the running processes of a container # 查看容器中运行的进程信息
unpause Unpause a paused container # 取消暂停容器
version Show the docker version information # 查看 docker 版本号
wait Block until a container stops, then print its exit code # 截取容器停止时的退出状态值
1.run和start的关系:
实践中需要注意的几个地方,创建并启动容器时候,通过docker run -it -p 主机端口:容器端口,这个端口一旦指定,容器就无法再去修改。
如果想换端口,就必须重新再run一遍。
每次run都会创建新的容器,所以,如果不需要修改端口的情况下,想再次开启容器,需要执行start而不是run。
如果是tomcat,在主机情况下,通过 localhost:主机端口 可以访问到docker的容器端口
比如:指定 docker run -it -p 8088:8080 tomcat,那么就可以通过 localhost:8088访问tomcat,因为docker中tomcat的默认端口是8080
删除nginx相关的容器
docker rm -f $(docker ps -a | grep nginx | awk '{print $1}')

尝试改了ip
来源:https://www.cnblogs.com/zhangzeyu/p/6427249.html

进入后修改 nginx.conf

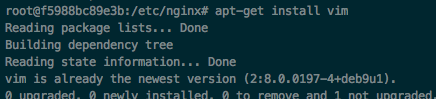
没有vim时要安装vim
vim /etc/nginx/nginx.conf
镜像操作实验---------------------------

[root@localhost vagrant]# docker exec -it 5475cb7c3fa1 /bin/bash root@5475cb7c3fa1:/usr/local/tomcat/webapps# rm -rf docs/ [root@localhost vagrant]# docker commit -a "lee" -m "remove a docs" 5475cb7c3fa1 tomcat:v1
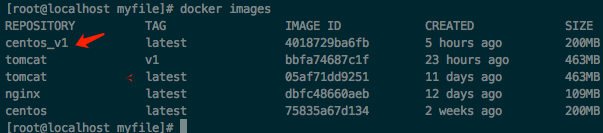
sha256:bbfa74687c1f9161fcfbe14ee8247445f7ac1a52fc47df46065c625ea8797069 [root@localhost vagrant]# docker images
REPOSITORY TAG IMAGE ID CREATED SIZE
tomcat v1 bbfa74687c1f About a minute ago 463MB
tomcat latest 05af71dd9251 10 days ago 463MB
nginx latest dbfc48660aeb 11 days ago 109MB
centos latest 75835a67d134 2 weeks ago 200MB
[root@localhost vagrant]#
nginx启动-------------------------------------------
参考:https://blog.csdn.net/kim_weir/article/details/80403805
里边docker映射nginx时,出现无法映射的情况
解决思路
1.自己创建映射的目录及文件,并拷贝conf
2.修改文件访问权限
3.修改文件所有者权限
docker run -p 80:80 --name nginx_80_80 -v $PWD/www:/www -v $PWD/conf/nginx.conf:/etc/nginx/nginx.conf -v $PWD/logs:/wwwlogs -d nginx
删除技巧:docker rm -f $(docker ps -a | grep nginx | awk '{print $1}')
设置共享目录------------------
本质上是创建数据卷进行共享通信
docker run -it -v /宿主机绝对路径目录:/容器内目录 镜像名
docker run -it -v /home/vagrant/test/myfile:/myfile centos
查看容器卷,docker inspect 容器id

-----------------------
可在Dockerfile中使用VOLUME指令来给镜像添加一个或多个数据卷
VOLUME["/dataVolumeContainer","/dataVolumeContainer2","/dataVolumeContainer3"]

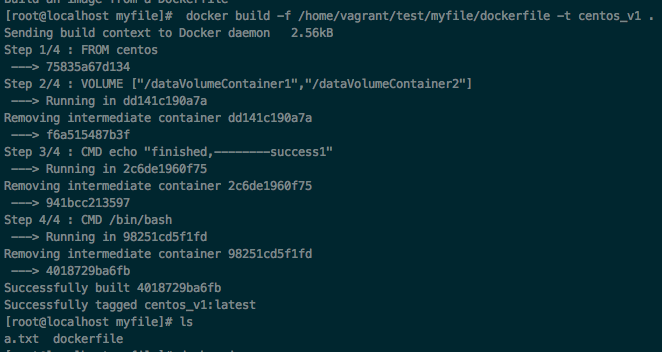
构建镜像
# volume test
FROM centos
VOLUME ["/dataVolumeContainer1","/dataVolumeContainer2"]
CMD echo "finished,--------success1"
CMD /bin/bash
docker build -f 镜像文件 -t 新的镜像名
docker build -f /home/vagrant/test/myfile/dockerfile -t centos_v1

通过docker inspect 容器id查看

构建继承关系-----------
以这个为镜像centos_v1为模板,构建容器centos_t1,centos_t2,centos_t3
docker run -it --name centos_t1 centos_v1 /bin/bash
exit
[root@localhost myfile]# docker ps -a

CONTAINER ID        IMAGE               COMMAND                  CREATED             STATUS                      PORTS                NAMES

9be7c0facf42        centos_v1           "/bin/bash"              6 minutes ago       Exited (0) 25 seconds ago                        centos_t1
启动
进入确认有这两个容器卷

在卷1里边添加 centos_t1.txt

创建容器继承, centos_t2 继承 centos_t1 通过同一个镜像centos_v1
docker run -it --name centos_t2 --volumes-from centos_t1 centos_v1
[root@localhost myfile]# docker run -it --name centos_t2 --volumes from centos_t1 centos_v1

unknown flag: --volumes

See 'docker run --help'.

[root@localhost myfile]# docker run -it --name centos_t2 --volumes-from centos_t1 centos_v1

[root@612a7e2a951a /]# exit

exit

[root@localhost myfile]# docker ps -a

CONTAINER ID        IMAGE               COMMAND                  CREATED             STATUS                      PORTS                NAMES

612a7e2a951a        centos_v1           "/bin/sh -c /bin/bash"   12 seconds ago      Exited (0) 2 seconds ago                         centos_t2

9be7c0facf42        centos_v1           "/bin/bash"              12 minutes ago      Exited (0) 6 minutes ago                         centos_t1

32943e151a0d        centos              "/bin/bash"              6 hours ago         Exited (0) 31 minutes ago                        modest_boyd

10ffd9d1d69d        nginx               "nginx -g 'daemon of…"   8 hours ago         Up 8 hours                  0.0.0.0:80->80/tcp   nginx_80_80

977213f8852b        tomcat:v1           "catalina.sh run"        22 hours ago        Exited (143) 11 hours ago                        tomcat_v1

d78bf34cd7c9        tomcat              "catalina.sh run"        30 hours ago        Exited (143) 13 hours ago                        tomcat8088

1a9337aa387e        centos              "/bin/bash"              34 hours ago        Exited (0) 34 hours ago                          awesome_benz

e2e9ba157f7b        centos              "/bin/bash"              34 hours ago        Exited (0) 34 hours ago                          relaxed_bardeen

6647e43f5912        75835a67d134        "/bin/bash"              37 hours ago        Exited (255) 31 hours ago                        centos

dc14127dd454        75835a67d134        "/bin/bash"              37 hours ago        Exited (137) 36 hours ago                        centos2

46db1d72bb6e        4ab4c602aa5e        "/hello"                 3 days ago          Exited (0) 3 days ago                            naughty_nash

[root@localhost myfile]# docker start 612a7e2a951a

612a7e2a951a

[root@localhost myfile]# docker attach 612a7e2a951a

[root@612a7e2a951a /]# cd /

.dockerenv            dataVolumeContainer1/ etc/                  lib64/                opt/                  run/                  sys/                  var/

anaconda-post.log     dataVolumeContainer2/ home/                 media/                proc/                 sbin/                 tmp/

bin/                  dev/                  lib/                  mnt/                  root/                 srv/                  usr/

[root@612a7e2a951a /]# cd /dataVolumeContainer1

[root@612a7e2a951a dataVolumeContainer1]# ls

centos_t1.txt

[root@612a7e2a951a dataVolumeContainer1]#
关于继承,容器间的信息传递,数据卷的生命周期是持续到没有容器使用它为止
------------------------------------
最新文章
- oracle树形查询 start with connect by
- 揭开Socket编程的面纱
- 给groupBox添加滚动条
- 【bzoj3246】 Ioi2013—Dreaming
- LeetCode: Maximum Product Subarray && Maximum Subarray &子序列相关
- 转载robots.txt的学习
- spring @Component
- HTML5笔记3——Web Storage和本地数据库
- PyQt5--基础篇:用eric6工具实现三级联动效果
- ArcGIS中的坐标系:基本概念和常用操作(一)
- 创建Gitblit本地服务器(For windows )01
- CentOS下配置SS5(SOCKS5)代理服务器
- BZOJ3393 [Usaco2009 Jan]Laserphones 激光通讯 BFS
- Win8驱动的兼容性问题
- python框架之Django(13)-admin组件
- JDBC事务,银行转账,货物进出库等等。
- 用Sample Flex Viewer框架创建GeoWeb应用程序
- hadoop-eclipse插件编译及windows下运行wordcount项目
- Oracle 视图view
- 关于System.getProperty("java.io.tmpdir");的输出,及System.getProperty();参数
热门文章
- 别再用"while (!feof(file))"来逐行读取txt文件了!
- 在XPS13 上安装Ubuntu 16.04
- k-近邻算法概述
- MariaDB报错Plugin 'InnoDB' init function returned error.解决方案
- JS对象的拷贝
- spark伪分布式的安装
- 2017-2018 ACM-ICPC, NEERC, Northern Subregional Contest
- Installation of CarbonData 1.1.0 with Spark 1.6.2
- C. Vasya and Robot二分
- 黑盒测试实践——day03