Linux-实现双主模型的nginx的高可用
2024-09-06 23:05:35
实现双主模型的ngnix高可用(一)
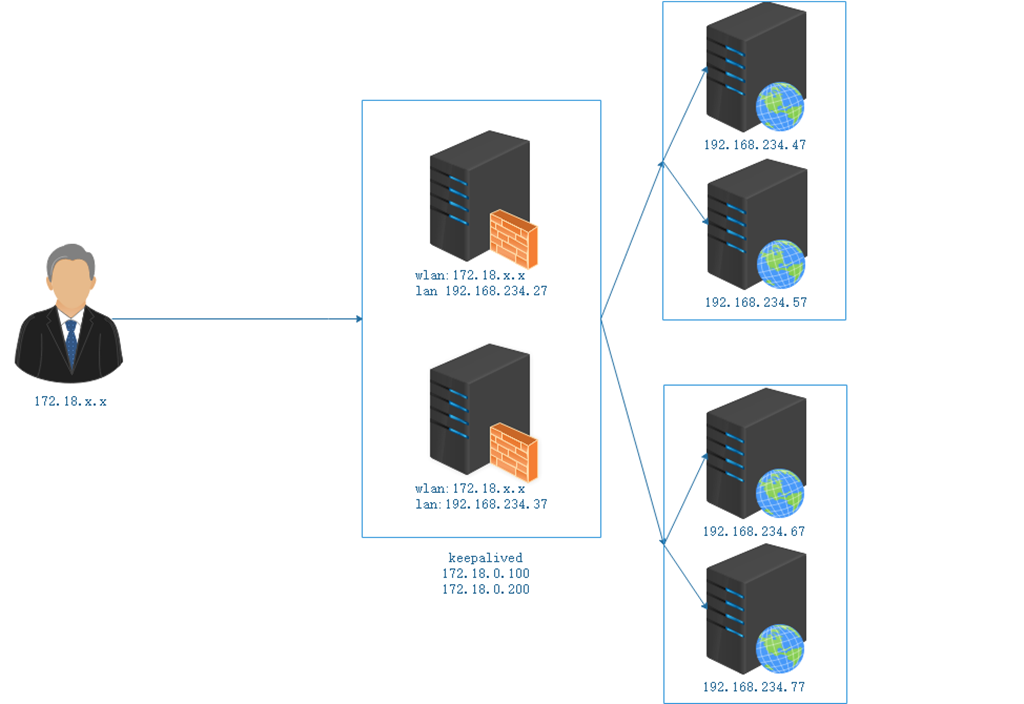
准备:主机7台
client:
172.18.x.x
调度器:keepalived+nginx 带172.18.x.x/16 网卡
192.168.234.27
192.168.234.37
real_server
192.168.234.47
192.168.234.57
192.168.234.67
192.168.234.77
实验结果
  1 [root@234c17 ~]# for i in {1..4};do curl www.a.com;curl www.b.com;sleep 1;done

  2 234.57

  3 234.77

  4 234.47

  5 234.67

  6 234.57

  7 234.77

  8 234.47

  9 234.67
过程:
一、先配置4台real_server,安装好测试用的httpd
  1 [root@234c47 ~]# curl 192.168.234.47;curl 192.168.234.57;curl 192.168.234.67;curl 192.168.234.77

  2 234.47

  3 234.57

  4 234.67

  5 234.77
二、配置keepalived
因为是双主模型
1.配置keepalived主机234.27
[root@234c27 ~]# vim /etc/keepalived/keepalived.conf

! Configuration File for keepalived

global_defs {

    notification_email {

      root@localhost

    }

    notification_email_from keepalived@localhost

    smtp_server 127.0.0.1

    smtp_connect_timeout 30

    router_id kpone

    vrrp _mcast_group4 234.10.10.10

 }

 vrrp_instance VI_1 {

     state MASTER

     interface ens33

     virtual_router_id 50

     priority 100

     advert_int 1

     authentication {

         auth_type PASS

         auth_pass 1111

     }

     virtual_ipaddress {

         172.18.0.100/16  //这ip调度 192.168.234.47/57

     }

 }

vrrp_instance VI_2 {

     state BACKUP

     interface ens33

     virtual_router_id 51

     priority 80

     advert_int 1

     authentication {

         auth_type PASS

         auth_pass 2222

     }

     virtual_ipaddress {

         172.18.0.200/16  //这ip调度 192.168.234.147/157

     }

}
2.配置keepalived主机234.37
[root@234c37 ~]# vim /etc/keepalived/keepalived.conf

! Configuration File for keepalived

global_defs {

    notification_email {

      root@localhost

    }

    notification_email_from keepalived@localhost

    smtp_server 127.0.0.1

    smtp_connect_timeout 30

    router_id kpone

    vrrp _mcast_group4 234.10.10.10

 }

 vrrp_instance VI_1 {

     state BACKUP

     interface ens33

     virtual_router_id 50

     priority 80

     advert_int 1

     authentication {

         auth_type PASS

         auth_pass 1111

     }

     virtual_ipaddress {

         172.18.0.100/16  //这ip调度 192.168.234.47/57

     }

 }

vrrp_instance VI_2 {

     state MASTER

     interface ens33

     virtual_router_id 51

     priority 100

     advert_int 1

     authentication {

         auth_type PASS

         auth_pass 2222

     }

     virtual_ipaddress {

         172.18.0.200/16  //这ip调度 192.168.234.147/157

     }

}
这样双主模型简单的就搭建好了
3.配置nginx主机234.27/37
先配置http语块
http {

    log_format  main  '$remote_addr - $remote_user [$time_local] "$request" '

                      '$status $body_bytes_sent "$http_referer" '

                      '"$http_user_agent" "$http_x_forwarded_for"';

    access_log  /var/log/nginx/access.log  main;

    upstream web1{		//

        server 192.168.234.47:80;

        server 192.168.234.57:80;

        }

    upstream web2{

        server 192.168.234.67:80;

        server 192.168.234.77:80;

        }

/*

ngx_http_upstream_module

ngx_http_upstream_module模块

用于将多个服务器定义成服务器组,而由proxy_pass, fastcgi_pass等指令

进行引用

1、upstream name { ... }

定义后端服务器组,会引入一个新的上下文

默认调度算法是wrr

Context: http

upstream httpdsrvs {

server ...

server...

...

*/
然后配置server
    server {

        listen       80 default_server; //默认监听80端口

        server_name www.a.com	//域名

        listen       [::]:80 default_server;

        root         /usr/share/nginx/html;

        # Load configuration files for the default server block.

        include /etc/nginx/default.d/*.conf;

        location / {

                proxy_pass http://web1 ;  //定义访问80端口的请求,以web1提供服务。而指定的web1在http语块中为 192.168.234.47/57:80 提供服务

        }

        error_page 404 /404.html;

            location = /40x.html {

        }

        error_page 500 502 503 504 /50x.html;

            location = /50x.html {

        }

    }

    server {

        server_name www.b.com

        listen 80;

        location / {

                proxy_pass http://web2 ; //定义访问80端口的请求,以web2提供服务。而指定的web2在http语块中为 192.168.234.147/157:80 提供服务

        }

    }

}
这样访问 www.a.com就是访问192.168.234.47/57:80
访问 www.b.com就是访问192.168.234.67/77:80
现在客户机将host添加www.a/b.com
172.18.0.100 www.a.com
172.18.0.200 www.b.com
客户端将www.a.com 解析 172.18.0.100
[root@234c17 ~]# ping www.a.com

PING www.a.com (172.18.0.100) 56(84) bytes of data.

64 bytes from www.a.com (172.18.0.100): icmp_seq=1 ttl=64 time=0.358 ms

64 bytes from www.a.com (172.18.0.100): icmp_seq=2 ttl=64 time=0.376 ms

64 bytes from www.a.com (172.18.0.100): icmp_seq=3 ttl=64 time=0.358 ms

64 bytes from www.a.com (172.18.0.100): icmp_seq=4 ttl=64 time=0.366 ms
客户端将www.b.com 解析 172.18.0.200
[root@234c17 ~]# ping www.b.com

PING www.b.com (172.18.0.200) 56(84) bytes of data.

64 bytes from www.b.com (172.18.0.200): icmp_seq=1 ttl=64 time=0.582 ms

64 bytes from www.b.com (172.18.0.200): icmp_seq=2 ttl=64 time=0.339 ms

64 bytes from www.b.com (172.18.0.200): icmp_seq=3 ttl=64 time=0.524 ms

64 bytes from www.b.com (172.18.0.200): icmp_seq=4 ttl=64 time=0.337 ms
结果:
实现双主模型的ngnix高可用(二)
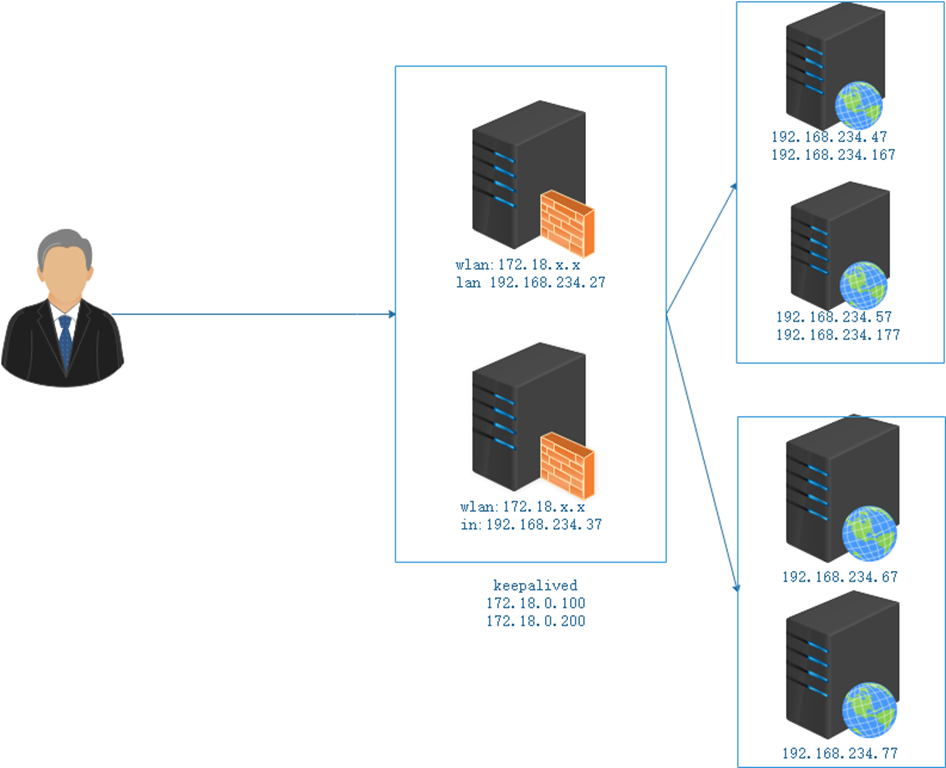
现在扩展实验
将192.168.234.47/57主机加ip地址
[root@234c47 ~]#ip a a dev ens37 192.168.167/24
[root@234c57 ~]#ip a a dev ens37 192.168.177/24
编辑http的的配置文件增加基于FQDN虚拟主机
[root@234c47 ~]# vim /etc/httpd/conf.d/vhost.conf

<virtualhost 192.168.234.167:80>

 documentroot /data/web1

 servername www.a.com

< directory /data/web1>

 require all granted

< /directory>

< /virtualhost>
另一个主机也加上虚拟主机
[root@234c57 ~]# vim /etc/httpd/conf.d/vhost.conf

<virtualhost 192.168.234.177:80>

documentroot /data/web1

servername www.a.com

<directory /data/web1>

require all granted

< /directory>

< /virtualhost>
重启httpd服务
结果:访问www.a.com
  1 [root@234c17 ~]# for i in {1..8};do curl www.a.com;done

  2 234.167

  3 234.177

  4 234.47

  5 234.57

  6 234.167

  7 234.167

  8 234.177

  9 234.47

 10
  1 [root@234c17 ~]# for i in {1..8};do curl www.b.com;done

  2 234.67

  3 234.67

  4 234.77

  5 234.67

  6 234.77

  7 234.67

  8 234.77

  9 234.77
最新文章
- WF4的数据库 表
- 通过javascript库JQuery实现页面跳转功能代码
- export和import实现模块化
- 一些javascript常用方法
- HMM基础
- mybatis自定义代码生成器(Generator)——自动生成model&dao代码
- Apache与Nginx动静分离
- BIM 开发商 --广州
- ubuntu git的安装更新及配置
- IntelliJ IDEA的使用之调试方法
- Windows 8.1 app 界面设计
- Day Eight
- Unity3D实践系列04, 脚本的生命周期
- CMenu and Dialog-based applications
- Beta 完结撒花 —— 事后诸葛亮
- nginx反向代理下载文件失败处理
- Writable atomic property '***' cannot pair a synthesized setter/getter with a user defined
- 20145326 《Java程序设计》第3周学习总结
- Integer类小细节随笔记录
- ZooKeeper分布式