Flume-Failover Sink Processor 故障转移与 Load balancing Sink 负载均衡
接上一篇:https://www.cnblogs.com/jhxxb/p/11579518.html
使用 Flume1 监控一个端口,其 sink 组中的 sink 分别对接 Flume2 和 Flume3,采用 Failover Sink Processor,实现故障转移的功能。

一、创建配置文件
1.flume-netcat-flume.conf
配置 1 个 netcat source 和 1 个 channel、1 个 sink group(2 个 sink),分别输送给 flumeflume-console1 和 flume-flume-console2。
# Name the components on this agent

a1.sources = r1

a1.channels = c1

a1.sinkgroups = g1

a1.sinks = k1 k2

# Describe/configure the source

a1.sources.r1.type = netcat

a1.sources.r1.bind = 127.0.0.1

a1.sources.r1.port = 4444

# Sink Group

a1.sinkgroups.g1.processor.type = failover

a1.sinkgroups.g1.processor.priority.k1 = 5

a1.sinkgroups.g1.processor.priority.k2 = 10

a1.sinkgroups.g1.processor.maxpenalty = 10000

# Describe the sink

a1.sinks.k1.type = avro

a1.sinks.k1.hostname = h136

a1.sinks.k1.port = 4141

a1.sinks.k2.type = avro

a1.sinks.k2.hostname = h136

a1.sinks.k2.port = 4142

# Describe the channel

a1.channels.c1.type = memory

a1.channels.c1.capacity = 1000

a1.channels.c1.transactionCapacity = 100

# Bind the source and sink to the channel

a1.sources.r1.channels = c1

a1.sinkgroups.g1.sinks = k1 k2

a1.sinks.k1.channel = c1

a1.sinks.k2.channel = c1
2.flume-flume-console1.conf
配置上级 Flume 输出的 Source,输出是到本地控制台。
# Name the components on this agent

a2.sources = r1

a2.sinks = k1

a2.channels = c1

# Describe/configure the source

a2.sources.r1.type = avro

a2.sources.r1.bind = h136

a2.sources.r1.port = 4141

# Describe the sink

a2.sinks.k1.type = logger

# Describe the channel

a2.channels.c1.type = memory

a2.channels.c1.capacity = 1000

a2.channels.c1.transactionCapacity = 100

# Bind the source and sink to the channel

a2.sources.r1.channels = c1

a2.sinks.k1.channel = c1
3.flume-flume-console2.conf
配置上级 Flume 输出的 Source,输出是到本地控制台。
# Name the components on this agent

a3.sources = r1

a3.sinks = k1

a3.channels = c2

# Describe/configure the source

a3.sources.r1.type = avro

a3.sources.r1.bind = h136

a3.sources.r1.port = 4142

# Describe the sink

a3.sinks.k1.type = logger

# Describe the channel

a3.channels.c2.type = memory

a3.channels.c2.capacity = 1000

a3.channels.c2.transactionCapacity = 100

# Bind the source and sink to the channel

a3.sources.r1.channels = c2

a3.sinks.k1.channel = c2
二、测试
1.故障转移
由于 flume-netcat-flume.conf 向另外两个发送数据,即 flume-flume-console1.conf 和 flume-flume-console2.conf 为服务端接收数据,需要在 flume-netcat-flume.conf 之前启动。
cd /opt/apache-flume-1.9.-bin

bin/flume-ng agent --conf conf/ --name a3 --conf-file /tmp/flume-job/group2/flume-flume-console2.conf -Dflume.root.logger=INFO,console

bin/flume-ng agent --conf conf/ --name a2 --conf-file /tmp/flume-job/group2/flume-flume-console1.conf -Dflume.root.logger=INFO,console

bin/flume-ng agent --conf conf/ --name a1 --conf-file /tmp/flume-job/group2/flume-netcat-flume.conf -Dflume.root.logger=INFO,console
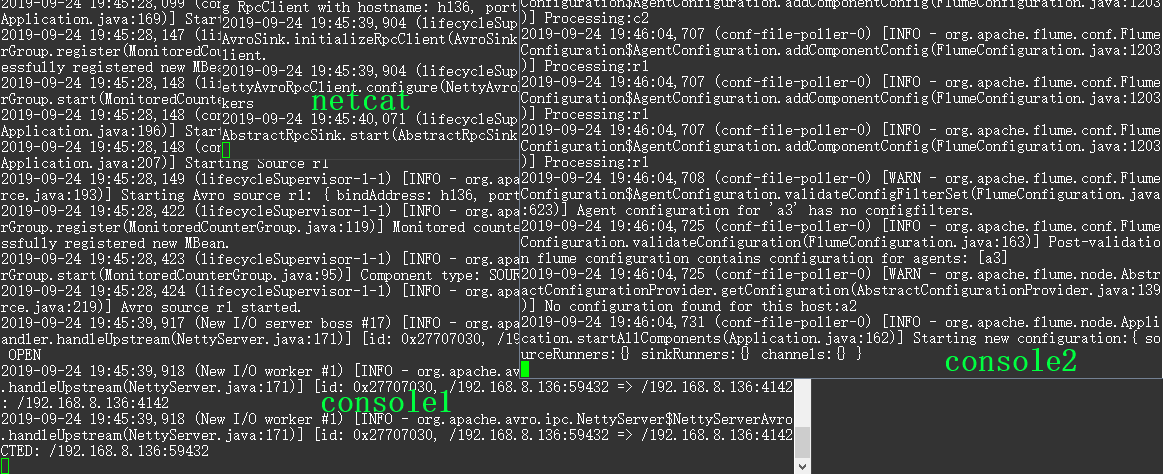
启动后,由于 flume-netcat-flume.conf 配置中 console1 的优先级高于 console2,所以会优先连接 console1。

向监控端口发送消息
yum -y install nc

nc 127.0.0.1
可以看到只有 netcat 和 console1 和 会接收到数据,这时把 console1 结束掉,模拟 console1 故障,这时 netcat 会自动去连接 console2,再发送消息就是只有 netcat 和 console2 接收到数据了。
2.负载均衡
使用 Load balancing Sink 完成,和故障转移差不多,只是在连接时不在是只连接 console1,而是在 console1 和 console2 之间切换。
要修改 flume-netcat-flume.conf 的配置
# Name the components on this agent

a1.sources = r1

a1.channels = c1

a1.sinkgroups = g1

a1.sinks = k1 k2

# Describe/configure the source

a1.sources.r1.type = netcat

a1.sources.r1.bind = 127.0.0.1

a1.sources.r1.port = 4444

# Sink Group

a1.sinkgroups.g1.sinks = k1 k2

a1.sinkgroups.g1.processor.type = load_balance

a1.sinkgroups.g1.processor.backoff = true

a1.sinkgroups.g1.processor.selector = random

# Describe the sink

a1.sinks.k1.type = avro

a1.sinks.k1.hostname = h136

a1.sinks.k1.port = 4141

a1.sinks.k2.type = avro

a1.sinks.k2.hostname = h136

a1.sinks.k2.port = 4142

# Describe the channel

a1.channels.c1.type = memory

a1.channels.c1.capacity = 1000

a1.channels.c1.transactionCapacity = 100

# Bind the source and sink to the channel

a1.sources.r1.channels = c1

a1.sinkgroups.g1.sinks = k1 k2

a1.sinks.k1.channel = c1

a1.sinks.k2.channel = c1
测试和故障转移一样,只是在用 nc 发送消息时会随机发送到 console1 和 console2 其中的一个,不在固定。
最新文章
- 如何在SharePoint 当中使用纯JSOM上传任意二进制文件(小于2MB)
- CodeTimerPerformance EasyPerformanceCounterHelper .NET 4.5
- oracle java SE
- angular指令大全
- O(nlogn)LIS及LCS算法
- iOS开发——UI进阶篇(九)block的巧用
- 开启后台 Service 闪退
- javascript优化--11模式(设计模式)02
- windows10 IOT +Azure会议概要总结
- 用java给html文件添加必要的控制html代码片
- CSS3中新出现的技术
- STL底层数据结构实现
- wikioi 1154 能量项链
- DNF技能贴图的研究
- IntelliJ IDEA14 安装
- android入门系列- TextView EditText Button ImageView 的简单应用
- C#DateTimePicker设置自定义格式
- 通用对象转换Json格式
- leetcode Divide Two Integers python
- Linux - 文件系统结构
热门文章
- R 读取xls/xlsx文件
- CDH5.16.1的Hbase1.2的G1参数配置
- Django学习:连接Mysql数据库
- CentOS7 基于 subversion 配置 SVN server
- Android基础相关面试问题-activity面试问题(生命周期,任务栈,启动模式,跳转协议,启动流程)
- Beego框架POST请求接收JSON数据
- CSS性能优化的8个技巧
- p4434 [COCI2017-2018#2] Usmjeri
- ubuntu nginx 启动多个Django项目
- BZOJ 2631 tree / Luogu P1501 [国家集训队]Tree II (LCT,多重标记)