【转】Android AlertDialog自定义布局
2024-08-24 11:09:30
原文网址:https://blog.csdn.net/u010694658/article/details/53022294
由于开发中经常使用弹框,然而系统自带的弹框太局限,也不太美观,经常不能满足开发需求,所以就只能自定义布局。其实自定义布局很简单,没不要写出来,但是如果不写一遍的,后面遇到的话就感觉又会忘记,所以在次记一小笔,仅记一个最简单的例子,可以举一反三。
直接上代码
public class MainActivity extends Activity implements OnClickListener {

    private TextView text1, text2;

    private Context mContext;

    @Override

    protected void onCreate(Bundle savedInstanceState) {

        super.onCreate(savedInstanceState);

        requestWindowFeature(Window.FEATURE_NO_TITLE);

        setContentView(R.layout.activity_main);

        mContext = this;

        initView();

    }

    private void initView() {

        text1 = (TextView) findViewById(R.id.text1);

        text2 = (TextView) findViewById(R.id.text2);

        text1.setOnClickListener(this);

        text2.setOnClickListener(this);

    }

    @Override

    public void onClick(View v) {

        switch (v.getId()) {

        case R.id.text1:

            dialogShow1();

            break;

        case R.id.text2:

            dialogShow2();

            break;

        default:

            break;

        }

    }

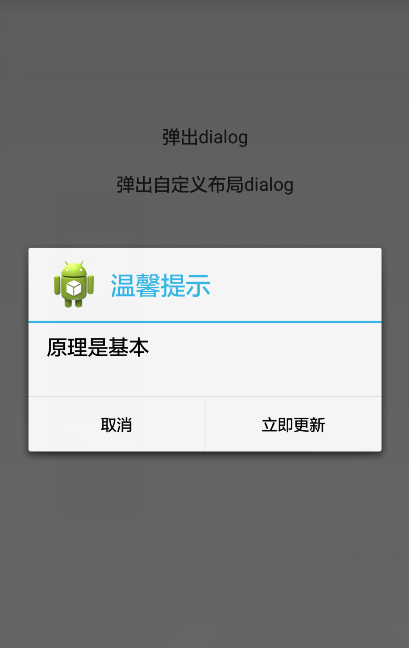
    private void dialogShow1() {

        AlertDialog.Builder builder = new Builder(mContext);

        builder.setTitle("温馨提示");

        builder.setIcon(R.drawable.ic_launcher);

        builder.setMessage("原理是基本");

        builder.setNegativeButton("取消", new DialogInterface.OnClickListener() {

            @Override

            public void onClick(DialogInterface arg0, int arg1) {

                Toast.makeText(mContext, "no", 1).show();

            }

        });

        builder.setPositiveButton("立即更新",

                new DialogInterface.OnClickListener() {

                    @Override

                    public void onClick(DialogInterface arg0, int arg1) {

                        Toast.makeText(mContext, "ok", 1).show();

                    }

                });

        Dialog dialog = builder.create();

        dialog.show();

    }

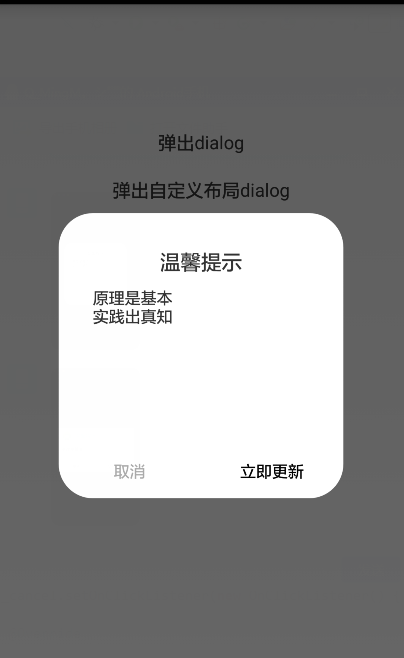
    /**

     * 自定义布局

     * setView()只会覆盖AlertDialog的Title与Button之间的那部分,而setContentView()则会覆盖全部,

     * setContentView()必须放在show()的后面

     */

    private void dialogShow2() {

        AlertDialog.Builder builder = new Builder(mContext);

        LayoutInflater inflater = LayoutInflater.from(mContext);

        View v = inflater.inflate(R.layout.update_manage_dialog, null);

        TextView content = (TextView) v.findViewById(R.id.dialog_content);

        Button btn_sure = (Button) v.findViewById(R.id.dialog_btn_sure);

        Button btn_cancel = (Button) v.findViewById(R.id.dialog_btn_cancel);

        //builer.setView(v);//这里如果使用builer.setView(v),自定义布局只会覆盖title和button之间的那部分

        final Dialog dialog = builder.create();

        dialog.show();

        dialog.getWindow().setContentView(v);//自定义布局应该在这里添加,要在dialog.show()的后面

        //dialog.getWindow().setGravity(Gravity.CENTER);//可以设置显示的位置

        btn_sure.setOnClickListener(new OnClickListener() {

            @Override

            public void onClick(View v) {

                dialog.dismiss();

                Toast.makeText(mContext, "ok", 1).show();

            }

        });

        btn_cancel.setOnClickListener(new OnClickListener() {

            @Override

            public void onClick(View arg0) {

                dialog.dismiss();

                Toast.makeText(mContext, "no", 1).show();

            }

        });

    }

}
activity_main的布局
<LinearLayout xmlns:android="http://schemas.android.com/apk/res/android"

    xmlns:tools="http://schemas.android.com/tools"

    android:layout_width="match_parent"

    android:layout_height="match_parent"

    android:layout_marginTop="100dp"

    android:orientation="vertical" >

    <TextView

        android:id="@+id/text1"

        android:layout_width="match_parent"

        android:layout_height="wrap_content"

        android:layout_margin="10dp"

        android:gravity="center"

        android:text="弹出dialog"

        android:textSize="@dimen/activity_horizontal_margin" />

    <TextView

        android:id="@+id/text2"

        android:layout_width="match_parent"

        android:layout_height="wrap_content"

        android:layout_margin="10dp"

        android:gravity="center"

        android:text="弹出自定义布局dialog"

        android:textSize="@dimen/activity_horizontal_margin" />

</LinearLayout>
update_manage_dialog布局
<RelativeLayout xmlns:android="http://schemas.android.com/apk/res/android"

    xmlns:tools="http://schemas.android.com/tools"

    android:layout_width="match_parent"

    android:layout_height="match_parent"

    android:background="#00FFFFFF" >

    <RelativeLayout

        android:layout_width="250dp"

        android:layout_height="250dp"

        android:layout_centerInParent="true"

        android:background="@drawable/update_bg" >

        <TextView

            android:id="@+id/dialog_title"

            android:layout_width="match_parent"

            android:layout_height="wrap_content"

            android:layout_marginTop="30dp"

            android:gravity="center"

            android:text="温馨提示"

            android:textSize="18sp" />

        <TextView

            android:id="@+id/dialog_content"

            android:layout_width="match_parent"

            android:layout_height="wrap_content"

            android:layout_below="@+id/dialog_title"

            android:layout_marginTop="10dp"

            android:layout_marginLeft="30dp"

            android:layout_marginRight="30dp"

            android:text="原理是基本\n实践出真知"

            android:textSize="14sp" />

        <LinearLayout

            android:layout_width="match_parent"

            android:layout_height="wrap_content"

            android:layout_alignParentBottom="true"

            android:orientation="horizontal" >

            <Button

                android:id="@+id/dialog_btn_cancel"

                android:layout_width="0dp"

                android:layout_height="wrap_content"

                android:layout_weight="1"

                android:background="@null"

                android:text="取消"

                android:textColor="#AAAAAA"

                android:textSize="14sp" />

            <Button

                android:id="@+id/dialog_btn_sure"

                android:layout_width="0dp"

                android:layout_height="wrap_content"

                android:layout_weight="1"

                android:background="@null"

                android:text="立即更新"

                android:textSize="14sp" />

        </LinearLayout>

    </RelativeLayout>

</RelativeLayout>
update_bg放在drawable里面,代码如下
<?xml version="1.0" encoding="utf-8"?>

<shape xmlns:android="http://schemas.android.com/apk/res/android" >

    <!-- android:radius 弧形的半径 -->

    <corners android:radius="30dp" />

    <!-- 填充的颜色 -->

    <solid android:color="@android:color/white" />

</shape>
最新文章
- VO对象和PO对象的区别
- [AJAX系列]XMLHttpResponse对象
- 20145330第五周《Java学习笔记》
- 制作本地 odoo deb包安装镜像
- 讲解Python中的递归函数
- jenkins配置记录(2)--代码发布流程
- rails获取json内容
- 【GoLang】GoLang GOPATH 工程管理 最佳实践
- MySQL: ON DUPLICATE KEY UPDATE 用法 避免重复插入数据
- silverlight visifire控件图表制作——silverlight 后台方法画图
- AJAX的简单梳理
- 纯CSS3实现轮播图
- 【R语言系列】作图入门示例一
- Java多线程volatile和synchronized总结
- 110个oracle常用函数总结
- css解决图片拉伸问题
- 关于不执行整个大项目而是执行其中一部分独立文件夹的时候的python运行方法
- Hive学习之路 (七)Hive的DDL操作
- Linux就是这个范儿之第一次亲密接触(2)
- oracle数据库查询全系整理

