使用 maven 构建 SpringMVC
引言
最近需要使用SpringMVC做一个小项目,之前对SpringMVC没什么了解,所以先写一个SpringMVC的小Demo练习一下。
使用Maven构建项目
IDE = Eclipse
首先创建一个Maven的webapp项目,Jar包的管理就交给Maven来完成;POM内容如下:
<project xmlns="http://maven.apache.org/POM/4.0.0" xmlns:xsi="http://www.w3.org/2001/XMLSchema-instance"

  xsi:schemaLocation="http://maven.apache.org/POM/4.0.0 http://maven.apache.org/maven-v4_0_0.xsd">

  <modelVersion>4.0.0</modelVersion>

  <groupId>com.tuo.example</groupId>

  <artifactId>SpringMVC</artifactId>

  <packaging>war</packaging>

  <version>0.0.1-SNAPSHOT</version>

  <name>SpringMVC Maven Webapp</name>

  <url>http://maven.apache.org</url>

  <properties>

        <project.build.sourceEncoding>UTF-8</project.build.sourceEncoding>

        <springversion>4.1.2.RELEASE</springversion>

        <junitversion>3.8.1</junitversion>

  </properties>

  <dependencies>

    <dependency>

      <groupId>junit</groupId>

      <artifactId>junit</artifactId>

      <version>3.8.1</version>

      <scope>test</scope>

    </dependency>

    <!-- Spring -->

    <dependency>

            <groupId>org.springframework</groupId>

            <artifactId>spring-aop</artifactId>

            <version>${springversion}</version>

            <type>jar</type>

            <scope>compile</scope>

        </dependency>

        <dependency>

            <groupId>org.springframework</groupId>

            <artifactId>spring-aspects</artifactId>

            <version>${springversion}</version>

            <type>jar</type>

            <scope>compile</scope>

        </dependency>

        <dependency>

            <groupId>org.springframework</groupId>

            <artifactId>spring-beans</artifactId>

            <version>${springversion}</version>

            <type>jar</type>

            <scope>compile</scope>

        </dependency>

        <dependency>

            <groupId>org.springframework</groupId>

            <artifactId>spring-context</artifactId>

            <version>${springversion}</version>

            <type>jar</type>

            <scope>compile</scope>

        </dependency>

        <dependency>

            <groupId>org.springframework</groupId>

            <artifactId>spring-context-support</artifactId>

            <version>${springversion}</version>

            <type>jar</type>

            <scope>compile</scope>

        </dependency>

        <dependency>

            <groupId>org.springframework</groupId>

            <artifactId>spring-core</artifactId>

            <version>${springversion}</version>

            <type>jar</type>

            <scope>compile</scope>

        </dependency>

        <dependency>

            <groupId>org.springframework</groupId>

            <artifactId>spring-expression</artifactId>

            <version>${springversion}</version>

            <type>jar</type>

            <scope>compile</scope>

        </dependency>

        <dependency>

            <groupId>org.springframework</groupId>

            <artifactId>spring-jdbc</artifactId>

            <version>${springversion}</version>

            <type>jar</type>

            <scope>compile</scope>

        </dependency>

        <dependency>

            <groupId>org.springframework</groupId>

            <artifactId>spring-jms</artifactId>

            <version>${springversion}</version>

            <type>jar</type>

            <scope>compile</scope>

        </dependency>

        <dependency>

            <groupId>org.springframework</groupId>

            <artifactId>spring-orm</artifactId>

            <version>${springversion}</version>

            <type>jar</type>

            <scope>compile</scope>

        </dependency>

        <dependency>

            <groupId>org.springframework</groupId>

            <artifactId>spring-oxm</artifactId>

            <version>${springversion}</version>

            <type>jar</type>

            <scope>compile</scope>

        </dependency>

        <dependency>

            <groupId>org.springframework</groupId>

            <artifactId>spring-tx</artifactId>

            <version>${springversion}</version>

            <type>jar</type>

            <scope>compile</scope>

        </dependency>

        <dependency>

            <groupId>org.springframework</groupId>

            <artifactId>spring-web</artifactId>

            <version>${springversion}</version>

            <type>jar</type>

            <scope>compile</scope>

        </dependency>

        <dependency>

            <groupId>org.springframework</groupId>

            <artifactId>spring-webmvc</artifactId>

            <version>${springversion}</version>

            <type>jar</type>

            <scope>compile</scope>

        </dependency>

        <dependency>

            <groupId>org.springframework</groupId>

            <artifactId>spring-test</artifactId>

            <version>${springversion}</version>

            <type>jar</type>

            <scope>compile</scope>

        </dependency>

          <!-- servlet & jstl-->

        <dependency>

            <groupId>javax.servlet</groupId>

            <artifactId>jstl</artifactId>

            <version>1.2</version>

            <type>jar</type>

            <scope>compile</scope>

        </dependency>

          <!-- common -->

        <dependency>

            <groupId>commons-collections</groupId>

            <artifactId>commons-collections</artifactId>

            <version>3.1</version>

        </dependency>

        <dependency>

            <groupId>commons-logging</groupId>

            <artifactId>commons-logging</artifactId>

            <version>1.1</version>

        </dependency>

  </dependencies>

  <build>

    <finalName>SpringMVC</finalName>

  </build>

</project>
修改Web.xml配置
web.xml作为前端的配置文件,需要在其中指定以SpringMVC方式处理HTTP请求,即配置servlet标签为SpringMVC,并且指明使用哪个文件作为SpringMVC的配置文件。
<?xml version="1.0" encoding="UTF-8"?>

<web-app xmlns:xsi="http://www.w3.org/2001/XMLSchema-instance" xmlns="http://java.sun.com/xml/ns/javaee" xsi:schemaLocation="http://java.sun.com/xml/ns/javaee http://java.sun.com/xml/ns/javaee/web-app_2_5.xsd" id="WebApp_ID" version="2.5">

  <display-name>SpringMVC01</display-name>

  <welcome-file-list>

    <welcome-file>index.html</welcome-file>

  </welcome-file-list>

  <!-- configure springmvc dispatcher for Servlet -->

  <servlet>

      <servlet-name>springmvc</servlet-name>

      <servlet-class>org.springframework.web.servlet.DispatcherServlet</servlet-class>

          <init-param>

            <param-name>contextConfigLocation</param-name>

            <param-value>classpath:spring-mvc.xml</param-value>

        </init-param>

  </servlet>

  <servlet-mapping>

      <servlet-name>springmvc</servlet-name>

      <url-pattern>*.do</url-pattern>

  </servlet-mapping>

</web-app>
SpringMVC 配置文件
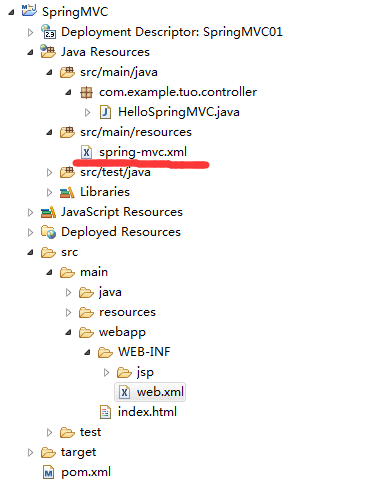
如上面web.xml中所示,我这里使用spring-mvc.xml最为SpringMVC的配置文件,并将其放在Maven项目默认的resoucres目录下:
其内容为:
<?xml version="1.0" encoding="UTF-8"?>

<beans xmlns="http://www.springframework.org/schema/beans"

    xmlns:xsi="http://www.w3.org/2001/XMLSchema-instance"

    xmlns:p="http://www.springframework.org/schema/p"

    xmlns:context="http://www.springframework.org/schema/context"

    xsi:schemaLocation="

        http://www.springframework.org/schema/beans

        http://www.springframework.org/schema/beans/spring-beans.xsd

        http://www.springframework.org/schema/context

        http://www.springframework.org/schema/context/spring-context.xsd">

    <!-- 使用注解的包,包括子集 -->

    <context:component-scan base-package="com.example.tuo"/>

    <!-- 视图解析器 -->

    <bean id="viewResolver"

        class="org.springframework.web.servlet.view.InternalResourceViewResolver">

        <property name="prefix" value="/WEB-INF/jsp/" />

        <property name="suffix" value=".jsp"></property>

    </bean>

</beans>
到此,SpringMVC的配置部分就完成了;下面需要写 controller 类 以及 HTML和JSP 页面。
实现HTML引导页面
基于我们在web.xml里面里面关于 “servlet-mapping” 的定义,我们需要截获的HTTP request 为 *.do(例如:http://localhost:8080/SpringMVC/HelloSpringMVC.do)
在这里,我们不直接输入xxx.do,通过web.xml里面定义的index.html中的超链接跳转到目标地址(HelloSpringMVC.do)。HTML如下:
<!DOCTYPE html>

<html>

<head>

<meta charset="UTF-8">

<title>SpringMVC start page</title>

</head>

<body>

<a href="sayHello.do">Hello springMVC!</a>

</body>

</html>
实现controller类
讲 controller 类放在controller包下,其内容很简单,就是利用MVC中的Model返回一个message到JSP,代码如下
package com.example.tuo.controller;

import org.springframework.stereotype.Controller;

import org.springframework.ui.Model;

import org.springframework.web.bind.annotation.RequestMapping;

@Controller

public class HelloSpringMVC {

    @RequestMapping("sayHello")

    public void sayHello(Model model){

        model.addAttribute("message", "Hello SpringMVC, I am coming!");

    }

}
实现 JSP 页面
还是基于我们在web.xml里面的视图解析器定义:
<!-- 视图解析器 -->

    <bean id="viewResolver"

        class="org.springframework.web.servlet.view.InternalResourceViewResolver">

        <property name="prefix" value="/WEB-INF/jsp/" />

        <property name="suffix" value=".jsp"></property>

    </bean>
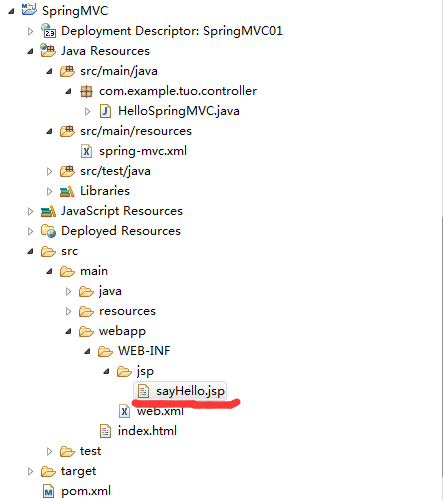
我们在项目里面建立一个sayHello.jsp, 请注意这里的前后缀以及在controller类里面定义的@RequestMapping的内容, 把它们连接在一起应指向了JSP页面:prefix+RequestMapping("sayHello")+suffix = /WEB-INF/jsp/sayHello.jsp, 如图所示:
JSP页面本身的内容就很简单了,只是简单的输出在controller类里面定义的message:
<%@ page language="java" contentType="text/html; charset=ISO-8859-1"

    pageEncoding="ISO-8859-1"%>

<!DOCTYPE html PUBLIC "-//W3C//DTD HTML 4.01 Transitional//EN" "http://www.w3.org/TR/html4/loose.dtd">

<html>

<head>

<meta http-equiv="Content-Type" content="text/html; charset=ISO-8859-1">

<title>SpringMVC page</title>

</head>

<body>

${message}

</body>

</html>
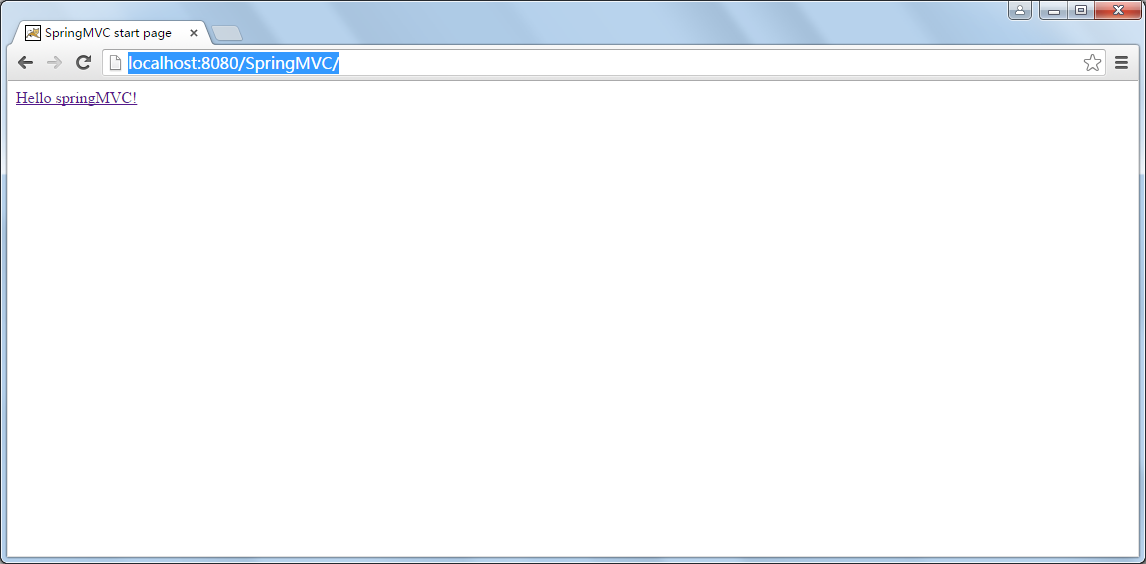
OK,我们的所有编码工作到这里就全部完成。启动Tomcat加载并运行项目,在浏览器中输入导航页面的路径:http://localhost:8080/SpringMVC/后,我们便来到了HTML页面:
在页面上点击超链接,即可跳转到sayHello.jsp;我们可以看到在view中输出了我们在controller里面定义的内容“Hello SpringMVC, I am coming!”;

Well done!我们的SpringMVC项目运行正确啦 :)
最新文章
- xmlHttp.readyState的五种状态
- Ajax UI方面的处理方式
- Jenkins的配置(rpm red hat方式)
- 【代码笔记】iOS-判断是否是模拟机
- 剑指Offer 栈的压入、弹出序列
- xcode使用
- Android LayoutParams
- 5分钟学习maven(根据英文文档整理)
- kindeditor 上传图片 显示绝对 路径
- Ubuntu 固态硬盘 4K对齐及启用 Trim,及其验证方法
- 17.1.1.7 Setting Up Replication with New Master and Slaves 设置复制使用新的master和slaves:
- poj 2771 最大独立集
- 如何正确理解正则表达式中的分隔符 \b
- C#实现微信开发
- [爬虫]通过url获取连接地址中的数据
- JavaScript 高级程序设计(第3版)笔记——chapter4:变量、作用域和内存问题
- SQL去掉小数点有效数字后的所有0
- Spark 2.2.0 文档中文版 Quick Start
- 对图像组成不了解?这样学习Matplotlib必走弯路!
- Java 数组及数组常用算法