第19章 Redis的一些常用技术
2024-09-03 13:51:53
19.1 Redis的基础事务
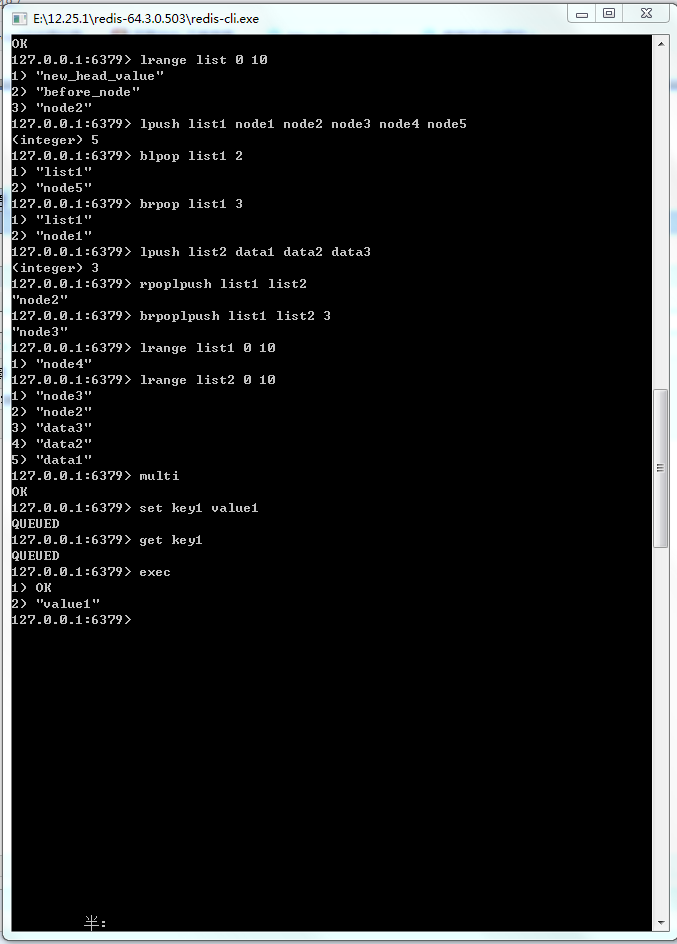
图19-1 Redis命令执行事务的过程
19-1:在Spring中使用Redis事务命令
 public static void testTransaction(){

        ApplicationContext applicationContext = new ClassPathXmlApplicationContext("applicationContext.xml");

        RedisTemplate redisTemplate = applicationContext.getBean(RedisTemplate.class);

        SessionCallback callBack = (SessionCallback)(RedisOperations ops) -> {

            ops.multi();

            ops.boundValueOps("key1").set("value1");

            // 注意由于命令只是进入队列,而没有被执行,所以此处采用get命令,而value却返回为null

            String value = (String) ops.boundValueOps("key1").get();

            System.out.println("事务执行过程中,命令入队列,而没有被执行,所以value为空:value=" + value);

            // 此时list会保存之前进入队列的所有命令的结果

            ops.exec();// 执行事务

            // 事务结束后,获取value1

            value = (String) redisTemplate.opsForValue().get("key1");

            return value;

        };

        // 执行Redis的命令

        String value = (String) redisTemplate.execute(callBack);

        System.out.println(value);

    }
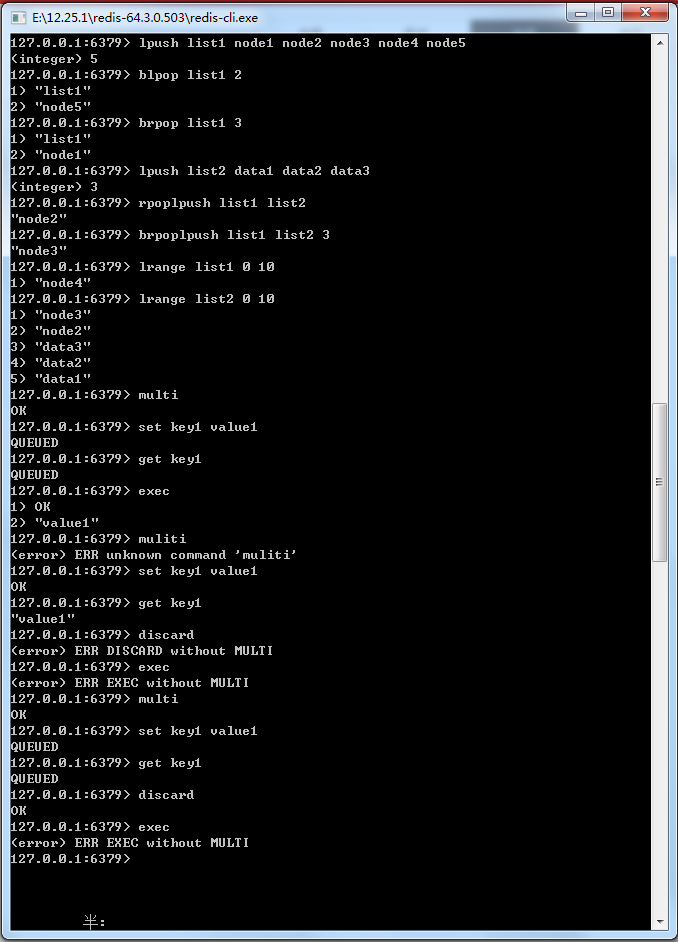
图19-2 使用discard命令取消事务
19.2 探索Redis事务回滚
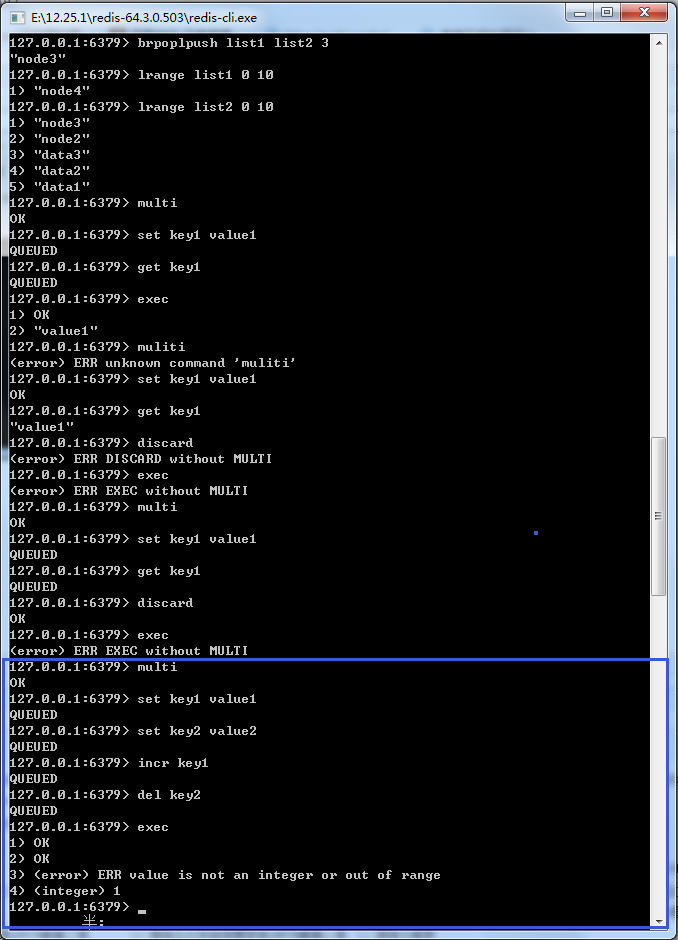
图19-3 Redis事务遇到命令格式正确而数据类型不符合
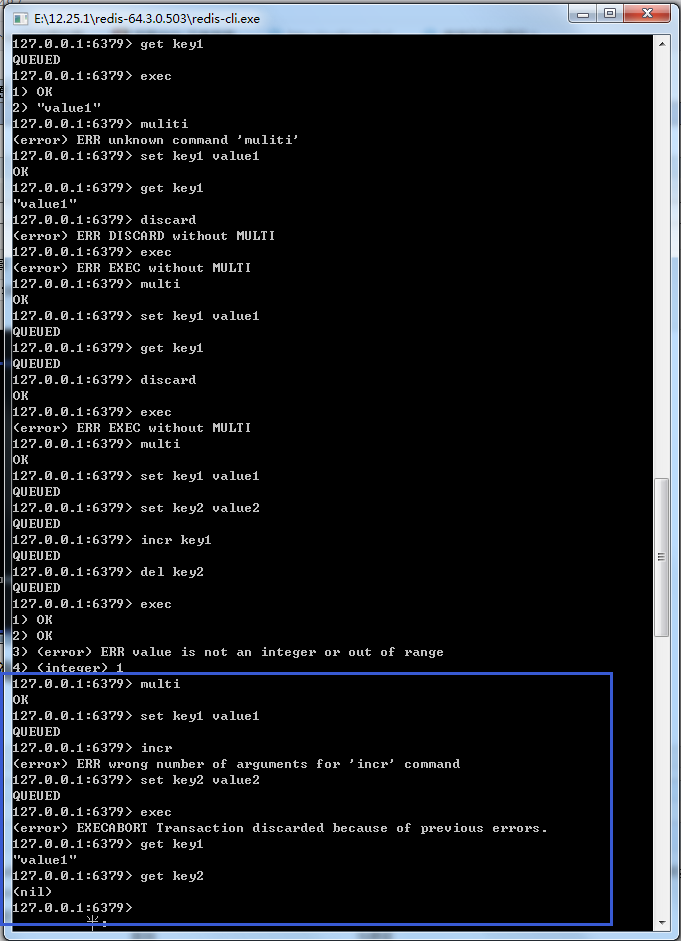
图19-4 Redis事务遇到命令格式错误的
19.3 使用watch命令监控事务
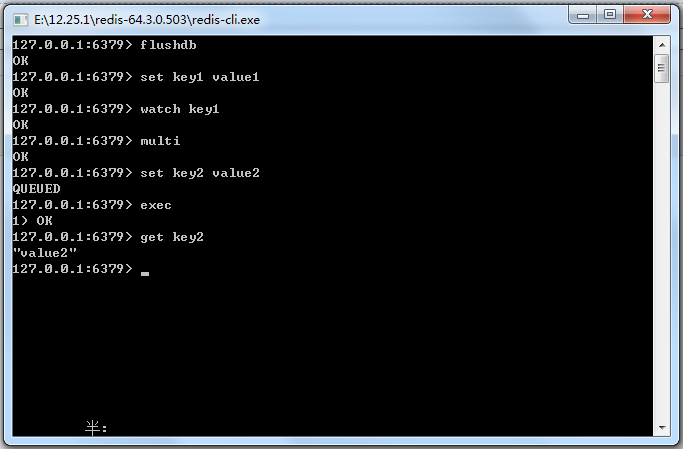
图19-6 Redis执行事务


图19-7 测试Redis事务回滚
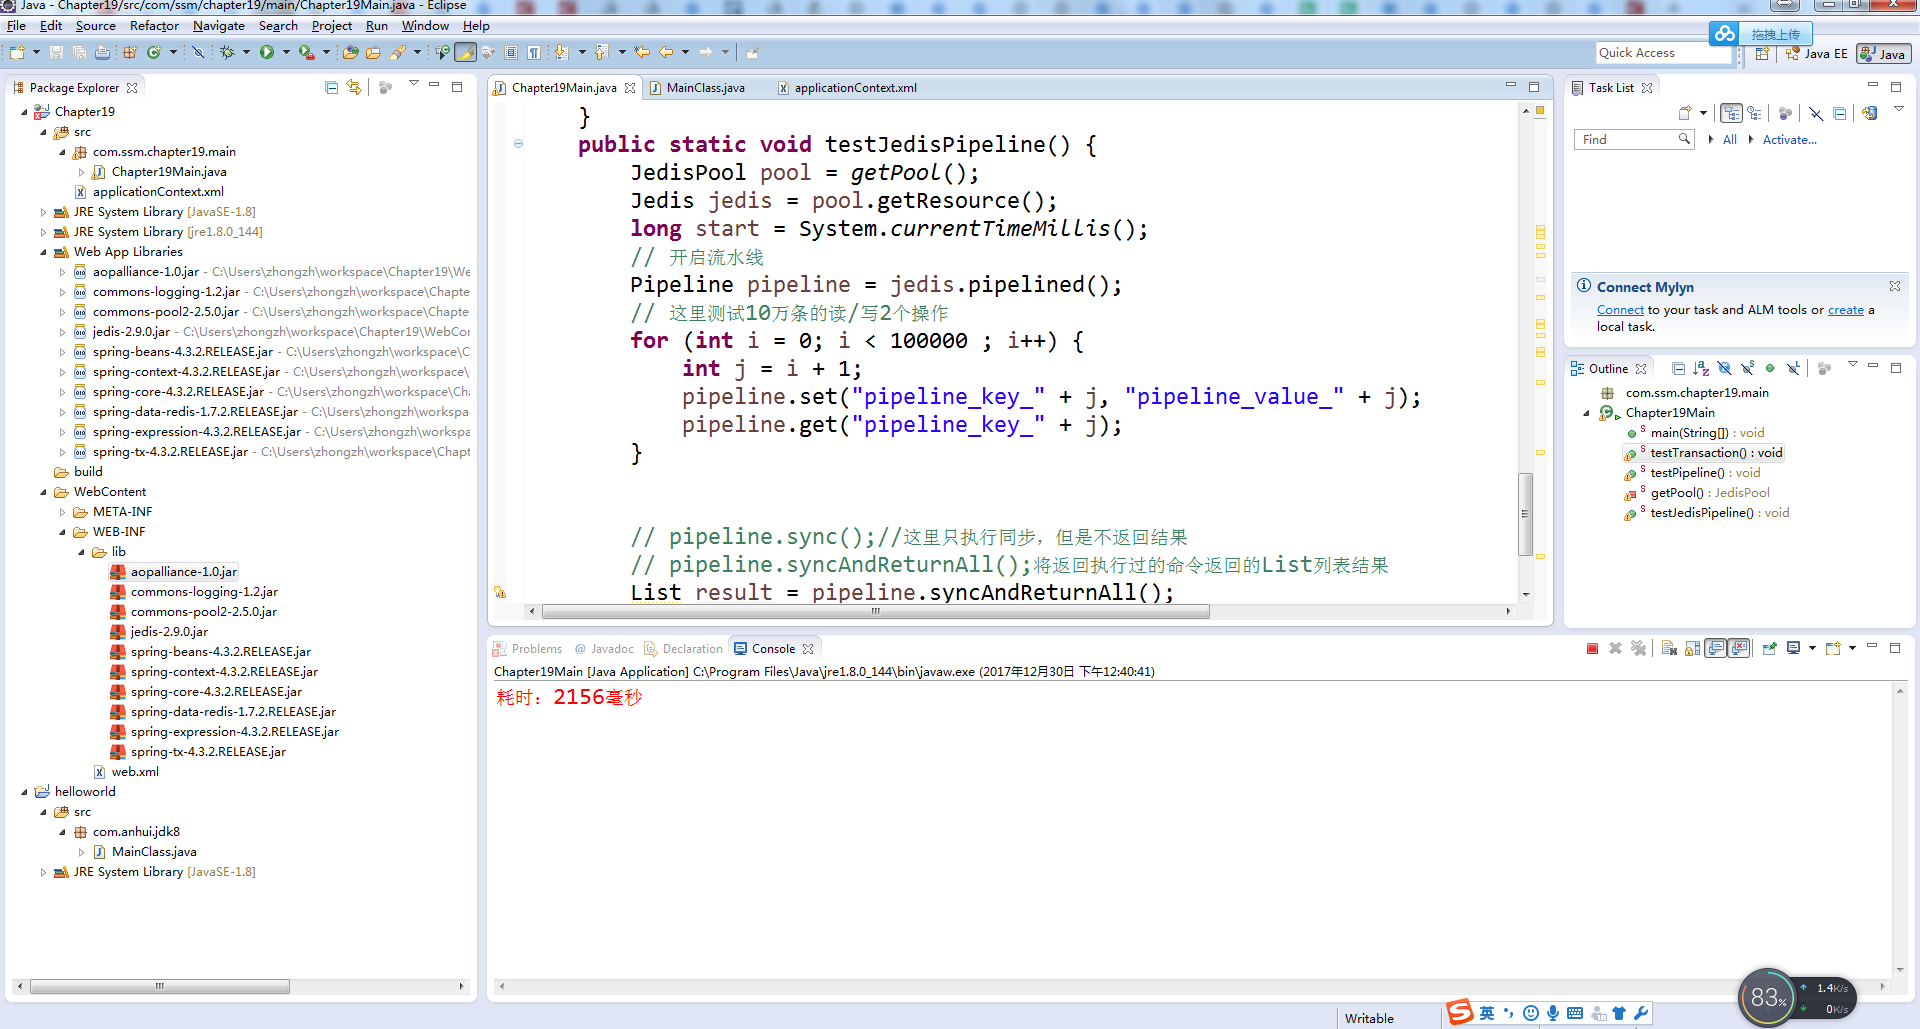
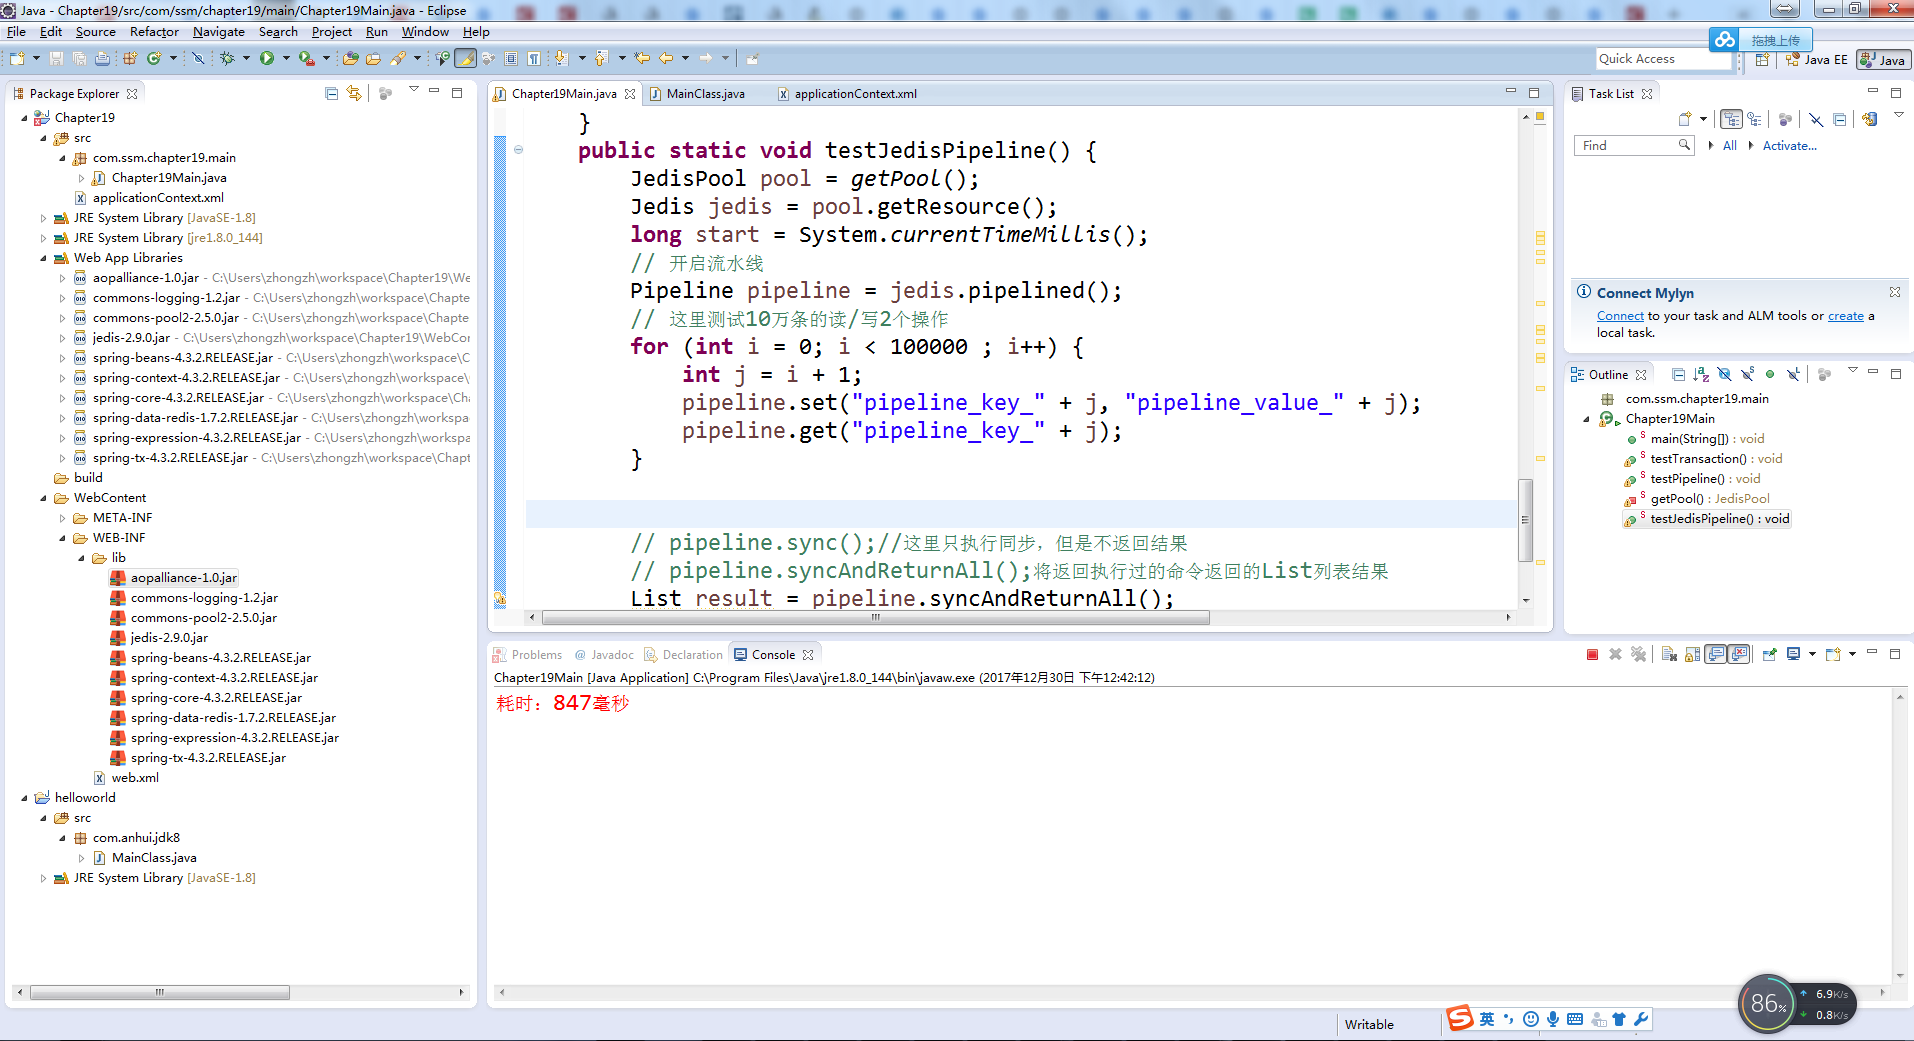
19.4 流水线(pipelined)
19-2:使用流水线操作Redis命令
    public static void testJedisPipeline() {

        JedisPool pool = getPool();

        Jedis jedis = pool.getResource();

        long start = System.currentTimeMillis();

        // 开启流水线

        Pipeline pipeline = jedis.pipelined();

        // 这里测试10万条的读/写2个操作

        for (int i = 0; i < 100000 ; i++) {

            int j = i + 1;

            pipeline.set("pipeline_key_" + j, "pipeline_value_" + j);

            pipeline.get("pipeline_key_" + j);

        }

        // pipeline.sync();//这里只执行同步,但是不返回结果

        // pipeline.syncAndReturnAll();将返回执行过的命令返回的List列表结果

        List result = pipeline.syncAndReturnAll();

        long end = System.currentTimeMillis();

        // 计算耗时

        System.err.println("耗时:" + (end - start) + "毫秒");

    }
19-3:使用Spring操作Redis流水线
 public static void testPipeline(){

        ApplicationContext applicationContext = new ClassPathXmlApplicationContext("applicationContext.xml");

        RedisTemplate redisTemplate = applicationContext.getBean(RedisTemplate.class);

        // 使用Java8的Lambda表达式

        SessionCallback callBack = (SessionCallback) (RedisOperations ops) -> {

            for(int i = 0; i < 100000; i++){

                int j = i + 1;

                ops.boundValueOps("pipeline_key_" + j).set("pipeline_value_" + j);

                ops.boundValueOps("pipeline_key_" + j).get();

            }

            return null;

        };

        long start = System.currentTimeMillis();

        // 执行Redis的流水线命令

        List resultList = redisTemplate.executePipelined(callBack);

        long end = System.currentTimeMillis();

        System.err.println(end-start);

    }
19-5 发布订阅


图19-10 Redis的发布订阅过程
代码清单19-4:Redis发布订阅监听类
package com.ssm.chapter19.redis.listener;

import org.springframework.data.redis.connection.Message;

import org.springframework.data.redis.connection.MessageListener;

import org.springframework.data.redis.core.RedisTemplate;

import org.springframework.data.redis.serializer.SerializationException;

/*** imports ***/

public class RedisMessageListener implements MessageListener{

    private RedisTemplate redisTemplate;

    /*** 此处省略redisTemplate的setter和getter方法 ***/

    @Override

    public void onMessage(Message message, byte[] bytes) {

        // TODO Auto-generated method stub

        // 获取消息

        byte[] body = message.getBody();

        // 使用值序列化器转换

        String msgBody;

        String channelStr = null;

        try {

            msgBody = (String)

               getRedisTemplate().getValueSerializer().deserialize(body);

        System.err.println(msgBody);

        // 获取channel

        byte[] channel = message.getChannel();

        // 使用字符串序列化器转换

        channelStr = (String)

                getRedisTemplate().getStringSerializer().deserialize(channel);

        } catch (SerializationException e) {

            // TODO Auto-generated catch block

            e.printStackTrace();

        }

        System.err.println(channelStr);

        // 渠道名称转换

        String bytesStr = new String(bytes);

        System.err.println(bytesStr);

    }

    public RedisTemplate getRedisTemplate() {

        return redisTemplate;

    }

    public void setRedisTemplate(RedisTemplate redisTemplate) {

        this.redisTemplate = redisTemplate;

    }

}
<?xml version='1.0' encoding='UTF-8' ?>

<!-- was: <?xml version="1.0" encoding="UTF-8"?> -->

<beans xmlns="http://www.springframework.org/schema/beans"

    xmlns:xsi="http://www.w3.org/2001/XMLSchema-instance" xmlns:p="http://www.springframework.org/schema/p"

    xmlns:aop="http://www.springframework.org/schema/aop" xmlns:tx="http://www.springframework.org/schema/tx"

    xmlns:context="http://www.springframework.org/schema/context"

    xsi:schemaLocation="http://www.springframework.org/schema/beans

       http://www.springframework.org/schema/beans/spring-beans-4.0.xsd

       http://www.springframework.org/schema/aop

       http://www.springframework.org/schema/aop/spring-aop-4.0.xsd

       http://www.springframework.org/schema/tx

       http://www.springframework.org/schema/tx/spring-tx-4.0.xsd

       http://www.springframework.org/schema/context

       http://www.springframework.org/schema/context/spring-context-4.0.xsd">

    <bean id="poolConfig" class="redis.clients.jedis.JedisPoolConfig">

        <property name="maxIdle" value="50" />

        <property name="maxTotal" value="100" />

        <property name="maxWaitMillis" value="20000" />

    </bean>

    <bean id="stringRedisSerializer"

        class="org.springframework.data.redis.serializer.StringRedisSerializer" />

    <bean id="connectionFactory"

        class="org.springframework.data.redis.connection.jedis.JedisConnectionFactory">

        <property name="hostName" value="localhost" />

        <property name="port" value="6379" />

        <property name="poolConfig" ref="poolConfig" />

    </bean>

    <bean id="redisTemplate" class="org.springframework.data.redis.core.RedisTemplate">

        <property name="connectionFactory" ref="connectionFactory" />

        <property name="defaultSerializer" ref="stringRedisSerializer" />

        <property name="keySerializer" ref="stringRedisSerializer" />

        <property name="valueSerializer" ref="stringRedisSerializer" />

    </bean>

    <bean id="redisMsgListener"

        class="com.ssm.chapter19.redis.listener.RedisMessageListener">

        <property name="redisTemplate" ref="redisTemplate" />

    </bean>

    <bean id="topicContainer"

        class="org.springframework.data.redis.listener.RedisMessageListenerContainer"

        destroy-method="destroy">

        <!--Redis连接工厂 -->

        <property name="connectionFactory" ref="connectionFactory" />

        <!--连接池,这里只要线程池生存,才能继续监听 -->

        <property name="taskExecutor">

            <bean

                class="org.springframework.scheduling.concurrent.ThreadPoolTaskScheduler">

                <property name="poolSize" value="2" />

            </bean>

        </property>

        <!--消息监听Map -->

        <property name="messageListeners">

            <map>

                <!--配置监听者,key-ref和bean id定义一致 -->

                <entry key-ref="redisMsgListener">

                    <!--监听类 -->

                    <bean class="org.springframework.data.redis.listener.ChannelTopic">

                        <constructor-arg value="chat" />

                    </bean>

                </entry>

            </map>

        </property>

    </bean>

</beans>
代码清单19-5:测试Redis发布订阅
package com.ssm.chapter19.main;

import org.springframework.context.ApplicationContext;

import org.springframework.context.support.ClassPathXmlApplicationContext;

import org.springframework.data.redis.core.RedisTemplate;

public class Chapter19Main {

   public static void main(String[] args) {

        ApplicationContext applicationContext

           = new ClassPathXmlApplicationContext("applicationContext.xml");

        RedisTemplate redisTemplate = applicationContext.getBean(RedisTemplate.class);

        String channel = "chat";

        redisTemplate.convertAndSend(channel, "I am lazy!!");

   }

}
    public static void testPubSub(){

         ApplicationContext applicationContext

           = new ClassPathXmlApplicationContext("applicationContext.xml");

        RedisTemplate redisTemplate = applicationContext.getBean(RedisTemplate.class);

        String channel = "chat";

        redisTemplate.convertAndSend(channel, "I am lazy!!");

    }
   public static void main(String[] args) {

       /* ApplicationContext applicationContext

           = new ClassPathXmlApplicationContext("applicationContext.xml");

        RedisTemplate redisTemplate = applicationContext.getBean(RedisTemplate.class);

        String channel = "chat";

        redisTemplate.convertAndSend(channel, "I am lazy!!");*/

       testPubSub();

   }

19.6 超时命令
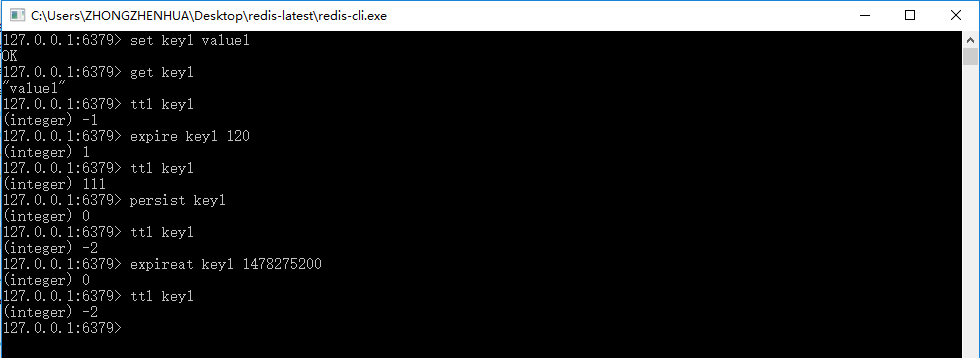
图19-11 Redis超时命令

代码清单19-6:使用Spring操作Redis超时命令
 public static void testExpire() {

       ApplicationContext applicationContext = new ClassPathXmlApplicationContext("applicationContext.xml");

       RedisTemplate redisTemplate = applicationContext.getBean(RedisTemplate.class);

       redisTemplate.execute((RedisOperations ops) -> {

           ops.boundValueOps("key1").set("value1");

           String keyValue = (String) ops.boundValueOps("key1").get();

           Long expSecond = ops.getExpire("key1");

           System.err.println(expSecond);

           boolean b = false;

           b = ops.expire("key1", 120L, TimeUnit.SECONDS);

           b = ops.persist("key1");

           Long l = 0L;

           l = ops.getExpire("key1");

           Long now = System.currentTimeMillis();

           Date date = new Date();

           date.setTime(now + 120000);

           ops.expireAt("key", date);

           return null;

       });

       }
   public static void main(String[] args) {

       /* ApplicationContext applicationContext

           = new ClassPathXmlApplicationContext("applicationContext.xml");

        RedisTemplate redisTemplate = applicationContext.getBean(RedisTemplate.class);

        String channel = "chat";

        redisTemplate.convertAndSend(channel, "I am lazy!!");*/

       //testPubSub();

       testExpire();

   }
19.7 使用Lua语言
19.7.1 执行输入Lua程序代码
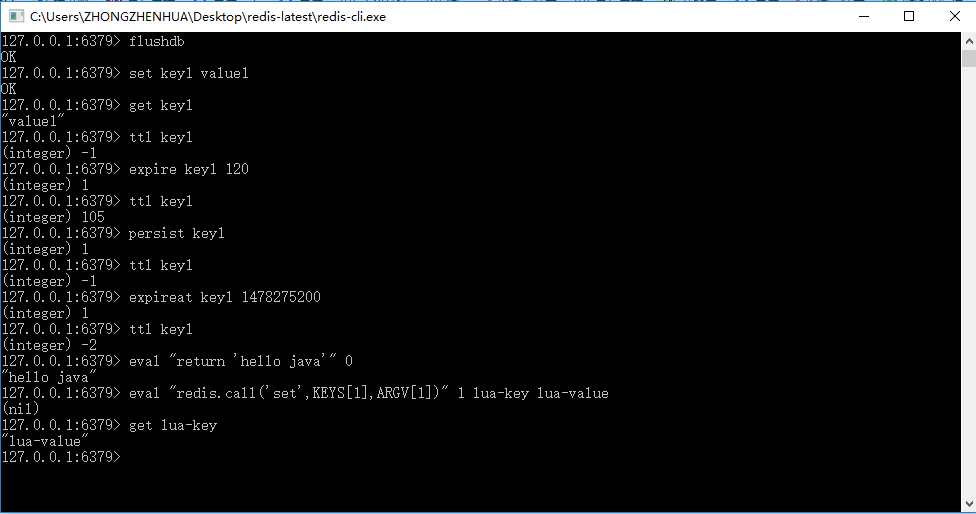
图19-12 Redis执行Lua语言脚本

图19-13 使用签名运行Lua脚本
代码清单19-7:在Java中使用Lua脚本
    public static void testLuaScript(){

        // 如果是简单的对象,使用原来的封装会简易些

        ApplicationContext applicationContext = new ClassPathXmlApplicationContext("applicationContext.xml");

        RedisTemplate redisTemplate = applicationContext.getBean(RedisTemplate.class);

        // 如果是简单的操作,使用原来的Jedis会简易些

        Jedis jedis = (Jedis) redisTemplate.getConnectionFactory().getConnection().getNativeConnection();

        // 执行简单的脚本

        String helloJava = (String) jedis.eval("return 'hello java'");

        System.out.println(helloJava);

        // 执行带参数的脚本

        jedis.eval("redis.call('set',KEYS[1],ARGV[1])",1,"lua-key","lua-value");

        String luaKey = (String) jedis.get("lua-key");

        System.out.println(luaKey);

        // 缓存脚本,返回sha1签名标识

        String sha1 = jedis.scriptLoad("redis.call('set',KEYS[1],ARGV[1])");

        // 通过标识执行脚本

        jedis.evalsha(sha1, 1, new String[]{ "sha-key", "sha-val"});

        // 获取执行脚本后的数据

        String shaVal = jedis.get("sha-key");

        System.out.println(shaVal);

        // 关闭连接

        jedis.close();

    }
代码清单19-8:可序列化的Role对象
public class Role implements Serializable{

    /**

     *

     */

    private static final long serialVersionUID = 5334128099542779325L;

    private Long id;

    private String roleName;

    private String note;

    public Long getId() {

        return id;

    }

    public void setId(Long id) {

        this.id = id;

    }

    public String getRoleName() {

        return roleName;

    }

    public void setRoleName(String roleName) {

        this.roleName = roleName;

    }

    public String getNote() {

        return note;

    }

    public void setNote(String note) {

        this.note = note;

    }

}
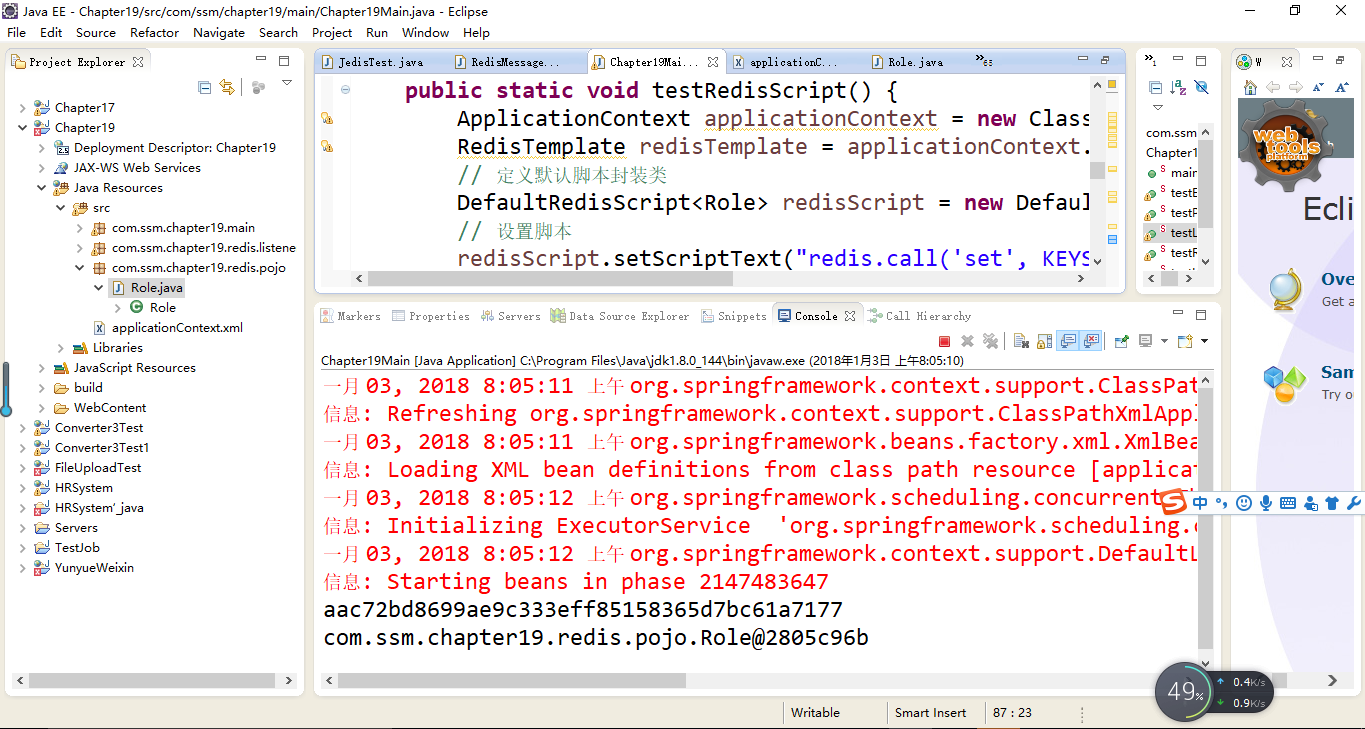
代码清单19-9:使用RedisScript接口对象通过Lua脚本操作对象
    public static void testRedisScript() {

        ApplicationContext applicationContext = new ClassPathXmlApplicationContext("applicationContext.xml");

        RedisTemplate redisTemplate = applicationContext.getBean(RedisTemplate.class);

        // 定义默认脚本封装类

        DefaultRedisScript<Role> redisScript = new DefaultRedisScript<Role>();

        // 设置脚本

        redisScript.setScriptText("redis.call('set', KEYS[1], ARGV[1]) return redis.call('get', KEYS[1])");

        // 定义操作的key列表

        List<String> keyList = new ArrayList<String>();

        keyList.add("role1");

        // 需要序列化保存和读取的对象

        Role role = new Role();

        role.setId(1L);

        role.setRoleName("role_name_1");

        role.setNote("note_1");

        // 获得标识字符串

        String sha1 = redisScript.getSha1();

        System.out.println(sha1);

        // 设置返回结果类型,如果没有这句话,结果返回为空

        redisScript.setResultType(Role.class);

        // 定义序列化器

        JdkSerializationRedisSerializer serializer = new JdkSerializationRedisSerializer();

        // 执行脚本

        // 第一个是RedisScript接口对象,第二个是参数序列化器

        // 第三个是结果序列化器,第四个是Redis的key列表,最后是参数列表

        Role obj = (Role) redisTemplate.execute(redisScript, serializer, serializer, keyList, role);

        // 打印结果

        System.out.println(obj);

    }
19.7.2 执行Lua文件
代码清单19-10:test.lua
redis.call('set', KEYS[], ARGV[])

redis.call('set', KEYS[], ARGV[])

local n1 = tonumber(redis.call('get' ,KEYS[]))

local n2 = tonumber(redis.call('get' ,KEYS[]))

if n1 > n2 then

   return

end

if n1 == n2 then

   return

end

if n1 < n2  then

   return

end

图19-14 redis-cli的命令执行
代码清单19-11:使用Java执行Redis脚本
 public static void testLuaFile(){

        ApplicationContext applicationContext = new ClassPathXmlApplicationContext("applicationContext.xml");

        RedisTemplate redisTemplate = applicationContext.getBean(RedisTemplate.class);

        // 读入文件流

        File file = new File("C:\\Users\\ZHONGZHENHUA\\Desktop\\redis-latest\\test.lua");

        byte[] bytes = getFileToByte(file);

        Jedis jedis = (Jedis) redisTemplate.getConnectionFactory().getConnection().getNativeConnection();

        // 发送文件二进制给Redis,这样Redis就会返回sha1标识

        byte[] sha1 = jedis.scriptLoad(bytes);

        // 使用返回的标识执行,其中第二个参数2,表示使用2个键

        // 而后面的字符串都转化为了二进制字节进行传输

        Object obj = jedis.evalsha(sha1, 2, "key1".getBytes(),"key2".getBytes(),"2".getBytes(),"4".getBytes());

        System.out.println(obj);

    }

    /**

     * 把文件转化为二进制数组

     *

     * @param file

     *            文件

     * @return 二进制数组

     *

     */

    public static byte[] getFileToByte(File file) {

        byte[] by = new byte[(int) file.length()];

        try {

            InputStream is = new FileInputStream(file);

            ByteArrayOutputStream bytestream = new ByteArrayOutputStream();

            byte[] bb = new byte[2048];

            int ch;

            ch = is.read(bb);

            while(ch != -1) {

                bytestream.write(bb, 0, ch);

                ch = is.read(bb);

            }

            by = bytestream.toByteArray();

        } catch (FileNotFoundException e) {

            // TODO Auto-generated catch block

            e.printStackTrace();

        } catch (IOException e) {

            // TODO Auto-generated catch block

            e.printStackTrace();

        }

        return by;

    }
最新文章
- Duilib源码分析(一)整体框架
- UVA 11817 Tunnelling the Earth --球面距离公式
- Python-01-基础
- tar命令的详细解释
- js 函数前的+号
- ionic cordova
- [ACM_水题] UVA 11292 Dragon of Loowater [勇士斗恶龙 双数组排序 贪心]
- IIS6.0启动网站ManagedPipelineHandler异常
- DataTable转换成List<T>
- java移位操作符
- 如何在PowerDesigner将PDM导出生成WORD文档或者html文件
- Buns(dp+多重背包)
- RabbitMQ Exchange类型详解
- Python使用wmi获取Windows相关信息
- 记python使用grpc
- vuex——做简单的购物车功能
- [c/c++] programming之路(1)、编写程序打开记事本、计算器等
- javascript 获取用户当前 经纬度 位置
- 【读书笔记】iOS-iOS6 Passbook应用开发
- Learning to Rank算法介绍:RankSVM 和 IR SVM