SAP Portal 上传资源到WRR
Uploading Resources to the Web Resource Repository
Prerequisites
You have been assigned the Content Administrator role.
Context
You can upload Web resources to the Web Resource Repository, so that they can be used by different portal components and applications. When you upload resources, they are saved as objects in the Portal Content Directory (PCD) and are also copied to the file system of the portal server (in the same folder hierarchy, and synchronized with any changes that you make). This allows the consumption of resources at runtime using relative paths. For example, a .css file that is saved in the Web Resource Repository can use a resource that is also saved in the Web Resource Repository, by specifying the following in one of its classes: background: url('../images/logo.png') .
Following are some guidelines for selecting resource files to upload:
- All resource file names that you want to upload must contain only legal characters ( A-Z , 0-9 , . , _ , % , ~ , - , ( , and ) )
- Maximum file name length is 100 characters
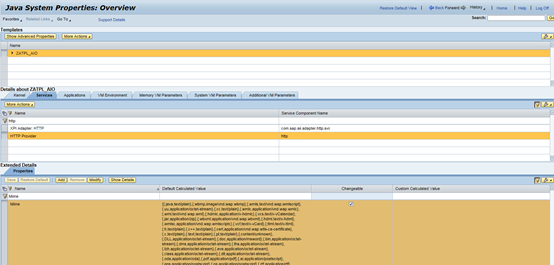
- To render, in Microsoft Internet Explorer, icons with an .ico extension that are saved in the Web Resource Repository, you need to enable support for .ico images in SAP NetWeaver Administrator.
In SAP NetWeaver Administrator, navigate to Configuration Infrastructure Java System Properties Services HTTP Provider. To the Mime property, add the following value: \{.ico,image/x-icon\} .
- Keep the folder hierarchy depth minimal, because the maximum file path for resource file storage is 120 characters (assuming that the root Web Resources folder is located here:C:\usr\sap\ROM\J00\j2ee\cluster\apps\sap.com\com.sap.portal.resourcerepository\servlet_jsp\com.sap.portal.resourcerepository\root\repo)
Note
To upload multiple resources simultaneously, add them to a compressed (.zip) file and then upload the compressed file.
If you have configured the Virus Scan Interface on your AS Java, all resource files are automatically scanned during the upload process.
Procedure
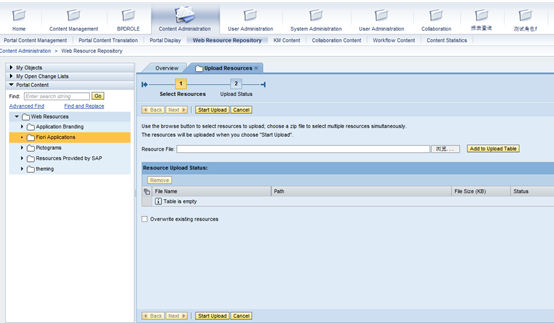
- Choose Content Administration Web Resource Repository.
- In the Portal Catalog, expand the Web Resources node and navigate to the folder into which you want to upload resources.
- From the context menu of the selected folder, choose Upload Resources . The first page of the Upload Resources wizard appears.
- In the Resource File field, choose the Browse button and select the file to upload from the file system. Choose Open .
- Choose Add to Upload Table . The selected file is added to the list of files to be uploaded. If you selected a compressed (.zip) file in the previous step, the contents of the file are extracted and added to the table, each file or folder in a single row.
In the list of files to be uploaded, each file has a status that indicates whether it can be uploaded. If a file cannot be uploaded, the reason is given (for example, a file may contain invalid characters or it may exceed the maximum file size allowed). For information about changing the maximum file size, see Modifying the Uploadable File Size . Use the Filter by Status field to more easily see the problematic files. A summary of the number of files with each status is displayed at the top of the table.
Note
To remove a resource or folder from the list of files to be uploaded, select it in the upload table and choose Remove . If you select a folder, all resources and folders located below that folder are removed from the list.
- By default, new files with duplicate names in the same folder in the Web Resource Repository are not uploaded during the upload process. To upload files with duplicate names and overwrite the existing files in the Web Resource Repository, choose the Overwrite existing resources checkbox.
Note
This option applies to all the duplicate files in the upload table.
Checks for duplicate resource names are not case-sensitive, meaning that My.png and my.png are treated as duplicate files.
- Choose Start Upload . The upload process starts, and the files with the valid (green) status are uploaded.
When the upload process is complete, the second page of the Upload Resources wizard appears. This page shows a list of all the files that were uploaded, and those that were not uploaded. A summary of the number of files that were and were not uploaded is displayed at the top of the table. If a file was not uploaded, the reason is given. Use the Filter by Status field to more easily see the files that were not uploaded.
You can now see the added resource files in the Portal Catalog, in the folder to which you uploaded them.
- To upload additional files, choose Restart Wizard ; otherwise choose Close .
最新文章
- Selenium-java-Log4j环境搭建和
- html5 兼容火狐 ev的事件
- 51nod1183(Edit Distance)
- Zookeeper API for JAVA实战与应用
- 转:eclipse打开文件或者目录位置(不使用插件)
- 2014年国人开发的最热门的开源软件TOP 100
- Winform容器标签 打印标签 对话框控件
- LeetCode Pow(x, n) (水题)
- Mono4安装教程
- js String Trim函数
- pyqt中使用matplotlib绘制动态曲线
- C# 匿名表达式(Lambda表达式)
- c++中的迭代器 iterator
- Android WebView简介
- Asp.net mvc4 + HighCharts + 曲线图
- IntelliJ IDEA运行项目成功后,无法访问Tomcat主页
- memory_profiler的使用
- Memcached cas 陷阱
- Grin v0.5在Ubuntu下的安装和启动
- [转载]详解主流浏览器多进程架构:Chrome、IE