Using variables inside Postman and Collection Runner
Variables are among the most powerful features in Postman. Using variables in your Postman requests, eliminates the need to duplicate requests, which can save a lot of time!
A very common scenario while testing APIs is that the API infrastructure might be present on your local machine, a staging setup, and a production setup. Using variables you can call all these APIs without having to replace values manually. You can also use variables to test for different users (for example, they might need different access tokens), different input values, and a lot more.
With Jetpacks(http://blog.getpostman.com/2014/01/16/ridiculously-easy-api-testing-introducing-jetpacks-for-postman/), you get even more power to play with variables. You can extract data from responses and set variable values automatically. You can chain requests one after the other with minimal effort. Variable values are also available inside tests to help you make them more generic.
Data variables let you test multiple instances of a request in one go. Imagine that you want to test an API which let's users post comments on a post. Using data variables you can test for hundreds of variations of a request with different IDs, tokens or content bodies.
Let's look at how you can use variables in your workflow inside Postman.
Create an environment
For this example, let's assume we want to create two environments, production and dev.
Click on "No environment" in the header.

1-dropdown
2. Select "Manage environments" and then on the "Add" button in the modal that comes up.
2-manage-environments
3. Fill in the values as shown in the screenshot below
3-add-environment
Press submit.
To create the dev environment, we can just duplicate this environment so that we don't have to type in variable keys all over again.
4-duplicated-environment

Click the duplicate environment icon, and then click on the environment name to edit. Fill in the values, as shown in the screenshot below.
4-2-duplicate-environment-values

Variables can be used almost everywhere inside Postman. They are available inside:
URL
URL params
Header values
form-data/url-encoded values
Raw body content
Helper fields
To use a variable you need to enclose the variable name with double curly braces – {{my_variable_name}}.
With our environments created, let's try out a sample request. Set the base URL field for the API to {{url}}/post.
6-url-request

Now select an environment from the environment selection dropdown.
5-dropdown-filled

Once an environment is selected, Postman will replace all instances of a variable with it's corresponding value. If no environment is selected, then Postman will try to find a matching global variable.
On hitting send here with the "Production" environment, we see that the request is made to "httpbin.org".
7-sent-request

Change the environment to "dev", and hit send. The request will be made to localhost:5000. It's as easy as that!
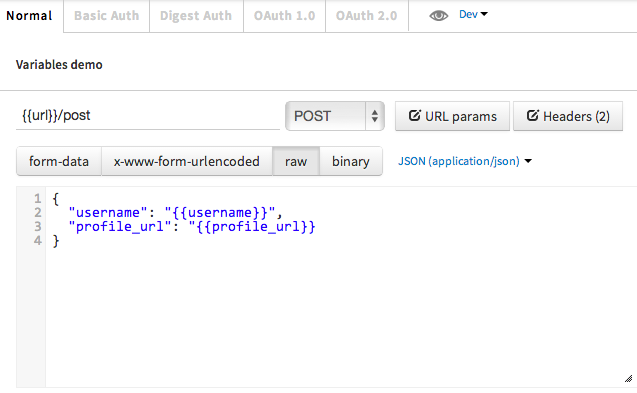
Now, let's modify this request by adding a POST body and setting a variable inside the body.
8-post-request

On hitting send, we see that the API received the response body with the variable replaced by it's value.
9-post-request-response

Variables with test scripts
You will need the Jetpacks upgrade for writing test scripts. If you still haven't purchased it, I strongly recommend that you do!
Inside Postman test scripts, you can set environment and global variables using the postman.setEnvironmentVariable and postman.setGlobalVariable functions. You can also access these values using the special environment and globals dictionaries.
Check out this blog entry about how you can extract values from response bodies and assign them to variables. Subsequent calls are made using these values. This is an extremely powerful feature and I am sure you will wonder how you went by without it!
Data variables
Data variables are used inside the Collection Runner. The Collection Runner can run a collection or a folder multiple times. For every iteration, it will pick up new values from a JSON or a CSV file and replace variables in the request with these values.
Let's save our request above in a collection and use data variables to change the response body.
10-data-variables-request
As shown in the screenshot above, I have added a couple of parameters to the JSON body. Values for these will be filled by Postman from a data file.
11-data-variables-test

I have also added a couple of tests which checks whether the correct value was received in the response. You can access the data values for a specific iteration using the special data variable. You can log values to the Chrome DevTools console inside test scripts. Make sure to enable Chrome DevTools first.
Postman lets you import CSV or JSON files as data sources.
The CSV file needs to have the variable names in it's first row. Subsequent rows should be separated by line breaks while the values should be separated by commas.
Download a sample CSV file(http://getpostman.com/samples/test_data_file.csv) to find out how it looks like.
profile_url, username

http://www.google.com, a85

http://www.google.com, google
The JSON file is an array of objects, with each object having key/value pairs. Postman supports only simple numerical and string values inside the JSON file.
Download a sample JSON file(http://getpostman.com/samples/test_data_file.json) to find out how it looks like.
[

{

"profile_url": "http://www.google.com",

"username": "a85",

"password": "blah"

},

{

"profile_url": "http://www.getpostman.com",

"username": "larry",

"password": "nocolors"

}

]
12-data-variables-start-test-run

Click on "Choose Files" and import the file that has the data with which the API is to be tested. For this example, we'll just run 2 iterations. I am running this example in the dev environment. Note that environment variables, global variables and data variables can be used together.
After clicking start, the requests are run one after the other. The Collection Runner window tells us that all our tests passed!
13-data-variables-test-run-results

Using variables is essential to maximising your Postman workflow. I hope this tutorial helped you gain a better understanding of this feature. If you have any questions, do let me know in the comments.
http://blog.getpostman.com/2014/02/20/using-variables-inside-postman-and-collection-runner/
最新文章
- mono for android 获取手机照片或拍照并裁剪保存
- AFNetworking图片缓存问题
- (原创)AD账户误删导致Exchange邮箱被删 莫苦恼
- 利用jquery获取html中被选中的input的值
- 在Windows Server 2012 中安装 .NET 3.5 Framework
- 基于s5pv210嵌入式系统busybox文件系统移植
- Java---replace与replaceAll的区别
- java学习面向对象之多态
- Poj2946-The Warehouse(bfs+哈希)
- Solaris-[ODBC-ORACLE WP Driver]遇到的几个问题
- shell 中的特殊符号的含义
- 第二篇flask响应方式
- java、asp.net 通用分页码函数
- sublime快捷方式小结
- Java线程锁&分布式锁的理解及应用
- 【CMS】DedeCMS Error: (PHP 5.3 and above) Please set 'request_order' ini value to include C,G and P (recommended: 'CGP') in php.ini
- 使用rollup 开发专业js library
- c#StreamWriter,StreamReader类(主要用于文本文件访问)
- 拉普拉斯(Laplace)分布
- poj 2528 Mayor's posters 线段树+离散化 || hihocode #1079 离散化