SVG渐变
前面的话
给SVG元素应用填充和描边,除了使用纯色外,还可以使用渐变。本文将详细介绍SVG渐变
线性渐变
有两种类型的渐变:线性渐变和径向渐变。必须给渐变内容指定一个id属性,否则文档内的其他元素不能引用它。为了让渐变能被重复使用,渐变内容需要定义在<defs>标签内部,而不是定义在形状上面
线性渐变沿着直线改变颜色,要插入一个线性渐变,需要在SVG文件的defs元素内部,创建一个<linearGradient> 节点
<svg height="70" version="1.1" xmlns="http://www.w3.org/2000/svg">

  <defs>

      <linearGradient id="Gradient1">

        <stop offset="0%" stop-color="#05a"/>

        <stop offset="100%" stop-color="#0a5"/>

      </linearGradient>

  </defs>

  <rect id="rect1" x="10" y="10" rx="15" ry="15" width="50" height="50" fill="url(#Gradient1)"/>

</svg>
结果如下所示,默认情况下实现的是水平方向的渐变
<stop>元素一共有3个属性,包括offset,stop-color,stop-opacity
offset用来设置色标位置

stop-color用来设置色标颜色

stop-opacity用来设置色标的透明度
下面是一个例子
<svg height="70" version="1.1" xmlns="http://www.w3.org/2000/svg">

  <defs>

      <linearGradient id="Gradient1">

        <stop offset="0%" stop-color="#05a"/>

        <stop offset="50%" stop-color="#50a" stop-opacity="0.5"/>

        <stop offset="100%" stop-color="#0a5"/>

      </linearGradient>

  </defs>

  <rect id="rect1" x="10" y="10" rx="15" ry="15" width="50" height="50" fill="url(#Gradient1)"/>

</svg>
【x1、x2、y1、y2】
线性渐变包括x1、x2、y1、y2这四个属性,用来控制渐变的大小和方向。取值为0-100%,或者0-1的小数。默认地,x1=y1=y2=0、x2=1
如果变成垂直方向的渐变,则需要设置为x1=x2=y1=0、y2=1
<svg height="70" version="1.1" xmlns="http://www.w3.org/2000/svg">

  <defs>

      <linearGradient id="Gradient1" x1=0 x2=0 y1=0 y2=1>

        <stop offset="0%" stop-color="#05a"/>

        <stop offset="100%" stop-color="#0a5"/>

      </linearGradient>

  </defs>

  <rect id="rect1" x="10" y="10" rx="15" ry="15" width="50" height="50" fill="url(#Gradient1)"/>

</svg>
如果将y2或x2设置为50%,则50%-100%这一部分区域填充为最后一个色标的纯色
<svg height="70" version="1.1" xmlns="http://www.w3.org/2000/svg">

  <defs>

      <linearGradient id="Gradient1" x1=0 x2=50% y1=0 y2=50%>

        <stop offset="0%" stop-color="#05a"/>

        <stop offset="100%" stop-color="#0a5"/>

      </linearGradient>

  </defs>

  <rect id="rect1" x="10" y="10" rx="15" ry="15" width="50" height="50" fill="url(#Gradient1)"/>

</svg>
当然了,可以有多个色标
<svg height="70" version="1.1" xmlns="http://www.w3.org/2000/svg">

  <defs>

      <linearGradient id="Gradient1" x1=0 x2=1 y1=0 y2=1>

        <stop offset="0%" stop-color="#05a"/>

        <stop offset="20%" stop-color="#50a"/>

        <stop offset="40%" stop-color="#5a0"/>

        <stop offset="60%" stop-color="#a05"/>

        <stop offset="80%" stop-color="#a50"/>

        <stop offset="100%" stop-color="#0a5"/>

      </linearGradient>

  </defs>

  <rect id="rect1" x="10" y="10" rx="15" ry="15" width="50" height="50" fill="url(#Gradient1)"/>

</svg>
渐变除了可以作为填充,也可以作为描边
<svg height="70" version="1.1" xmlns="http://www.w3.org/2000/svg">

  <defs>

      <linearGradient id="Gradient1" x1=0 x2=1 y1=0 y2=1>

        <stop offset="0%" stop-color="#05a"/>

        <stop offset="20%" stop-color="#50a"/>

        <stop offset="40%" stop-color="#5a0"/>

        <stop offset="60%" stop-color="#a05"/>

        <stop offset="80%" stop-color="#a50"/>

        <stop offset="100%" stop-color="#0a5"/>

      </linearGradient>

  </defs>

  <rect id="rect1" x="10" y="10" rx="15" ry="15" width="50" height="50" fill="transparent" stroke-width="10" stroke="url(#Gradient1)"/>

</svg>
【xlink:href】
xlink:href属性用于在一个渐变中引用另一个渐变,被引用的渐变的属性是可继承的,也可以被重写
下面的例子中,Gradient2引用了Gradient1的渐变,并重写了渐变的方向
<svg height="70" version="1.1" xmlns="http://www.w3.org/2000/svg">

  <defs>

      <linearGradient id="Gradient1" x1=0 x2=1 y1=0 y2=1>

        <stop offset="0%" stop-color="#05a"/>

        <stop offset="50%" stop-color="#50a"/>

        <stop offset="100%" stop-color="#0a5"/>

      </linearGradient>

      <linearGradient id="Gradient2" xlink:href="#Gradient1" x1=0 x2=0 y1=0 y2=1>

      </linearGradient>

  </defs>

  <rect id="rect1" x="10" y="10" rx="15" ry="15" width="50" height="50" fill="url(#Gradient2)"/>

</svg>
【gradientUnits】
gradientUnits有两个的值,userSpaceOnUse和objectBoundingBox,这用于决定渐变是否随着引用它的元素进行缩放。也就是说它决定了x1、y1、x2、y2的缩放
userSpaceOnUse: x1、y1、x2、y2表示当前用户坐标系统的坐标。也就是说渐变中的值都是绝对值
objectBoundingBox: x1, y1, x2, y2表示应用渐变的元素创建的边界坐标系统。也就是说渐变随着应用的元素进行了缩放
如果不设置,默认取值是objectBoundingBox
<svg height="70" version="1.1" xmlns="http://www.w3.org/2000/svg">

  <defs>

      <linearGradient id="Gradient1" gradientUnits="objectBoundingBox">

        <stop offset="0%" stop-color="#05a"/>

        <stop offset="50%" stop-color="#50a"/>

        <stop offset="100%" stop-color="#0a5"/>

      </linearGradient>

  </defs>

  <rect id="rect1" x="10" y="10" rx="15" ry="15" width="50" height="50" fill="url(#Gradient1)"/>

</svg>
如果设置为userSpaceOnUse,则x1、x2、y1、y2需要设置为用户坐标系的坐标绝对值
<svg height="70" version="1.1" xmlns="http://www.w3.org/2000/svg">

  <defs>

      <linearGradient id="Gradient1" gradientUnits="userSpaceOnUse" x1="10" x2="60" y1="0" y2="0">

        <stop offset="0%" stop-color="#05a"/>

        <stop offset="50%" stop-color="#50a"/>

        <stop offset="100%" stop-color="#0a5"/>

      </linearGradient>

  </defs>

  <rect id="rect1" x="10" y="10" rx="15" ry="15" width="50" height="50" fill="url(#Gradient1)"/>

</svg>
【spreadMethod】
spreadMethod可以接受三个值,pad,reflect,repeat,它定义了渐变如何开始和结束,当cx和cy的值是在0%到100%里面的时候
pad:(默认值)使用开始和结束位置的颜色结点来填充剩余的部分

reflect: 反射渐变图案,从开始->结束,再从结束->开始,然后开始->结束,往复直到空间都填满

repeat: 从start-to-end重复渐变图案,直到空间填满
pad为默认值
<svg height="70" version="1.1" xmlns="http://www.w3.org/2000/svg" >

  <defs>

      <linearGradient id="Gradient1" spreadMethod=pad x1=0.4 x2=0.6>

        <stop offset="0%" stop-color="#05a"/>

        <stop offset="100%" stop-color="#0a5"/>

      </linearGradient>

  </defs>

  <rect id="rect1" x="10" y="10" rx="15" ry="15" width="50" height="50" fill="url(#Gradient1)"/>

</svg>
下面是reflect的效果
<svg height="70" version="1.1" xmlns="http://www.w3.org/2000/svg" >

  <defs>

      <linearGradient id="Gradient1" spreadMethod=reflect x1=0.4 x2=0.6>

        <stop offset="0%" stop-color="#05a"/>

        <stop offset="100%" stop-color="#0a5"/>

      </linearGradient>

  </defs>

  <rect id="rect1" x="10" y="10" rx="15" ry="15" width="50" height="50" fill="url(#Gradient1)"/>

</svg>
下面是repeat的效果
<svg height="70" version="1.1" xmlns="http://www.w3.org/2000/svg" >

  <defs>

      <linearGradient id="Gradient1" spreadMethod=repeat x1=0.4 x2=0.6>

        <stop offset="0%" stop-color="#05a"/>

        <stop offset="100%" stop-color="#0a5"/>

      </linearGradient>

  </defs>

  <rect id="rect1" x="10" y="10" rx="15" ry="15" width="50" height="50" fill="url(#Gradient1)"/>

</svg>
径向渐变
径向渐变与线性渐变相似,只是它是从一个点开始发散绘制渐变。创建径向渐变需要在文档的defs中添加一个<radialGradient>元素
<svg height="70" version="1.1" xmlns="http://www.w3.org/2000/svg">

  <defs>

      <radialGradient id="Gradient1">

        <stop offset="0%" stop-color="#05a"/>

        <stop offset="50%" stop-color="#50a" stop-opacity="0.5"/>

        <stop offset="100%" stop-color="#0a5"/>

      </radialGradient>

  </defs>

  <rect id="rect1" x="10" y="10" rx="15" ry="15" width="50" height="50" fill="url(#Gradient1)"/>

</svg>
【cx、cy、r、fx、fy】
与线性渐变的x1、y1、x2、y2属性不同,径向渐变使用cx、cy、r、fx、fy这五个属性来设置渐变
r 设置圆的半径

cx、cy 定义渐变的中心点坐标

fx、fy  定义渐变的焦点坐标
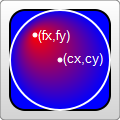
如果不设置,r默认0.5,即元素宽度或高度的一半;cx、cy默认为0.5;fx、fy默认为0.5
<svg height="70" version="1.1" xmlns="http://www.w3.org/2000/svg">

  <defs>

      <radialGradient id="Gradient1"  r=0.5 cx=0.5 cy=0.5 fx=0.5 fy=0.5>

        <stop offset="0%" stop-color="#05a"/>

        <stop offset="50%" stop-color="#50a" stop-opacity="0.5"/>

        <stop offset="100%" stop-color="#0a5"/>

      </radialGradient>

  </defs>

  <rect id="rect1" x="10" y="10" rx="15" ry="15" width="50" height="50" fill="url(#Gradient1)"/>

</svg>
巧妙地设置焦点坐标,可以实现聚光灯的效果
<svg height="70" version="1.1" xmlns="http://www.w3.org/2000/svg">

  <defs>

      <radialGradient id="Gradient1"  r=0.5 cx=0.5 cy=0.5 fx=0.8 fy=0.8>

        <stop offset="0%" stop-color="#05a"/>

        <stop offset="50%" stop-color="#50a" stop-opacity="0.5"/>

        <stop offset="100%" stop-color="#0a5"/>

      </radialGradient>

  </defs>

  <rect id="rect1" x="10" y="10" rx="15" ry="15" width="50" height="50" fill="url(#Gradient1)"/>

</svg>
【xlink:href】
xlink:href属性用于在一个渐变中引用另一个渐变,被引用的渐变的属性是可继承的,也可以被重写
下面的例子中,Gradient2引用了Gradient1的渐变,并重写了渐变的方向
<svg height="70" version="1.1" xmlns="http://www.w3.org/2000/svg">

  <defs>

      <radialGradient id="Gradient1">

        <stop offset="0%" stop-color="#05a"/>

        <stop offset="50%" stop-color="#50a" stop-opacity="0.5"/>

        <stop offset="100%" stop-color="#0a5"/>

      </radialGradient>

      <radialGradient id="Gradient2" xlink:href="#Gradient1" fx=0.6>

  </defs>

  <rect id="rect1" x="10" y="10" rx="15" ry="15" width="50" height="50" fill="url(#Gradient2)"/>

</svg>
【gradientUnits】
gradientUnits有两个的值,userSpaceOnUse和objectBoundingBox,这用于决定渐变是否随着引用它的元素进行缩放。也就是说它决定了cx、cy、fx、fy、r的缩放
userSpaceOnUse: cx、cy、fx、fy、r表示当前用户坐标系统的坐标。也就是说渐变中的值都是绝对值
objectBoundingBox: cx、cy、fx、fy、r表示应用渐变的元素创建的边界坐标系统。也就是说渐变随着应用的元素进行了缩放
如果不设置,默认取值是objectBoundingBox
<svg height="70" version="1.1" xmlns="http://www.w3.org/2000/svg">

  <defs>

      <radialGradient id="Gradient1" gradientUnits="objectBoundingBox">

        <stop offset="0%" stop-color="#05a"/>

        <stop offset="50%" stop-color="#50a" stop-opacity="0.5"/>

        <stop offset="100%" stop-color="#0a5"/>

      </radialGradient>

  </defs>

  <rect id="rect1" x="10" y="10" rx="15" ry="15" width="50" height="50" fill="url(#Gradient1)"/>

</svg>
如果设置为userSpaceOnUse,则cx、cy、fx、fy、r需要设置为用户坐标系的坐标绝对值
<svg height="70" version="1.1" xmlns="http://www.w3.org/2000/svg">

  <defs>

      <radialGradient id="Gradient1" gradientUnits="userSpaceOnUse" cx=35 cy=35 fx=35 fy=35 r=25>

        <stop offset="0%" stop-color="#05a"/>

        <stop offset="50%" stop-color="#50a" stop-opacity="0.5"/>

        <stop offset="100%" stop-color="#0a5"/>

      </radialGradient>

  </defs>

  <rect id="rect1" x="10" y="10" rx="15" ry="15" width="50" height="50" fill="url(#Gradient1)"/>

</svg>
【spreadMethod】
和线性渐变一样。它可以接受三个值,pad,reflect,repeat,它定义了渐变如何开始和结束,当cx和cy的值是在0%到100%里面的时候
pad:(默认值)使用开始和结束位置的颜色结点来填充剩余的部分

reflect: 反射渐变图案,从开始->结束,再从结束->开始,然后开始->结束,往复直到空间都填满

repeat: 从start-to-end重复渐变图案,直到空间填满
pad为默认值
<svg height="70" version="1.1" xmlns="http://www.w3.org/2000/svg">

  <defs>

      <radialGradient id="Gradient1" r=0.2 spreadMethod=pad>

        <stop offset="0%" stop-color="#05a"/>

        <stop offset="50%" stop-color="#50a" stop-opacity="0.5"/>

        <stop offset="100%" stop-color="#0a5"/>

      </radialGradient>

  </defs>

  <rect id="rect1" x="10" y="10" rx="15" ry="15" width="50" height="50" fill="url(#Gradient1)"/>

</svg>
下面是reflect的效果
<svg height="70" version="1.1" xmlns="http://www.w3.org/2000/svg">

  <defs>

      <radialGradient id="Gradient1" r=0.2 spreadMethod=reflect>

        <stop offset="0%" stop-color="#05a"/>

        <stop offset="50%" stop-color="#50a" stop-opacity="0.5"/>

        <stop offset="100%" stop-color="#0a5"/>

      </radialGradient>

  </defs>

  <rect id="rect1" x="10" y="10" rx="15" ry="15" width="50" height="50" fill="url(#Gradient1)"/>

</svg>
下面是repeat的效果
<svg height="70" version="1.1" xmlns="http://www.w3.org/2000/svg">

  <defs>

      <radialGradient id="Gradient1" r=0.2 spreadMethod=repeat>

        <stop offset="0%" stop-color="#05a"/>

        <stop offset="50%" stop-color="#50a" stop-opacity="0.5"/>

        <stop offset="100%" stop-color="#0a5"/>

      </radialGradient>

  </defs>

  <rect id="rect1" x="10" y="10" rx="15" ry="15" width="50" height="50" fill="url(#Gradient1)"/>

</svg>
最新文章
- CORS 协议(跨域资源共享)
- 成都亚马逊AWSome Day回顾
- BZOJ2118墨墨的等式[数论 最短路建模]
- Xcode中使用debug模式和release模式
- POJ1364 King-差分
- SQLSERVER 里经常看到的CACHE STORES是神马东东?
- css3学习总结2--CSS3圆角边框
- LUA笔记之表
- 11个新鲜出炉的jQuery图像滑块插件
- 【转】解决Cannot change version of project facet Dynamic web module to 2.5
- 配置babel
- centOS6.6网络设置
- spring security 4.2后出现CouldnotverifytheprovidedCSRFtokenbecauseyoursessionwasnotfound
- 把sublime text打造成python交互终端(windows和Ubuntu)
- JS前端创建CSV或Excel文件并浏览器导出下载
- OpenGL介绍
- WPF中。。DataGrid 实现时间控件和下拉框控件
- linux automake 交叉编译
- java web工程启动socket服务
- IE下object元素遮挡div表单